
Dual Oil Cooler Install

Thread Starter


Joined: Oct 2002
Posts: 2,251
Likes: 26
From: Herndon, Virginia
Dual Oil Cooler Install
I'm in the process of installing a set of OEM dual oil coolers in my '93 touring. So far I've sourced the following components:
Both coolers
Mounting brackets
Ducts
Some lines
4 clips to connect lines to coolers
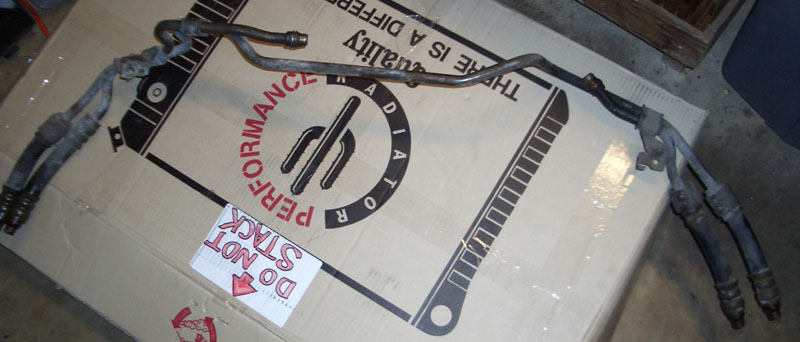
Looking at some of the other posts on the topic it seems that I may not have all the lines I need. What I have, apart from the stock single oil cooler lines currently on the car is this 3-piece set of lines that appears to be missing some connections in the middle.
The ends appear to connect to the respective coolers (which of the lines connects to which port on the coolers isn't immediately obvious when they're not on the car and my shop manual does not show the R1 layout).
Can anyone tell me if I need additional piping or if I can use the plumbing from my touring to augment what I've got here? Also if anyone has a diagram showing which line connects to which port on each cooler that'd be great too.
Thanks!
Both coolers
Mounting brackets
Ducts
Some lines
4 clips to connect lines to coolers
Looking at some of the other posts on the topic it seems that I may not have all the lines I need. What I have, apart from the stock single oil cooler lines currently on the car is this 3-piece set of lines that appears to be missing some connections in the middle.
The ends appear to connect to the respective coolers (which of the lines connects to which port on the coolers isn't immediately obvious when they're not on the car and my shop manual does not show the R1 layout).
Can anyone tell me if I need additional piping or if I can use the plumbing from my touring to augment what I've got here? Also if anyone has a diagram showing which line connects to which port on each cooler that'd be great too.
Thanks!
Senior Member
Joined: Aug 2002
Posts: 587
Likes: 0
From: DC
Without looking at my own car I'd say there's a flexible line on the left side that connects to the engine block. I think you can re-use the flexible line that is already on your touring for the right side.
EDIT : Now that I think about it they may not be flexible but there are two lines that extend from the hard lines, you can re-use the one on the right but not the left.
EDIT : Now that I think about it they may not be flexible but there are two lines that extend from the hard lines, you can re-use the one on the right but not the left.


You need two flexible oil lines to connect between your hard lines and engine block. Part No. N3A1-14-710B replaces N3A2-14-710B of single setup. Reuse N3a1-14-720B on other side as this is common to both setups.
Page from '94 Parts Manual enclosed, Hard Suspension = R2.
PS: Is it just me that has problesm with the 100KB file size limitation
Page from '94 Parts Manual enclosed, Hard Suspension = R2.
PS: Is it just me that has problesm with the 100KB file size limitation
The real PN is N3A1-14-710B, use this with dealer; 14-7102 is the picture description No. only, the way the Parts catalog works is: find the description no. in the diagram then look up the applicable PN from the list. My attachment has the list included. I assume you have both engine block banjo bolts and washers still.
Trending Topics
Thread Starter
Joined: Oct 2002
Posts: 2,251
Likes: 26
From: Herndon, Virginia
Originally Posted by Julian
The real PN is N3A1-14-710B, use this with dealer; 14-7102 is the picture description No. only, the way the Parts catalog works is: find the description no. in the diagram then look up the applicable PN from the list. My attachment has the list included. I assume you have both engine block banjo bolts and washers still.
The stealership quoted me over $200 for the 14-710B pipe which seems fairly ridiculous as Fd3s.net says it was $52 and that I got the oil coolers, brackets, ducts and all the other lines pictured above for less than the cost of that one stubby pipe. Arrgh.

Joined: Jul 2003
Posts: 4,678
Likes: 97
From: Bay Area, CA
Originally Posted by ArmitageGVR4
The stealership quoted me over $200 for the 14-710B pipe which seems fairly ridiculous as Fd3s.net says it was $52 and that I got the oil coolers, brackets, ducts and all the other lines pictured above for less than the cost of that one stubby pipe. Arrgh.
Thread Starter
Joined: Oct 2002
Posts: 2,251
Likes: 26
From: Herndon, Virginia
Originally Posted by moconnor
It is $98 on Mazdapartscheap.com and I presume Ray at Malloy Mazda would be the same or cheaper (and would not charge shipping).
Thread Starter
Joined: Oct 2002
Posts: 2,251
Likes: 26
From: Herndon, Virginia
For those of you who have done the second R1 cooler upgrade, did you remove your bumper to do it or is it possible to install the cooler and lines from behind by just removing the undertray/panels? The shop manual for my touring only mentions removing the headlight bezel.
Giving myself the whole weekend for this, hopefully it doesn't take that long as I have a bunch of other things I need to do too!
Giving myself the whole weekend for this, hopefully it doesn't take that long as I have a bunch of other things I need to do too!
Senior Member
Joined: Nov 2006
Posts: 449
Likes: 0
From: Memphis
Originally Posted by ArmitageGVR4
For those of you who have done the second R1 cooler upgrade, did you remove your bumper to do it or is it possible to install the cooler and lines from behind by just removing the undertray/panels? The shop manual for my touring only mentions removing the headlight bezel.
Giving myself the whole weekend for this, hopefully it doesn't take that long as I have a bunch of other things I need to do too!
Giving myself the whole weekend for this, hopefully it doesn't take that long as I have a bunch of other things I need to do too!
How did it turn out? I'm looking for info on the install. I'm about to do it myself and was wondering what's involved as far as what I have to remove.
Thanks,
Jeremy
King of the Duct Tape
Joined: Feb 2001
Posts: 1,177
Likes: 0
From: PA
greatest DIY dual oil cooler thread ever.
https://www.rx7club.com/3rd-generation-specific-1993-2002-16/what-else-do-i-need-build-dual-oilcooler-setup-527044/
https://www.rx7club.com/3rd-generation-specific-1993-2002-16/what-else-do-i-need-build-dual-oilcooler-setup-527044/
Lives on the Forum
Joined: Dec 2001
Posts: 14,716
Likes: 10
From: San Lorenzo, California
Originally Posted by 3rd Gen Jeremy
How did it turn out? I'm looking for info on the install. I'm about to do it myself and was wondering what's involved as far as what I have to remove.
Thanks,
Jeremy
Thanks,
Jeremy

Senior Member
Joined: Aug 2002
Posts: 587
Likes: 0
From: DC
I installed stock r1 oil coolers on my touring without removing the bumper, but the passenger side cooler probably isn't mounted as well as it could be. If I wasn't lazy I probably would have done a better job without the bumper, but its definetly possible to do with the bumper on.
Thread Starter
Joined: Oct 2002
Posts: 2,251
Likes: 26
From: Herndon, Virginia
Originally Posted by 3rd Gen Jeremy
How did it turn out? I'm looking for info on the install. I'm about to do it myself and was wondering what's involved as far as what I have to remove.
Thanks,
Jeremy
Thanks,
Jeremy

Joined: Aug 2004
Posts: 4,497
Likes: 1,485
From: West Coast
Just tagging this thread because out of all the threads that my search ("oil cooler install") returned, this is the one that helped me the most. Might even be worthy of the archive, IMO.
The part number for the return line, which I'm sure a lot of people have and will be looking for, was nice to find.
The part number for the return line, which I'm sure a lot of people have and will be looking for, was nice to find.
development
Joined: Aug 2002
Posts: 5,714
Likes: 7
From: Lafayette, LA

this thread is helpful for stock dual set-up and the above is helpful for upgraded dualers
Joined: Oct 2001
Posts: 6,279
Likes: 728
From: Florence, Alabama
just to be helpful re two oil coolers i thought i would post a link to my thread:
"Dual Oil Coolers Cheap"
https://www.rx7club.com/showthread.p...al+oil+coolers
(cheap is $179 plus a driver's side OEM cooler you can get for between free and $50 all day. i use dash 8 lines as there are plenty of restrictions in the OEM system that are that I D or smaller... so why use big clunky lines.
my oil pressure is unchanged V stock w the dash 8.
the key on the thread is a parts list so you can just order exactly what you need. i had posted i would do an install picture study and it appears late in the thread.
so for you DIY-ers... enjoy.
howard coleman
Last edited by Howard Coleman; Nov 7, 2008 at 09:47 AM.
Thread Starter
Joined: Oct 2002
Posts: 2,251
Likes: 26
From: Herndon, Virginia
If you have all the r1 lines, you won't need to buy any new ones at all. In my case I had the big set of lines that go from the passenger-to-driver-side cooler, but not the r1 line that connects to the block. You won't need the 14-622 part, that whole line remains unchanged because you're not doing anything to the driver side cooler.