
diff bushing install


diff bushing install
Installed Jim's unobtanium diff bushings and here is the story so far:
First, I used the directions that Jim wrote in a realted thread about how to remove the dif mount without having to take apart your entire car.
It wast to bad, not much space there but it worked out ok:
Pic of diff dropped down:
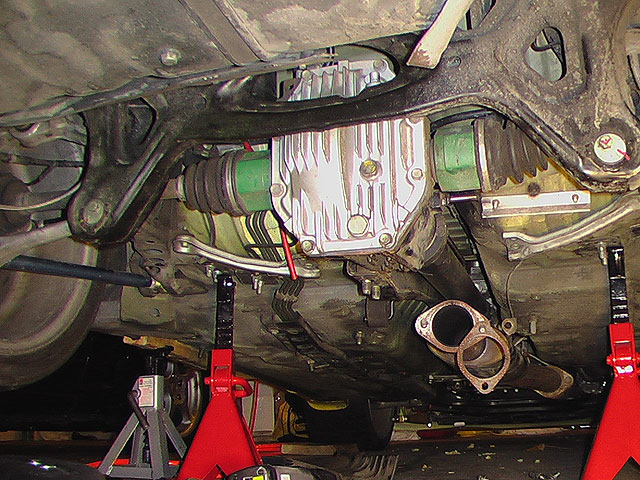
Basically you just remove the underpanels and catback for room, then support the diff with a jack, remove the bolts holding the diff mount to the car frame, drop the jack and the diff will drop (remove the cross bar that goes through the PPF!!!), the axels will hit rubber stoppers on the car frame and then you have enough room to get tools up on top of the diff (not easy though) and remove the 4 nuts that hold the brace on. It took a lot of 'persuading' for a lot of things, like getting the dif to drop enough, i had to pry it down, and i had to hammer (gently) the dif mount to get it to seperate from the diff/car frame, et, et.
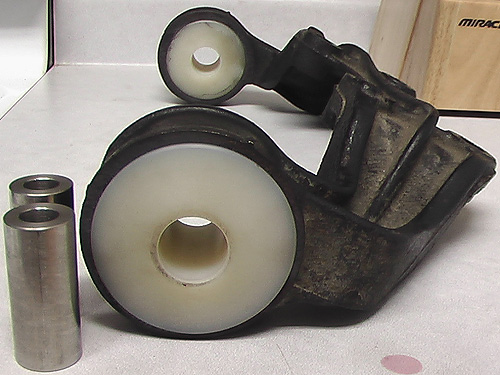
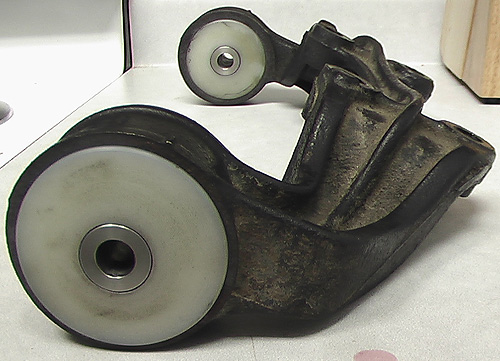
Then I got the diff bushings pressed in:
Not a big deal, had a local auto shop do it since my press had not arrived yet and I need the car together for this weekend (road america track event).
Then I greeeessed up the pins and tapped them in, they are easier to go in from the inside rather than outside because the flange on the out side compreeses the hole just a tiny bit more, mine slid in part way from the inside, then i tapped them flush.
Then re-installed in reverse of teh removal, HOWEVER, it is very tricky to get it back in right and I had to do an extra step here, I first put the diff mount above the diff and pmounted it to the car frame points but did not tighten it down, then I raised the diff with the jack to get the studs to match up with the mount , took some prying and gettin-giggy-wit-it to get all the studs to pop in the mount, then I tightened the nuts on the mount studs hand tight, at this point he diff is pp high so you cant get tools in there, so I removed the bolts that hold the mount to the carframe and dropped the diff...again (hehhehe), then I had room to properly tighten the mount nuts on the studs and then jacked the diff up ...again (heheh)... this time the trick was lining up the care frame holes with the mount bushing pin holes, more prying and gettin-giggy-wit-it and finaly got the bolts in and torqed it all down...and ....
Boooya, unobtanium diff bushings now in the rear.
First, I used the directions that Jim wrote in a realted thread about how to remove the dif mount without having to take apart your entire car.
It wast to bad, not much space there but it worked out ok:
Pic of diff dropped down:
Basically you just remove the underpanels and catback for room, then support the diff with a jack, remove the bolts holding the diff mount to the car frame, drop the jack and the diff will drop (remove the cross bar that goes through the PPF!!!), the axels will hit rubber stoppers on the car frame and then you have enough room to get tools up on top of the diff (not easy though) and remove the 4 nuts that hold the brace on. It took a lot of 'persuading' for a lot of things, like getting the dif to drop enough, i had to pry it down, and i had to hammer (gently) the dif mount to get it to seperate from the diff/car frame, et, et.
Then I got the diff bushings pressed in:
Not a big deal, had a local auto shop do it since my press had not arrived yet and I need the car together for this weekend (road america track event).
Then I greeeessed up the pins and tapped them in, they are easier to go in from the inside rather than outside because the flange on the out side compreeses the hole just a tiny bit more, mine slid in part way from the inside, then i tapped them flush.
Then re-installed in reverse of teh removal, HOWEVER, it is very tricky to get it back in right and I had to do an extra step here, I first put the diff mount above the diff and pmounted it to the car frame points but did not tighten it down, then I raised the diff with the jack to get the studs to match up with the mount , took some prying and gettin-giggy-wit-it to get all the studs to pop in the mount, then I tightened the nuts on the mount studs hand tight, at this point he diff is pp high so you cant get tools in there, so I removed the bolts that hold the mount to the carframe and dropped the diff...again (hehhehe), then I had room to properly tighten the mount nuts on the studs and then jacked the diff up ...again (heheh)... this time the trick was lining up the care frame holes with the mount bushing pin holes, more prying and gettin-giggy-wit-it and finaly got the bolts in and torqed it all down...and ....
Boooya, unobtanium diff bushings now in the rear.
Last edited by damian; Apr 14, 2004 at 01:33 AM.


Joined: Oct 2001
Posts: 6,279
Likes: 728
From: Florence, Alabama
hey damian,
nice post as usual...
i am finishing my rear end project. new rear wheel bearings, pillowball bushings in the lower lateral link and a nylon bushing in the front of the latitudinal lower link and rear gears.
of course i used the opportunity to lose the rear rotor dust shields... anything for weight reduction.
since i had the axles out i decided to yank the rear gear assembly. all of a sudden no problems getting the diff mounting bracket off and on and properly torqued. as a bonus i had the opportunity to clean the diff and the underbody. it would have been a great time to swap fuel filters but i have about an hour on my filter...
i think going to nylon diff bushings is one of the better mods for the car. notice the slop in the bushings when you jack up the rear of the fd using the third member, there is at least an inch of slop! it is no wonder that you get wheel hop and blown rear gears w the rear bouncing up and down.
plus the car feels really good w the nylon bushings.
when will you be at elkhart? i am around until sunday when i leave for new jersey to pick up my Ito motor and would love to stop by. i'll bring my pyrometer...
howard coleman
Eats, Sleeps, Dreams Rotary
Joined: Apr 2001
Posts: 3,736
Likes: 10
From: Dallas, Texas
Damian,
once again, archivable write up! However I don't know if it was up to par with your other posts! Where is all of your multimedia and photoshopped inserts and diagrams!! Definitely of poorer quality when compared to your other posts!
.
.
.
.
just kidding GREAT WRITE UP!
once again, archivable write up! However I don't know if it was up to par with your other posts! Where is all of your multimedia and photoshopped inserts and diagrams!! Definitely of poorer quality when compared to your other posts!
.
.
.
.
just kidding
GREAT WRITE UP!
hey howard, good to hear from you. ill be in elkart lake this entire weekend (16th-18th), the event is with speedseekers (in conjunction with the f-body club) and I'll drive up friday and run on the track sat and sun. stop by if you can, I'll be up there with another 3rd gen guy and a bunch of other f-body car guys that I dont know (hehehe)
Originally posted by 7racer
Damian,
once again, archivable write up! However I don't know if it was up to par with your other posts! Where is all of your multimedia and photoshopped inserts and diagrams!! Definitely of poorer quality when compared to your other posts!
.
.
.
.
just kidding GREAT WRITE UP!
Damian,
once again, archivable write up! However I don't know if it was up to par with your other posts! Where is all of your multimedia and photoshopped inserts and diagrams!! Definitely of poorer quality when compared to your other posts!
.
.
.
.
just kidding
GREAT WRITE UP!
hahahah, i know i know, i was too lazy to do 3d rendering of the diff mount and animations of the bushing being pressed in (hahaha)
I actually had planned to take a series of pictures showing the exact steps visually, but my biz partner's wife had a baby recently so they got the camera for a while (hehehe)
Trending Topics
Originally posted by ek9220ps
did you tap a grease fitting? It took my about 6 hour by myself to do all to rear bushing.
-andrew
did you tap a grease fitting? It took my about 6 hour by myself to do all to rear bushing.
-andrew
the suspention bushings actuallyt get rotaion during suspention movement, the dif dostn, it really just gets 'compression' forces on it, the pins dont 'rotate' in the bushing as the other suspention
if i had more time i would have zerked them just for fun :-) but I had to get the car back together for road america this weekend....so i ran out of time.
Joined: May 2003
Posts: 2,096
Likes: 1
From: Dove le cose sono fatte il vecchio moda il senso
Another great write-up. It needs to become a sticky, or go into the archives in the suspension category. Thanks.
You need to do a write-up on a complete engine overhaul!!
You need to do a write-up on a complete engine overhaul!!
Originally posted by areXseven
Another great write-up. It needs to become a sticky, or go into the archives in the suspension category. Thanks.
You need to do a write-up on a complete engine overhaul!!
Another great write-up. It needs to become a sticky, or go into the archives in the suspension category. Thanks.
You need to do a write-up on a complete engine overhaul!!
>>You need to do a write-up on a complete engine overhaul!!
hahaha, ... ahh yes, probably the only thing I have left to tackle on a 3rd gen rx7... an engine rebuild :-)
but lets hope I dont have to do that writeup for a looong time ;-)
PV = nRT
Joined: Jan 2003
Posts: 2,250
Likes: 0
From: New Zealand (was California)
The one tool that will make your life a 1000 times easier for this job are those "GearDrive" ratchet kits they sell at Sears. They're basically a low profile ratchet and with the space you have to work with, make a world of difference.
I used standard craftsman ratchets when I removed my differential mount bracket (Damian does kind of rush from diff still mounted to bracket off of diff stages ) and there was always something in the way - you will hate it, trust me. Unbolting the charcoal canister and temporarily removing it also helps provide more space.
Installed solid ones in mine:

Something odd I noticed but cannot really gauge (as I also replaced 6 rear pillow ***** at the same time) is that my ride height went *up* after doing the diff bushings and pillowballs.
Anyone else notice this? My car is rancho-spec now.
I used standard craftsman ratchets when I removed my differential mount bracket (Damian does kind of rush from diff still mounted to bracket off of diff stages
) and there was always something in the way - you will hate it, trust me. Unbolting the charcoal canister and temporarily removing it also helps provide more space.Installed solid ones in mine:
Something odd I noticed but cannot really gauge (as I also replaced 6 rear pillow ***** at the same time) is that my ride height went *up* after doing the diff bushings and pillowballs.
Anyone else notice this? My car is rancho-spec now.
Last edited by clayne; Apr 14, 2004 at 04:26 PM.
hey clayne,
>>(and Damian does kind of rush from diff still mounted to bracket off of diff stages ) and there was always something in the way - you will hate it, trust me.
yes, sooo true, it is a long and drawn out proccess of finding space to move tools/stuff in and out of there.
so those are diff bushings in the picture above? they look more like solid motor mounts.
PV = nRT
Joined: Jan 2003
Posts: 2,250
Likes: 0
From: New Zealand (was California)
That's because I pasted the wrong URL. 

They're Kazama mounts.
In my case, I left the exhaust on. You don't have to take the muffler off, in fact, by leaving it on it tends to mute the "piece of ****" 's and "come the **** on already" 's eminating from under the car much better.
They're Kazama mounts.
In my case, I left the exhaust on. You don't have to take the muffler off, in fact, by leaving it on it tends to mute the "piece of ****" 's and "come the **** on already" 's eminating from under the car much better.
Originally posted by clayne
That's because I pasted the wrong URL.
They're Kazama mounts.
In my case, I left the exhaust on. You don't have to take the muffler off, in fact, by leaving it on it tends to mute the "piece of ****" 's and "come the **** on already" 's eminating from under the car much better.
That's because I pasted the wrong URL.
They're Kazama mounts.
In my case, I left the exhaust on. You don't have to take the muffler off, in fact, by leaving it on it tends to mute the "piece of ****" 's and "come the **** on already" 's eminating from under the car much better.
>>the "piece of ****" 's and "come the **** on lready" 's
hahaha, omg this was my words verbatum!!! and not muffled by anything (hahahah)
i think i litterally started punching the car at one point hahahah)
...counted to 10 , took a breath, then went in for another round...you have to do it lke boxing, 1 round,... take a break, another round....
somtime you win a round, somtimes the car wins the round (hahahah)
PV = nRT
Joined: Jan 2003
Posts: 2,250
Likes: 0
From: New Zealand (was California)
The goofiest part is the way one ends up using tools to get the job done. Box end wrenches perpendicular to other box end wrenches, using the axle as a fulcrum point.
I also was never able to torque the top mounting bolts either - like one could ever get a torque wrench in there in the first place.
I also was never able to torque the top mounting bolts either - like one could ever get a torque wrench in there in the first place.
Lives on the Forum
Joined: Feb 2001
Posts: 9,617
Likes: 8
From: Dallas
Originally posted by clayne
Something odd I noticed but cannot really gauge (as I also replaced 6 rear pillow ***** at the same time) is that my ride height went *up* after doing the diff bushings and pillowballs.
Something odd I noticed but cannot really gauge (as I also replaced 6 rear pillow ***** at the same time) is that my ride height went *up* after doing the diff bushings and pillowballs.
>>The goofiest part is the way one ends up using tools to get the job done. Box end wrenches perpendicular to other box end wrenches, using the axle as a fulcrum point.
YES clayne!!!! hahah that is exatly what i did to get the top bolts tight!!! HAHAHAH lol
>>I also was never able to torque the top mounting bolts either - like one could ever get a torque wrench in there in the first place.
exaclty!!!!
YES clayne!!!! hahah that is exatly what i did to get the top bolts tight!!! HAHAHAH lol
>>I also was never able to torque the top mounting bolts either - like one could ever get a torque wrench in there in the first place.
exaclty!!!!

