
Can the throttle body and UIM be removed as a unit?

Place your ad here...
Joined: Apr 2002
Posts: 1,336
Likes: 2
From: Dayton, OH
In addition to Clayne's basic test: you should also check for resistance at the terminals and at the connectors on the harness.
Be sure to also test the solenoids while hot. Either heat them in an oven or drop them in some boiling water. Often these solenoids will work perfectly fine when cold, but will fail at the engine's operating temperature. I've had this happen on 4 different solenoids.
Rob
Be sure to also test the solenoids while hot. Either heat them in an oven or drop them in some boiling water. Often these solenoids will work perfectly fine when cold, but will fail at the engine's operating temperature. I've had this happen on 4 different solenoids.
Rob
Thread Starter
Rotary Freak
Joined: Jul 2001
Posts: 1,817
Likes: 16
From: South Carolina
OK, Coils are out.
I cannot believe how hard it is to remove the first SP wire. I don't see why Mazda went under the oil filler tube rather than over it.
I had to loosen the three bolts holding the tube in place in order to get that first wire out!
So, now I will take more picture and then remove the rack. I see now why it is hard to get out.
Thread Starter
Rotary Freak
Joined: Jul 2001
Posts: 1,817
Likes: 16
From: South Carolina
OK, I'm boned.
There are three screws (front) holding the rack to the rack frame (?) The first came loose easy. The second was already slightly rounded and got worse as I tried to apply pressure.
On the back of the rack, The first screw was also already rounded.
I am guessing that this is the reason Petitt never completed the job. (If they didn't.)
On the drivers side of the engine it looks like there are five bolts holding the rack to the engine. This might allow me to remove the entire rack, but the screw that is rounded (in the rear) attaches what seems to be a water or gas hose to that frame and I cannot see how to remove this brass line without removing the bad screw.
So, it looks like the rack will need to wait until the engine is removed so that I can get in there with a drill to remove the bad screws.
I will replace all the hoses I can and then reassemble the engine. This is a disappointment after going so far.
I will wait a couple of hours to see if there is a better suggestion before I continue.
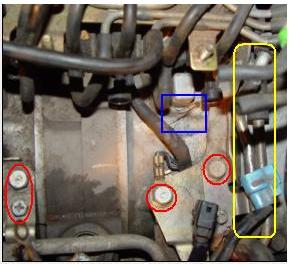
In this pic the rack bolts are in red, the gas/water pipes are in yellow and the dead daddy long legs is in blue...
There are three screws (front) holding the rack to the rack frame (?) The first came loose easy. The second was already slightly rounded and got worse as I tried to apply pressure.
On the back of the rack, The first screw was also already rounded.
I am guessing that this is the reason Petitt never completed the job. (If they didn't.)
On the drivers side of the engine it looks like there are five bolts holding the rack to the engine. This might allow me to remove the entire rack, but the screw that is rounded (in the rear) attaches what seems to be a water or gas hose to that frame and I cannot see how to remove this brass line without removing the bad screw.
So, it looks like the rack will need to wait until the engine is removed so that I can get in there with a drill to remove the bad screws.
I will replace all the hoses I can and then reassemble the engine. This is a disappointment after going so far.
I will wait a couple of hours to see if there is a better suggestion before I continue.
In this pic the rack bolts are in red, the gas/water pipes are in yellow and the dead daddy long legs is in blue...
Last edited by BLKTOPTRVL; Mar 31, 2004 at 11:21 AM.
Place your ad here...
Joined: Apr 2002
Posts: 1,336
Likes: 2
From: Dayton, OH
yeah, that rack is a lot of fun, eh 
The pipes you are talking about are fuel lines. You can remove the rack using the method you are talking about by disconnecting these lines (make sure you depressurize the fuel system first). I can't remember if you need to disconnect the fuel rails... but I don't think so. Either way, it's not too hard to do it this way.
Good luck
Thread Starter
Rotary Freak
Joined: Jul 2001
Posts: 1,817
Likes: 16
From: South Carolina
Originally posted by saxyman990
yeah, that rack is a lot of fun, eh
The pipes you are talking about are fuel lines. You can remove the rack using the method you are talking about by disconnecting these lines (make sure you depressurize the fuel system first). I can't remember if you need to disconnect the fuel rails... but I don't think so. Either way, it's not too hard to do it this way.
Good luck
I don't have the time now to reassemble the car and then disassemble it again.
I think I will have to wait till later.
I just had my rack out. You need only to remove the 3 bolts under the ignition coil tray and the very bottom screw on the front side of the rack. The other screws all pretty much just hold the rack together. The hardest part of removing the rack is the way the fuel line bracket sandwiches the solenoid rack bracket under the coils. It took alot of muscle and a bit of benfing to get it out, but that was nothing compared to getting it to line up right putting it back in!
forgot to add, for obvious reasons the 2 nuts that hold the coil tray to the rack need to be removed
forgot to add, for obvious reasons the 2 nuts that hold the coil tray to the rack need to be removed
Thread Starter
Rotary Freak
Joined: Jul 2001
Posts: 1,817
Likes: 16
From: South Carolina
Originally posted by Tom93R1
I just had my rack out. You need only to remove the 3 bolts under the ignition coil tray and the very bottom screw on the front side of the rack. The other screws all pretty much just hold the rack together. The hardest part of removing the rack is the way the fuel line bracket sandwiches the solenoid rack bracket under the coils. It took alot of muscle and a bit of benfing to get it out, but that was nothing compared to getting it to line up right putting it back in!
forgot to add, for obvious reasons the 2 nuts that hold the coil tray to the rack need to be removed
Place your ad here...
Joined: Apr 2002
Posts: 1,336
Likes: 2
From: Dayton, OH
Originally posted by BLKTOPTRVL
Unfortunately, you need to run the engine to depressurize the fuel system.
Unfortunately, you need to run the engine to depressurize the fuel system.
Thread Starter
Rotary Freak
Joined: Jul 2001
Posts: 1,817
Likes: 16
From: South Carolina
Originally posted by saxyman990
Nah. When's the last time you ran the car? Most likely the system has depressurized itself (it doesn't hold pressure forever). Place rag over the end of a hose, and start to (slowly) back it off. Once you have it off the hardline, drop the end into a plastic cup so you don't spill fuel everywhere (more than likely, there won't be that much). Doing the FSM depressurization thing is usually only needed when the car has been running very recently
Nah. When's the last time you ran the car? Most likely the system has depressurized itself (it doesn't hold pressure forever). Place rag over the end of a hose, and start to (slowly) back it off. Once you have it off the hardline, drop the end into a plastic cup so you don't spill fuel everywhere (more than likely, there won't be that much). Doing the FSM depressurization thing is usually only needed when the car has been running very recently
PV = nRT
Joined: Jan 2003
Posts: 2,250
Likes: 0
From: New Zealand (was California)
Originally posted by saxyman990
Nah. When's the last time you ran the car? Most likely the system has depressurized itself (it doesn't hold pressure forever). Place rag over the end of a hose, and start to (slowly) back it off. Once you have it off the hardline, drop the end into a plastic cup so you don't spill fuel everywhere (more than likely, there won't be that much). Doing the FSM depressurization thing is usually only needed when the car has been running very recently
Nah. When's the last time you ran the car? Most likely the system has depressurized itself (it doesn't hold pressure forever). Place rag over the end of a hose, and start to (slowly) back it off. Once you have it off the hardline, drop the end into a plastic cup so you don't spill fuel everywhere (more than likely, there won't be that much). Doing the FSM depressurization thing is usually only needed when the car has been running very recently
Place your ad here...
Joined: Apr 2002
Posts: 1,336
Likes: 2
From: Dayton, OH
Well clayne, what can I say, you're an exception to the rule  I've worked on plenty of fuel injected cars, and they almost always loose pressure after a few days. Even if it does hold pressure, it won't be that much. But that's why I said use a plastic cup and rag.
I've worked on plenty of fuel injected cars, and they almost always loose pressure after a few days. Even if it does hold pressure, it won't be that much. But that's why I said use a plastic cup and rag.
Originally posted by BLKTOPTRVL
You are speaking of the three larger bolts I have circled in red?
You are speaking of the three larger bolts I have circled in red?

Thread Starter
Rotary Freak
Joined: Jul 2001
Posts: 1,817
Likes: 16
From: South Carolina
Took a break... I had to go help a friend replace his front disk studs... two broke off when removing the tire.
I had been stalled for an hour because after replacing a few hoses, I noticed that one pipe did not have a hose attached, and since I have been doing them one at a time, this allarmed me.
After searching for a while, I came back to the color vacuum diagram on the scuderiaciriani web site to find that this is just an empty pipe. No other diagrams that I have found so far indicate that this is empty. A life saver!
So far I have found only two suspect hoses:
- the one for the manual transmission that crosses from behind the air pump to the rack - it was loose fitting
- the one that goes into the charge relieve valve from the pipe - it looks like it has a kink in it (it is flattened at the top)
Thread Starter
Rotary Freak
Joined: Jul 2001
Posts: 1,817
Likes: 16
From: South Carolina
Here is a new hose I attached, I am hoping the radius is not too tight. The hose I am replacing had a flattened top and when I sliced it open, I found that the hose was badly flattened inside too.
New Hose:

New Hose:
Last edited by BLKTOPTRVL; Apr 1, 2004 at 10:28 AM.
Thread Starter
Rotary Freak
Joined: Jul 2001
Posts: 1,817
Likes: 16
From: South Carolina
Need a little help...
The hoses going between [(1) the pre-control solenoid (2) wastegate control] and the distribution pipe (round tube with three nipples going straight up seem to be wrong.
On the solenoid, the nipples seem to be 4mm and the distribution block seem to be 6mm or greater. Am I missing something here? If I use the 6mm hose, then the hose is loose on the solenoids. If I use the 4mm, it is very tight on the pipe.
Anyone else run into this?
Place your ad here...
Joined: Apr 2002
Posts: 1,336
Likes: 2
From: Dayton, OH
Yep, this is normal. The OEM hose is kind of a form-fitting hose (it fits the big pipe on one end, and tapers slightly to fit over the solenoid).
For mine, I used the smaller vacuum line (3.5mm), and that worked fine. It was definately a snug fit over that large pipe, but I used a little lubricant to help ease the vacuum line on. You can also probably use 6mm hose, and just cinch it down real tight with tie-wraps on the solenoid side. But like I said, I used the 3.5mm and it worked fine.
Rob
Thread Starter
Rotary Freak
Joined: Jul 2001
Posts: 1,817
Likes: 16
From: South Carolina
Thanks,
I made these custom pipes. I used the 6mm (blue) attached (bonded and zip tied) to the 90 degree elbow attached to the 4mm.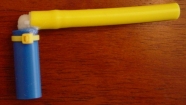
I made these custom pipes. I used the 6mm (blue) attached (bonded and zip tied) to the 90 degree elbow attached to the 4mm.
Last edited by BLKTOPTRVL; Apr 2, 2004 at 01:43 PM.