
Battery Relocation Writeup

Senior Member
Joined: Oct 2002
Posts: 596
Likes: 0
From: Hampton, VA
Very nice writeup.
I noticed your link to hifisoundconnection is broken. When linking to an external site you need to include the http:// like below.
I noticed your link to hifisoundconnection is broken. When linking to an external site you need to include the http:// like below.
Code:
<a href="http://www.hifisoundconnection.com/">HiFi Sound Connection</a>

Thread Starter


Joined: Jul 2003
Posts: 4,678
Likes: 97
From: Bay Area, CA
Originally Posted by eatmyclutch
What about removed bin?
Both bins remain in place - I just drilled access holes in the passenger bin.

Full Member
Joined: Mar 2005
Posts: 234
Likes: 0
From: Arroyo Grande, CA
I find this interesting because I am also in the process of relocating my battery.
I did the same thing to the main fuse block, except I silver soldered a jam nut to the back of the bus bar and used a thin round head hex screw and washer to attach the positive cable to it. That way you don't have to disassemble the fuse block to disconnect the battery cable.
You are right, you can't get a 0 or 1/0 in the drivers door sill cable tray. As a result I used 2 awg which barely fits.
In my opinion, threaded 1/4" aluminum tubing for a battery hold down is not adequate. Heaven forbid you ever get in a serious accident, but if you did I wouldn't be surprised if your battery tore loose. I would not want a 25lb brick flying around in my cabin.
Anyway, overall pretty good. And yes, to do it right is a lot of work.
Thread Starter
Joined: Jul 2003
Posts: 4,678
Likes: 97
From: Bay Area, CA
Originally Posted by ReadyKW
I did the same thing to the main fuse block, except I silver soldered a jam nut to the back of the bus bar and used a thin round head hex screw and washer to attach the positive cable to it. That way you don't have to disassemble the fuse block to disconnect the battery cable.
You are right, you can't get a 0 or 1/0 in the drivers door sill cable tray. As a result I used 2 awg which barely fits.
In my opinion, threaded 1/4" aluminum tubing for a battery hold down is not adequate. Heaven forbid you ever get in a serious accident, but if you did I wouldn't be surprised if your battery tore loose. I would not want a 25lb brick flying around in my cabin.

NYC's Loudest FD
Joined: Mar 2001
Posts: 1,539
Likes: 1
From: Long Island, NY
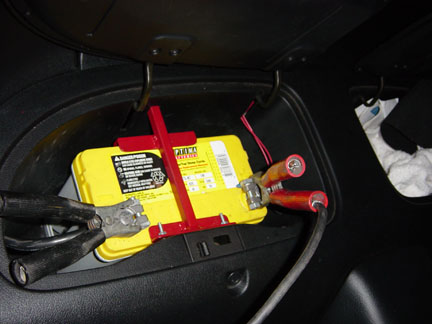
In the interest of sharing I have posted what a 51R battery relocated in the rear bin would look like, my friend fabricated the bracket for me, stays put and looks simple.(Don't mind the Jumper cables, hehe)
since this is turning into show and tell:

not much to tell... Optima Yellow Top and Carbon Fiber Cover.
and in the engine, i have a jumper box from a BMW so i dont have to run jumper cables through my interior:

maybe that can give some other people some ideas. good write up by the way.

not much to tell... Optima Yellow Top and Carbon Fiber Cover.
and in the engine, i have a jumper box from a BMW so i dont have to run jumper cables through my interior:

maybe that can give some other people some ideas. good write up by the way.
OK, here's mine. Honda size Optima battery, Streetwires distribution block, terminals, and connectors. Some leds for show in a cover that I made out of texured black plastic 1/4" thick. 14ft. of 00 guage wire with a 300MA fuse in the engine bay.

Joined: Oct 2001
Posts: 6,279
Likes: 728
From: Florence, Alabama
thanks for the nice write-up. space in the FD is always at a premium...
i did the battery relocation thing in 99 seeking to get more rear weight and engine compartment room. my "kit" came from M2 and was comprised of a battery and length of wire. go for it
as my car became more tuned up my compartment, then compartments, became more crowded.
currently i have:
passengerside compartment
battery
Kenne Bell Boost A Pump elec module
Kenne Bell adj dial
global electrical kill switch
Alkycontrol pump controller module
Alkycontrol adj module
relay for alcohol system... from my discarded ABS
i like it that the Kill Switch, Boost A Pump dial and the alcohol adjuster are easily reachable from the driver's seat.
Drivers compartment
two Jacobs FC3000 ignition amps. i purposely have them separated from the other elec components.
i do suggest that anyone w a relocated battery install a high quality global Kill Switch.
howard coleman
Senior Member
Joined: Aug 2005
Posts: 447
Likes: 1
From: UK
Would love to see the rest f your car if this is anything to go by.
Xerlent work man obviously a car is being looked after im in no doubt.
As stated before this for me is bookmarked and i will be imitating it.
Imitation is i guess the highest form of flattery.
Aplologies as stated in my other posts, beer is getting the better of me tonight.
Xerlent work man obviously a car is being looked after im in no doubt.
As stated before this for me is bookmarked and i will be imitating it.
Imitation is i guess the highest form of flattery.
Aplologies as stated in my other posts, beer is getting the better of me tonight.
Last edited by Veger; Oct 17, 2006 at 02:29 PM.
Thread Starter
Joined: Jul 2003
Posts: 4,678
Likes: 97
From: Bay Area, CA
Originally Posted by silverTRD
looks real nice. i like the covers, just dont think i'd take the time to fabricatre one
Some of these covers look good. I'm sorry I did not think of doing one during the install.

Full Member
Joined: Nov 2004
Posts: 184
Likes: 0
From: Manville, NJ
Last edited by JebenKurac; Oct 18, 2006 at 08:17 PM.
These are some great examples of battery relocations. Great writeup. I too will be imitating this procedure to relocate my battery. Man, I am NOT looking forward to doing this. But then again, I guess I know have nothing but time since winter is here in full force now....
the link to the place with all the stinger hardware didn't seem to work in the write-up. but after some searching I found it.
https://app.infopia.com/Shop/Control...8075/SFV/30046
by the way, nice write-up moconnor! learned alot. only thing I don't fully understand is the breaker switch.(sorry, don't know anything about wiring) how many amps do these batteries typically put out? If you have a 150 amp breaker switch, wouldn't it blow all the fuses (like the main 120amp fuse and such) before tripping the breaker? or is the point to the breaker not to protect the fuses, but only a fire safety thing?
Very nice moconner. There's a lot to be said for craftsmanship, and I can relate to the amount of time it takes to do a 1st class job.
Here's a pic of my install with the (larger) Odessy PC925 in the drivers side bin. I also included a pic of the tray I made to hold to battery inside the bin. The flanges are attached to the front, left and rear side of the bin with bolts, and will contain the battery in the event the car assumes an undesired attitude--important for safety.
Another note: I ran the positive battery cable directly to the stud on the starter and let exisiting starter cable backfeed the rest of the system. It shortens the cable, simplifies the install, it's clean and it works excellent.