3rd Generation Specific (1993-2002) 1993-2002 Discussion including performance modifications and Technical Support Sections.
Sponsored by:

99 tailight conversion details

Thread Tools
 
Search this Thread
 
Old 01-30-08, 03:12 PM
  #1  
Jake

Thread Starter
iTrader: (3)
 
twisted7's Avatar
 
Join Date: Aug 2005
Location: Columbus
Posts: 982
Received 0 Likes on 0 Posts
99 tailight conversion details

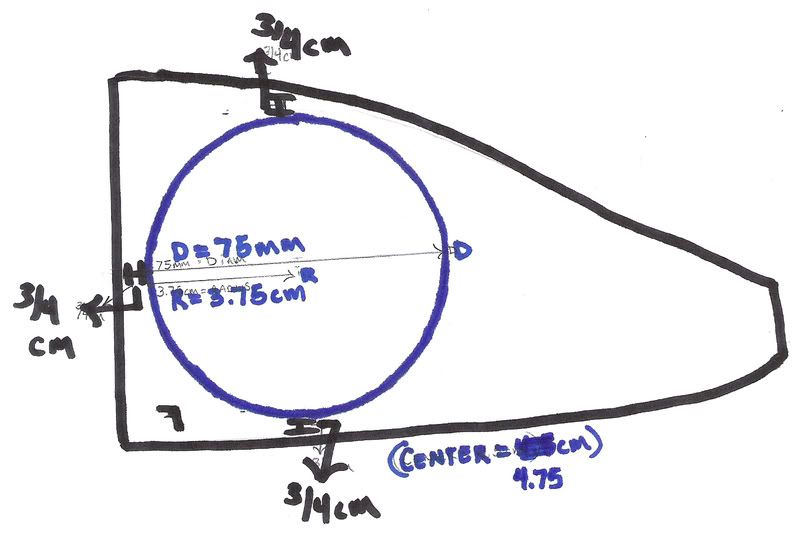
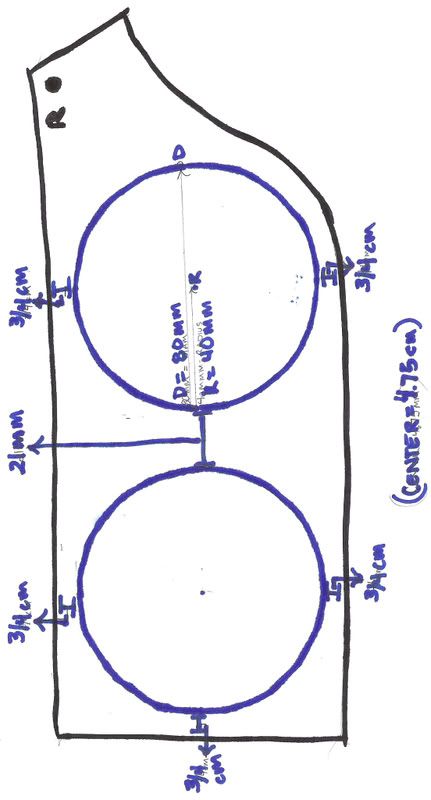
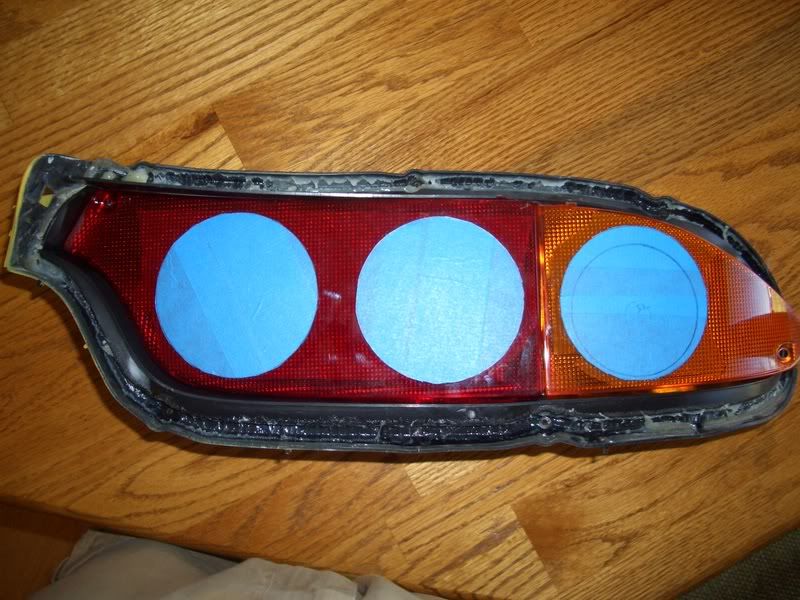
I figured since it took me awhile to figure out where to actually place the circles on the lens that i would make a detailed drawling of what i actually did. This way in the future if anyone has any questions they can just refer to this.

These measurements are not taken from the 99 tailights themselves, just what i thought looked good and the best placement. If you have any questions feel free to ask.


Old 01-30-08, 03:43 PM
  #2  
Rotary Enthusiast

iTrader: (2)
 
silverflash2's Avatar
 
Join Date: Sep 2002
Location: FL
Posts: 924
Likes: 0
Received 0 Likes on 0 Posts
Thanks !
Old 01-30-08, 04:15 PM
  #3  
Diamond Cut Seven

iTrader: (4)
 
The Driver's Avatar
 
Join Date: Apr 2006
Location: with all the rare parts
Posts: 1,446
Likes: 0
Received 1 Like on 1 Post
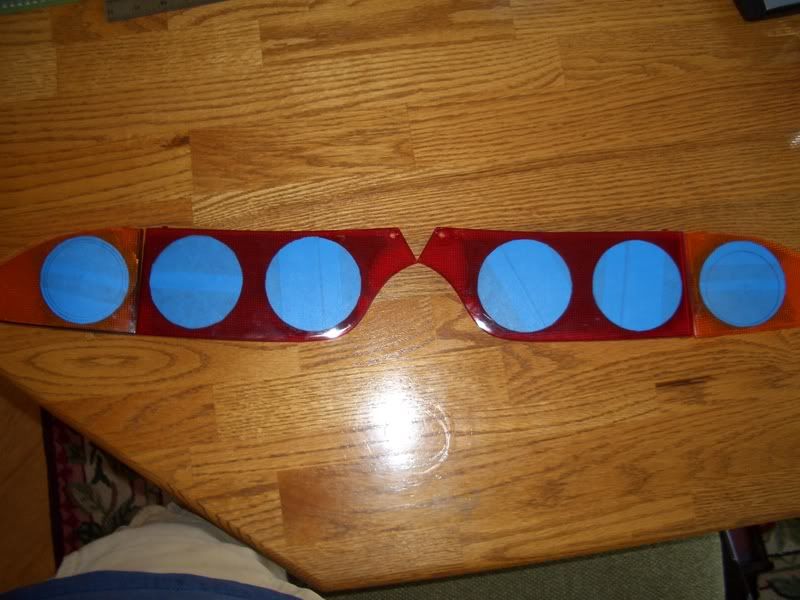
I just bought a set of 80, 75 and 70mm circle templates. Then took that clear notebook cover adhesive stuff and cut circles with it. Then finally put them on the lenses and sprayed them. They came out perfect IMO.
Old 01-30-08, 04:23 PM
  #4  
Full Member

iTrader: (1)
 
samad's Avatar
 
Join Date: Dec 2007
Location: islamabad, pakistan
Posts: 158
Likes: 0
Received 0 Likes on 0 Posts
man i cant get my tail lights out. ive tried pushing them outwards with alot of force but they just wont budge!
Old 01-30-08, 06:05 PM
  #5  
Jake

Thread Starter
iTrader: (3)
 
twisted7's Avatar
 
Join Date: Aug 2005
Location: Columbus
Posts: 982
Received 0 Likes on 0 Posts
you have to push the tabs in the back to get them to come out. You need to take out the plastic in the trunk to get them out.
Old 01-30-08, 06:38 PM
  #6  
Rotary Enthusiast

 
BigWillieStyles's Avatar
 
Join Date: May 2005
Location: Okayama - Japan
Posts: 986
Likes: 0
Received 0 Likes on 0 Posts
or you can buy some genuines and no stuff up anything
Old 01-30-08, 07:11 PM
  #7  
Jake

Thread Starter
iTrader: (3)
 
twisted7's Avatar
 
Join Date: Aug 2005
Location: Columbus
Posts: 982
Received 0 Likes on 0 Posts
its cheaper to do it yourself! and you can learn more about your car lol.
Old 01-30-08, 07:15 PM
  #8  
Rotary Enthusiast

 
BigWillieStyles's Avatar
 
Join Date: May 2005
Location: Okayama - Japan
Posts: 986
Likes: 0
Received 0 Likes on 0 Posts
not cheaper if you muck it up
Old 01-30-08, 08:22 PM
  #9  
Jake

Thread Starter
iTrader: (3)
 
twisted7's Avatar
 
Join Date: Aug 2005
Location: Columbus
Posts: 982
Received 0 Likes on 0 Posts
still cheaper...ask me how i know
Old 01-31-08, 03:44 AM
  #10  
Sex On Wheels

iTrader: (1)
 
rash_rvg's Avatar
 
Join Date: Dec 2006
Location: Portugal, Europe
Posts: 257
Likes: 0
Received 0 Likes on 0 Posts
How do you open the tail-lights exacly? got a stock set and a 99 spec set but 1 with a broken glass....
Old 01-31-08, 04:23 AM
  #11  
Full Member

iTrader: (1)
 
samad's Avatar
 
Join Date: Dec 2007
Location: islamabad, pakistan
Posts: 158
Likes: 0
Received 0 Likes on 0 Posts
ohhhhh so ther tabs at the baaack! everyone failed to mention this in all the other diy light threads. thanks twisted 7!
Old 01-31-08, 02:00 PM
  #12  
Jake

Thread Starter
iTrader: (3)
 
twisted7's Avatar
 
Join Date: Aug 2005
Location: Columbus
Posts: 982
Received 0 Likes on 0 Posts
http://www.jsott.com/rx-7/lights/index.html
Old 01-31-08, 09:02 PM
  #13  
I win

 
skir2222's Avatar
 
Join Date: Jun 2004
Location: NJ
Posts: 1,875
Likes: 0
Received 2 Likes on 2 Posts
Originally Posted by twisted7
Great link! I would love to do this myself as well.
Old 02-01-08, 12:40 PM
  #14  
Rotary Enthusiast

iTrader: (4)
 
DriftDreamzSS's Avatar
 
Join Date: Apr 2006
Location: Ventura
Posts: 1,236
Likes: 0
Received 3 Likes on 3 Posts
Thanks for the info, your diagram with measurements helped alot. I just did mine yesterday and they came out great. I spent $20 to have some vinyl circles cut (a little pricey but im impatient) and $4 on a can of black lacquer, already had a heat gun and some left over sand paper so total cost was $24 for 99 tails and I didnt have to wait or mess with shipping.
Old 02-01-08, 12:55 PM
  #15  
I win

 
skir2222's Avatar
 
Join Date: Jun 2004
Location: NJ
Posts: 1,875
Likes: 0
Received 2 Likes on 2 Posts
Originally Posted by DriftDreamzSS
Thanks for the info, your diagram with measurements helped alot. I just did mine yesterday and they came out great. I spent $20 to have some vinyl circles cut (a little pricey but im impatient) and $4 on a can of black lacquer, already had a heat gun and some left over sand paper so total cost was $24 for 99 tails and I didnt have to wait or mess with shipping.
Pictures? I am sure everyone would love to see how everyones work looks like, including me. This thread should be archived...
Old 02-01-08, 08:07 PM
  #16  
Rotary Enthusiast

iTrader: (4)
 
DriftDreamzSS's Avatar
 
Join Date: Apr 2006
Location: Ventura
Posts: 1,236
Likes: 0
Received 3 Likes on 3 Posts
Originally Posted by skir2222
Pictures? I am sure everyone would love to see how everyones work looks like, including me. This thread should be archived...
There are a couple pics on page 9 in the link in my sig.
Old 02-01-08, 08:22 PM
  #17  
RIP Creamsicle!

iTrader: (9)
 
eo2am's Avatar
 
Join Date: Jun 2005
Location: Oxnard
Posts: 1,363
Likes: 0
Received 1 Like on 1 Post
Its about time you did it. I did mine a while back and I love how simple it is and how good it looks.
Old 02-06-08, 12:44 PM
  #18  
Jake

Thread Starter
iTrader: (3)
 
twisted7's Avatar
 
Join Date: Aug 2005
Location: Columbus
Posts: 982
Received 0 Likes on 0 Posts
alright here are some pictures guys!

Just took them the other night, I have been pretty sick


There you go!
Old 02-06-08, 12:45 PM
  #19  
Jake

Thread Starter
iTrader: (3)
 
twisted7's Avatar
 
Join Date: Aug 2005
Location: Columbus
Posts: 982
Received 0 Likes on 0 Posts
I had to redo them because i wanted them perfect, so if it was a little bit off i would redo them until they were perfect.
Old 02-06-08, 01:06 PM
  #20  
Full Member

 
Mybaby's Avatar
 
Join Date: Dec 2003
Location: Great Neck, NY
Posts: 225
Likes: 0
Received 0 Likes on 0 Posts
Question

How are you redoing them if you have already layed down a coat of spray?
Old 02-06-08, 02:29 PM
  #21  
Jake

Thread Starter
iTrader: (3)
 
twisted7's Avatar
 
Join Date: Aug 2005
Location: Columbus
Posts: 982
Received 0 Likes on 0 Posts
magic my friend magic....


lol

No if the circle seemed to have a little flaw in it iwould sand it a little and than respray it.
Old 02-06-08, 03:09 PM
  #22  
Full Member

 
Mybaby's Avatar
 
Join Date: Dec 2003
Location: Great Neck, NY
Posts: 225
Likes: 0
Received 0 Likes on 0 Posts
Not trying to bust you *****.
But it looks like some of the spray go into the circum. of the circles.
If you sand that won't it take away from the contour pattern of the area were the light would come through.
Only reason I'm asking is cause I've attempted this a few time cause I had a bunch of extra lenses over the course of the years. Finally go it right but I have had some problem with the paint getting into the circum area and at that point I new I was f-cked.
On one set I threw some paint remover but it stripped the plastic?
Again, not trying to but you chops.
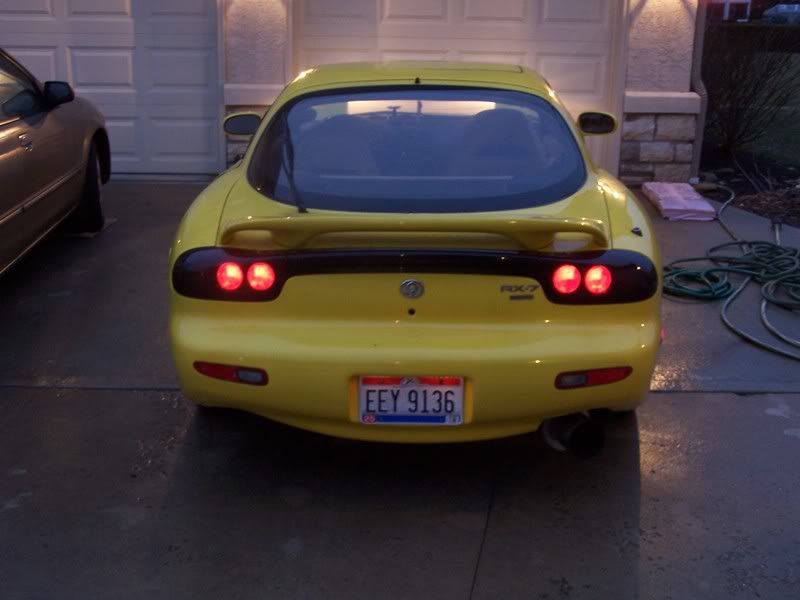
If those are the light on you car they look pretty good. 1 up for you if that them
Old 02-06-08, 08:27 PM
  #23  
Jake

Thread Starter
iTrader: (3)
 
twisted7's Avatar
 
Join Date: Aug 2005
Location: Columbus
Posts: 982
Received 0 Likes on 0 Posts
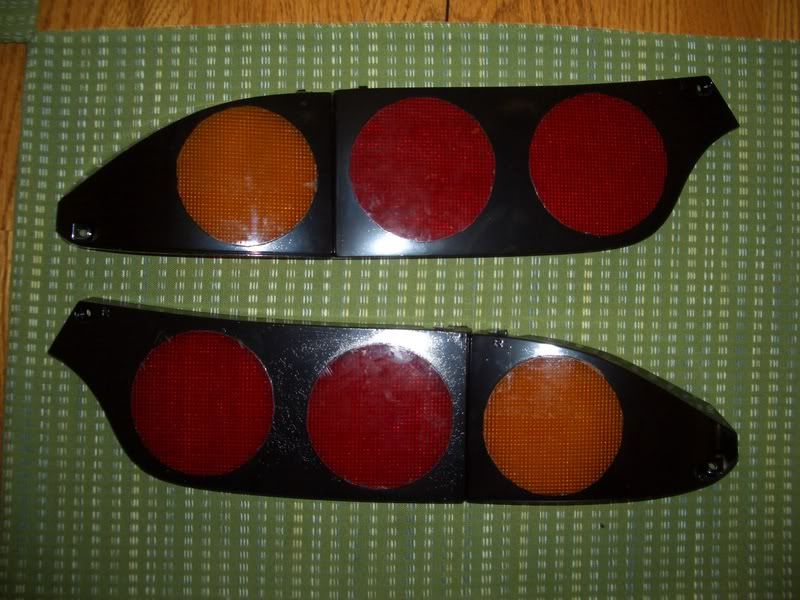
I do not have any paint on the inside of the circum at all. I had a spot where there was about a mm of paint that go through, all i did was scratch it off with my fingernail. It was not anything big. I than took a drill and a plastic polishing pad and went to town to get any inperfections out, as well as making them shin.

There is a product you can use to get some paint off that gets into the non painted area off. It is called Graffiti remover. I know a few paint shop that use it and have success.

those were not the finished product lenses in the photo. i redid them about 2 more times to make them perfect.

It is also really hard to understand your post as well.
Old 02-06-08, 08:45 PM
  #24  
Rotary Enthusiast

 
apexFD's Avatar
 
Join Date: Oct 2006
Location: BC, Canada
Posts: 1,319
Likes: 0
Received 1 Like on 1 Post
This thread is great!


I will now be doing this mod.


=Ben
Old 02-07-08, 07:21 AM
  #25  
Junior Member

 
Rx7Rocket's Avatar
 
Join Date: Aug 2007
Location: Allentown, PA
Posts: 26
Likes: 0
Received 0 Likes on 0 Posts
yeah that looks pretty good i think this is a much better option than buying the 99 specs. this will be my first project once i get mine back.
Related Topics
Thread
Thread Starter
Forum
Replies
Last Post
Turblown
Vendor Classifieds
12
10-17-20 03:25 PM
demetlaw
3rd Generation Specific (1993-2002)
6
10-02-15 06:22 PM


Quick Reply: 99 tailight conversion details


All times are GMT -5. The time now is 08:36 AM.