v mount setup pics


 04-10-10, 03:28 PM
#277
Newbie
iTrader: (9)
Join Date: Feb 2002
Location: MI
Posts: 1,171
Likes: 0
Received 0 Likes
on
0 Posts
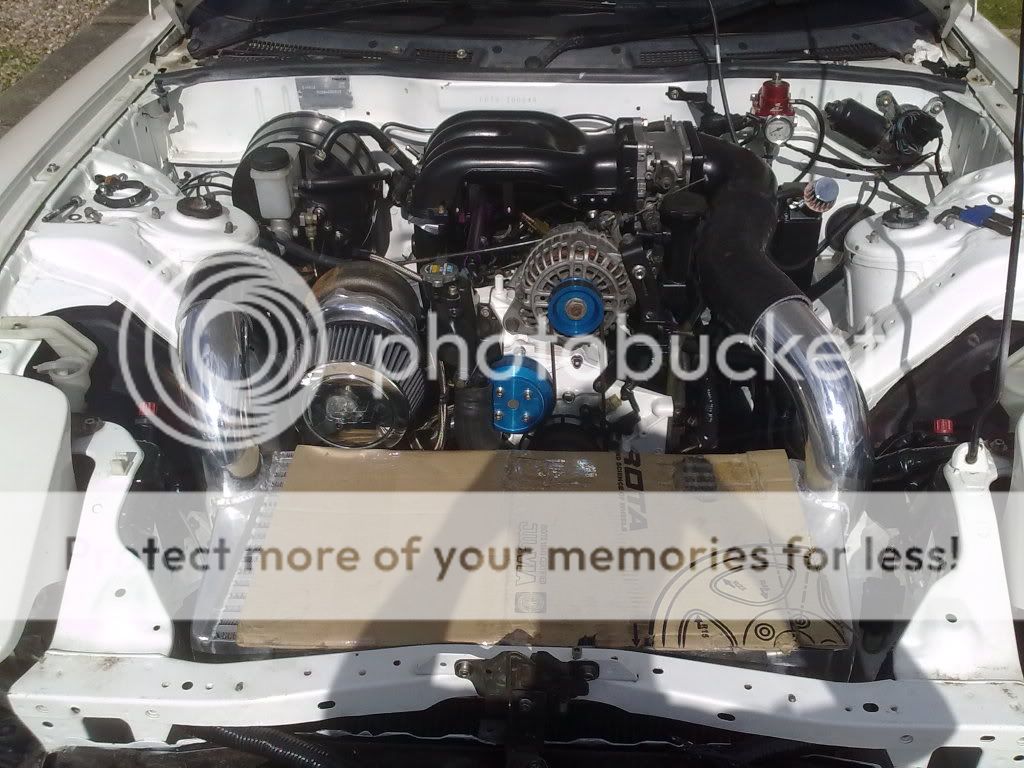
I just got done assembling my Knight Sports V-mount kit and I can honestly say trying to mount things the opposite way would be a NIGHTMARE, and not worth the hassle. Who's to say the extended piping you'd have from the IC being on the bottom wouldn't get heat soaked somehow? And realistically what is the big deal with some elevated IAT's when standing still? It would not take that long once you get moving to cool the IC back down again which is really where it counts. Going to all that trouble to POSSIBLY reduce standing IAT's seems like a lot of work for nothing.
Here's my setup as it sits:

Waiting on some stuff to come from hose techniques before I can finish up the other charge pipe. And I just got done mocking up most of my ducting, should have that done pretty soon, mostly just need to figure out how I'm going to bolt it to the chassis.
04-10-10, 03:39 PM
#278
Newbie
iTrader: (9)
Join Date: Feb 2002
Location: MI
Posts: 1,171
Likes: 0
Received 0 Likes
on
0 Posts
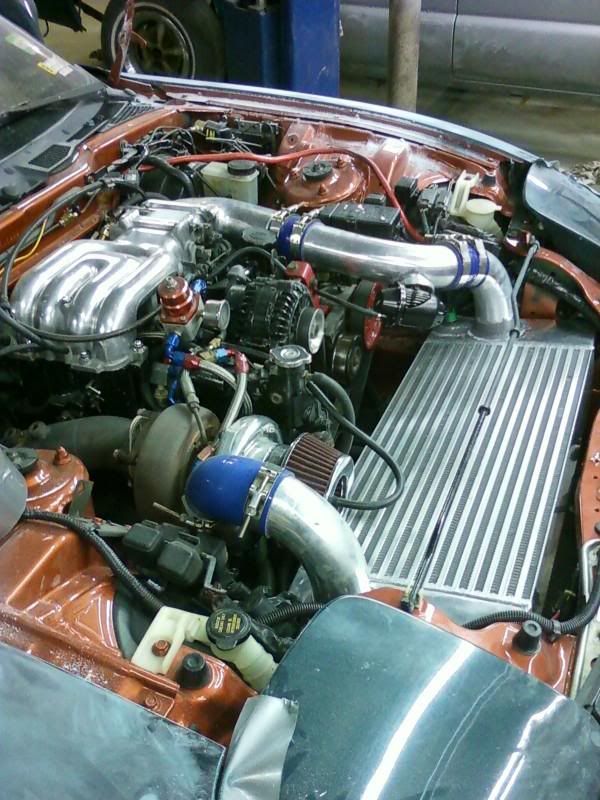
here is what i came up with for 200 bux ... 3" in/out intercooler
2.75 ( sock IN ) ... 3" OUT ... greddy elbow grinded to the 3"mark plus i eliminated soem 90 deg. turnse out of the stock design ...
http://i69.photobucket.com/albums/i7...f/DSC08987.jpg
http://i69.photobucket.com/albums/i7...f/DSC08989.jpg
http://i69.photobucket.com/albums/i7...f/DSC08986.jpg
no time to do the ducting . maybe over the winter
 .
.Also are you running no PS? Threw me off for a second looking at that tensioner pulley on the wrong side of the belt
 . You should ditch the AC too, cleans up the engine bay SO nice not having the PS pump or the AC compressor over there
  .
05-21-10, 01:30 PM
.
05-21-10, 01:30 PM
#279
has anyone made their own vmic using an unmodified radiator? do the endtank locations make a difference if you just change the position of the radiator?
please correct me if im wrong but people relocated their end tanks to make the install easier and for less piping correct?
also has anyone tried modifying the greddy FMIC to work as a vmic? jt the one with the white fd and the ic through the hood did right?
last q... what size piping are you guys using? does it make a huge difference what size the outlets of the IC are?
05-21-10, 06:32 PM
#281
Speed Mach Go Go Go
iTrader: (2)
Join Date: Oct 2001
Location: My 350Z Roadster kicks my RX7's butt
Posts: 4,772
Likes: 0
Received 2 Likes
on
2 Posts
 05-21-10, 08:46 PM
#282
Newbie
iTrader: (9)
Join Date: Feb 2002
Location: MI
Posts: 1,171
Likes: 0
Received 0 Likes
on
0 Posts
1)has anyone made their own vmic using an unmodified radiator? do the endtank locations make a difference if you just change the position of the radiator?
2)please correct me if im wrong but people relocated their end tanks to make the install easier and for less piping correct?
3)also has anyone tried modifying the greddy FMIC to work as a vmic? jt the one with the white fd and the ic through the hood did right?
4)last q... what size piping are you guys using? does it make a huge difference what size the outlets of the IC are?
2) yes
3) I'm sure they have, seems like an expensive route to go though when you could pick up a cheaper intercooler that would work just as well.
4) My piping is 2.75". I would shoot for AT LEAST a 2.75" outlet, my 35R has a 2.5" outlet so it wouldn't make a huge difference to have that same size inlet, but uniformity is the best route to go.
I have my Knight Sports V-Mount finished now. Still working on finishing up the ducting work but the pipes are done and it is working great. Lower overall temps in every day driving (typically in the 20's-30's), and up in the 40's during auto-x's if I don't ice the IC down between runs. This is also with a huge gaping hole between the IC and radiator though, temps should drop even more after I fill that in.
Here's the most recent picture of the engine bay, excuse the dirt, it's not a show car
 05-22-10, 02:35 AM
#283
kai, thanks for the info.. anyone used rotary works rad? do the stock fans fit in without any modification?
jhew- thanks for all the help! but why would an unmodified rad be have more of failure points? only one i can see is the bottom endtank will sit lower to the ground... but thats all determined by the placement of it.....
jhew- thanks for all the help! but why would an unmodified rad be have more of failure points? only one i can see is the bottom endtank will sit lower to the ground... but thats all determined by the placement of it.....
 05-23-10, 10:28 AM
#286
Newbie
iTrader: (9)
Join Date: Feb 2002
Location: MI
Posts: 1,171
Likes: 0
Received 0 Likes
on
0 Posts
At this point there are quite a few places selling converted radiators, I also went to a local radiator shop and it was even cheaper to have him make me one. In my opinion it just makes sense to do it that way as opposed to having a bunch of water hose running around that really doesn't need to be there.
05-24-10, 02:15 AM
#287
Senior Member

Join Date: Nov 2007
Location: Warwickshire, UK
Posts: 251
Likes: 0
Received 0 Likes
on
0 Posts
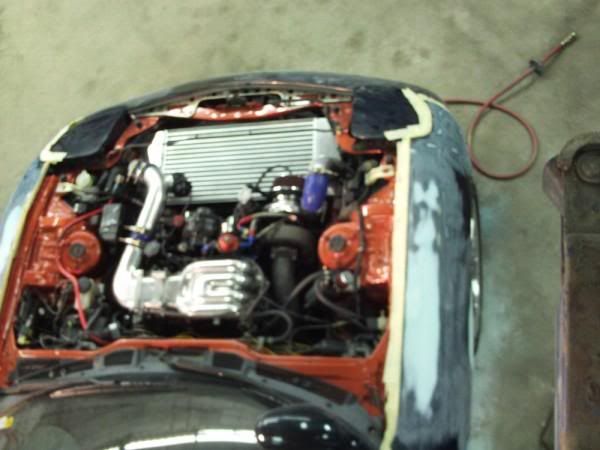
Mine(without clamps!)
Koyo N-Flo rad with lower outlet chopped and alloy pipe run half way up the back.
Stock fans (trimmed), generic core modified, 3" pipework.
Turns out I should probably get rid of the cardboard for better cooling :shrugs:
Koyo N-Flo rad with lower outlet chopped and alloy pipe run half way up the back.
Stock fans (trimmed), generic core modified, 3" pipework.
Turns out I should probably get rid of the cardboard for better cooling :shrugs:
 05-25-10, 11:32 AM
#290
Newbie
iTrader: (9)
Join Date: Feb 2002
Location: MI
Posts: 1,171
Likes: 0
Received 0 Likes
on
0 Posts
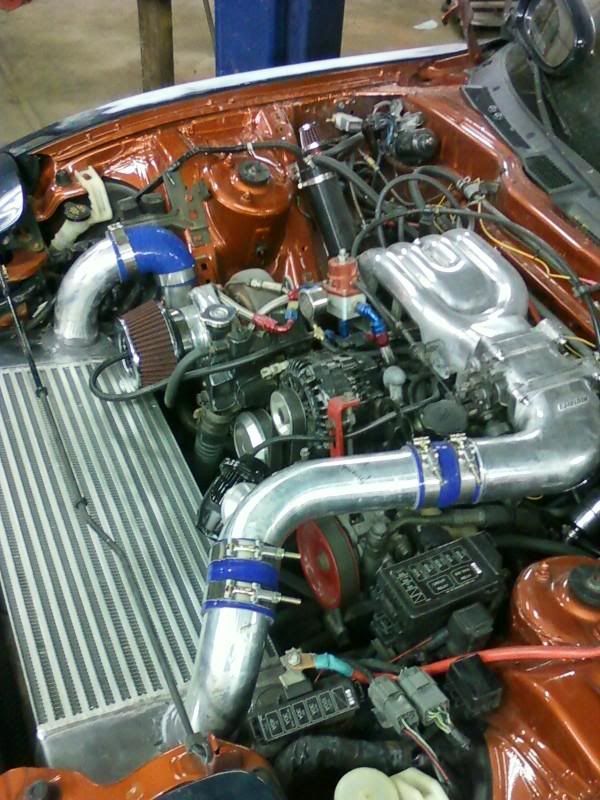
I think 3 things contribute to his engine bay looking so clean.
1) it's RHD
2) he has deleted MANY factory options (airpump, AC, PS, ABS etc)
3) it's not finished, in this picture at least.
It is very sharp though, one day I hope my engine bay can be that spartan.
1) it's RHD
2) he has deleted MANY factory options (airpump, AC, PS, ABS etc)
3) it's not finished, in this picture at least
.It is very sharp though, one day I hope my engine bay can be that spartan
.
05-25-10, 04:13 PM
#291
Senior Member
Join Date: Nov 2007
Location: Warwickshire, UK
Posts: 251
Likes: 0
Received 0 Likes
on
0 Posts

Yup, stuff is tucked, trimmed, and hustled away under covers
Almost A lot of stuff has gone thanks to UK laws being a bit more 'flexible' (to an extent
 ) But it's still very much an uncompromised car in terms of performance in my eyes (just mine, obviously different people see things differntly )
PS is still there, but now powered by an electric pump from a french hatchback
The only thing not finished in that piccy is that there's cardboard on the IC, and that hoses don't have clamps on them.
AC had to go, ABS is gone.
Everything else is 'as is', and started up for the first time at the weekend, on the second turn of the key
It is very nearly finished, all it needs is:
- WI installing when run it
- Vac lines tidying on the firewall
- TB and Alternator spraying
- Strut brace bolting up.
Other than that, it's good to go
 05-25-10, 08:21 PM
#293
Newbie
iTrader: (9)
Join Date: Feb 2002
Location: MI
Posts: 1,171
Likes: 0
Received 0 Likes
on
0 Posts
You got me there Almost
A lot of stuff has gone thanks to UK laws being a bit more 'flexible' (to an extent) But it's still very much an uncompromised car in terms of performance in my eyes (just mine, obviously different people see things differntly )
PS is still there, but now powered by an electric pump from a french hatchback
The only thing not finished in that piccy is that there's cardboard on the IC, and that hoses don't have clamps on them.
AC had to go, ABS is gone.
Everything else is 'as is', and started up for the first time at the weekend, on the second turn of the key
It is very nearly finished, all it needs is:
- WI installing when run it
- Vac lines tidying on the firewall
- TB and Alternator spraying
- Strut brace bolting up.
Other than that, it's good to go
Almost A lot of stuff has gone thanks to UK laws being a bit more 'flexible' (to an extent
) But it's still very much an uncompromised car in terms of performance in my eyes (just mine, obviously different people see things differntly )PS is still there, but now powered by an electric pump from a french hatchback
The only thing not finished in that piccy is that there's cardboard on the IC, and that hoses don't have clamps on them.
AC had to go, ABS is gone.
Everything else is 'as is', and started up for the first time at the weekend, on the second turn of the key
It is very nearly finished, all it needs is:
- WI installing when run it
- Vac lines tidying on the firewall
- TB and Alternator spraying
- Strut brace bolting up.
Other than that, it's good to go
. I noticed the charge pipe clamps first, then noticed the missing upper rad hose clamp, then the throttle cable, and I also didn't see an overflow hose, is that just not there or are you doing something else? I was also surprised at how clean the firewall was, but then realized that being RHD a lot of that crap isn't even there, then the ABS delete pretty much cleans up the rest. I do really like the way it looks though, I would love to have mine be that clean.I'm diggin the electric PS pump, I just ditched mine altogether for a Maval conversion. And the US has a few states that aren't too strict about cars, MI is luckily one of them
. I'm single converted, with almost as much as you have deleted, with a full turbo back straight pipe exhaust, haven't gotten in trouble yet :crossesfingers: haha.
05-26-10, 12:18 PM
#298
Newbie
iTrader: (9)
Join Date: Feb 2002
Location: MI
Posts: 1,171
Likes: 0
Received 0 Likes
on
0 Posts
You need to buy an FC filler neck, at least the top part of it. then you cap off the one nipple on the thermostat housing and run the line from the FC filler neck to the overflow bottle.
05-26-10, 04:44 PM
#300
it was actually a front mount for a srt4 (Ebay) i cut the brackets off and yes did my own pipes. the drivers side i cut the existing pipe and moved it towards the front more i patched the old hole and mounted my ait sensor there. it barley fits had to relocate wires though no cuting. the end tanks were perfect though.