
S4 6pt motor build large Sp and some more build tips

Thread Starter
Passing life by
Joined: Feb 2005
Posts: 4,028
Likes: 2
From: Scotland, USA
S4 6pt motor build large Sp and some more build tips
Last time we covered all the pre build inspections and cleaning but did not get to the assembly. I will touch in that a tad bi this time maybe you can pick up a few more things.
Here is our motor parts ready to be assembled and the rotors have been built. We covered this last time on checking side seals corner seals and clearance between them. Please see the Archives for this information.

I took pics but they loaded on another computer that is down right now on assembling the oil control orings. I will try and talk this one out. I take the control ring and pore 20x50 royal purple in a cap poring it down the grove to coat the ring. Add a few dabs of patrolium to help stick the oring and coat the oring in the oil to coat it. Place the oring into or around the control ring rub fingers around lube it really well. See the FSM or Haynes on what way to place the oil control orings into the rotors then spread a light coat of assembly lube in the groves and around the edges. We are trying to avoid any hot spots of metal when the motor heats up without lube and burn the oring up. If you add to much lube into the grove you will hydro lock the ring and you will not be bale to push the control ring into place. When you have seated it use a 2x4 and gently push the ring down into place, be sure to use the square notch in the ring to line up with the spring tab.
Now place our front Iron on the stand I use patrolium jelly or naval jelly to help hold the coolant seals in place. I do not use hylomar I do not like it and I think it could have some adverse affects on sealing or life potential.
The side seals pack in a few spots patrolium and place the seal in with the ends facing up then do this again for the seal to help hold them in place. Add some patrolium into the corner grove add the spring some more to hold the corner seal in next. Add some more into the apex groves and slide the apex seal in and install the springs after you place the rotor in the motor.

screw your stationary gear in place the rotor in and then work the shaft down. I lube all the bearings and shaft with patrolium. Now is the time to place the springs into the grove little one first then push the big one in.

This motor was Atkins seals and they were to large so I needed to sand them and lap the side assist piece.


Now push the shaft up with your leg and have the lobe facing the intake port, gently rock on the int iron and lower them in a unit using the dowel pins as the seat guide. Don't forget the brush able RTV or Permatex 300 on the legs.

Slide the rotor down onto the shaft and place the rotor 180o off from the other one then slide the housing on.


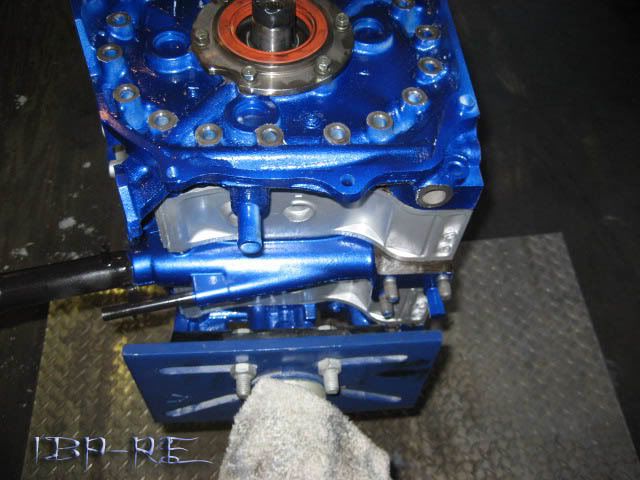
Here is our motor parts ready to be assembled and the rotors have been built. We covered this last time on checking side seals corner seals and clearance between them. Please see the Archives for this information.
I took pics but they loaded on another computer that is down right now on assembling the oil control orings. I will try and talk this one out. I take the control ring and pore 20x50 royal purple in a cap poring it down the grove to coat the ring. Add a few dabs of patrolium to help stick the oring and coat the oring in the oil to coat it. Place the oring into or around the control ring rub fingers around lube it really well. See the FSM or Haynes on what way to place the oil control orings into the rotors then spread a light coat of assembly lube in the groves and around the edges. We are trying to avoid any hot spots of metal when the motor heats up without lube and burn the oring up. If you add to much lube into the grove you will hydro lock the ring and you will not be bale to push the control ring into place. When you have seated it use a 2x4 and gently push the ring down into place, be sure to use the square notch in the ring to line up with the spring tab.
Now place our front Iron on the stand I use patrolium jelly or naval jelly to help hold the coolant seals in place. I do not use hylomar I do not like it and I think it could have some adverse affects on sealing or life potential.
The side seals pack in a few spots patrolium and place the seal in with the ends facing up then do this again for the seal to help hold them in place. Add some patrolium into the corner grove add the spring some more to hold the corner seal in next. Add some more into the apex groves and slide the apex seal in and install the springs after you place the rotor in the motor.
screw your stationary gear in place the rotor in and then work the shaft down. I lube all the bearings and shaft with patrolium. Now is the time to place the springs into the grove little one first then push the big one in.
This motor was Atkins seals and they were to large so I needed to sand them and lap the side assist piece.
Now push the shaft up with your leg and have the lobe facing the intake port, gently rock on the int iron and lower them in a unit using the dowel pins as the seat guide. Don't forget the brush able RTV or Permatex 300 on the legs.
Slide the rotor down onto the shaft and place the rotor 180o off from the other one then slide the housing on.
Thread Starter
Passing life by
Joined: Feb 2005
Posts: 4,028
Likes: 2
From: Scotland, USA
Coat the tension bolts with RTV and anti seize on the threads. Check the archived thread for proper dies to use.


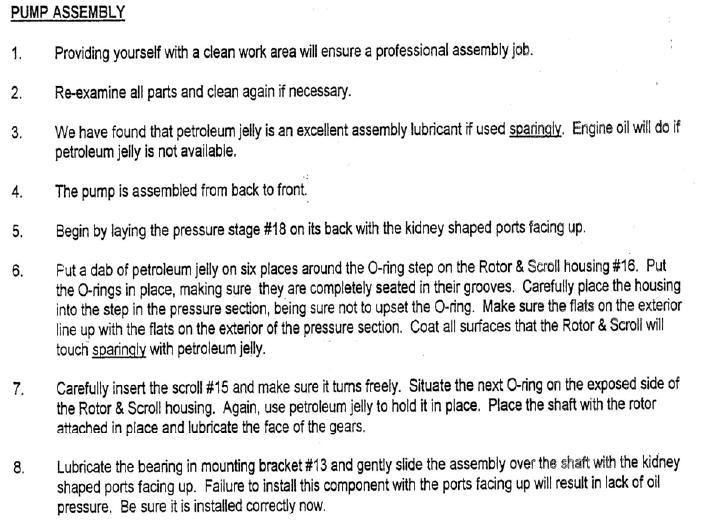
When you put the pump together take it apart pack it and lube everything with patrolium, this keeps the pump from running dry on start up.


Check the end play of the motor be sure to not lube the parts this time.


thermal pellet

brush able rtv thin coat along the coper crush washer and blue lock tite on the threads.


When you put the pump together take it apart pack it and lube everything with patrolium, this keeps the pump from running dry on start up.
Check the end play of the motor be sure to not lube the parts this time.
thermal pellet
brush able rtv thin coat along the coper crush washer and blue lock tite on the threads.
I'm a boost creep...
Joined: Jan 2002
Posts: 15,608
Likes: 8
From: Auckland, New Zealand
Originally Posted by iceblue
When you put the pump together take it apart pack it and lube everything with patrolium, this keeps the pump from running dry on start up.
And it's petroleum jelly. It even says it on the side...
Damn, that is beautiful!!
But no hylomar? Adverse affects? I would think its good, because aluminum and iron probably expand and contract differently.
I'd be careful about checking endplay from the oil pump chain. May not be accurate.
I just turned the motor over by hand a few times, then turned it over with egi fuse removed, and it fired right up after that. I don't really see any problems with using too much though jelly. Unless you Packed the motor full!
Have fun with that, try to keep it clean too!!
Trending Topics
Winter sucks
Joined: Jan 2004
Posts: 3,083
Likes: 0
From: Newberg, Oregon
Hey IceBlue, do you have any closeup shots of those ports? The secondary/Aux specifically... They look EXACTLY like what I'm going to try to do in the next month or so... Look a lot like Kahren's ports on his 195rwhp NA.
Thread Starter
Passing life by
Joined: Feb 2005
Posts: 4,028
Likes: 2
From: Scotland, USA
wtf is up with people assume I am checking the end play from the chain. What ******* idiot would do that? You can even see the dial indicator rod behind the chain. I do not like how the hylomar sticks and causes clumps on the seals. Yes it can have adverse effects as it gets between the bond of the seal and metal, maybe no one is seeing them and its not big enough but I rather not do it that way.
Based on the over 30+years of race engine building experiance pool when assembling the pump you should pack them that way, you can now thank me for the tip :-D.
Based on the over 30+years of race engine building experiance pool when assembling the pump you should pack them that way, you can now thank me for the tip :-D.
Winter sucks
Joined: Jan 2004
Posts: 3,083
Likes: 0
From: Newberg, Oregon
Originally Posted by iceblue
Based on the over 30+years of race engine building experiance pool when assembling the pump you should pack them that way, you can now thank me for the tip :-D.

Banned. I got OWNED!!!
Joined: Mar 2006
Posts: 1,970
Likes: 1
From: Connecticut
I'm with NZconvertible. If you positition the engine correctly you can fill the oilpump with actual oil and keep it there for assembly. Not to mention, there is plenty of suction from the oilpump to pull the oil almost immediately. There is very little load on the oil-pump. All you are doing is spreading petroleum jelly through-out the entire oil system.
Naval jelly is what hardware stores sell to remove rust..........
Naval jelly is what hardware stores sell to remove rust..........

Joined: Oct 2003
Posts: 11,576
Likes: 27
From: Morristown, TN (east of Knoxville)
Dude, why the heck do you "coat the tension bolts with RTV"? 
I HATE when I take a motor apart and all that nasty **** is everywhere inside and on the floor. IT usually makes such a mess that I have to throw the tension bolts out and use new ones. It also creates a lot of extra work trying to clean the irons and housings of all that ****.
I have never understood the need for doing this. Sure, if you want to reduce resonating/flex you can use a small coating of RTV IN THE MIDDLE OF THE TENSION BOLT where the ribs are, about 2 inches in length, but there is no need to coat the whole thing with it, other than to see if you can set a record for how much of a mess you can make for the next person who works on it.
Other than that, looks good.
Thread Starter
Passing life by
Joined: Feb 2005
Posts: 4,028
Likes: 2
From: Scotland, USA
To reduce harmonic frequency vibrations. I don't care I don't clean them they get hot dipped and glass beaded no big deal.
The pump is the most vital part of the motor if you want to trust it basically dry then so be it. When we were building hydroplane race boat motors 502 rats that rev limited to 12krpm and we packed the pumps on these motors as well believe me there is a reason.
micaheli - You can talk to me on PM or AIM

Yea, thanks for the tips! If you don't want people questioning your **** don't put it on here.. its a forum... if you want to just post pics of your engine build make a website.
People will have good and bad things to say about anything...
Believe you there's a reason? What's the reason?
People will have good and bad things to say about anything...
Believe you there's a reason? What's the reason?
Originally Posted by iceblue
Based on the over 30+years of race engine building experiance pool when assembling the pump you should pack them that way, you can now thank me for the tip :-D.
I wish I was driving!
Joined: Dec 2001
Posts: 5,241
Likes: 84
From: BC, Canada
Much better way to prime the oil pump is to pour some engine oil into the pickup tube when you have the engine upside down for putting on the oil pan, and then spin the engine over once or twice by hand. All that is needed for the oil pump to start working instantly is a very thin layer of oil/grease on the gears.
All that is needed for the oil pump to start working is a very thin layer of oil on the gears. A very thin layer of petroleum jelly works great for this. No serious engine builder I have ever met recommends packing the pump with petroleum jelly. Packing the pump completely with PJ is the "haynes manual mistake". Petroleum jelly does not flow through the oil system well at all until the engine is warmed up, and packing massive amounts of jelly into the pump will reduce oil system flow during the engine's first start up.
Moroso, who manufactures internal, external, and dry sump oil pumps for thousands of applications, agrees:
I'm a boost creep...
Joined: Jan 2002
Posts: 15,608
Likes: 8
From: Auckland, New Zealand
Originally Posted by iceblue
The pump is the most vital part of the motor if you want to trust it basically dry then so be it. When we were building hydroplane race boat motors 502 rats that rev limited to 12krpm and we packed the pumps on these motors as well believe me there is a reason.
The "we've been doing this for many years" reason doesn't hold any water if it doesn't have a logical explanation behind it.
I wish I was driving!
Joined: Dec 2001
Posts: 5,241
Likes: 84
From: BC, Canada
Originally Posted by iceblue
Now place our front Iron on the stand I use patrolium jelly or naval jelly to help hold the coolant seals in place. I do not use hylomar I do not like it and I think it could have some adverse affects on sealing or life potential.
Naval jelly is a MASSIVELY corrosive agent used for removing rust from iron. It is a very strong acid!! It contains phosphoric acid, isopropanol, and sulfuric acid, and has a pH of less than 1!
Surface pitting of iron occurs if naval jelly is not washed from its surface with 15 minutes. All of the chemicals in naval jelly listed above WILL cause damage to all engine components.
Banned. I got OWNED!!!
Joined: Mar 2006
Posts: 1,970
Likes: 1
From: Connecticut
Yeah.... what did I say? Hardware stores sell that **** to remove RUST!!!!
Once again.... I agree with NZConvetible..... boost creep and all. It makes no ******* sense whatsoever to presuruse petroleum jelly through the oil system, even if you do remove all the pubes I'd kinda like to crack that filter open.
I dunno about you guys, but about a year ago I had some knee surgery on the left knee so I couldn't drive my Jeep or my 7 (Both manual trans) they sat for about a month..... so when it was finally time to drive them I pulled the EGI fuse and cranked them until I saw pressure on the oil gauge. Took a FEW seconds of cranking before it happened. Then I fired both up. I dare say, that if you position the engine correctly and fill the oilpump with oil, then crank that som' bitch over till pressure is seen BEFORE firing her off, there would be no need for an **** lubricante to be squited through your engine.
And please...... stay away from the Naval Jelly.... **** will eat you plates up rather quickly.
So......... how does one confuse an **** lubricant with a rust remover???
Once again.... I agree with NZConvetible..... boost creep and all. It makes no ******* sense whatsoever to presuruse petroleum jelly through the oil system, even if you do remove all the pubes
I'd kinda like to crack that filter open. I dunno about you guys, but about a year ago I had some knee surgery on the left knee so I couldn't drive my Jeep or my 7 (Both manual trans) they sat for about a month..... so when it was finally time to drive them I pulled the EGI fuse and cranked them until I saw pressure on the oil gauge. Took a FEW seconds of cranking before it happened. Then I fired both up. I dare say, that if you position the engine correctly and fill the oilpump with oil, then crank that som' bitch over till pressure is seen BEFORE firing her off, there would be no need for an **** lubricante to be squited through your engine.
And please...... stay away from the Naval Jelly.... **** will eat you plates up rather quickly.
So......... how does one confuse an **** lubricant with a rust remover???

Thread
Thread Starter
Forum
Replies
Last Post
Azevedo
Other Engine Conversions - non V-8
26
Mar 1, 2019 09:19 PM