
Replacing centering spring in manual trans


Thread Starter
Full Member
Joined: Oct 2009
Posts: 106
Likes: 2
From: Southern Md
Replacing centering spring in manual trans
The shift selector in my 87 no longer returns to center. The only thing I can guess is that the spring broke. I have a new spring but need to know if I can change it with the trans still in the car. It looks like there is an access cover on the right side of the shifter tower on the trans. Will removing this give me enough room to get the return to center spring replaced in the car? Will I have enough room to drive the roll pin out of the selector and are there any tricks to getting in in and out?
Thanks
Steve
Thanks
Steve
Full Member
Joined: Jan 2002
Posts: 67
Likes: 0
From: northern indiana
pull the heat shields, pull the shift lever, pull the retaining nut from tail housing, the detent ball and spring--or whats left of it will fall out, replace and reverse. It is in the stick drawings of the tranny in the FSM. But you don't have to remove or dismount the tranny at all--I did mine recently.
Full Member
Joined: Jan 2002
Posts: 67
Likes: 0
From: northern indiana
Hey,
Just read through your first threat again. The nut you're looking for is on the opposite side of the cover you saw, or maybe its the one on the back, anyway, you're in the right place, just the other side
Just read through your first threat again. The nut you're looking for is on the opposite side of the cover you saw, or maybe its the one on the back, anyway, you're in the right place, just the other side
Rotary Enthusiast
Joined: May 2001
Posts: 903
Likes: 1
From: Conyngham, PA
Just to clairify with what the factory manual calls these parts:
1) The Check ball - This is the large bolt at the back of the shifter housing.
2) The lower shifter lockout mechanism - note the orientation of the plunger.
Once those two things are out, you can remove the 4 bolts that hold the access cover.
At this point you're in the shifter housing looking at the shift actuator and the roll pin that holds it to the shift rod. (Make sure the transmission is in neutral.) You'll need to find a drift to tap the roll pin out. I had to loosen the trany cross member to get a good angle on the roll pin.
Once the pin is out, you need to rotate the shift actuator rod 180 degrees. Once rotated, you'll be able to push the rod forward into the transmission, giving you enough room to slide the shift actuator end off the back of the rod.
With the actuator finally out, you can wrap the spring around it. The orientation has the "Hook" part centered above the socket for the shifter. The other end of the spring wraps around the actuator and rests on the indentation on the right side.
The only tricky part now is reinstalling the actuator piece on the rod. You still have the actuator rod turned 180 degrees... You need to replace the actuator on the rod, slide the rod back, turn the rod 180 degrees till it�s in the normal position, then reinstall the roll pin.
Good luck! This job can be done with the tranny in the car, but it's easier with the transmission on the floor.
Jeff
Thread Starter
Full Member
Joined: Oct 2009
Posts: 106
Likes: 2
From: Southern Md
Thank you for the detailed explanations Ted and Jeff! I have had manual transmissions apart before but am very new to the RX7 platform so I need all the help I can get. I will print this thread out and bring it with me.
Steve
Steve
Last edited by bondospecial; Nov 3, 2009 at 10:47 AM.
Trending Topics
Thread Starter
Full Member
Joined: Oct 2009
Posts: 106
Likes: 2
From: Southern Md
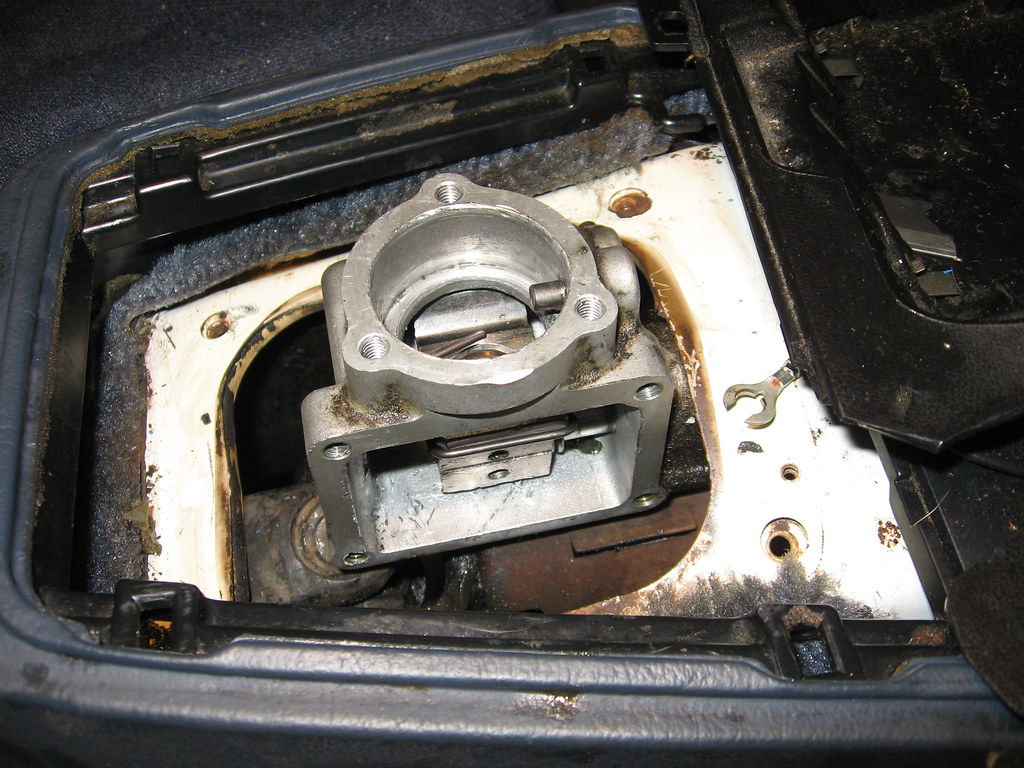
Ok I was able to remove everything to get the shift selector block out of the transmission, with the trans still in the car, and without having to tilt the trans down. I saw several posts where people were suggesting taking the whole trans out - that is a little extreme. All I had to do was remove the one center nut that bolts the trans to the cross member and jack the trans up until it hit the floor pan. That allows enough room to drive the roll pin out and slide the block out.
I installed the centering spring but I need someone to take a look and verify I have it in correctly. I hooked one end around the flat on the right side of the selector block, but then the loop end looks like it just sits there and presses against the left side of the shifter? Is that correct?
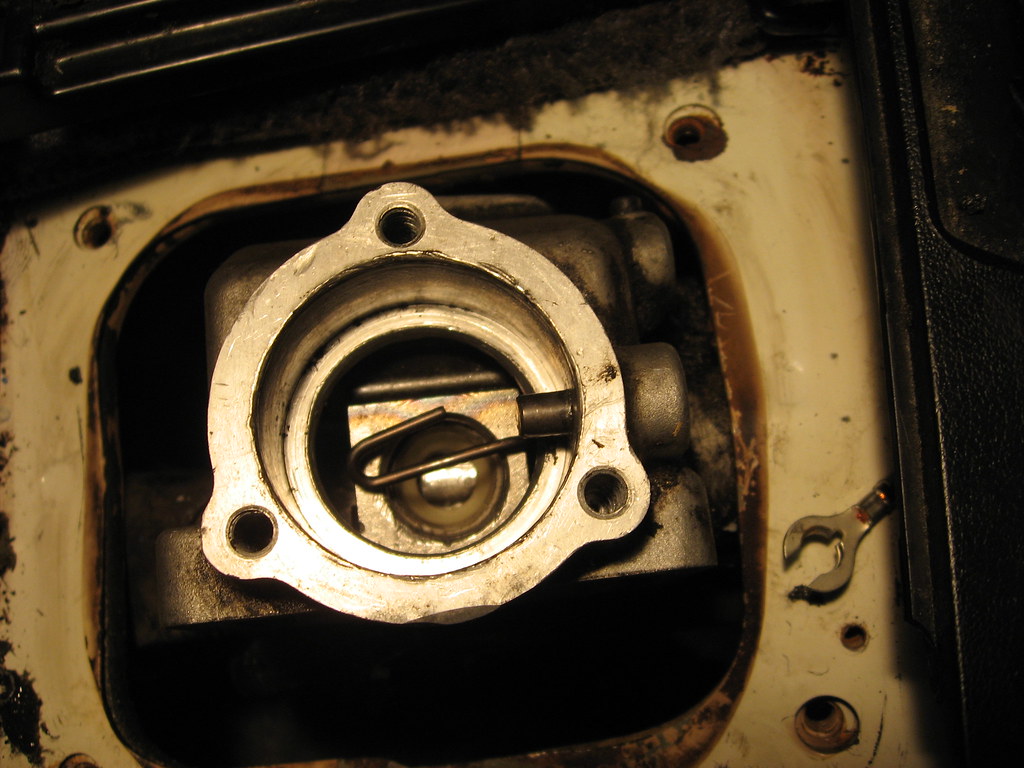
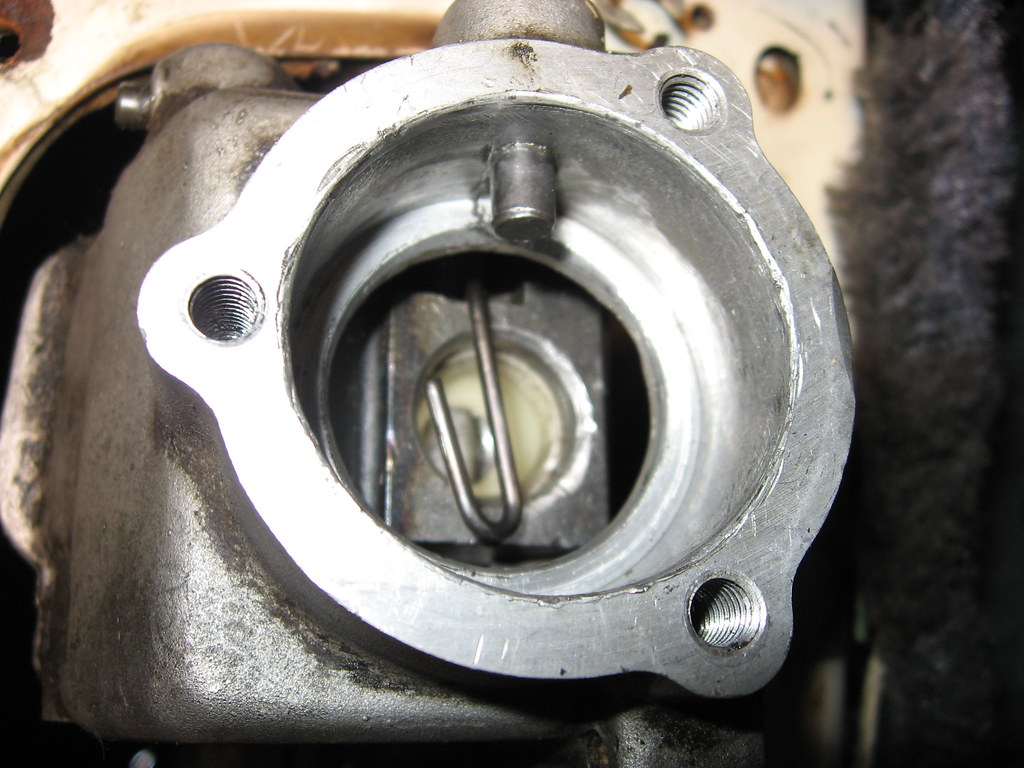
I installed the centering spring but I need someone to take a look and verify I have it in correctly. I hooked one end around the flat on the right side of the selector block, but then the loop end looks like it just sits there and presses against the left side of the shifter? Is that correct?
Thread Starter
Full Member
Joined: Oct 2009
Posts: 106
Likes: 2
From: Southern Md
^That turned out to be the correct orientation and what a huge difference it makes with the centering spring installed. The shifter stays in the 3/4 gate now like it's supposed to and it is much easier to tell what gear you are in. This project was very worthwhile, I couldn't stand driving the car with the centering spring broken. Total time was about 5 hours, including me having a hard time getting the roll pin out (I did have enough room to drive it straight through, barely), having a hard time getting the shift selector in and out, having to cut a new roll pin from longer stock, having to file down the new lower shifter bushing to fit, and installing the reverse lockout wrong and having to take it apart a couple times to get it right. I did most everything from the interior of the car. Having the centering spring also eliminated the short shifter vibration.

Junior Member
Joined: Sep 2009
Posts: 23
Likes: 0
From: Freeport, FL
This thread has been very informative, but I do have a question. Is the spring layout in the pictures the same as a long shifter? Long story short, I just finished replacing the clutch on my 84 GS, and that spring is being a ***** to me. When I thought I had it hooked up around the shifter, I closed everything up, put it in gear, and...it sprung off. Any suggestions for getting a deviant spring to work? A little more info would be that the spring is more of an angle than a curve. Should I replace it?
Thread Starter
Full Member
Joined: Oct 2009
Posts: 106
Likes: 2
From: Southern Md
The spring is the same layout as a stock shifter. The spring should stay to the left of the shifter, just touching against it. It does not hook AROUND the shifter. All you do is pop the shifter in to the right of the spring and into the cup and the spring just rides against it. That "hook" on the end of the spring was just made so it does not catch on anything, the hook does not hook on anything. If you tried to hook the shifter into the spring you probably over stretched it.
Thread Starter
Full Member
Joined: Oct 2009
Posts: 106
Likes: 2
From: Southern Md
Woops forgot about the pics. Well they weren't much different from what you saw above. Here is my version of the instructions
Step 1. Put wheel chocks behind the rear wheels and put the front end of the car up on jackstands. Get it high enough in the air that you will be comfortable working under it.
Step 2. Remove the heat shield screwed to the body over the driveshaft, that is under the transmission.
Step 3 (could be done before steps 1 and 2, does not matter). Remove the plastic piece in the console that has the leather shift boot in it. Remove the 2 piece rubber shift boots. Then remove the bolted down plate that holds the shifter stick in. Remove shifter stick. Remove the entire console from the car. Remove the 4 bolts holding the metal ring that retains the final lower boot that seals the pass compartment from the outside above the trans and remove that boot.
Step 4. Remove the single nut that holds the trans center stud mount to the cross member
Step 5. Put a hefty (3+ ton) floor jack under the transmission and jack it up until it hits the floor pan.
Step 6. Put a small piece of 2x4 under the rear of the plastic surrounding the shifter hole.
Step 7. Push the shift selector into 3rd gear
Step 8. Remove the 5/reverse lockout mechanism (plate on the drivers side bottom of the tail housing held on w/ 2 bolts) and remove the nut from the back of the tail housing that has a spring and check ball in it
Step 9. Use an appropriately size pin punch to drive the roll pin out of the shift selector. Do not use a nail or something improvised, you need a real pin punch. The piece of 2x4 you put under the rear of the plastic surround will allow you to insert the pin punch straight at the roll pin, in between the plastic dash surround and the floor pan.
Step 10. Using a small pry bar, manipulate the selector block to a 45 degree angle and it will just barely roll out of the case.
Step 11. install the spring as shown in my pics above.
Step 12+ installation is the reverse of disassembly
Total time about 3 hours if you take your time and clean everything.
Last edited by bondospecial; Nov 25, 2009 at 11:03 AM.
On the fasttrack!
iTrader: (22)
Joined: Oct 2006
Posts: 2,494
Likes: 2
From: virginia beach, virginia
according to the FSM, the fastest way is to do it while the tranny is out of the car. all you have to take off is the extension housing and 4 bolts. you can do it in 30 minutes if you do it properly.
WHILE THE TRANNY IS OUT
1) drain tranny
2) remove 4 bolts extension housings
3) remove blind cover (4 bolts)
4) knock out roll pin (use pin punch)
5) rock the inner shift lever downward
6) rock the extension housing upwards
at this point, you should be able to slide the extension housing outward enough to remove the inner shift lever off of the shaft
at this point, align the shift spring on the inner shift lever, then simply install in reverse order. ALWAYS replace the roll pin, as well as any gaskets or sealing areas
its VERY difficult to replace while in the car. i would not recommend it unless its your only option.
always be sure to fill the tranny and check the level. dont just assume that the level is good. replace the fluid with proper weight gear oil.
Lloyd
Thread Starter
Full Member
Joined: Oct 2009
Posts: 106
Likes: 2
From: Southern Md
I must be super smart? I really didn't find this to be that big of a deal in the car, thanks to the info the guys gave me earlier in the thread about removing the 5/reverse lockout mechanism. The hardest part was getting the selector block out, there was barely enough room with the transmission shift shaft pushed as far into a gear as it would go, but if I turned the block to a 45 degree angle after the pin was out it did pop out and then back in. I got a nice set of hardened, Made in USA pin punches at Lowe's for about $25. Having a properly sized pin punch made driving the roll pin straight through easy. It doesn't seem like there is enough room to drive the roll pin straight through but there is.
Last edited by bondospecial; Nov 27, 2009 at 07:30 PM.