
Removing dash, easy?


Thread Starter
Senior Member
Joined: Feb 2009
Posts: 290
Likes: 1
From: Victoria B.C.
My friend did it in his parts car, but didn't car about the condition of the dash, i know there is ~6 bolt or something holding it down (that's after all the things are taken off it)
Just curious if anyone has any tips on taking it off without damaging it (front vents, triangle vents etc...) or should I just I just go read the FSM : /
Cheers
Just curious if anyone has any tips on taking it off without damaging it (front vents, triangle vents etc...) or should I just I just go read the FSM : /
Cheers

The FSM has some halfway decent info, but mostly, just take your time. The defroster vents by the windshield are likely to crumble when you try to remove them, so expect to replace those. The triangle defroster vents may also break. The front panel by the windshield has to come out before the logicon can be removed, as its harness snakes up to a connector there.
If I remember correctly, it's more than six bolts, but I'm pretty sure 10 or less. A quick glance in the garage makes it look like there are nine bolts. Two on either side of the center behind two removable triangles. Two on each side and three on top.
If I remember correctly, it's more than six bolts, but I'm pretty sure 10 or less. A quick glance in the garage makes it look like there are nine bolts. Two on either side of the center behind two removable triangles. Two on each side and three on top.


Joined: Dec 2006
Posts: 2,859
Likes: 13
From: Sterling Heights, MI
It was easier than I thought it would be. It's not particularly hard, just tedious (unplugging lots of stuff, bolts in hard-to-reach areas, etc). This thread, combined with the dash diagram in the FSM, was a very big help.
there was someone on here who said he could do it in under 20 minutes, the trick is to take it easy so the plastics dont break, while its out I would take a good look at all the mounting points to see if I could make them stronger with some thickened epoxy or even structural urethane
Joined: Sep 2005
Posts: 25,581
Likes: 136
From: Smiths Falls.(near Ottawa!.Mapquest IT!)
10 bolts and a half hour,I was getting good at this!
Pop the middle plastic square piece between the dash vents and there is a 1/4 inch headed screw.
2 bolts on each side,two on the end of the center,2 on each side of the center console.Undo the column.
speedo cluster and center surround,shifter console goes.to make it easier,push the seats all the way back.
Trending Topics

What I found to be the two biggest pain the asses about dash removal is the logicon plug at the firewall and removing the shifter so it doesnt find me as bad since I dont have help(1 man it).

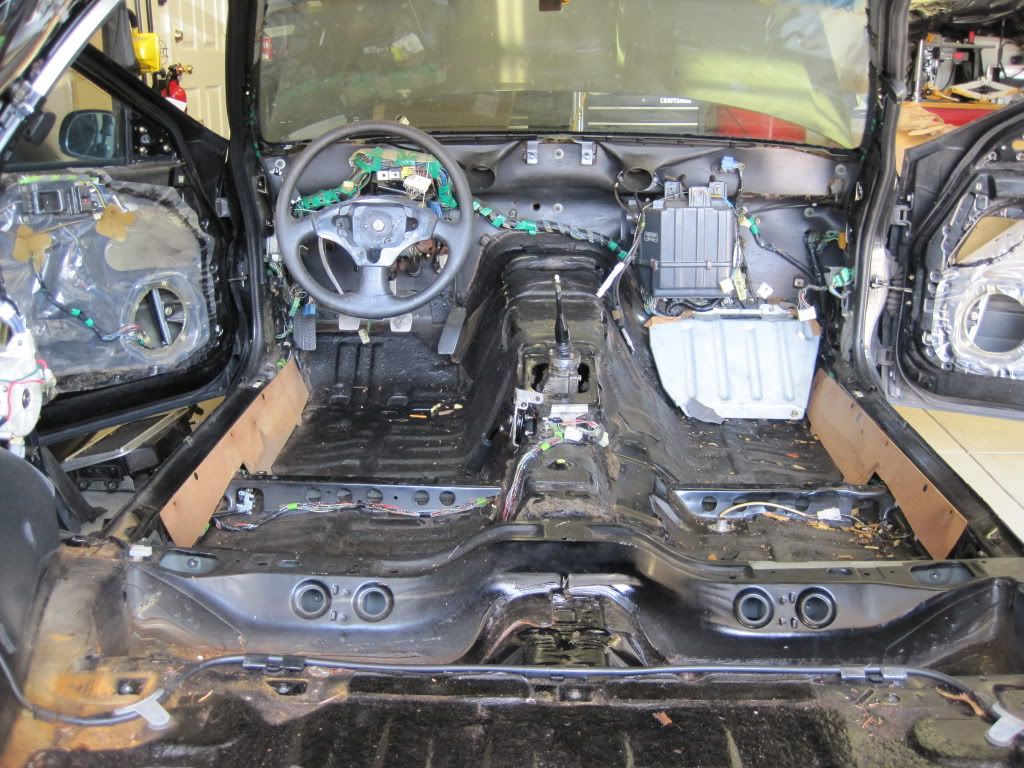
Thanks guys! ^_^ [I'm trying to put an S5 interior together despite having never removed a dashboard -- my project car was stripped to the frame/painted/dynamat'ed.. I'm trying to figure out exactly how all the wiring/climate boxes should be just before the dash goes on]

Thread
Thread Starter
Forum
Replies
Last Post
Jeff20B
1st Generation Specific (1979-1985)
73
Sep 16, 2018 07:16 PM