
Rebuilding Oil Metering Pump, need help.

Thread Starter
Boost ahoy!
Joined: Jan 2006
Posts: 968
Likes: 0
From: Joplin, MO
Rebuilding Oil Metering Pump, need help.
I've been trying to fix my oil leak from my Oil Metering Pump for a while now, and found a write up on where the seals are that need to be replaced. Well, I got it all apart, found the seals, and am currently waiting on them, but the only problem I have is I can't put it back together!! I've got some pieces down on how to put them back in, but I can't quite figure out the order, certain parts. I've been using this picture to try to figure it out...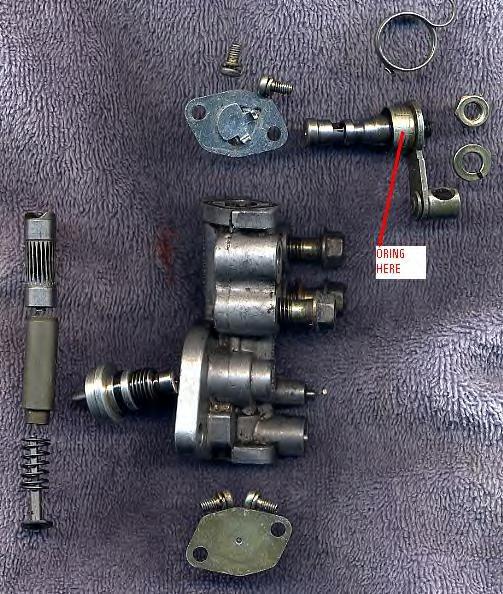
But it just isn't working, apparently. If anybody has a good write up on how to put it all back together or anything, I'd appreciate it. The only thing the right up really said was what to replace, not how/what to take off, and putting back together. It did say "remember where things went" but I've had this thing apart for a week, and there is no way in hell I could remember that \=.
But it just isn't working, apparently. If anybody has a good write up on how to put it all back together or anything, I'd appreciate it. The only thing the right up really said was what to replace, not how/what to take off, and putting back together. It did say "remember where things went" but I've had this thing apart for a week, and there is no way in hell I could remember that \=.
Thread Starter
Boost ahoy!
Joined: Jan 2006
Posts: 968
Likes: 0
From: Joplin, MO
Originally Posted by kungfuroy
you took the whole thing apart like in that photo?

Thread Starter
Boost ahoy!
Joined: Jan 2006
Posts: 968
Likes: 0
From: Joplin, MO
Originally Posted by theory

HAILERS
Joined: May 2001
Posts: 20,563
Likes: 27
From: FORT WORTH, TEXAS,USA
1.Put the lever assy into the body first. I assume you know to put the o'ring on the shat and can figure out how to put the spring on right.
2. Then install the guts in the order you have it in your picture.
3.Put the forward endplate on.
4. Then install the drive gear.
5. Then the aft end cap.
Fwd and aft refer to body of the omp when installed on the engine. The lever end is the aft end.
2. Then install the guts in the order you have it in your picture.
3.Put the forward endplate on.
4. Then install the drive gear.
5. Then the aft end cap.
Fwd and aft refer to body of the omp when installed on the engine. The lever end is the aft end.
Trending Topics
Thread Starter
Boost ahoy!
Joined: Jan 2006
Posts: 968
Likes: 0
From: Joplin, MO
Well, that diagram helps a bit. Now that spring has me baffled for some reason. I tried putting that bad together, but I can't figure it out. maybe I'll have to take my OTHER one off and look at it and see how that's on there.....oh boy. lol.
Thread Starter
Boost ahoy!
Joined: Jan 2006
Posts: 968
Likes: 0
From: Joplin, MO
Well, I got it all together, luckily. Gotta use RTV on the seal that would attach to the block. I'm guessing putting some oil in the unit before attaching it is good...so things move smooth?
And for the RTV, I'm sure it's obvious, but we don't want any getting into the engine, right?
And for the RTV, I'm sure it's obvious, but we don't want any getting into the engine, right?
HAILERS
Joined: May 2001
Posts: 20,563
Likes: 27
From: FORT WORTH, TEXAS,USA
About the spring. What I do is put the lever all the way in. Then pull it out enough so the lever can be rotater clockwise and still clear the stop pin. Once wound up you press the lever back in the body. The spring has a tendency to get under that *cover* that is over the o'ring and I use a scribe/whatever is handy to pull the spring out from under that cover.
Hard to explain. Sorta gotta be there to understand.
Hard to explain. Sorta gotta be there to understand.

Strength and Honor
Joined: Apr 2006
Posts: 391
Likes: 0
From: CA bay area
Gentlemen, mind if I update kungfuroy's write-up with this bit of collaborative info (CyberPitz's photo and HAILER's insight)? It seems like information that should be in one place.
Thread Starter
Boost ahoy!
Joined: Jan 2006
Posts: 968
Likes: 0
From: Joplin, MO
I was thinking about making a write up that actually included what pieces you are to take out, and where the seals go, and putting it back together...
So Steve, if you want to do it, hoorah go for it.
So Steve, if you want to do it, hoorah go for it.
Strength and Honor
Joined: Apr 2006
Posts: 391
Likes: 0
From: CA bay area
Originally Posted by CyberPitz
I was thinking about making a write up that actually included what pieces you are to take out, and where the seals go, and putting it back together...
So Steve, if you want to do it, hoorah go for it.
So Steve, if you want to do it, hoorah go for it.
http://howto.globalvicinity.com/gv_w...=186&co=1&vi=1
I figure it's better to have one article the community can focus on rather than multiple parallel articles that each differ slightly and clutter searches. So, please modify the article and make it better! That way the library can be as helpful to the community as possible.
I'll add the ability to see a list of who's contributed to an article, not just who originally authored it, since significant improvements can be made by others, and their contributions shouldn't go unnoticed. In the meantime, I have a manual link back here giving you and HAILERS credit.
Strength and Honor
Joined: Apr 2006
Posts: 391
Likes: 0
From: CA bay area
Starting now, if anyone modifies an article on the GV site, their name gets added to that article's contributor list.
edit: Since anyone can improve any article, this makes sense: if I improve someone else's article, I want credit, and if I author an article, I want people to know the work isn't just mine once someone gets their grubby hands on it.
Yup.
edit: Since anyone can improve any article, this makes sense: if I improve someone else's article, I want credit, and if I author an article, I want people to know the work isn't just mine once someone gets their grubby hands on it.
Yup.
Last edited by stevej88na; Apr 25, 2007 at 08:14 PM.

Thread
Thread Starter
Forum
Replies
Last Post
LunchboxSA22
2nd Generation Specific (1986-1992)
37
Oct 26, 2015 10:53 AM