
Power Window Switch Write Up

Thread Starter
Epilepsy
Joined: Apr 2006
Posts: 675
Likes: 1
From: ..
Power Window Switch Write Up
Alright, if your power windows 'stick', aka only move when they want to this is the fix for you. Does your passenger window only move from the driver side? This is the fix for you. Does your window 'jutter/skip' while rolling down? This isn't for you.
Alright, this topic has been beaten to death, however there's so many people asking how to do _____ part of this, I took the time to document the whole process while cleaning my switches.
Before we begin, I'm also going to mention that I'm not a photographer, and nor is my iPhone.
Step 1: Understanding the Electrical System
Wiring Diagram:
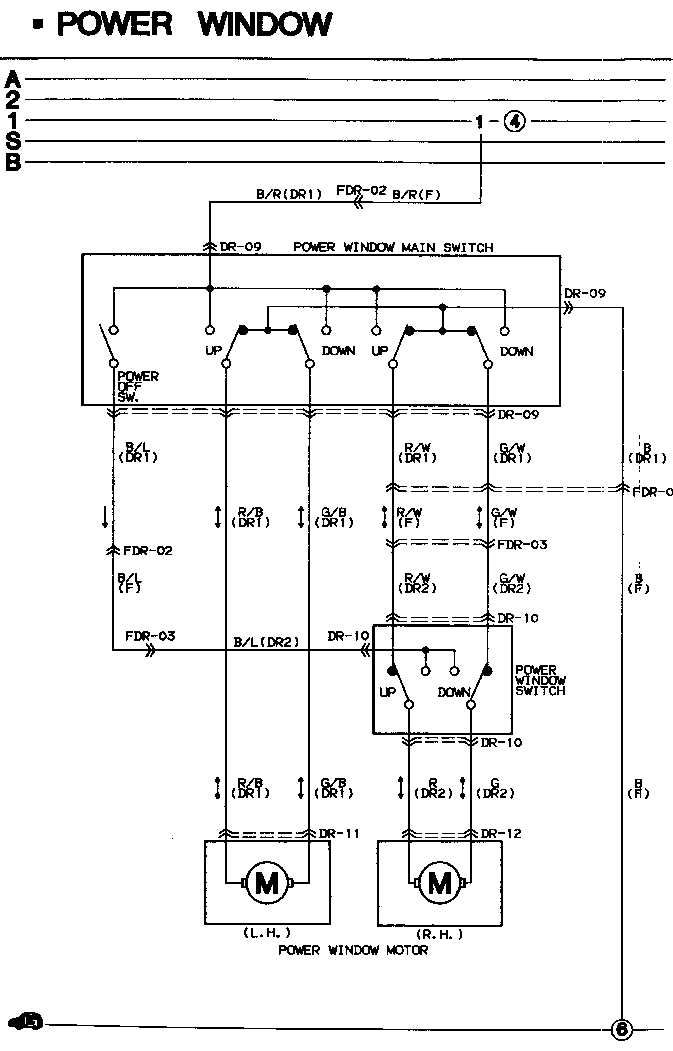
Power is fed in from the main harness, fed into the driver's side switch. The driver's switch THEN supplies power to the passenger side switch (THE PASSENGER SWITCH'S POWER IS DEPENDENT ON THE DRIVER'S SIDE PASSENGER SWITCH OR THE ON/OFF SWITCH). Then the switches feed the motor directly. The diagram above explains this better then what I can type.
Step 2: Removing the Switch and Door Panel

There are 9 screws in your door, 4 in the armrest, 3 along the bottom carpet (far left, middle, far right), 1 at the top left (obvious), and one in the door pull cup (painfully obvious). All of these must be removed to take the panel off. Once these are removed, remove the door pull cup, then lightly pry along the corners and bottom to 'un-clip' the clips holding the door on. Once done, lightly pull the door panel straight up.
OPTIONAL
You can removed the power window switch ahead of time using something thin, perhaps a knife, to pry up against the window switch and door panel. Doing this will result in bending the metal clips that hold the switch into the door, don't worry as these can be bent back to normal easily. (this is what I did prior to removing the door panel)
Picture of switch removed with the door panel still mounted:

Step 3: Unplug the Power Window Switch and the Door Access Light

Pretty self explanatory, unplug both clips (one in the middle, and the black coloured one to the far right). Note, you will not have the wire the the far left, as that feeds my Tweeter.
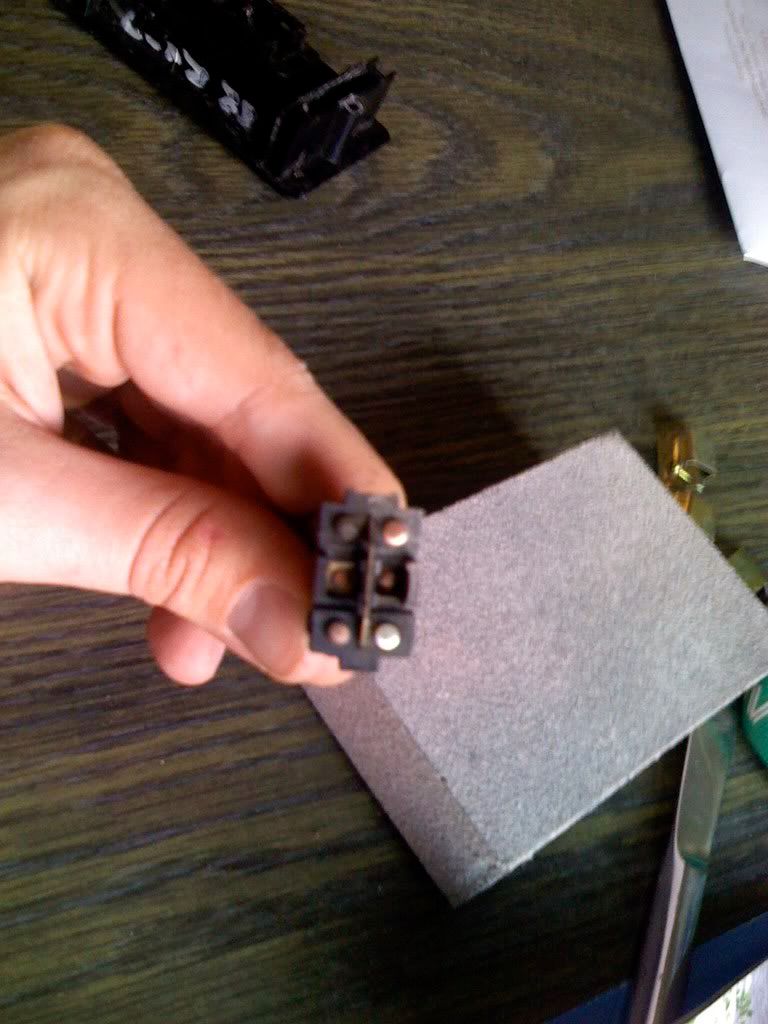
Step 4: Disassembling the Switch

Note, the passenger switch is 'snapped' together, you must stick something thin between the side wall as well as the trigger mounts (Note, the driver's side switch is screwed together - same 2 screws that hole the metal clips on). Better illustrated in this picture:

This is an S4 passenger switch disassembled, S5's will be slightly different, but the same principle applies.
Step 5: Cleaning the Switch Contacts

These are the contacts that you will be cleaning (as well as the copper bridges). As you can see, my contacts were BLACK, meaning they needed cleaning badly. There's 6 contacts that will need to be cleaned, 4 on the outside edges, and 2 recessed inside the mount.
One Side cleaned, one side dirty:
One of the bridges being cleaned:

Step 6: Re-assembly

Place bridges back on contact mount (they only go in one way), then snap switch back together with the mount (only goes in one way). Simple as that.
Step 7: Re-Mounting and Assembly
Simply push the switch back into the opening, where upon it will reseat itself and snap into place, then clip the harness back together and snap/screw the door back on.
There you have it, you're done!
Note - door panel screws are the same for S4 door panels (S5 door panel pictured), and I AM NOT RESPONSIBLE FOR YOUR F*CK UPS, THAT IS YOUR OWN FAULT. FOLLOW THIS WRITE-UP AT YOU'RE OWN RISK.
Now, lets get this stickied, or FAQ'd.
Cheers.
Alright, this topic has been beaten to death, however there's so many people asking how to do _____ part of this, I took the time to document the whole process while cleaning my switches.
Before we begin, I'm also going to mention that I'm not a photographer, and nor is my iPhone.
Step 1: Understanding the Electrical System
Wiring Diagram:
Power is fed in from the main harness, fed into the driver's side switch. The driver's switch THEN supplies power to the passenger side switch (THE PASSENGER SWITCH'S POWER IS DEPENDENT ON THE DRIVER'S SIDE PASSENGER SWITCH OR THE ON/OFF SWITCH). Then the switches feed the motor directly. The diagram above explains this better then what I can type.
Step 2: Removing the Switch and Door Panel
There are 9 screws in your door, 4 in the armrest, 3 along the bottom carpet (far left, middle, far right), 1 at the top left (obvious), and one in the door pull cup (painfully obvious). All of these must be removed to take the panel off. Once these are removed, remove the door pull cup, then lightly pry along the corners and bottom to 'un-clip' the clips holding the door on. Once done, lightly pull the door panel straight up.
OPTIONAL
You can removed the power window switch ahead of time using something thin, perhaps a knife, to pry up against the window switch and door panel. Doing this will result in bending the metal clips that hold the switch into the door, don't worry as these can be bent back to normal easily. (this is what I did prior to removing the door panel)
Picture of switch removed with the door panel still mounted:
Step 3: Unplug the Power Window Switch and the Door Access Light
Pretty self explanatory, unplug both clips (one in the middle, and the black coloured one to the far right). Note, you will not have the wire the the far left, as that feeds my Tweeter.
Step 4: Disassembling the Switch
Note, the passenger switch is 'snapped' together, you must stick something thin between the side wall as well as the trigger mounts (Note, the driver's side switch is screwed together - same 2 screws that hole the metal clips on). Better illustrated in this picture:
This is an S4 passenger switch disassembled, S5's will be slightly different, but the same principle applies.
Step 5: Cleaning the Switch Contacts
These are the contacts that you will be cleaning (as well as the copper bridges). As you can see, my contacts were BLACK, meaning they needed cleaning badly. There's 6 contacts that will need to be cleaned, 4 on the outside edges, and 2 recessed inside the mount.
One Side cleaned, one side dirty:
One of the bridges being cleaned:
Step 6: Re-assembly
Place bridges back on contact mount (they only go in one way), then snap switch back together with the mount (only goes in one way). Simple as that.
Step 7: Re-Mounting and Assembly
Simply push the switch back into the opening, where upon it will reseat itself and snap into place, then clip the harness back together and snap/screw the door back on.
There you have it, you're done!
Note - door panel screws are the same for S4 door panels (S5 door panel pictured), and I AM NOT RESPONSIBLE FOR YOUR F*CK UPS, THAT IS YOUR OWN FAULT. FOLLOW THIS WRITE-UP AT YOU'RE OWN RISK.
Now, lets get this stickied, or FAQ'd.
Cheers.
Thread Starter
Epilepsy
Joined: Apr 2006
Posts: 675
Likes: 1
From: ..
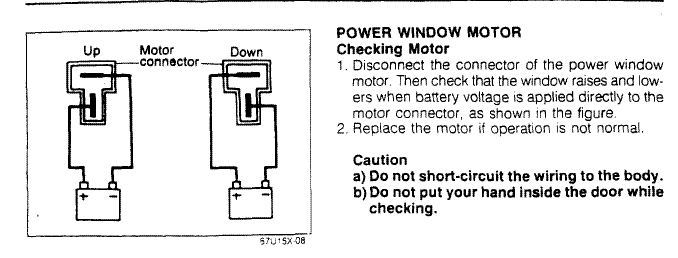
Step 8 (OPTIONAL): Testing the Power Window motor
The power window motor can be tested with a 12 volt battery from a cordless drill, simply attach one wire to each contact to each side of the battery then touch it to the motor's harness contacts. The power window motor works on polarity (I think, correct me if I'm using the wrong term here), if the motor doesn't move, swap the wire contacts and that'll move the window. This is the clip that powers the window motor.

The clip on the left (exposed metal prongs) is where the wires running off of the 12 volt battery will make contact. If the window doesn't move, reverse which wires are touching which contact.
The power window motor can be tested with a 12 volt battery from a cordless drill, simply attach one wire to each contact to each side of the battery then touch it to the motor's harness contacts. The power window motor works on polarity (I think, correct me if I'm using the wrong term here), if the motor doesn't move, swap the wire contacts and that'll move the window. This is the clip that powers the window motor.
The clip on the left (exposed metal prongs) is where the wires running off of the 12 volt battery will make contact. If the window doesn't move, reverse which wires are touching which contact.
highly technical flavor
Joined: Mar 2008
Posts: 40
Likes: 0
From: Novato, CA
awesome write-up. contact cleaning and they started working immediately. after a few days, more weird intermittent problems such as:
1.) passenger has no control over window going down (only up) no matter which position the drivers power control switch is in.
2.) drivers side window will only go down, never up (and only when it wants to)
3.) driver has complete control over passenger side window (goes up & down on voice-command)
so i took out the switches and polished them to a high-gloss shine. when i put them back in it was almost exactly the same results except once in a while i can roll the drivers side window up...
but not tonight or last night. the window has been down for two days now and i dont live in the best neighborhood. theres a bar right down the street. i know how it is to be young and drunk.
so i guess ill pull the door panel off again (as opposed to popping out the switches with a flathead) and see about a twisted cable or insufficient power to the motor, yes?
my interior is taking a beating from all this problem solving.
Excellent writeup. For step 8, you are correct: it is polarity. This should help:
The switch burns out easily because the current powering the motors go through the switch itself, rather than through relays that can handle the current.
After burning out my switch for the nth time, I came across this post in another thread and wired in a 530T module. Hasn't burned out since.
The switch burns out easily because the current powering the motors go through the switch itself, rather than through relays that can handle the current.
After burning out my switch for the nth time, I came across this post in another thread and wired in a 530T module. Hasn't burned out since.


Trending Topics


So sorry to bump this, but I was just cleaning these off myself, and discovered a little thing! Mostly due to stupidity, but still.
The passenger side switch, when you pop it out, can pop back in in either direction. And if you happen to pop it in backwards- The passenger side window will go down from either switch, and then not go back up, from either switch.
This was very confusing to say the least until I figured out where I had gone wrong!
Just a little tidbit in case it happens or happened to anyone else!
