
Pinion Snubber & Diff Mount Replacement (Convertible)

Thread Starter
Joined: Mar 2008
Posts: 8,718
Likes: 6
From: San Diego, CA
Pinion Snubber & Diff Mount Replacement (Convertible)
My front diff mount finally gave out last week, so I got to take on the task of replacing it. I picked up the competition mount sold by Mazdatrix for $84, and while I was at it, I also bought a $10 pair of energy suspension bump stops (http://www.summitracing.com/parts/ENS-4-6104G). One of the bump stops would be used as a pinion snubber, as suggested by others in some of the threads I sifted through. This is the run down on taking care of both at the same time.
EDIT: It looks like the PN on Summit's site has changed to this: http://www.summitracing.com/parts/ENS-9-9101G/
1) Remove Y-pipe or entire cat-back system
2) Remove bolt/nut from rear link
3) Remove 21mm nuts (2) from subframe mounts & pry subframe down for clearance
4) Remove all five 17mm nuts from the front diff mount (these can be VERY tight)
5) Place jack under subframe for support
6) Remove one 17mm nut from rear diff mount & loosen nut on the other one (this allows the front of the diff to be rotated to the passenger-side, which will make taking the mount out very easy)
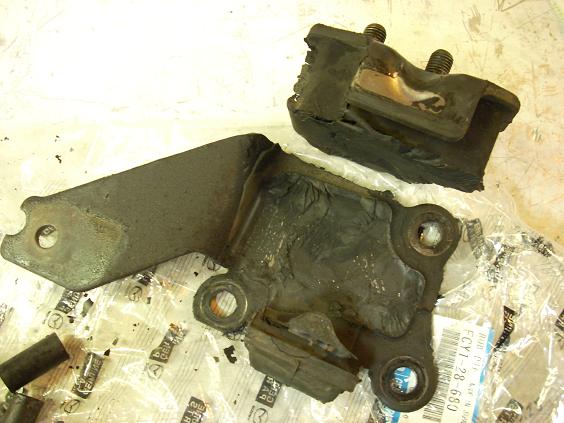
7) Replace front mount & tighten down the 5 nuts
8) Drill 3/8" hole at dimpled location (Yes, it is in the same spot as found on coupes)

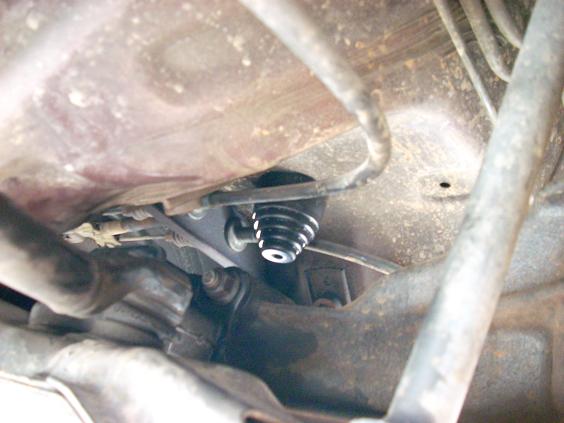
9) Place pinion snubber in position, shim with washers & tighten nut (A helper is needed to do this)
10) Guide subframe back up onto studs & jack it and the diff back up into position
11) Thread subframe & diff nuts back on
12) Bolt exhaust system back up
Something to note would be the fact that I left the driveshaft and heat shields in place, but I also had to be careful not to lower the subframe/diff too far. If I went too far, the driveshaft would have popped out of the transmission. I spent about 5 hours on this project, but a lot of that was devoted to trying to get the nuts off of the front diff mount. I think Mazda put loctite on them from the factory, and I was wishing I could use an impact gun down there. In the end, long ratchets and wrenches did the job. Anyone doing this project needs to give themselves a whole day to spend on it.
And the end result? No more clunk between shifts and on harsh throttle input!
EDIT: It looks like the PN on Summit's site has changed to this: http://www.summitracing.com/parts/ENS-9-9101G/
1) Remove Y-pipe or entire cat-back system
2) Remove bolt/nut from rear link
3) Remove 21mm nuts (2) from subframe mounts & pry subframe down for clearance
4) Remove all five 17mm nuts from the front diff mount (these can be VERY tight)
5) Place jack under subframe for support
6) Remove one 17mm nut from rear diff mount & loosen nut on the other one (this allows the front of the diff to be rotated to the passenger-side, which will make taking the mount out very easy)
7) Replace front mount & tighten down the 5 nuts
8) Drill 3/8" hole at dimpled location (Yes, it is in the same spot as found on coupes)
9) Place pinion snubber in position, shim with washers & tighten nut (A helper is needed to do this)
10) Guide subframe back up onto studs & jack it and the diff back up into position
11) Thread subframe & diff nuts back on
12) Bolt exhaust system back up
Something to note would be the fact that I left the driveshaft and heat shields in place, but I also had to be careful not to lower the subframe/diff too far. If I went too far, the driveshaft would have popped out of the transmission. I spent about 5 hours on this project, but a lot of that was devoted to trying to get the nuts off of the front diff mount. I think Mazda put loctite on them from the factory, and I was wishing I could use an impact gun down there. In the end, long ratchets and wrenches did the job. Anyone doing this project needs to give themselves a whole day to spend on it.
And the end result? No more clunk between shifts and on harsh throttle input!
Last edited by RotaryRocket88; Apr 15, 2011 at 10:07 AM. Reason: Added new PN
Nice writeup! How were the rear diff bushings? I had not replaced mine when I did the comp mount and snubber install a year ago, and eventually the mount sheared off the subframe. The bushings have since been replaced by MMR Delrins, and with a reinforced subframe bracket, I haven't had any problems since!


Thread Starter
Joined: Mar 2008
Posts: 8,718
Likes: 6
From: San Diego, CA
Nice writeup! How were the rear diff bushings? I had not replaced mine when I did the comp mount and snubber install a year ago, and eventually the mount sheared off the subframe. The bushings have since been replaced by MMR Delrins, and with a reinforced subframe bracket, I haven't had any problems since!
Yeah, I pried/lowered the subframe off of the front studs & loosened the rear diff mounts. The whole subframe/diff assembly was allowed to droop, and I kept it where I wanted it with a jack. It worked pretty well actually. The toughest part was working the subframe back onto the studs when I was done. The last picture I posted shows the gap between the snubber & diff before raising the subframe back up all the way.
Thread Starter
Joined: Mar 2008
Posts: 8,718
Likes: 6
From: San Diego, CA
Jack the subframe back up all the way and check for clearance between the diff and the snubber. Lower it down, then add washers as necessary. I actually have a small gap between the end of my snubber and the diff itself, so it's not preloaded. I was worried about excessive road noise and vibration if it was directly on it. Anyone with preloaded snubbers experience this? It would be fairly easy for me to go back and add washers to it.
I tried changing mines last month.
I did it the exact way you did. Though it was just me by myself doing it, and I am pretty big, fitting under the rear of the car was a tight squeeze lol. I tried Prying it out but damn thing wont drop far enough, even with both rear diff bolts out. So i just installed a pinion snubber where its just touching the diff by a hair. After I finished installing everything back, I remembered I forgot to take out the vertical rear link......I got mad real quick, and cooled back down just as quick and said **** it lol
I will probably try again later next month or during spring, but it has to be before autox starts up new again. I might just bring it to my brothers workplace and use his lift to do it.
Trending Topics
Thread Starter
Joined: Mar 2008
Posts: 8,718
Likes: 6
From: San Diego, CA
Forgetting to unhook the rear link will do that, hah. If you do it on a lift, be careful once all of the nuts are off or loosened. The whole thing will want to fall on your head, and you won't have the luxury of a hydraulic jack to hold it up. Of course it won't fall all the way since the rear shocks will still be bolted in.

just followed your directions and installed my mazdatrix comp mount.
What sucks is that i didnt even need a front diff mount.....and the one that was in there was a mazdatrix comp mount....though now i know i need the rear diff mounts now lol
worked t 11am finished everything at 2. just me alone in the street, in 30f degree weather....
What ever you do, get help! Would be much easier.
Thread Starter
Joined: Mar 2008
Posts: 8,718
Likes: 6
From: San Diego, CA
Were you getting a clunk in the rear end that lead you to believe you needed a new front mount? Doing it on the street in 30 degree whether doesn't sound fun, and yes, having a second person really helps. Especially when it comes to handing you tools so you don't have to get out from under the car 50 times.
Hmm. I am putting a turbo diff in for my LS1 swap. I am going to put the delrin rear mounts in and a new front mount with the snubber. My cousin has his clunking all the time and looks broken at the subframe. I put the bump stop in but need to shim it down much further.
Were you getting a clunk in the rear end that lead you to believe you needed a new front mount? Doing it on the street in 30 degree whether doesn't sound fun, and yes, having a second person really helps. Especially when it comes to handing you tools so you don't have to get out from under the car 50 times.
Or if I suddenly step on the clutch
I was installing my RB Rev TII exhaust and was thinking might as well install the front mount also since I failed last time. Took me 6 hours to complete everything....I didnt even eat yet, soooo hungry
Its not that hard, but its pretty time consuming. If you take your time, its a piece of cake.
Took the two bolts and link off the subframe and dropped it 2 inches below the studs where the subframe bolts to the body. Elevate with jack or jack stand.
I took the driver side nut off the rear mount, and the passenger side is only threaded on atleast 3-4 turns. Took a pry bar and start prying the subframe and diff to a point where you can pull out the mount or let it drop by itself.
I was prying and moving the mount at the same time.
Took me only 3 hours but I already knew what to do after my first failed attempt lol.
if you are doing it on the lift, then taking out the subframe is so much easier.

Junior Member
Joined: Jun 2006
Posts: 10
Likes: 0
From: atlanta
So how to tell which mount is needed. I have a vibration all the time between 40-60 and it gets worse while slowing down with the car in gear. Sorry about the newb question, but what is a pinion snubber? I just want to have everything ready when I go under the car.

The whole *** is going to get delrin'd out when i can afford it.
I want the parts back there to do their job, not be all lazy and quit on me.
It's definately NOT a bad investment for those of us wanting kickass suspension. Very easy on the wallet. Easier than replacing diff mounts OVER and OVER and OVER again and risking breaking where the mount bolts into the subframe.....
The snubber alone is worth every penny because it prevents just that.
Joined: May 2006
Posts: 3,881
Likes: 3
From: Jacksonville, Tampa & Tallahassee
For those who installed snubbers: did they come mounted to a bolt? I ordered the energy suspension bump stops that everyone keeps talking about but its literally just the stopper w/ no bolt included or attached.
What size should I get and how did you secure it to the bump stop?
What size should I get and how did you secure it to the bump stop?
http://www.energysuspensionparts.com...Shock-Eyes.asp
They make ALOT of bump stops. You should be using one that has a bolt attached to it.
They make ALOT of bump stops. You should be using one that has a bolt attached to it.
Joined: May 2006
Posts: 3,881
Likes: 3
From: Jacksonville, Tampa & Tallahassee
hmmmm.....so I'm guessing its part number 99101 from that page?
I ordered mine from summit based on the part# posted in a similar thread to this one :-/ . Oh well, w/ derilin rear mounts and comp fronts, I'll do this when I get around to it.
I ordered mine from summit based on the part# posted in a similar thread to this one :-/ . Oh well, w/ derilin rear mounts and comp fronts, I'll do this when I get around to it.