
Painting Engine Bay

Thread Starter
Winter sucks
Joined: Jan 2004
Posts: 3,083
Likes: 0
From: Newberg, Oregon
Painting Engine Bay
I'll be doing an engine swap in the next couple months, and I want to re-paint the engine black to a nice neutral color... or maybe use a rhinoliner type bedliner product...
My question is.. what paint to use.. those bed-liner products would be nice and durable, and good looking, but might chip/melt/burn with the heat of the rotary...
Any suggestions are appreciated.
My question is.. what paint to use.. those bed-liner products would be nice and durable, and good looking, but might chip/melt/burn with the heat of the rotary...
Any suggestions are appreciated.
If you search for Zbrown, he has a nice PPG OMNI 2 part primer in his bay that is extremely durable. It takes a pint and you can get it anywhere PPG paint is sold.
P.S. I plan on painting my bay with this stuff soon too.
P.S. I plan on painting my bay with this stuff soon too.
Not 100% but I believe this is it http://www.ppgcarpaint.com/products.php?ItemId=85
Those are the colors available. You also need the catalyst for it.
Those are the colors available. You also need the catalyst for it.

Joined: Oct 2003
Posts: 11,576
Likes: 27
From: Morristown, TN (east of Knoxville)
I'm no painter, but I've done a few bays myself. Almost anything will look better than faded, chipped, scratched original paint. I usually like to go back with the current body color, or gloss black. Those rubberized bedliners and undercoatings would look like ****, IMO. Just go with a gloss black and you won\t be disappointed.
The biggest deal is getting everything out of the way, keeping up with what bolt and clip goes where, etc. There is a LOT more little bullshit in the enginebay than you think. Even knowing a lot about what I am doing, and exactly where everything goes, it is a good 3 day process for me to paint a bay with no engine in the car. Of course you're gonna wanna do the underside of the hood, too.
You can forget sanding all those cracks and crevices, so I generally sandblast/sodablast the bay once it's stripped, then rinse it all off well, blow it out with compressed air, and go over it once more by hand with clean towels.
Here's some pics if what you're up against.
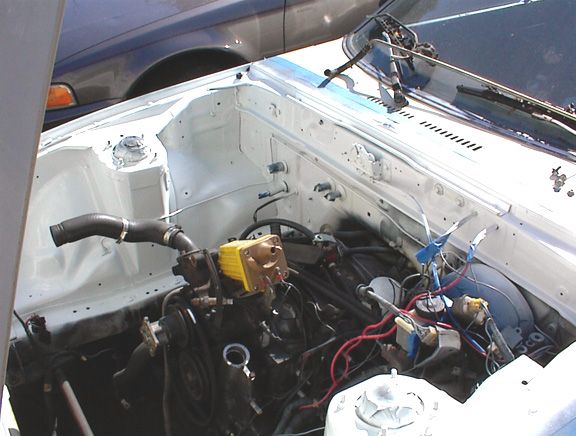
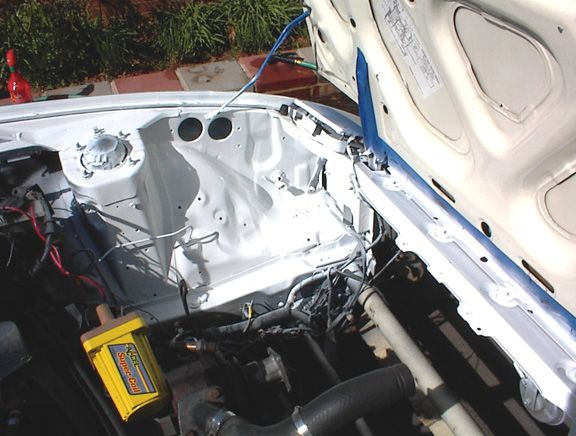
This was my turbo vert...when I got it from the DPO, it had flat black high temp engine paint all over the bay, which did not suit me. I sandblasted and then used a pint each (probably a little too much, enough for 3 coats each) of base and clear from the local paint shop for about 100 bucks. Note that I left some of the key plumbing in place to save time and keep from creating more work.


The biggest deal is getting everything out of the way, keeping up with what bolt and clip goes where, etc. There is a LOT more little bullshit in the enginebay than you think. Even knowing a lot about what I am doing, and exactly where everything goes, it is a good 3 day process for me to paint a bay with no engine in the car. Of course you're gonna wanna do the underside of the hood, too.
You can forget sanding all those cracks and crevices, so I generally sandblast/sodablast the bay once it's stripped, then rinse it all off well, blow it out with compressed air, and go over it once more by hand with clean towels.
Here's some pics if what you're up against.
This was my turbo vert...when I got it from the DPO, it had flat black high temp engine paint all over the bay, which did not suit me. I sandblasted and then used a pint each (probably a little too much, enough for 3 coats each) of base and clear from the local paint shop for about 100 bucks. Note that I left some of the key plumbing in place to save time and keep from creating more work.
Joined: Oct 2003
Posts: 11,576
Likes: 27
From: Morristown, TN (east of Knoxville)
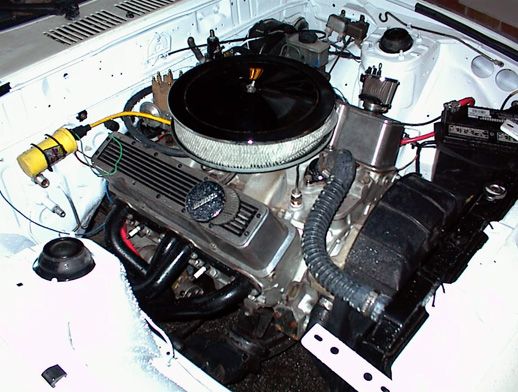
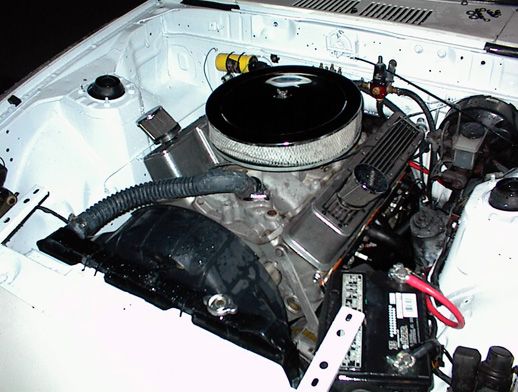
Here was my FD, with faded stock silver paint that didnt match new stock OR new aftermarket paint that I went with. Same procedure on this one except I used wal mart rattle can black with wal mart rattle can clear. Results were still great. Since I was going black this time, I wasnt as picky about what all to remove, since black on blackwires/boots/etc really doesnt look bad. I also went with a primer (walmart spraycan) since I didnt want the paint to be likely to peel off due to heat, and I knew I'd be working on it a lot so I wanted the paint to be more resistant to chipping.


Trending Topics
Thread Starter
Winter sucks
Joined: Jan 2004
Posts: 3,083
Likes: 0
From: Newberg, Oregon
That looks really good! So yeah.. bedliner is out of the question now... I thought about it and it would probably collect more dirt/crap than anything else. I'll be doing gloss black. The car is White Crystal right now.. but I'll be getting it painted black. So.. my MAIN concern is that I get to the areas that they won't paint when I get the car done. And hell, it doesn't even have to look SUPER professional.. long as its black and will last long enough to my next rebuild. 
My question is.... I don't have access to a soda/sand blaster (I probably could if 100% neccesary)... however, how possible would it be to paint over the existing paint? I know its kinda ghetto, but... do I care? only a little.
Thanks for the advice!
My question is.... I don't have access to a soda/sand blaster (I probably could if 100% neccesary)... however, how possible would it be to paint over the existing paint? I know its kinda ghetto, but... do I care? only a little.
Thanks for the advice!
Joined: Oct 2003
Posts: 11,576
Likes: 27
From: Morristown, TN (east of Knoxville)
IF you can't blast, the next best thing would be a generous spray down/soak down in greased lightning, followed by a pressure wash, and a wipe down by hand. Be sure it is nice and dry before painting, obviously.
Joined: Oct 2003
Posts: 11,576
Likes: 27
From: Morristown, TN (east of Knoxville)
Just go with regular old paint like you'd use anywhere else. The high temp engine paints tend to not look nealry as good, in addition to being very thick and running easily. Trust me, I use them daily on painting rebuild blocks. Theyre fine for engines and even engine parts, but not for body panels.
No reason to remove the fenders, headlights, etc...simply mask them off. Takes 3 minutes. Besides, you want to paint up to and including the inner fender lips, because usually that paint is in rough condition. Start masking right where the hood meets the fender.
No reason to remove the fenders, headlights, etc...simply mask them off. Takes 3 minutes. Besides, you want to paint up to and including the inner fender lips, because usually that paint is in rough condition. Start masking right where the hood meets the fender.
Thread Starter
Winter sucks
Joined: Jan 2004
Posts: 3,083
Likes: 0
From: Newberg, Oregon
Well, I'm not worried about that section of paint.. I'll be getting a paint job soon.. they SHOULD remove the fenders to paint them.... if they don't... its smackdown time.
Rotary Apprentice
Joined: Jan 2005
Posts: 2,181
Likes: 0
From: USA
i painted mine with the famous roll on rustoleum paint that people have been painting the outside of their cars with recently. I just brushed the **** on and it came out shiny & thick with a nice texture and its super durable. It doesnt look like it was brushed on at all either, its smooth vurry sexy. in addition, if anything gets scratched i can just dab some more paint on. It was super easy to do because i could paint around everything.

Rotary Apprentice
Joined: Jan 2005
Posts: 2,181
Likes: 0
From: USA
Originally Posted by micaheli
What kind of prep-work did you do?
Banned. I got OWNED!!!
Joined: Jun 2006
Posts: 698
Likes: 0
From: South East
i always use Rustoleum brand rattle can paint for my engine bays... altho the cheap walmart stuff works very well too! i just really like how the rustoleum paint levels off. everything ends up insanely smooth and glossy. here's a couple pics of my old V8 FB engine bay i did. i just degreased the hell out of the bay and lightly sanded some rough spots then layed on 3 coats of rustoleum glossy white from rattle can. it STILL looks this bright after some serious abuse!!!! even around the headers the paint hasn't flaked, peeled, or even faded. also, up until i sold it i degreased the engine bay every weekend and it took it like a champ
i just really like how the rustoleum paint levels off. everything ends up insanely smooth and glossy. here's a couple pics of my old V8 FB engine bay i did. i just degreased the hell out of the bay and lightly sanded some rough spots then layed on 3 coats of rustoleum glossy white from rattle can. it STILL looks this bright after some serious abuse!!!! even around the headers the paint hasn't flaked, peeled, or even faded. also, up until i sold it i degreased the engine bay every weekend and it took it like a champ
here's some of my work
i also rattle canned my engine bay while engine was out. first cleaned the living crap out of it for two days(power washer helps tremendously for fluid leaks and grime). then scuffed paint with scotch brite pad and sand paper. layed three coats of home depot's finest auto grade primer. two coats of textured flat black and three coats of clear. at first i wanted just the flat look but oils from my fingers were getting into paint. the un cleared paint also scratched very easily so i laid some clear for protection, but not to much to look glossy like wet. i also used POR15 for front subframe cuz its crazy durable and if anything spilled it would be on the subframe.taking off fenders also makes it easier to paint without getting overspray everywhere, and it wraps underneath for a more finished look. getting in the nooks was the hardest part like under the brake booster. i didn't have any pics of progress but here's the finished product. definitely worth the trouble.
Thread Starter
Winter sucks
Joined: Jan 2004
Posts: 3,083
Likes: 0
From: Newberg, Oregon
I'll actually be swapping out the entire brake system most likely as I'll be doing a 4-pot break conversion while I'm doing this... Just have to find out if the booster/MC/proportioning valve is different between 91 NA w/4-pot and 91 NA w/single pot.
Thread Starter
Winter sucks
Joined: Jan 2004
Posts: 3,083
Likes: 0
From: Newberg, Oregon
And now that I think about it... I'll have the radiator out, brake system, steering column (converting to tilt.. for giggles) and transmission....... The only thing that'll be left in the engine bay is the A/C components.... I sure hope thats easy enough to get out of the way.

Thread
Thread Starter
Forum
Replies
Last Post
immanuel__7
2nd Generation Specific (1986-1992)
89
Sep 5, 2015 10:23 AM