
Is our motor toast? Compression Check :|


Thread Starter
Full Member
Joined: Dec 2008
Posts: 97
Likes: 0
From: Hamilton
Is our motor toast? Compression Check :|
13B S4 N/A
Motor was semi-warm when we did the test, we had it idling like 30min before we did the test, then when we got around to do the compression check it had cooled down a bit, when we removed the compression tester from each spark plug hole it was pretty hot to touch.
When we did these tests We did not hold down the throttle or clutch(Far as I know).
I should maybe preface this by saying this car has been sitting for 7 years :S
Front Housing
Blew 120 compression, holding down the button so it doesn't build compression it shows about 90 for each lobe
Rear Housing
Blew 90 compression, holding down the button so it doesn't build compression it shows about 60-70 for each lobe
Joined: Sep 2005
Posts: 25,581
Likes: 136
From: Smiths Falls.(near Ottawa!.Mapquest IT!)
The rear is not exactly "excellent" but it is runnable.
The front is real good.
If the car was driven daily it would last for a while...not saying how long though.
The front is real good.
If the car was driven daily it would last for a while...not saying how long though.
the engine may run but it does need to be rebuilt.
60 and 90 is not within spec by a longshot, the rear rotor is having issues.
a healthy engine should be pushing 100-120psi on every single pulse, 90 marginal and below 85 on any face is too low. it may carry you from point A to point B but if you push it too hard it may just let go at any time.
60 and 90 is not within spec by a longshot, the rear rotor is having issues.
a healthy engine should be pushing 100-120psi on every single pulse, 90 marginal and below 85 on any face is too low. it may carry you from point A to point B but if you push it too hard it may just let go at any time.
Last edited by RotaryEvolution; Aug 12, 2013 at 12:39 PM.
as said for a million times, start and stall issues are almost always(i'd guess 90% of the time) related to vacuum leaks. about 5% are due to failing airflow meters and another 5% due to failing fuel pumps or faulty fuel hose routing. but there is a million variables, i would start with those and work your way to the less common.
Last edited by RotaryEvolution; Aug 12, 2013 at 08:16 PM.
That's definitely a vacuum leak; It's surging like mad. Then again, look at the rest of the issues!
EDIT:
This video makes me happy though. Friends gathered around, working on car(s). I haven't done that in ages
EDIT:
This video makes me happy though. Friends gathered around, working on car(s). I haven't done that in ages
Trending Topics


thats interesting you can hold the throttle wide open and it doesnt change....very weird.
check grounds. get a can of carb cleaner and check for vacuum leaks, make sure timing is set right. make sure all 4 plugs are sparking. those are a good place to start.
check grounds. get a can of carb cleaner and check for vacuum leaks, make sure timing is set right. make sure all 4 plugs are sparking. those are a good place to start.


Junior Member
Joined: Sep 2009
Posts: 26
Likes: 0
From: Alabama
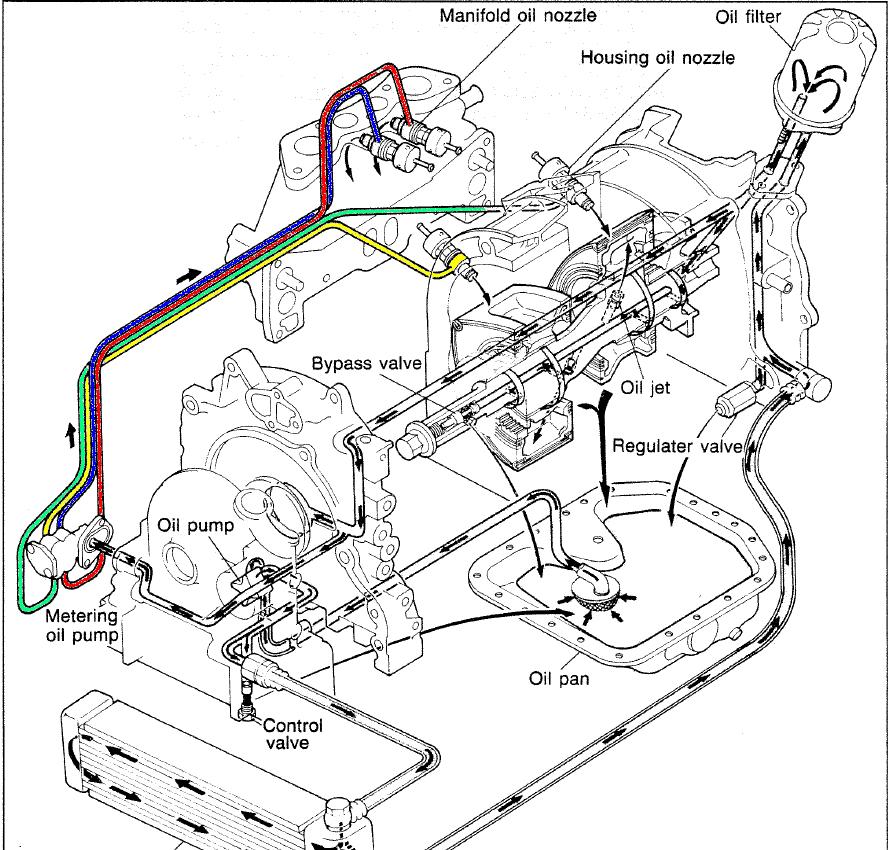
Did anyone else notice the OMP arm not move with the throttle?
I have spent hours chasing vacuum leaks. Its amazing how little of a leak will destroy dirveability of a rotary. as suggested before hold it a little off idle and soak it down with some brake clean, once you hit the spot of a leak she will smooth out or bog down like its trying to flood pending on how big the leak.
I have spent hours chasing vacuum leaks. Its amazing how little of a leak will destroy dirveability of a rotary. as suggested before hold it a little off idle and soak it down with some brake clean, once you hit the spot of a leak she will smooth out or bog down like its trying to flood pending on how big the leak.
Thread Starter
Full Member
Joined: Dec 2008
Posts: 97
Likes: 0
From: Hamilton
Regarding fuel rails, is the one i can easily see the secondary and the primary burried under?
I watched a video that said this was the case, however in our haynes manual im pretty sure it says the opposite.
Where is the OMP arm and what do i need to do to hook it up ? got maybe diagrams?
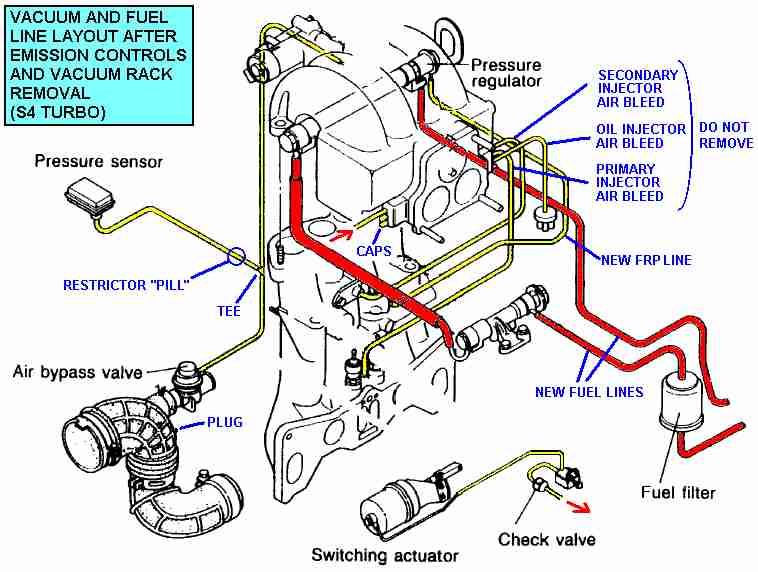

I watched a video that said this was the case, however in our haynes manual im pretty sure it says the opposite.
Where is the OMP arm and what do i need to do to hook it up ? got maybe diagrams?

The rail on top is for the secondary injectors.
The OMP rod connects to the throttle linkage at the front of the throttlebody. Look at post #6, pic #2.
https://www.rx7club.com/new-member-r...bo-ii-1041848/
The OMP rod connects to the throttle linkage at the front of the throttlebody. Look at post #6, pic #2.
https://www.rx7club.com/new-member-r...bo-ii-1041848/
The omp rod not moving is not catastrophic, especially if the engine isn't even revving (despite full throttle applied). At rest, it's still injecting oil.
The OMP is not a priority at this point.
The OMP is not a priority at this point.
i would focus on worrying about the condition of the engine and the fact that it won't idle first. no point spending 3 hours with the OMP linkage if it all has to inevitably come apart anyways. oil injection isn't as critical for short term running as people tend to claim, as long as it is getting something at least.
Automotive Masochist
Joined: Aug 2013
Posts: 23
Likes: 0
From: Tillsonburg
second that.
i would focus on worrying about the condition of the engine and the fact that it won't idle first. no point spending 3 hours with the OMP linkage if it all has to inevitably come apart anyways. oil injection isn't as critical for short term running as people tend to claim, as long as it is getting something at least.
i would focus on worrying about the condition of the engine and the fact that it won't idle first. no point spending 3 hours with the OMP linkage if it all has to inevitably come apart anyways. oil injection isn't as critical for short term running as people tend to claim, as long as it is getting something at least.
Junior Member
Joined: Sep 2009
Posts: 26
Likes: 0
From: Alabama
fixing the OMP. or continue Pre-mixing can be dealt with later. I would focus on fixing the vacuum leak/s.
my 2-cents:
there are a number of hoses disconnected / cut and or missing.
1. order a set of intake gaskets from lower/mid/upper from any flavor of supplier.
2. pull the intake apart upper mid and lower clean everything.
3. clean the 5th 6th intake ports. ensure actuation.
at this point you can make a decision before re-assembly
A. - by a spool of vacuum line and a couple pages of the FSM and refurbish the emissions equipment.
B. - remove all emissions equipment. block off the EGR the ACV and remove 90% of the vacuum tubing. Rotary Ressurrection has a pretty good write up on this.
BE advised - this is not to be used as a quick way to get around all that tubing. you can inadvertently add leaks to the system with block off plates etc. this requires you to remove the intake multiple times to chase down leaks. and also requires a crafty way to actuate the 5th 6th ports.
4. re-assemble and test.
Automotive Masochist
Joined: Aug 2013
Posts: 23
Likes: 0
From: Tillsonburg