
My Aftermarket Stereo Radio Writeup

Thread Starter
s4 Tails for Life!
Joined: Feb 2005
Posts: 577
Likes: 0
From: Dallas, TX
Well, I finally got my radio working and as promised, I'm posting my writeup.
Firstly, here's what NOT to expect:
- A step-by-step guide to setting up your exact radio.
- A lesson on wiring electronics.
- A lesson on common sense and precautions.
Understand that there are thousands of variables when installing an aftermarket radio, I'm posting MY experiences with MY car with MY stereo. Results may vary :P
Getting Started
As posted before, you may need some of these items and not others. You may also need items that I have not mentioned.
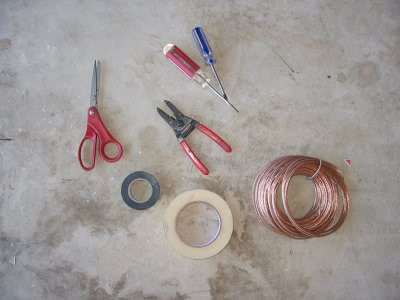
TOOLS
- A good assortment of screwdrivers. [Phillips, Flathead, Size, Length]
- A 13 Metric Wrench (For disconnecting the battery)
- Wire Strippers
- Scissors
- Electrical Tape
- Masking or other Tape (For non-electrical purposes)
- Speaker Wire
- Aftermarket Radio Multikit for RX-7 (Check Best Buy)
- Fire Extinguisher (Accidents DO happen)
- A strong will & determination!
Now that you have some tools handy, get ready to dive in!
But first, I feel the need to show off my car during this whole process.
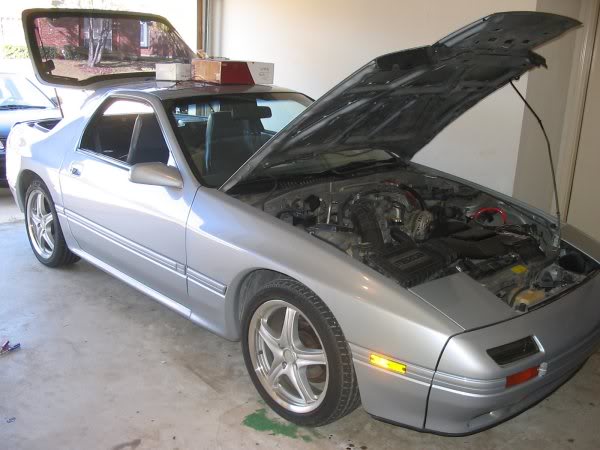
<3
OK, time to get that radio working!
Which Wire Goes... Wah?
This project may look intimidating, it did to me - but it really isn't that complicated. Here's the color codes for the RX-7 Dash Harness. (Taken from the FAQ for FC):
LTBlue/Red= 12v+
LtBlue/White= +Accessory
LtBlue/Yellow= -power ant trigger
Red/Black=+ Lumination
White=Factory Amp Turn on
Ground to the body, use the 10mm bolt behind the center console front drivers access panel. Do not use the Red/Black as ground it will damage the interior light circuit and dimmer in the car
Front Speakers (maximum of a 15 watt peak from the radio):
LtGreen/Red= Left
LtGreen/Black= Left
LtGreen= Right
LtGreen/Yellow=Right
Rear Speakers (if applicable, if you have the amplified rear speakers again the Maximum of 15 watts peak is all the stock speaker amp input can handle):
Brown= Left rear
Brown/White= Left Rear
LtBlue= Right Rear
LtBlue/Orange=Right Rear
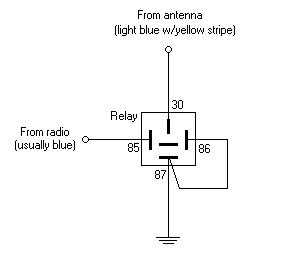
Note: as mentioned above the power antenna's trigger is ground (or - ). With all aftermarket radio's antenna output as 12 volts positive (+). To make a stock power antenna work you need a relay wired like this:
Let me be blunt. You may have to improvise. You see, I "ghetto-wired" my entire vehicle. That means I bypassed the stock connections completely, I wired directly from the Head Unit to whatever it was going to.
So, I only needed the following information:
LTBlue/Red= 12v+
LtBlue/White= +Accessory
LtBlue/Yellow= -power ant trigger
Red/Black=+ Lumination
White=Factory Amp Turn on
And I didn't use the Factory Amp so:
LTBlue/Red= 12v+
LtBlue/White= +Accessory
LtBlue/Yellow= -power ant trigger
Red/Black=+ Lumination
And I never could get the antenna to work right, so:
LTBlue/Red= 12v+
LtBlue/White= +Accessory
Red/Black=+ Lumination
That's all I needed to know.
It is important to note that you don't simply "match the colors" when connecting an aftermarket radio. The colors rarely match up. You instead match up the wires "function".
Your head unit should have a connector with wires coming out of it. If it doesn't, go get a generic aftermarket radio harness that adapts to your head unit.
And now, it's time to have some fun.
Stripping your first wire and lightin' up that thang :P
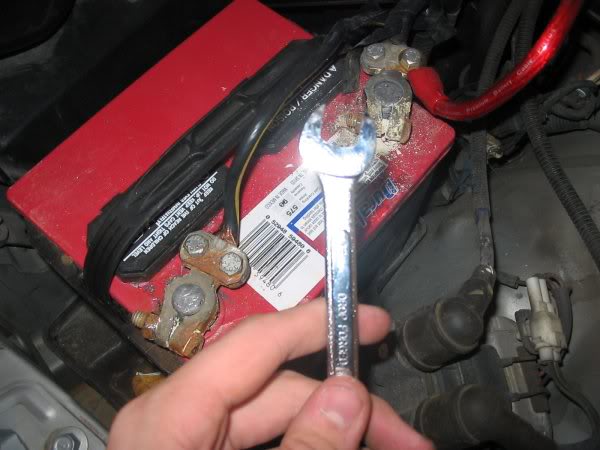
Go grab that 13 metric wrench and unhook your battery. (I unhook both terminals simply because electricity scares the ever-loving crap out of me. But the negative terminal should be fine.) ALWAYS DISCONNECT YOUR BATTERY BEFORE WORKING ON WIRING PROJECTS LIKE THIS ONE. Now...
Go get those wire strippers and find the 12v+ "BATTERY/MEMORY" from your Head Unit. (It usually is labeled in very small print somewhere on the wire itself - don't confuse this with the 12v+ "ACC/IGNITION")
I'm not going to tell you how to strip a wire, I assume you already know.
Now strip that wire and find the 12v+ from your dash harness. (LTBlue/Red= 12v+) Strip that wire.
Now take the stripped wires together and intertwine them so they appear as one wire. (Again, I assume you understand the basic idea, here.) Finally, wrap the 12v+ up with electrical tape.
Do the same for the Illumination wire. Match the wires and join them.
Now for the accessory wire. Join your head unit's 12v+ "ACC/IGNITION" wire to the accessory wire. If you are running any amps, run the remote wire to this wire as well. (Yes, it's OK to join multiple wires to one wire.)
This ensures that your radio will not drain your battery. It will only be ON when your key is in and turned to the ACC position or higher.
Tape that wire up and you just wired the head unit my friend.
You may want to test everything out - go right ahead. Reconnect your battery, insert your key and enjoy!
Oh wait... no sound comes out of it... bummer...
If a tree falls in the woods but no one is around to hear it...
Well, good job, I hope your head unit turned on as well as your amp, etc. But now we need to get some sound coming out of that thing.
I wired my speakers DIRECT. I ran new speaker wire to all my speakers and then back to the head unit. Obviously, if you're using an amp for your speakers, you'll need to run from your head unit to your amp and then out to the speakers. I bypassed all stock amps, you don't have to - but I won't be covering that here.
This is very easy and should be very simple: one wire, from speaker to head unit or from head unit to speaker, however you look at it. (Most sound guys will say the latter.)
Strip the wires, connect the wires and enjoy!
You should have it all hooked up, now. Aside from accessories such as satellite radio systems, amps, subs, etc. I hope it all works out for you, feel free to ask questions.
Thanks & God Bless,
iSP33D-for-J3SUS
Firstly, here's what NOT to expect:
- A step-by-step guide to setting up your exact radio.
- A lesson on wiring electronics.
- A lesson on common sense and precautions.
Understand that there are thousands of variables when installing an aftermarket radio, I'm posting MY experiences with MY car with MY stereo. Results may vary :P
Getting Started
As posted before, you may need some of these items and not others. You may also need items that I have not mentioned.
TOOLS
- A good assortment of screwdrivers. [Phillips, Flathead, Size, Length]
- A 13 Metric Wrench (For disconnecting the battery)
- Wire Strippers
- Scissors
- Electrical Tape
- Masking or other Tape (For non-electrical purposes)
- Speaker Wire
- Aftermarket Radio Multikit for RX-7 (Check Best Buy)
- Fire Extinguisher (Accidents DO happen)
- A strong will & determination!
Now that you have some tools handy, get ready to dive in!
But first, I feel the need to show off my car during this whole process.
<3
OK, time to get that radio working!
Which Wire Goes... Wah?
This project may look intimidating, it did to me - but it really isn't that complicated. Here's the color codes for the RX-7 Dash Harness. (Taken from the FAQ for FC):
LTBlue/Red= 12v+
LtBlue/White= +Accessory
LtBlue/Yellow= -power ant trigger
Red/Black=+ Lumination
White=Factory Amp Turn on
Ground to the body, use the 10mm bolt behind the center console front drivers access panel. Do not use the Red/Black as ground it will damage the interior light circuit and dimmer in the car
Front Speakers (maximum of a 15 watt peak from the radio):
LtGreen/Red= Left
LtGreen/Black= Left
LtGreen= Right
LtGreen/Yellow=Right
Rear Speakers (if applicable, if you have the amplified rear speakers again the Maximum of 15 watts peak is all the stock speaker amp input can handle):
Brown= Left rear
Brown/White= Left Rear
LtBlue= Right Rear
LtBlue/Orange=Right Rear
Note: as mentioned above the power antenna's trigger is ground (or - ). With all aftermarket radio's antenna output as 12 volts positive (+). To make a stock power antenna work you need a relay wired like this:
Let me be blunt. You may have to improvise. You see, I "ghetto-wired" my entire vehicle. That means I bypassed the stock connections completely, I wired directly from the Head Unit to whatever it was going to.
So, I only needed the following information:
LTBlue/Red= 12v+
LtBlue/White= +Accessory
LtBlue/Yellow= -power ant trigger
Red/Black=+ Lumination
White=Factory Amp Turn on
And I didn't use the Factory Amp so:
LTBlue/Red= 12v+
LtBlue/White= +Accessory
LtBlue/Yellow= -power ant trigger
Red/Black=+ Lumination
And I never could get the antenna to work right, so:
LTBlue/Red= 12v+
LtBlue/White= +Accessory
Red/Black=+ Lumination
That's all I needed to know.
It is important to note that you don't simply "match the colors" when connecting an aftermarket radio. The colors rarely match up. You instead match up the wires "function".
Your head unit should have a connector with wires coming out of it. If it doesn't, go get a generic aftermarket radio harness that adapts to your head unit.
And now, it's time to have some fun.
Stripping your first wire and lightin' up that thang :P
Go grab that 13 metric wrench and unhook your battery. (I unhook both terminals simply because electricity scares the ever-loving crap out of me. But the negative terminal should be fine.) ALWAYS DISCONNECT YOUR BATTERY BEFORE WORKING ON WIRING PROJECTS LIKE THIS ONE. Now...
Go get those wire strippers and find the 12v+ "BATTERY/MEMORY" from your Head Unit. (It usually is labeled in very small print somewhere on the wire itself - don't confuse this with the 12v+ "ACC/IGNITION")
I'm not going to tell you how to strip a wire, I assume you already know.
Now strip that wire and find the 12v+ from your dash harness. (LTBlue/Red= 12v+) Strip that wire.
Now take the stripped wires together and intertwine them so they appear as one wire. (Again, I assume you understand the basic idea, here.) Finally, wrap the 12v+ up with electrical tape.
Do the same for the Illumination wire. Match the wires and join them.
Now for the accessory wire. Join your head unit's 12v+ "ACC/IGNITION" wire to the accessory wire. If you are running any amps, run the remote wire to this wire as well. (Yes, it's OK to join multiple wires to one wire.)
This ensures that your radio will not drain your battery. It will only be ON when your key is in and turned to the ACC position or higher.
Tape that wire up and you just wired the head unit my friend.
You may want to test everything out - go right ahead. Reconnect your battery, insert your key and enjoy!
Oh wait... no sound comes out of it... bummer...
If a tree falls in the woods but no one is around to hear it...
Well, good job, I hope your head unit turned on as well as your amp, etc. But now we need to get some sound coming out of that thing.
I wired my speakers DIRECT. I ran new speaker wire to all my speakers and then back to the head unit. Obviously, if you're using an amp for your speakers, you'll need to run from your head unit to your amp and then out to the speakers. I bypassed all stock amps, you don't have to - but I won't be covering that here.
This is very easy and should be very simple: one wire, from speaker to head unit or from head unit to speaker, however you look at it. (Most sound guys will say the latter.)
Strip the wires, connect the wires and enjoy!
You should have it all hooked up, now. Aside from accessories such as satellite radio systems, amps, subs, etc. I hope it all works out for you, feel free to ask questions.
Thanks & God Bless,
iSP33D-for-J3SUS
nice right up but isnt this covered in the faq's?? i did this a month ago and just got around to wiring up my antenna so it goes uppers and downers. just a little better reception  next summer ill put a 12 solarbaric in the spare tire's home.
next summer ill put a 12 solarbaric in the spare tire's home.
Thread Starter
s4 Tails for Life!
Joined: Feb 2005
Posts: 577
Likes: 0
From: Dallas, TX
Originally Posted by 88rxn/a
nice right up but isnt this covered in the faq's?? i did this a month ago and just got around to wiring up my antenna so it goes uppers and downers. just a little better reception next summer ill put a 12 solarbaric in the spare tire's home.
next summer ill put a 12 solarbaric in the spare tire's home.I just thought it might help some people out.
iSP33D-for-J3SUS
Needs more Displacement.
Joined: Jun 2005
Posts: 1,329
Likes: 0
From: Louisville, Ky
I have 6x9's in boxes in the bank of hatch, I was thinking about finding a way of mounting them in the spare tire home, but I know if I remove the spare tire I'll end up needing it so I decided not to worry about it. I just need to find a way of mounting the boxes so if I wreck I don't get speaker on my head.


It's nice to have more step-by-step instructions out there, good job.
I do think that electrical tape is just too ghetto though. You can go to radio shack or any hardware store really and get these connectors that allow you to crimp two wires together. They should be called like a butt splice. It's a hollow tube with insulation surrounding a conductive inner part.
Basically you strip the two wires like you said, but instead of twisting them together and using electrical tape, you put one wire into one end of the splice and the other wire into the opposite end. Make sure you twist the exposed wire before you put it into the splice.
Then you get yourself a set of wire crimpers and press down pretty hard on each end of the butt splice. You should be able to pull on both wires and they won't come out of the splice. If you they do come out, you probably didn't crimp them hard enough. If any wire is still exposed then put some electrical tape around that part.
Last edited by arghx; Nov 7, 2005 at 11:26 PM.


Rockn' The Galant
Joined: Jan 2005
Posts: 1,901
Likes: 0
From: Shreveport, LA
Depends on the amplifier and how much power it's pushing Syonyk.
TIP FOR SAT OWNERS! The box for the sat connection fits perfectly beside the ECU on the passenger side.
Also, if you buy the kit from Best Buy, there's a big gap between the radio and surround (albit the surround blends in with the major surround great) so what happens if you put the extra trim ring in there to cover the gap any automatic radios wont go up and down, just trim off the bottom (usually you can just tug on it and it'll come off) and put it in there, it'll still snap in at the top and it looks SO much better!
Trending Topics
Thread Starter
s4 Tails for Life!
Joined: Feb 2005
Posts: 577
Likes: 0
From: Dallas, TX
Originally Posted by Syonyk
I've noticed a lot of cars have huge gauge wire running from the battery to the stereo. Is that really needed for a normal stereo, or is it just "bling"?
-=Russ=-
-=Russ=-
I have a rather large power wire coming from my battery. It all depends on how much your amp is pushing. My amp is only 150 watts and that wire can power up to 800 watts - I bought it cause I didn't know what I was doing.

Also, here's the best way that I have found to run wires from the dash / engine bay (power wire) to the back.
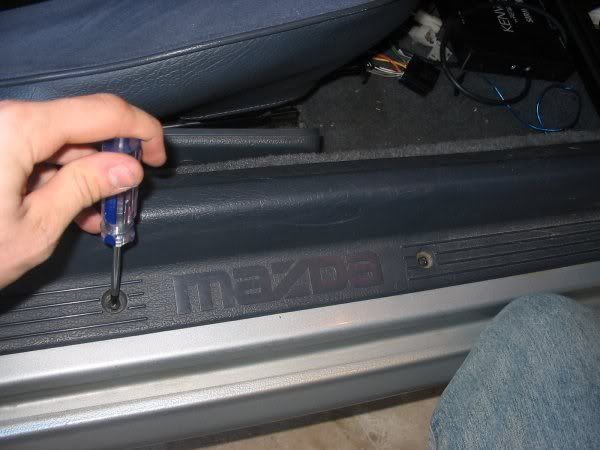
Enjoy that Muzzac kids.

iSP33D-for-J3SUS
Former Moderator. RIP Icemark.
Joined: Apr 2001
Posts: 25,896
Likes: 24
From: Rohnert Park CA
You generally want to avoid tapeing the connections as iSP33D-for-J3SUS mentions. Many of the cheaper tapes will often bleed adhesive causing the copper to corrode and the joint to fail.
This results in the stereo having intermitent problems not right away, but rather a year or two down the road.
Crimp style connectors are 1000% more reliable and then won't damage the copper conductors.
In addition you posted:
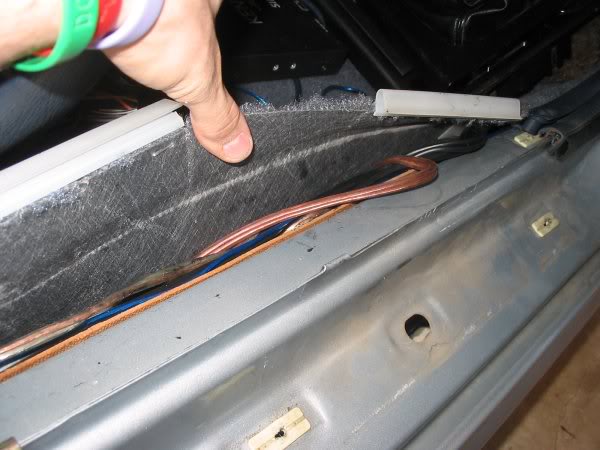
 This would also be wrong. If you look at the running board area, there is a thin layer of masonite. The wires should be tucked into the cavity between the metal and the masonite wood, not between the carpet and the Masonite. Between the carpet and masonite lends the wires to being damaged (besides looking like crap with the wires pushing up the carpet)
This results in the stereo having intermitent problems not right away, but rather a year or two down the road.
Crimp style connectors are 1000% more reliable and then won't damage the copper conductors.
In addition you posted:
Last edited by Icemark; Nov 15, 2005 at 01:33 PM.
very sleepy!!
Joined: Jan 2005
Posts: 1,052
Likes: 0
From: Tampa, FL
Originally Posted by iSP33D-for-J3SUS

Enjoy that Muzzac kids.
iSP33D-for-J3SUS
that's exactly what i did. also ran them underneath the storage bin thingy and through the hatch belt holes in the carpet. the wires only show on the sub box. i'm planning to convert my storage bins to put in the subs cuz i dont like the fact that it's waaaay too visible from the outside.

Rotary Enthusiast
Joined: May 2005
Posts: 1,135
Likes: 0
From: Vernon, BC
yeah exactly. I went tape on my frist install, then crimps on my second. I'll never go back
if youre really feeling rich you could crimp a female spade connector onto all the wires in the car, and males onto all the wires off of the harness on the head unit. this would allow quick swapability, if you ever needed that....
if youre really feeling rich you could crimp a female spade connector onto all the wires in the car, and males onto all the wires off of the harness on the head unit. this would allow quick swapability, if you ever needed that....
Thread Starter
s4 Tails for Life!
Joined: Feb 2005
Posts: 577
Likes: 0
From: Dallas, TX
This would also be wrong. If you look at the running board area, there is a thin layer of masonite. The wires should be tucked into the cavity between the metal and the masonite wood, not between the carpet and the Masonite. Between the carpet and masonite lends the wires to being damaged (besides looking like crap with the wires pushing up the carpet)
Also, yes, there are more reliable ways to wire a radio than "ghetto-rigging" like I did. But the true test shall be the one of time. We'll see how well my radio functions into the future and I'll update with any problems I come across.
iSP33D-for-J3SUS
Former Moderator. RIP Icemark.
Joined: Apr 2001
Posts: 25,896
Likes: 24
From: Rohnert Park CA
Originally Posted by iSP33D-for-J3SUS
I don't know about damage, (we'll see a couple years down the road) but it doesn't push my carpet up at all.
Also, yes, there are more reliable ways to wire a radio than "ghetto-rigging" like I did. But the true test shall be the one of time. We'll see how well my radio functions into the future and I'll update with any problems I come across.
iSP33D-for-J3SUS
Also, yes, there are more reliable ways to wire a radio than "ghetto-rigging" like I did. But the true test shall be the one of time. We'll see how well my radio functions into the future and I'll update with any problems I come across.
iSP33D-for-J3SUS
Thread Starter
s4 Tails for Life!
Joined: Feb 2005
Posts: 577
Likes: 0
From: Dallas, TX
Originally Posted by Icemark
I spent 17 years installing or designing car stereo and electronics... I have seen it all, and can pretty much tell failure points just by looking at it.
iSP33D-for-J3SUS
Drive.
Joined: Oct 2002
Posts: 1,676
Likes: 1
From: Washington, North Carolina
i'm with icemark on this one.
Also, maybe I missed it, but why did you not use a wiring harness (then you can match colors)? I HATE going to put in a new deck and finding that the factory harness is all cut to crap and now I have to "pop" speakers and find what color wire is what.
Also, maybe I missed it, but why did you not use a wiring harness (then you can match colors)? I HATE going to put in a new deck and finding that the factory harness is all cut to crap and now I have to "pop" speakers and find what color wire is what.
Thread Starter
s4 Tails for Life!
Joined: Feb 2005
Posts: 577
Likes: 0
From: Dallas, TX
Originally Posted by X-JaVeN-X
i'm with icemark on this one.
Also, maybe I missed it, but why did you not use a wiring harness (then you can match colors)? I HATE going to put in a new deck and finding that the factory harness is all cut to crap and now I have to "pop" speakers and find what color wire is what.
Also, maybe I missed it, but why did you not use a wiring harness (then you can match colors)? I HATE going to put in a new deck and finding that the factory harness is all cut to crap and now I have to "pop" speakers and find what color wire is what.
iSP33D-for-J3SUS :bighumb:
Full Member
Joined: Oct 2005
Posts: 136
Likes: 0
From: Hollister, Missouri
You're not going to have any problems.. I've had my wires pushed in that same place for about 4 years, and nothing has happened to them. They are protected and work just as well as the day I installed them. It's not really so ghetto if you think about it... But what do I know... I'm just rice.
-np-
-np-

Thread
Thread Starter
Forum
Replies
Last Post
SteelBlue
1st Generation Specific (1979-1985)
2
Sep 27, 2015 08:26 AM