
I think I popped it.

Fair enough. I'm pulling it all in two separate pieces so I can service the transmission too, and then assembling before I put it back in.
My next question. On my S5 UIMs, the rear lifting hook is on the VDI manifold. Is there a place where I can attach this hook to the block for safe handling? I considered just using a bellhousing bolt hole, but I'm not so sure about that one.
Also, now that I have the VDI section removed [only broke three vac lines! woo!], I have the rest of the vacuum routing exposed. I still have to get some big wrenches so I can get the oil cooler lines free, pull the starter, etc, but other than that the engine is ready to pull. What's the safest way to remove all of these vacuum lines, and is there a more detailed S4/S5 vac diagram with some labels rather than just showing the whole assy removed in the FSM? I need to make sure I have ZERO manifold issues putting everything back together, as I'm on somewhat of a budget with money and time. I have been taking great care to label things, but it doesn't always help like when I break stuff.


Joined: Mar 2001
Posts: 31,857
Likes: 3,243
From: https://www2.mazda.com/en/100th/
Fair enough. I'm pulling it all in two separate pieces so I can service the transmission too, and then assembling before I put it back in.
My next question. On my S5 UIMs, the rear lifting hook is on the VDI manifold. Is there a place where I can attach this hook to the block for safe handling? I considered just using a bellhousing bolt hole, but I'm not so sure about that one.
Also, now that I have the VDI section removed [only broke three vac lines! woo!], I have the rest of the vacuum routing exposed. I still have to get some big wrenches so I can get the oil cooler lines free, pull the starter, etc, but other than that the engine is ready to pull. What's the safest way to remove all of these vacuum lines, and is there a more detailed S4/S5 vac diagram with some labels rather than just showing the whole assy removed in the FSM? I need to make sure I have ZERO manifold issues putting everything back together, as I'm on somewhat of a budget with money and time. I have been taking great care to label things, but it doesn't always help like when I break stuff.
My next question. On my S5 UIMs, the rear lifting hook is on the VDI manifold. Is there a place where I can attach this hook to the block for safe handling? I considered just using a bellhousing bolt hole, but I'm not so sure about that one.
Also, now that I have the VDI section removed [only broke three vac lines! woo!], I have the rest of the vacuum routing exposed. I still have to get some big wrenches so I can get the oil cooler lines free, pull the starter, etc, but other than that the engine is ready to pull. What's the safest way to remove all of these vacuum lines, and is there a more detailed S4/S5 vac diagram with some labels rather than just showing the whole assy removed in the FSM? I need to make sure I have ZERO manifold issues putting everything back together, as I'm on somewhat of a budget with money and time. I have been taking great care to label things, but it doesn't always help like when I break stuff.
for lifting the engine, its light, so you can just about put the lift hook anywhere. the older engines have it on the top bellhousing bolt
That saved me a headache, and I got the rack and primary rail removed. There was a real mess under all that manifold. Thanks again, j9. You and Ben have made this worlds easier.
What size are the oil cooler fittings? I need to get some bigger wrenches. Also, do I need flare-nut for them instead of just open-end?
What size are the oil cooler fittings? I need to get some bigger wrenches. Also, do I need flare-nut for them instead of just open-end?
This is going to seem completely ridiculous, but I don't know which side loosens which way on the front line. Also, these lines are on there pretty damn good. I can't seem to get a good grip with these metric sizes. It almost seems like they're all standard. On the rear line, 22 is too small while 23 has some wiggle room, which is what rounds **** off. On the front it's the same. I don't have enough room to get the wrench head on the 21* mm small side on the front. The large side is 25. The 21 just barely squeezed onto it anyway. Any of you fellows have a special trick or something to getting these off easily or am I going to have to get oil cooler lines too? I don't even want to know about the OMP lines.
if it's giving you difficulty sometimes it is best to pull out the radiator, alternately you can remove the line from the cooler but that's going to be almost as much of a pain.
the 23mm should be correct for the rear banjo. the front i have to tap my 22mm behind the fitting because it is supposed to require a narrow wrench to keep the flare nut from spinning with the line. once the wrench is in place i use the crescent wrench and tap the end with a hammer while holding force in the opposite direction on the holder wrench(pull up on the left wrench, push down on the right).
the front line is standard right hand thread. standing at the front of the car push down on the wrench to loosen the fitting.
15/16 for a more solid grip on the rear, 21 and 25 on the front. Everything is loose and out of the way. I have decided that I'm going to leave the transmission in the car when I pull it, although it may be easier to reconnect the two on the floor than in the car, but I digress. It's coming out in the morning. I'll get it pulled and get to tearing the rest of it down as soon as I can. I'm knocking on wood here, but my OMP lines seemingly aren't stiff or brittle. They have plenty of flex in them, and wiggling some of the fittings to remove wasn't difficult at all and I didn't break anything. Praying it stays like that. If I pop the lines, what's a good source for some teflon coated nylon line?
Searched all morning for the easiest way to remove the 14mm nut from the driver-side motor mount and I can't find anything. I can fit a socket but obvs no ratchet, but I wonder if a box end will have the umph to do it with the limited space. Ideas?
Joined: Mar 2001
Posts: 31,857
Likes: 3,243
From: https://www2.mazda.com/en/100th/
i just use a ratchet from the bottom? or remove the whole bracket from the engine.
Pictures will have to come soon. It's either do it with my phone that doesn't work or worry about uploading, resizing and everything from my Nikon. Whatever.
Teardown was pretty straightforward. Air box, battery, etc. Started there and moved to the fan and clutch, radiator, belts. Did the UIM, lots of labeling, AC/PS and bracket, Then left the LIM and OMP on.
I left the harness IN THE CAR. Why would you spend half an hour pulling something out that still has to be removed from the engine?
Pulled all the hoses, lines, vacuum, connectors and did more labeling. My bay looks like a kindergarten classroom; colours, letters and labels for everything. I decided it was a better idea for my time constraint to take the engine out alone, as I have pulled my fair share of piston engines too. Using a jack under the bellhousing and a friend, we easily removed the engine with no hangups or issues in a cool 25 minutes, with a few smoke breaks included.
Now, the flywheel nut. This is the recipe for a small guy working with no impact - the mighty Mazdatrix [or whomever's] flywheel brake, 3/4" drive breaker bar, your socket, an engine hoist leg and a friend to sit on the block. I didn't even sweat.
But now I'm stuck at the front nut. Used heat to around red hot [4-5 minutes], waited for it to cool slightly but still twisted the heads off a 3/8" drive adapter [duh] and then a half" drive breaker bar. I had to order a BUNCH of measuring equipment to clearance everything as I sold most of this equipment moons ago, so along with that I also ordered a 19mm 3/4" drive impact socket I'll try with the hoist leg. I'm not going to the local machine shoppe to have them hammer away on the front of this engine for normal labour rate. They can **** off. So I've got to figure a way to get it just right. My stuff should all be here on friday.
Front cover is disassembled and stored in bags. Engine is tipped nose down on my little rig here and is ready to take apart.
I love Purple Power and Super Clean. What besides some soft bristle brushes and a **** load of brake/carb cleaner will I need to get everything spotless? I have a dremel with wire wheel for the rusty spots on the outside of the irons, etc. but I have thought about using scotchbrite pads on the housing and iron faces where the coolant seals go, etc.
What methods do you guys like to use to clean? I don't have a deep sink but I may know where I can use one. What stuff do you like to use?
Also, what can I come to expect from an engine with a failed coolant seal that ran 14000 hard daily miles?
It's all torn apart, cleaning is coming slowly but surely.
Here's the thing. I have 3mm Super Seals inside. Don't these normally cause a little scoring on the housings? I found slight grooves around the rear housing and even less on the front, but they're still there. I will need new stat gear bearings, rotor bearings look great. I will post pictures of the housings before long.
Here is where I get bad vibes. I am going to continually inspect as I clean more, but I haven't found so much as a crack in anything, and all of my coolant seals looked great and were still very flexible aside from a few inner seals. No broken coolant walls. What could have possibly leaked coolant into my engine? When I pulled the plugs, it didn't smell like fuel until a few minutes after. The plugs smelled sweet and had slightly clear, sticky liquid on them.
Did I tear apart my **** without needing to? Everything looks amazing and most will be reused, but damn!
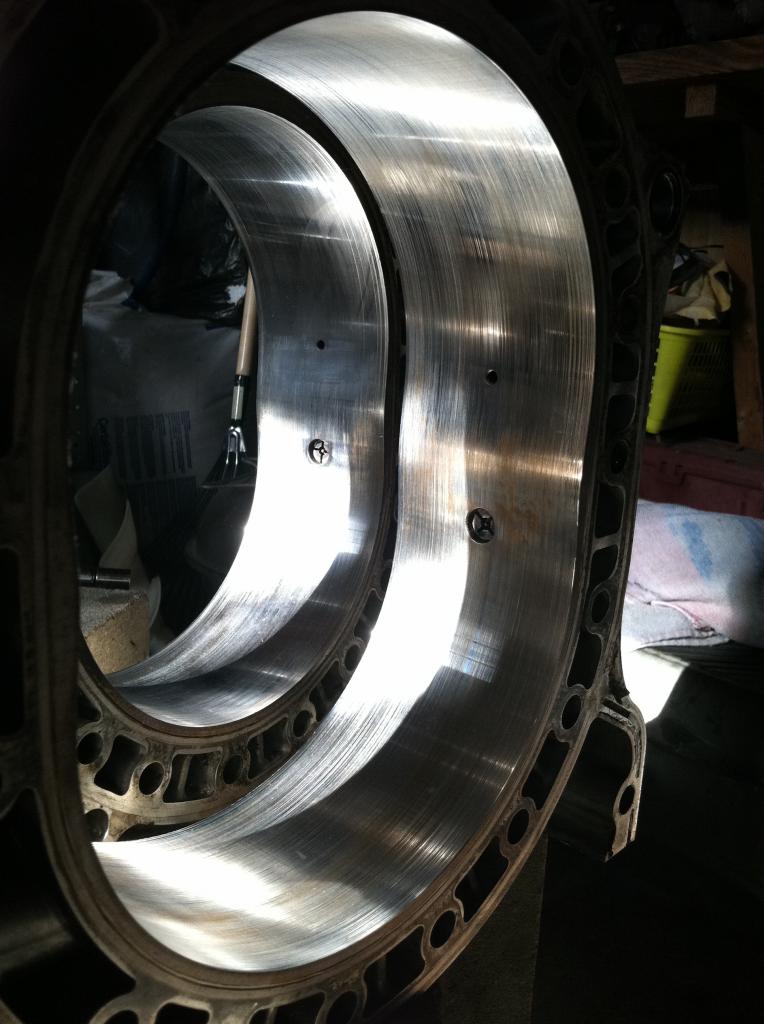
Rear housing closer to the foreground. See the grooves? They feel a little rough, but I haven't measured anything yet. Not done cleaning.
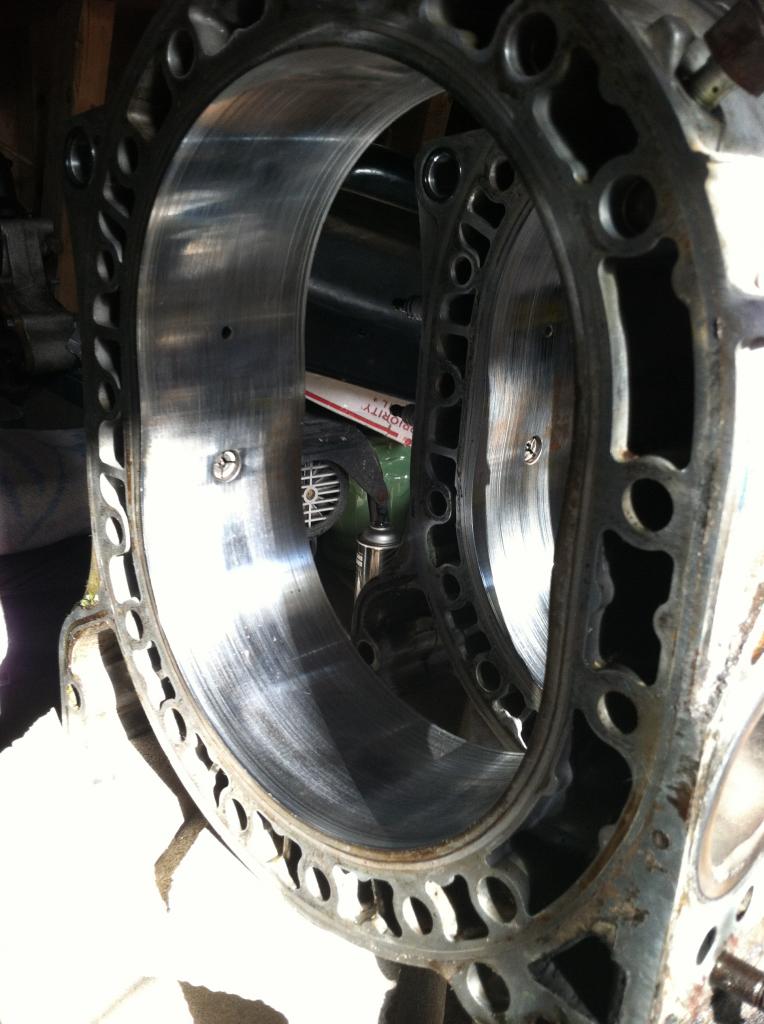
Front housing here. It's not as bad, but still noticeable. Concerns?
MECP Certified Installer
Joined: Feb 2009
Posts: 3,176
Likes: 3
From: Mesquite, TX-DFW
Good god, I have never seen that before. Every housing I have ever seen look polished with visible chatter marks that you can't really feel. Your have the visible chatter marks, but look as if the apex seals where dragging abrasive particles around.
What air filter are you running?
What air filter are you running?
The seals are fine. I want you guys to know that. They're not even grooved like this. When you say chatter, I see grooves perpendicular to the housing too. Everything is cleaned down to the bone now and some if it came off each but not much.
My air filter is old, but I was gonna grab up another K&N before it goes back together.
Do I need housings or no? If I am gonna need them, I'm gonna be at this a lot longer.
Also, as for gaskets, does it make a difference which set I get since I have some S4, some S5 and some FD stuff in there?
My air filter is old, but I was gonna grab up another K&N before it goes back together.
Do I need housings or no? If I am gonna need them, I'm gonna be at this a lot longer.
Also, as for gaskets, does it make a difference which set I get since I have some S4, some S5 and some FD stuff in there?
There's one more thing I want to talk about. The little plastic diffusers underneath the primary injectors. I can see what they are for but are they 100% necessary to have? I broke one by accident and I don't even know what people call them.
MECP Certified Installer
Joined: Feb 2009
Posts: 3,176
Likes: 3
From: Mesquite, TX-DFW
The plastic injector diffusers you must use. Mazdatrix sells them.
Joined: Aug 2002
Posts: 2,614
Likes: 31
From: Freeland, MI
I do plan to upgrade fuel, but I don't need much more than TII spec. Would that make a difference? Before it broke, I was trying to carefully weasel it back in.Is there a trick to installing these? I was missing a secondary diffuser already, broke a primary one in the cleaning process.
Joined: Aug 2002
Posts: 2,614
Likes: 31
From: Freeland, MI
No, t2 spec isn't enough. They put in the diffusors cause old injector technology the spray pattern sucked, and the diffusors help. I've read that you can get away without the secondaries, but not the primaries. Honestly, i'd replace the one you broke and one that was missing, it'll be almost another $100, but i've seen some for sale on ebay that are cheaper than atkins, but they look identical
Update time;
I have spent the past little while measuring everything a few times over. The front iron is fine. Front side of center is okay but getting there. Couldn't quite squeeze my .002" feeler under my straightedge on the rear side, but I could see a hair between the .0015" feeler and the straightedge. I know the spec is .0016" but a ten-thousandth is a tiny space to see. I haven't gotten to the rear iron yet, which had the more torn up rotor housing. Had a pinch of side seal step on the rear side of the intermediate as well but not either of the oil seal tracing marks.
Can this much wear on a set of irons cause an oil deprivation severe enough to score my housings like they did? Since I can't measure that last 10,000th, Are the irons toast too?