
Howto: Rough Idle Diagnostics

Thread Starter
Rotary Enthusiast
Joined: Aug 2002
Posts: 850
Likes: 0
From: MO
Howto: Rough Idle Diagnostics
I compiled some things from the FSM and random posts about diagnosing and fixing a rough idle. Mostly i want to put this together for a reference for myself and whoever else. It will be less difficult than scanning through the FSM at the least. Please feel free to make any comments you wish to add and i can edit this.
Heres the order in wich the FSM gives rough idle diagnostics. I will post pictures of the sections it references and some quotes from other posts for reference. Some things will be omitted in the following posts, as i didnt feel they needed to be discussed here.
#1. Check idle speed (4a-77)
#2. Check ignition timing and system (5)
#3. Check for vacuum leaks
#4. Check water thermo sensor (4a-46)
#5. Check atmospheric pressure sensor (4a-73)
#6. Check throttle sensor (4a-50)
#7. Confirm opening sound of primary injectors (4a-69)
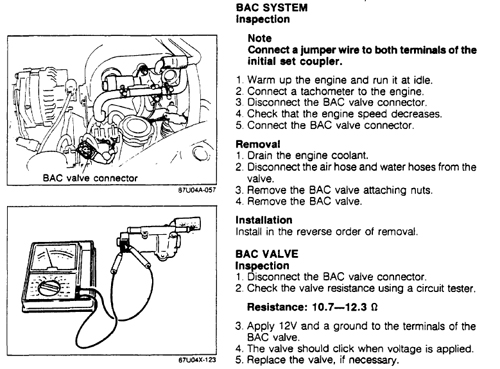
#8. Check bac valve system (4a-62)
#9. Check operation of acv (4a-42)
#10. Check operation of fast idle (4a-56)
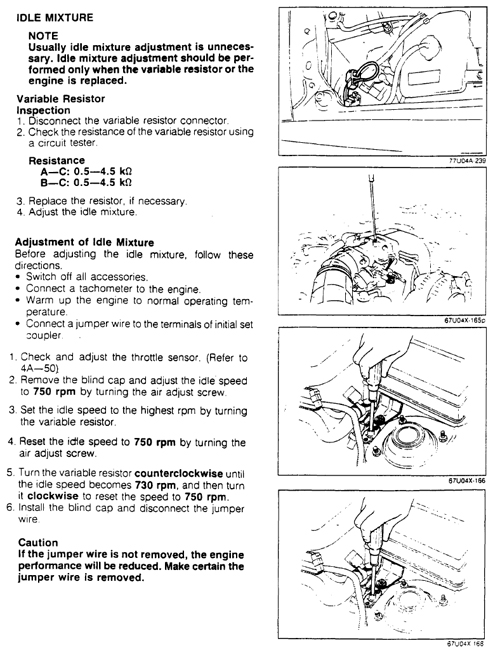
#11. Check amount of fuel flow at idle (4a-77) (Variable resistor)
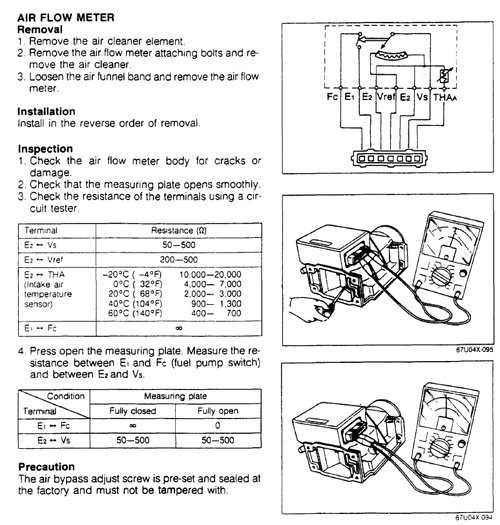
#12. Check operation of afm (4a-54)
#13. Check intake air temp sensor (4a-81)
#14. Check egr valve (4a-82)
#15. Check fuel pressure (4a-66)
#16. Check ecu
#17. Check compression
Posts to follow...
Heres the order in wich the FSM gives rough idle diagnostics. I will post pictures of the sections it references and some quotes from other posts for reference. Some things will be omitted in the following posts, as i didnt feel they needed to be discussed here.
#1. Check idle speed (4a-77)
#2. Check ignition timing and system (5)
#3. Check for vacuum leaks
#4. Check water thermo sensor (4a-46)
#5. Check atmospheric pressure sensor (4a-73)
#6. Check throttle sensor (4a-50)
#7. Confirm opening sound of primary injectors (4a-69)
#8. Check bac valve system (4a-62)
#9. Check operation of acv (4a-42)
#10. Check operation of fast idle (4a-56)
#11. Check amount of fuel flow at idle (4a-77) (Variable resistor)
#12. Check operation of afm (4a-54)
#13. Check intake air temp sensor (4a-81)
#14. Check egr valve (4a-82)
#15. Check fuel pressure (4a-66)
#16. Check ecu
#17. Check compression
Posts to follow...
Thread Starter
Rotary Enthusiast
Joined: Aug 2002
Posts: 850
Likes: 0
From: MO
#1. Check idle speed
#1. Check idle speed

I have a 1989 RX7, GTUs. Idle has been a problem since it was new. While attempting to clean the BAC valve, I unscrewed a plastic plug in the end. I put some pipe thread sealer on it and screwed it back in. After reasembly, I found that car idled very fast. I reajusted the idle speed and turned the plastic plug out slowly (this is done with a metric allen wrench. I found that the speed decreased then it became unstable. Turning the screw further out stablized the idle and it appears to have fixed the problem.
I first removed the BAC valve.
With an allen wrench I removed the plug in the end. (Note how far the plug is in before removing it.) This was difficult because it appeared to be factory sealed with blue paint. I used WD40 and worked the plug back and forth until it could be unscrewed. There is a spring inside, so be careful to reinstall it properly.
When I put the plug back in I used some paste pipe thread sealer. I screwed it in past the point where it was initially set.
The plug evidently sets the spring tension which affects the idle speed servo stability. Use your own judgement on trying this.
Originally Posted by MasteRX
Idle adjustment is pretty easy. To do it the right way:
1. Run vehicle and let it warm up to operating temp. Turn off vehicle.
2. Locate the initial set plug. It is a green plug on the drivers side by the primary ignition coil. There are two plugs there the one with six or so connections is for ECU code checking. HTe one with two connections is the initial set plug that you are looking for. Attatch a jumper wire to bridge the terminals of the initial set plug. (this puts the computer into a special mode so that things like the BAC and other things arent operating)
3. Start car
4. To adjust the idle, locate the idle set screw located on the top of the intake manifold. Some people have a plastic cover over this screw, if so, take it off. Adjust idle to your liking (stock: 750 rpms)
5. Turn off car, remove jumper wire, and you are set!
Originally Posted by Patsrx7
I have a 1989 RX7, GTUs. Idle has been a problem since it was new. While attempting to clean the BAC valve, I unscrewed a plastic plug in the end. I put some pipe thread sealer on it and screwed it back in. After reasembly, I found that car idled very fast. I reajusted the idle speed and turned the plastic plug out slowly (this is done with a metric allen wrench. I found that the speed decreased then it became unstable. Turning the screw further out stablized the idle and it appears to have fixed the problem.
I first removed the BAC valve.
With an allen wrench I removed the plug in the end. (Note how far the plug is in before removing it.) This was difficult because it appeared to be factory sealed with blue paint. I used WD40 and worked the plug back and forth until it could be unscrewed. There is a spring inside, so be careful to reinstall it properly.
When I put the plug back in I used some paste pipe thread sealer. I screwed it in past the point where it was initially set.
The plug evidently sets the spring tension which affects the idle speed servo stability. Use your own judgement on trying this.
Thread Starter
Rotary Enthusiast
Joined: Aug 2002
Posts: 850
Likes: 0
From: MO
#2. Check ignition timing and system
#2. Check ignition timing and system
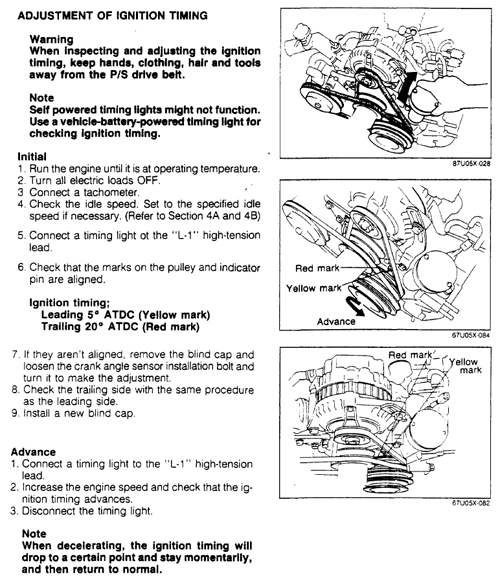
CANT FIND MARKS OR NOTCHES ON PULLEY
MORE INSTRUCTION
CANT FIND MARKS OR NOTCHES ON PULLEY
Originally Posted by HAILERS
http://www.teamfc3s.org/info/articles/demystifying.html
At the very bottom of the page in YELLOW.
With a flashlight and mirror, it is NOT that hard to see the apex seal pass by the sparkplug holes.
Put a piece of masking tape on the aft flange of the pulley so you can see the marks your going to make.
The only alteration I'd make to his method is: When sighting the apex seal in the LEAD hole (bottom hole), don't center the apex seal in the sparkplug opening, but keep rotating the pulley til the apex seal is resting in the bottom of the sparkplug hole. THEN make a mark on the masking tape.
As for the TRAIL hole, center the apex seal in the hole then make the pencil mark on the masking tape.
For any accuracy at all, you almost have to use a flexible scale measuring in 100th's, at least.
Anyway, TDC should be b/t those two marks. And, I'd suspect that once you make those marks, you'll find the two small indentations on the aft edge of the pulley that are the stock lead and trail marks.
Originally Posted by RETED
Unless the CAS was removed, you only need to *verify* that ignition timing is within spec; you should *not* be removing the CAS!
Fire the timing gun...
Look straight down on the pin.
The right-hand "notch" should be directly under it.
If the notch is not directly under the pin, then you need to adjust it to within spec.
If the CAS is stuck, the o-ring might've gotten frozen.
You can try and carefully pry under the CAS to see if it'll loosen.
Shooting some lubricant (i.e. WD-40, Liquid Wrench, P'Blaster) under the CAS body might help in this case.
Note, you should be doing this with the engine fully warmed up and within idle spec.
Idle spec is 750RPM + or - 50RPM.
If the engine is too cold, or the idle is not within that range, the ignition timing should not be adjusted against the notch(es).
Last edited by imloggedin; Jul 18, 2007 at 11:49 AM.
Thread Starter
Rotary Enthusiast
Joined: Aug 2002
Posts: 850
Likes: 0
From: MO
#3. Check for vacuum leaks
#3. Check for vacuum leaks
Originally Posted by NZCONVERTIBLE
If you have a compressor, this is the quickest way to find vac leaks:
https://www.rx7club.com/2nd-generation-specific-1986-1992-17/water-sensors-water-pump-diff-models-583211/ (posts #11 & #16)

https://www.rx7club.com/2nd-generation-specific-1986-1992-17/water-sensors-water-pump-diff-models-583211/ (posts #11 & #16)
Thread Starter
Rotary Enthusiast
Joined: Aug 2002
Posts: 850
Likes: 0
From: MO
#6. Check throttle sensor
#6. Check throttle sensor
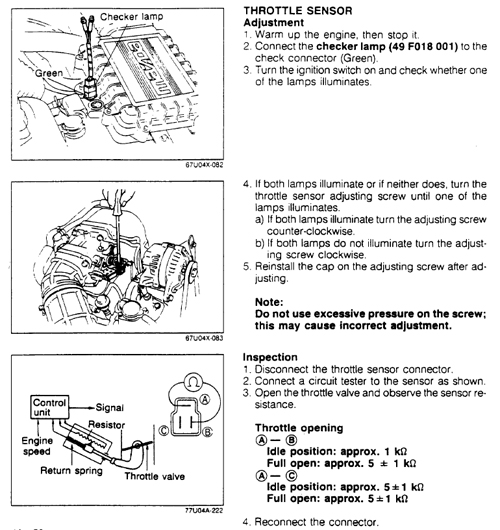
HOWTO MAKE CHECKER LAMP IS IN THIS ARTICLE:
http://www.teamfc3s.org/info/article...odes/main.html
HOW IT WORKS:
https://www.rx7club.com/2nd-generation-specific-1986-1992-17/how-things-work-inside-tps-360803/
ADJUST VIA RESISTANCE:
http://fc3spro.com/TECH/HOWTO/TPS/tps.html
HOWTO MAKE CHECKER LAMP IS IN THIS ARTICLE:
http://www.teamfc3s.org/info/article...odes/main.html
HOW IT WORKS:
https://www.rx7club.com/2nd-generation-specific-1986-1992-17/how-things-work-inside-tps-360803/
ADJUST VIA RESISTANCE:
http://fc3spro.com/TECH/HOWTO/TPS/tps.html
Originally Posted by HAILERS
There is no requirement for the initial set coupler to be jumpered. If your using the two light method, with the two bug light unit plugged into the green connector, try this to make your life easier:
Fully warm the engine up(hot, not tepid warm). Shut the engine down. Key to the on position. Turn the tps screw counterclockwise until both the lights go out, and for extra measure turn it some more counterclockwise but make sure the thing does not unscrew and fall out.
Now turn the screw clockwise until you see one light, keep turning more until you see two lights and stop.
Now with two lights turned on, turn counterclockwise, slowly, until you have only one light on.
Your done now. Through. Done. FInished.
Don't EVER set your tps with a less than fully hot engine.
Now if you had a volt/ohm meter, you could shove that meters positive probe up the rear of the green/red wire at the true tps connector while everthing is connected, and you'll see an output of approx one volt. Something on the order of 0.95volts or 0.97 volts or 1.04 is what you can call *approx* one volt.
Also if using the bug lite method, do not try adjusting the tps with the engine running.
Originally Posted by HAILERS
There's nothing really wrong with the two light method. IF the car is fully warmed up when you do it.
The two lights represent a ground being put on the Relief solenoid by one light being on and a ground being put on the Switching solenoid by the other light being on..
When done adjusting the TPS, the ECU will be putting a gnd on the Relief solenoid (Blue plug) and no gnd on the Switching solenoid (Grau plug).
And it happens that when this condition is met, you will find approx 1vdc being output by the green/red wire on the harness side of the TPS connector. Plus in the INPUT/OUTPUT chart in the FSM it states that at idle the TPS pin 2G, will show approx 1vdc.
TPS can have dead spots in them. That's bout the only time I'd bother to ohm one out and I'd do it with a old time swing (Tex Beneke) meter. Its very inlikely that is your problem.
Trending Topics
Thread Starter
Rotary Enthusiast
Joined: Aug 2002
Posts: 850
Likes: 0
From: MO
#11. Check amount of fuel flow at idle (Variable resistor)
#11. Check amount of fuel flow at idle (Variable resistor)
Originally Posted by HAILERS
Well, it is out of the specs according to the manual. So what do you have to lose by adjusting it??? Playing with it? Fiddleing with it??? Nothing is the answer.
With everything connected up, measure the output voltage on the plug. Write it down. Its the Green/Black wire. Now you will be able to return the setting back to this setting if you get confused while turning the screw. Nothing lost so to speak.
So follow the instructions in the manual. Its under Idle Speed And Mixture. They have you install the initial set coupler to prevent feedback from the bac circuit. The adjusting of the screw will have an effect on the mixture whether or not the initial set couple is installed, though.
Its self explanitory what the R and L stand for. Frankly its not a big deal if you screw the darn thing in a gentle manner and don't crank the screw past its stops. Like I said, you can always return the screw to the setting it was at prior to your messing with it.
Do fully heat your engine up prior to setting the idle, messing with the variable resistor etc.
And if you watch the voltage at the variable resistors output to the ECU it should vary smoothly b/t 1and 4 volts. I vaguely remember mine, on the N/T being somewhere close to 2.65 or there abouts. Varies from car to car. That's not a reliable figure for every car. Just a general idea of what it might be.
Thread Starter
Rotary Enthusiast
Joined: Aug 2002
Posts: 850
Likes: 0
From: MO
#13. Check intake air temp sensor
#13. Check intake air temp sensor
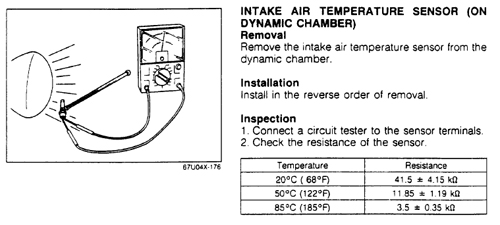
For a turbo, that sensor is quite important. The ECU retards timing as intakes temps increase, to avoid detonation. The ECU's default 68degF is a lot cooler than the actual air temp when boosting hard, which is when detonation is most likely.
The air temp sensor is a thermistor, which is a very common type of temp sensor. It's resistance decreases as temp increases, and vice versa. All the other temp sensors on the car are of this type too.
Originally Posted by NZConvertible
For a turbo, that sensor is quite important. The ECU retards timing as intakes temps increase, to avoid detonation. The ECU's default 68degF is a lot cooler than the actual air temp when boosting hard, which is when detonation is most likely.
The air temp sensor is a thermistor, which is a very common type of temp sensor. It's resistance decreases as temp increases, and vice versa. All the other temp sensors on the car are of this type too.

Don't hold your breath. I wrote this article addressing rough idle diagnosis and I couldn't get a moderator interested enough to archive it. It is a method I have used for all of the 31 years of my career as a technician, with consistent success:
https://www.rx7club.com/showthread.p...idle+diagnosis
Perhaps I should have added pics or condensed it a bit and it might have made it.
I
Joined: Dec 2007
Posts: 139
Likes: 0
From: Killeen
Don't hold your breath. I wrote this article addressing rough idle diagnosis and I couldn't get a moderator interested enough to archive it. It is a method I have used for all of the 31 years of my career as a technician, with consistent success:
https://www.rx7club.com/showthread.p...idle+diagnosis
Perhaps I should have added pics or condensed it a bit and it might have made it.
https://www.rx7club.com/showthread.p...idle+diagnosis
Perhaps I should have added pics or condensed it a bit and it might have made it.
Not only is it safer, but if there is a vacuum leak, propane will be sucked into places that you might not be able to reach with carb spray. I have never had a fire with the propane method in all those years of using it. If you have a fire with carb cleaner, such as on a turbine housing, the fire continues to burn anywhere the chemical was sprayed. Propane would burn quickly (from a spark perhaps) but wouldn't leave a continuous flame. It would go out almost immediately. Still I see countless numbers of people suggesting carb sprays or starting fluids.

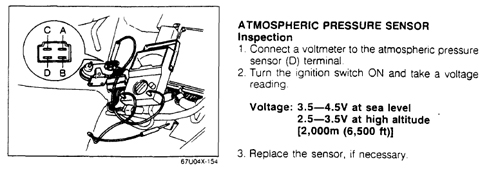
It says to attach a voltmeter to terminal D.Does this mean to put the positive lead of voltmeter on terminal D and the negative(ground) lead to a ground such as the negative terminal of the battery. Also,can this test be done with engine cold which is what I am guessing.
Yes, and it can be done at any temp. Keep in mind that your post illustrates an atmospheric pressure sensor, not the boost sensor that is mounted on the pass. side strut tower. The altitude here in OKC is around 1100 ft, I would imagine Tulsa would be similar.
Play Well
Joined: Feb 2005
Posts: 4,218
Likes: 0
From: We're all fine here now, thank you. How are you?
One thing i see alot is that the intake piping going to the TB is sometimes cracked. The one on My t2 was so hard to find I had to put it under pressure to see. If it is cracked this will cause more air to enter the intake that is unmetered and cause the car to run lean and either idle rough or not idle at all.