
How-to tail lights painted for $6 :D

Thread Starter
Full Member
Joined: Oct 2001
Posts: 174
Likes: 0
From: Burbank, CA
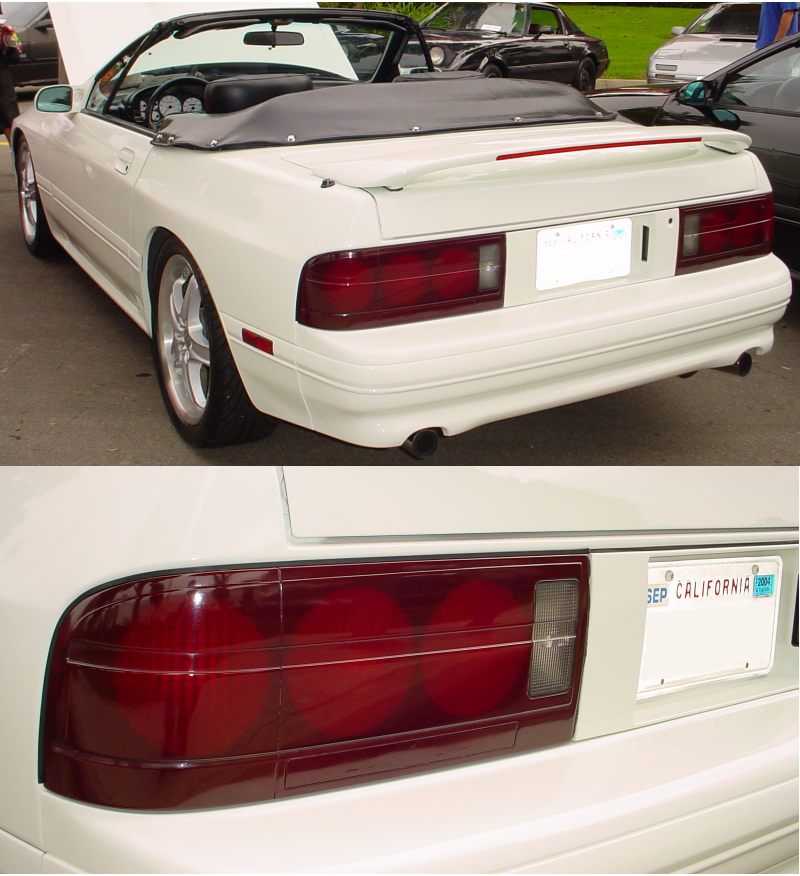
Hello everyone, last week i decided to re paint my tail lights since they were pretty scrached up. They turned out pretty nice, so i thought i would document the process here.
1)... The beginning. Begin by removing the lights by accesing it as if you were to take the spare tire out.

2)... once the lights are out, clean them with a damp towel. Make sure it isn't too wet because the water will go into the grooves and the tape wont stick in the corners specially. After you clean them, begin by masking the corner of the lights

I decided to mask the lights as opposed to taking the plastic off is because the factory glue used to stick both together was on super hard, and if i would have pull on it hard enough, then the plastic would have broken.
3)... mask the lenses thouroughly

I used the 371 brown scotch tape that i bought at 99c store.
4)... once both were well masked i got my good lil' bro to help me sand them out a bit. I did this because even though i'm using a "no-sanding required paint", i wanna even out the little cracks on the plastic. I used a 400 grit first, then 600 grit ($.79 a piece). Didn't go very hard, just enough so it is smooth to the touch.

5) Before painting them, i decided to wrap the back side of the light with christmas gift wrap because i didn't want to get paint all over the back.
6)Went to OSH and got some Krylon for plastics ($4).

I decided to pick it because if was both for plastics and the nice spray pattern.

7) Apply a light coat of paint every 30 secs. or so. Peal the masking before it dries completely so the paint doesn't chip off the edges.

8) ... Once you've done that to both lights, let them sit around for a few days before installation to let cure as much as possible. And the end.

- Carlos
1)... The beginning. Begin by removing the lights by accesing it as if you were to take the spare tire out.
2)... once the lights are out, clean them with a damp towel. Make sure it isn't too wet because the water will go into the grooves and the tape wont stick in the corners specially. After you clean them, begin by masking the corner of the lights
I decided to mask the lights as opposed to taking the plastic off is because the factory glue used to stick both together was on super hard, and if i would have pull on it hard enough, then the plastic would have broken.
3)... mask the lenses thouroughly
I used the 371 brown scotch tape that i bought at 99c store.
4)... once both were well masked i got my good lil' bro to help me sand them out a bit. I did this because even though i'm using a "no-sanding required paint", i wanna even out the little cracks on the plastic. I used a 400 grit first, then 600 grit ($.79 a piece). Didn't go very hard, just enough so it is smooth to the touch.
5) Before painting them, i decided to wrap the back side of the light with christmas gift wrap because i didn't want to get paint all over the back.
6)Went to OSH and got some Krylon for plastics ($4).
I decided to pick it because if was both for plastics and the nice spray pattern.
7) Apply a light coat of paint every 30 secs. or so. Peal the masking before it dries completely so the paint doesn't chip off the edges.
8) ... Once you've done that to both lights, let them sit around for a few days before installation to let cure as much as possible. And the end.
- Carlos
Senior Member
Joined: Sep 2002
Posts: 724
Likes: 0
From: "You take my car, I take your knee caps"
knightkarr, Thats sweet
86gxl- Nevermind, I just looked at your pics on cardomain.com
someone already have you **** haha
"limitedslip7: YOU %&%@@!!! NOENS!? ON AN RX7!? JUST KILL YOURSELF!!"
I wouldent have put it like though... Im an ***.... but not that much of one.
*edited for flaming*
86gxl- Nevermind, I just looked at your pics on cardomain.com
someone already have you **** haha
"limitedslip7: YOU %&%@@!!! NOENS!? ON AN RX7!? JUST KILL YOURSELF!!"
I wouldent have put it like though... Im an ***.... but not that much of one.
*edited for flaming*
Last edited by Icemark; Jan 5, 2004 at 04:52 PM.
I'm your huckleberry..
Joined: Jul 2002
Posts: 736
Likes: 0
From: Tucson, AZ
Nice job! IMO though, if I were to put the effort into repainting the tails, I would have painted them the same color as my car. I just think they look better that way, but, to each their own I guess 
Trending Topics
Joined: Jul 2002
Posts: 724
Likes: 0
From: 195 Miles West of Bridgeport, WA
"limitedslip7: YOU %$#@!!!! NOENS!? ON AN RX7!? JUST KILL YOURSELF!!"
lol I love how mean he is
*edited for flaming*
lol I love how mean he is
*edited for flaming*
Last edited by Icemark; Jan 5, 2004 at 04:53 PM.
Thread Starter
Full Member
Joined: Oct 2001
Posts: 174
Likes: 0
From: Burbank, CA
Originally posted by skunks
paint the rest of your car now
paint the rest of your car now
knowledge junkie
Joined: Mar 2001
Posts: 5,595
Likes: 6
From: Atlanta, GA
Looks good. I should also mention clear tint painting your tail lights as an option. One of the series IV guys changed his red sections to crystal/sparkel red and white sections to clear ... which looked good.
Last edited by vaughnc; Jan 5, 2004 at 11:50 AM.

Rotary Freak
Joined: Jun 2003
Posts: 1,709
Likes: 0
From: Metro Detroit
Originally posted by vaughnc
Looks good. I should also mention clear tint painting your tail lights as an option. One of the series IV guys changed his red sections to crystal/sparkel red and white sections to clear ... which looked good.
Looks good. I should also mention clear tint painting your tail lights as an option. One of the series IV guys changed his red sections to crystal/sparkel red and white sections to clear ... which looked good.
Hmm, Not bad but not exactly what I would do. I hang out with pro painters so I'm kinda picky.
I can see orange peel just from those pics.
To do it right you should have bought primer(can stuff still bad but better than all in one stuff) scuff the exterior so the paint grabs and then spray it on.
Sand it smooth and add another layer.
If it looks good and smooth then spray some clear coat over it and wetsand that to a good gloss.
I have a Black GTU and plan on going with blacked out tails. I'm going to do exterior cuz I'm still lazy and don't want to open up the tails. I'll mix some black paint with more parts clear coat and spray them. I hope it comes out well.
To me it's got that kind of "Krylon touch" that Rice boys and Hondas love but for $6 bux it's not a bad fix to aging tails.

Senior Member
Joined: Aug 2001
Posts: 291
Likes: 0
From: Michigan
Not bad but like he said you should spray some clear over it and wetsand it out. Then buff it afterwords to get the shine back. Alot of the tails dont even have to be repainted to get the black back out. I did one side by just sanding and then wetsanding and buffing and it was back to new. Any how good job.
GO white vert GO !!
love that car
may be i'll make mine look like that too
go auto zone ask for wet sand paper, buy them and then get them wet, then start sanding
start with like 600, 800, then 1000, then 1200, then .. 2000
after that u good to go
love that car
may be i'll make mine look like that too
Originally posted by DCRotor
How do you wet sand?
How do you wet sand?
start with like 600, 800, then 1000, then 1200, then .. 2000
after that u good to go
Wetsanding is exactly like regular sanding but you do it with a wetted piece which helps keep it from being really harsh.
Usually you will do this with high grit sand paper after removing major imperfections with harsher sandpaper.
I might start with 800 instead of 600 but your tails seemed to have a bit of wavy-ness to them.
Usually you will do this with high grit sand paper after removing major imperfections with harsher sandpaper.
I might start with 800 instead of 600 but your tails seemed to have a bit of wavy-ness to them.