FD Upper on an Fc.

 03-06-09, 04:37 PM
#127
NIKOCRX
Join Date: Dec 2005
Location: greece
Posts: 616
Likes: 0
Received 0 Likes
on
0 Posts
1.PHILIP LONGO------->RE571373450GR
2.DAVID GIBB---------->RE571373477GR
3.BRANDON KUHL----->RE571373463GR
4.OWNERS DANIEL--->RE571367485GR
5.BARRY RAMPERSAD->RE589070905GR
6.JASON DAWBERRY-->RE589070896GR
7.JOHN GOMES-------->RE571368300GR
you are welcome!
Last edited by ΝΙΚΟΣ; 03-06-09 at 04:38 PM. Reason: spelling
03-06-09, 04:54 PM
#128
NIKOCRX
Join Date: Dec 2005
Location: greece
Posts: 616
Likes: 0
Received 0 Likes
on
0 Posts
also i did found a s4 lim and gave it to the man,he will start making them next week,as we see even the mounting holes are different but he said that it's possible to make them...
03-06-09, 07:09 PM
#130
Rotary Freak
iTrader: (2)
Join Date: Mar 2006
Location: Wayne NJ
Posts: 2,508
Likes: 0
Received 0 Likes
on
0 Posts
yeah the hole difference shown is the amount you have to enlongate the holes on the fd manifold. btw its that adaptor transitioned at all, to match the runners? mayb its just the pic angle
03-07-09, 01:53 AM
#132
NIKOCRX
Join Date: Dec 2005
Location: greece
Posts: 616
Likes: 0
Received 0 Likes
on
0 Posts
this is a s5 adapter,there is difference on the ports too,but can be done...will let you know...
03-07-09, 07:04 PM
#135
I got a chance to check it out and it looks pretty decent. This is what it looks like for the S5 to FD adapter from Greece-
NOTE- Disregard the blue marker everywhere except for pics 5, 7 and 8.


Material to be removed from the S5 LIM in blue-
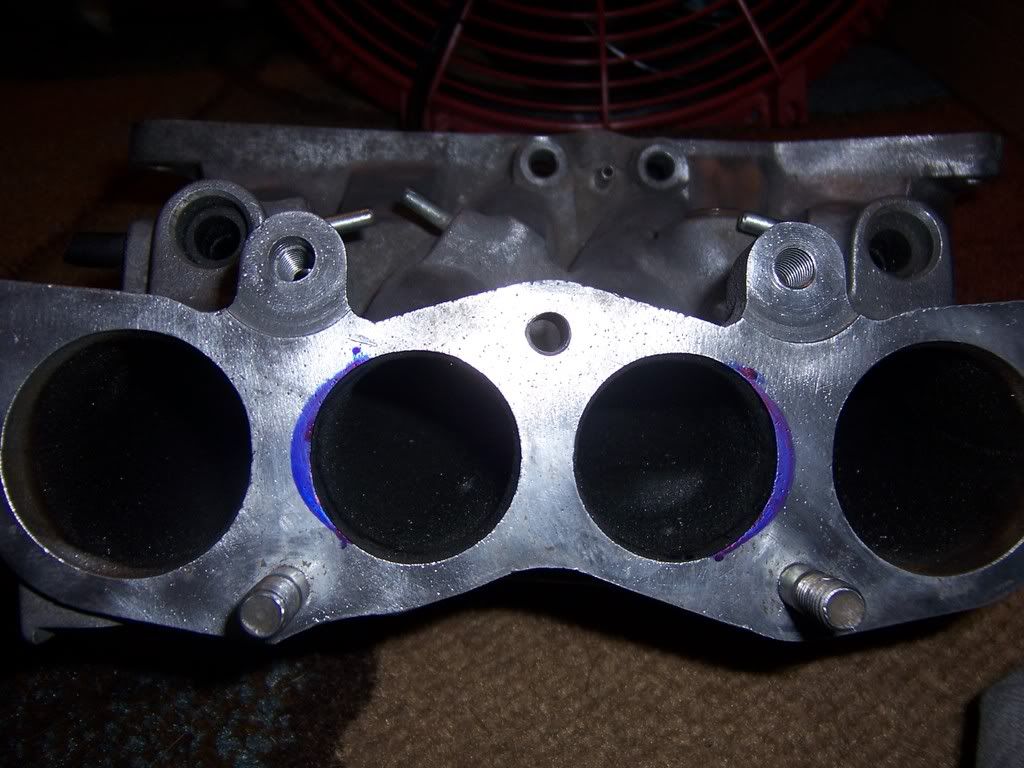
Bolt holes for FD UIM need to be ovaled out a bit, new position outlined in faint blue lines.


So it comes with one longer bolt but what are we supposed to do for the rest of them?
?
NOTE- Disregard the blue marker everywhere except for pics 5, 7 and 8.
Material to be removed from the S5 LIM in blue-
Bolt holes for FD UIM need to be ovaled out a bit, new position outlined in faint blue lines.
So it comes with one longer bolt but what are we supposed to do for the rest of them?
?
03-08-09, 12:12 PM
#137
Rotary Freak
iTrader: (2)
Join Date: Mar 2006
Location: Wayne NJ
Posts: 2,508
Likes: 0
Received 0 Likes
on
0 Posts
Nikoe- i dont need an adaptor
greenbud- go to the hard ware store and buy new studs 3/4 or half of an inch longer then stock depending on the adaptor thickness
Why is the there additional porting needed on the lim? the transitions of the adaptor dont look soo good. With the adaptor the should be no reason to modify ur lim, even with an s4.
03-08-09, 05:26 PM
#138
I don't know man, the more I am working with this thing the more I hate it. The instructions say something about ovaliing out the two holes but I had to do more than that to get it to fit right. Overall it was just tedious grinding and refitting, the bolt holes on the adapter even needed to be fine tuned. This is the S5 to S6 adapter using a S5 LIM.
The LIM just needs to be trimmed up a bit to clean up the flow. The other marker was me getting all confused for a while....The spacer was able to work in the end but it was a pain in the ***.
I also got lucky and found that the studs from a S4 TB/UIM happen to fit right in place of the short studs on the S5 LIM. I just swapped in some longer studs but still have issues with clearance for the nuts on the two front studs.
I had to oval out four holes to get it to fit-
03-08-09, 09:52 PM
#139
does anyone have any dimensioned drawings of these things either electronic or hand drawn? I am going to start drawing the adapter in inventor but I don't want to waste my time if it has been done.
I have a piece of 1/2 in aluminum and a piece of 1 in aluminum, I imagine that the 1 in will work best for a smooth transition.
once I am done with the drawings I am going to cnc one for myself. If it goes smooth enough and people want them I will probably consider selling a few.
I have a piece of 1/2 in aluminum and a piece of 1 in aluminum, I imagine that the 1 in will work best for a smooth transition.
once I am done with the drawings I am going to cnc one for myself. If it goes smooth enough and people want them I will probably consider selling a few.
03-08-09, 11:30 PM
#140
Rotary Freak
iTrader: (2)
Join Date: Mar 2006
Location: Wayne NJ
Posts: 2,508
Likes: 0
Received 0 Likes
on
0 Posts
damn man, the only thing you should of had to do is enlongate the mounting holes on the uim.
kevin had ours made of 3/4 '' aluminum and the holes cnc'd exactly to the gasket w/o the transition and we each ported it ourselves to our liking. Niether of us had to port the manifolds except for the mounting holes
kevin had ours made of 3/4 '' aluminum and the holes cnc'd exactly to the gasket w/o the transition and we each ported it ourselves to our liking. Niether of us had to port the manifolds except for the mounting holes
03-09-09, 02:00 AM
#142
NIKOCRX
Join Date: Dec 2005
Location: greece
Posts: 616
Likes: 0
Received 0 Likes
on
0 Posts
but now i see what you have done in the pic i understund what you have done,you didn't read the instructions,you will have to use the central mounting hole as a guide,and the s5 gasket to help you understand how to oval the mounting holes....you don't have to touch the ports...
03-09-09, 02:10 AM
#143
Rotary Enthusiast
iTrader: (1)
Join Date: Aug 2005
Location: Canada
Posts: 1,315
Likes: 0
Received 0 Likes
on
0 Posts
but now i see what you have done in the pic i understund what you have done,you didn't read the instructions,you will have to use the central mounting hole as a guide,and the s5 gasket to help you understand how to oval the mounting holes....you don't have to touch the ports...

Spec.
03-09-09, 03:10 AM
#144
NIKOCRX
Join Date: Dec 2005
Location: greece
Posts: 616
Likes: 0
Received 0 Likes
on
0 Posts
There are 2 chances:
1.he put it upside down
2.i believe that is the problem:
he said:
I also got lucky and found that the studs from a S4 TB/UIM happen to fit right in place of the short studs on the S5 LIM. I just swapped in some longer studs but still have issues with clearance for the nuts on the two front studs.
as i see in the pic,he use this 2 bolts but thats wrong,he has to use the center bolt first and then ovaling the rest mounting holes.there is no work needed in the ports.the s5 and the s6 has a little differend mounding holes so you need to do some work on the s6uim.as for the 98,5% i did send a guy a rx8 stop light and replace a small screw at the bottom that was missing with a used one to help him,not to serch for one,and he give me negative feedback,i offered return but he was asking the half money back,well that's a stupid for sure...
FOR EVERYONE:READ THE INSTRUCTION,DON'T HURRY UP TO INSTALL IT WITHOUT CLEARY UNDERSTUND WHAT YOU HAVE TO DO.
03-09-09, 09:12 AM
#145
NIKOCRX
Join Date: Dec 2005
Location: greece
Posts: 616
Likes: 0
Received 0 Likes
on
0 Posts
ok,guys only one s5 adapter has been left:
http://cgi.ebay.com/ebaymotors/ws/eB...m=300299282682
after that will make some for the s4 guys.i'm asking for anyone really interested for the s4 aqdapter to write his name here,just to know how many will do.thank you!
http://cgi.ebay.com/ebaymotors/ws/eB...m=300299282682
after that will make some for the s4 guys.i'm asking for anyone really interested for the s4 aqdapter to write his name here,just to know how many will do.thank you!
03-09-09, 09:40 AM
#147
NIKOCRX
Join Date: Dec 2005
Location: greece
Posts: 616
Likes: 0
Received 0 Likes
on
0 Posts
no hard feelings but the adapters are fine,the ports are fine,and they didn't pay a fortune to get them...anyone who wants a so perfect adapter,chrome etc... can buy it from you...
 03-09-09, 10:42 PM
#149

but now i see what you have done in the pic i understund what you have done,you didn't read the instructions,you will have to use the central mounting hole as a guide,and the s5 gasket to help you understand how to oval the mounting holes....you don't have to touch the ports...
The instructions don't even make sense:

This is the pic that is linked to in the instructions, looks like the same thing I did to my UIM except that they welded some new material onto the UIM and re-drilled the holes instead of ovaling the holes. i didn't know we were going to have to weld aluminum to do this:
http://s23.photobucket.com/albums/jj.../howtoDOIT.jpg

Explain what he did please. He put the adapter upside down, right? I was going to buy one until I saw his pics, so I like to know what happened. I'm sure its his mistake since you have 98.5% satisfaction and we all know 1.5% of the world population are idiots that blame others for their mistakes.
Spec.
Spec.
1)The adpater was not upside down.
2.i believe that is the problem:
he said: I also got lucky and found that the studs from a S4 TB/UIM happen to fit right in place of the short studs on the S5 LIM. I just swapped in some longer studs but still have issues with clearance for the nuts on the two front studs.
as i see in the pic,he use this 2 bolts but thats wrong, he has to use the center bolt first and then ovaling the rest mounting holes.
Original S5 short studs- too short to make it though FD UIM

Longer Studs from S4 UIM to TB - I swapped these into the S5 LIM

Longer Studs allow it to be bolted together-

But the bolt is too close to the UIM runner to get a nut on it-

Two very seperate issues here
You can see clearly that the ports are slightly off in these pics, no big deal easy enough to fix.
Took me a while to realize that I had to oval the four holes instead of just two holes. The adpater itself wouldn't even fit onto the S5 LIM studs at first, I had to clean up the holes on the adpater just a bit before it would slide over the studs without binding up. Then I had to find new longer bolts for the LIM. Now I have to figure out how to get nuts onto the other two studs that are too close to the ruuners.
The ebay ad read like this-
"You will get the adapter,the bigger screw and full instructions for the installation.you will have to buy the 2 gaskets from your local mazda dealer for the installation.(gaskets are not included)...a minimal custom work needed at the uper manifold,the instructions will make it very easy to do it.this adapter is on the market from japan for 350E!!!"
Made me think this was a refined piece that just needed a finishing touch. I mean it worked in the end buit it was a lot more work than I had orgonally thougt it was going to be.
Are you the ebay seller?
03-10-09, 03:42 AM
#150
NIKOCRX
Join Date: Dec 2005
Location: greece
Posts: 616
Likes: 0
Received 0 Likes
on
0 Posts
i can't cleary understund what's going wrong,can you take a pic with the adapter on the lim at the other side?better take a pic at both sides to compare.and also wonder is this a s5 lim that you use or it is s4?the 4 bolts i have wasn't short enough so i didn't use bigger.i will try to get photos tonight.no ,i'm not the ebay seller,safe drive service is the seller,i'm just helping him.