When you click on links to various merchants on this site and make a purchase, this can result in this site earning a commission. Affiliate programs and affiliations include, but are not limited to, the eBay Partner Network.
DIY: Modernizing your S5 RX7 tail lights with LEDs
Ok guys, there's been much discussion on this topic and a few people asked me how I put mine together, and the other "how to's" here no longer have photos or were not very detailed, so I decided I would try putting this together myself as a service to other members.
Things to keep in mind:
- Check your local laws to see if this is indeed legal in your state/country/location.
- I'm presenting this information as a service to other members on this website, so if you are following my guide and you break something its not my fault. Use your common sense with tools and car parts.
- If you aren't comfortable doing this yourself, find someone who is, or buy a set from someone. Don't start something you can't finish.
- You will be working on one of the most important safety features of your car (you don't want some one crashing into the back of your car because you didn't wire something up, right?), keep this in mind. I'm not responsible your YOUR negligence.
- This information and photos is presented "as is", I'm not responsible for your projects, problems or any issues that might appear while you are following my guide.
- Feel free to spread this guide and share my information and photos as long as you include a link back to this thread
This guide was made with coupe (non convertible) in mind. My car is a 86 that I had already swapped over series 5 tail lights prior to this LED conversion. I'm sure there is some way you can successfully convert S4 tail lights to LEDs as well, but I have personally not done that and have not seen much information on the topic.
There are several ways to "skin the cat," I chose to simply buy 4" circular lights and attach them in the stock location. There are companies/individuals out there that can custom make lights for you, but I leave the searching for that on your own, as they come and go a lot. Above I listed a link to another "how to" if you want to buy your own LEDs and wire them up a specific way. This tutorial is just for replacing the incandescent bulb with a glue in replacement of your choice.
Tools/ supplies needed:
- Philips screwdriver
- Flat head screwdriver
- Wire strippers
- Socket set with ratchet or wrenches
- 2 oz container of silicone or other sealant
- 4 4" wide circle shaped red led "truck" style brake lights
- 2 4" wide circle shaped amber color "truck" style brake lights
- 6 wire connectors (butt connector, top hat connector, which ever one you want to use)
- Electrical tape
- Paper towels
- Soldering gun and solder.
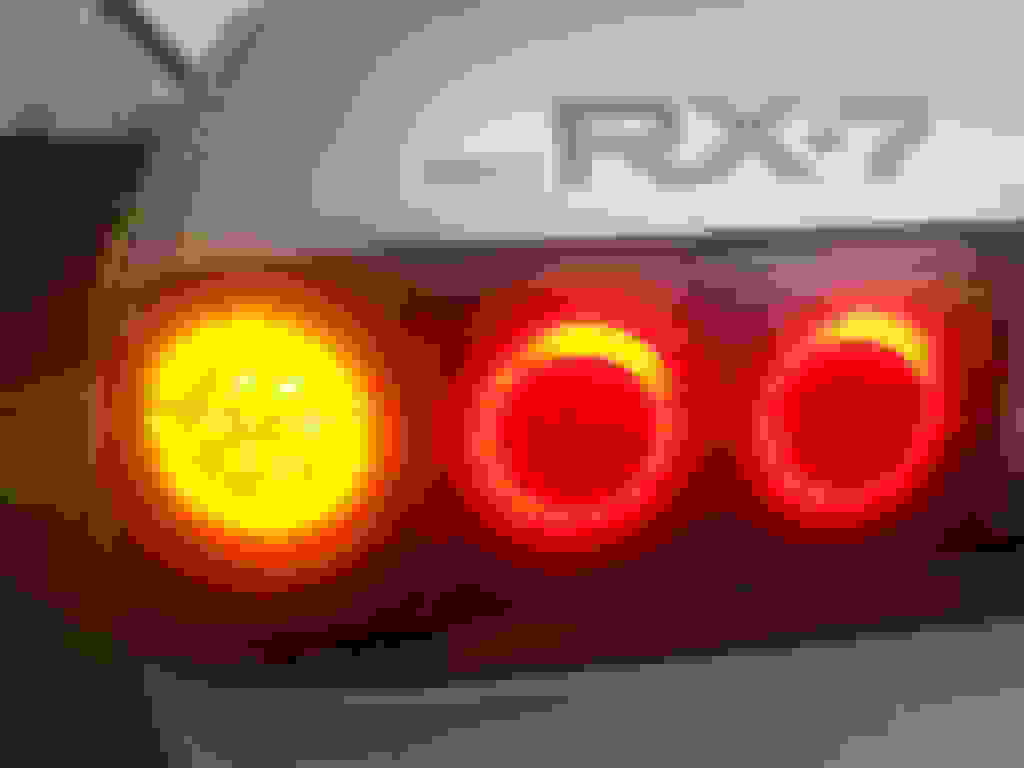
First step, lets find some 4" circular LED brake lights. Check places like truck stops and automotive stores (Autozone, O'Reilley's, Advance Auto, etc). I bought mine online, ebay specifically. Check around, know what you are looking for and set a budget for what you want and eventually you'll find your set! For the brake lights they MUST have two stages of illumination. One for running lights and one for when you press down on the brake petal. The amber lights only need one, but I purchased a set that matched the brake lights for a "halo" effect.
Once you have them, take off your tail lights. If you are going from series 4 lights to series 5, see the link above, you will need a few extra steps. You'll need your socket set or wrenches to take them off. The nuts are accessible through the hatch/trunk.
Once out, take the set of tail lights to your work area. Detach the wiring harness for the bulbs that go in your tail lights and take them as well. Now, take out the bulbs and set the harness and bulbs aside for now. On the back of the tail lights you'll see several screws holding the tail lights together. Use your Philips head screwdriver to remove them, there should be 6 on the inside of the tail lights and 3 (I think) on the outside perimeter. Turn on your oven to 250 degrees Fahrenheit and once warm, place your brake lights inside for 2 minutes. What this does is loosen the sealant so you can take apart your tail lights further. Be sure to place something between the tail light and the grid of your oven so you don't get marks on your tail light!
Once out, start prying the lens off. BE CAREFUL! GO SLOW! This plastic is old and brittle!!! YOU WILL CRACK YOUR LENS IF YOU ARE NOT CAREFUL! Use the flat head screwdriver for leverage if you would like. Take your time! Put the tail light back in the oven again if you start struggling again.
Is this photo you will see that there are small clips you have to get the black plastic over.
Ok, once you pull the lenses off (without breaking any plastic right? ) Take out the diffusers. They look like this:
Set them aside, we will not need them again.
Now, use your flat head screwdriver to push out the reflectors (shiny silver from the front, white from the back view), you should have already removed the screws holding them in earlier, but now you will need to push through the white clips:
Once you take all three of these out, test fit your lights to see if they will fit the hole without adjustment. I had to sand the edges of mine a little to get them to fit correctly. Once you are satisfied with fitment, you are ready to start placing your new brake lights. Use your tube of silicone or other sealant and make a ring around were you will be placing your lights. Like so:
Place your lights in the holes how you want them to sit, I sat mine flush for the brake lights and slightly at an angle for the turn signal (it won't sit "flush"). Use a rag or a paper towel to clean up any excess sealant before it dries.
The sealant will have to sit several hours to cure, so check the tube to see how long it will be to cure. In the mean time, grab your soldering gun and plug it in and let it warm up. Grab your wiring harness and let's convert your harness to accept the new LEDs. These are the bulbs we will be working with:
Turn signal x1 brake light x2 per tail light. The 4th wire is your reverse light, we are not doing anything with it in this writeup, but I suggest buying a LED direct replacement bulb from your auto parts store of choice.
This next step, there are several ways of doing it and my way is not the only "correct" way. You could wire them directly to the harness and not splice like I am. I am only showing you one way.
To my knowledge, I do not think the wires are "universal" when you are buying truck lights, so check with your packaging to make sure which wire does what.
For the lights I bought, the wires were:
White - ground
Black - "Running light" illumination only, i.e. when you turn your headlights on
Red - Illumination for when brake lights are depressed, or for hazards/turn signal, depending on which light we are talking about.
Stock wiring: (keep in mind I don't know if these color codes are appropriate for all FC rx7's, check your haynes manual or factory service manual to be sure before you do this!)
- Black - ground
- Green - illumination for when brake lights are depressed, or for hazards/turn signal, depending on which light we are talking about.
- Red - "Running light" illumination only, i.e. when you turn your headlights on
Note: The stock turn signal does not have a wire for a "running light" function, if you replace the turn signal with a LED set that has that function like I did, you'll have to connect it with the red wire from one of the brake light connections.
Note: If you do this my way, the turn signal will flash faster than stock. LEDs use less power than incandescent bulbs, and the car thinks that because there is such low power usage, that the bulb is burned out and will flash quickly. To remedy this, you must wire in a resistor to fool the car into thinking there is an old style bulb there. I don't know the exactly OHM requirement of the resistor, but if you search you will find it. Resistors are cheap, you can easily find one for less than a dollar.
Use your wire clipper/strippers to expose about a 1/4 inch or so of wire at each connection. Twist together the appropriate connections (using the above guide, product packaging, haynes manual, factory service manual, the internet whatever guide you choose).
Now solder together the wires. They should look something like this:
Once you have all of your connections soldered, I used a "top hat" style connector and some electrical tape to keep the connection from coming undone or shorting out. THIS IS VERY IMPORTANT!
Now, all of the wiring should be completed, and your lights are going to need to sit for a few hours to completely cure. Unplug your soldering iron, let it cool and put it away.
After your sealant has fully cured according to the container's guidelines, its now time to clean up the tail lights and put everything back together. Use a paper towel to clean up any gunk that has accumulated and put the lenses back in place. GENTLY push them back into their home locations. I suggest heating them back up in the oven like we did earlier (2 minutes at 250 degrees), then pushing them back in place. This also helps make the sealant loose, making it easier to push the lenses back into place and seal the tail light. It wouldn't be a bad idea to use any leftover sealant from earlier to help seal the tail light as well.
Note: my oven is ridiculously small, so I had to put my tail lights in several times to get warm. Look:
Got everything back together? Good! Use your philips head screwdriver to replace the missing screws to hold together your tail lights. Bring your tail lights out to your car and start plugging everything back in. Turn your key into the On position, and test out your new lights!
Feel free to ask me questions, but keep in mind, I'm not an expert electrician or mechanic by any means.
Last edited by StrandedRX; Jun 27, 2015 at 05:49 PM.
Reason: Forgot to add some details
Not sure what a "top hat" connector is, but instead of electrical tape, use adhesive lined heat shrink. Electrical tape will dry out and in general is a poor choice for insulating connections.
They look good. One thing I'd suggest is that if the circular light modules are the typical made in China, spray some conformal coating on the board to seal out moisture. That will increase the reliability a LOT.
I took a while and looked for lights specifically made stateside, they are pretty hard to find and a little more cost wise. Probably worth the extra few dollars, but even some of the stuff made in the states are of questionable quality.
This is what I mean by "top hat connector." I live in the backwoods, that's what I've always heard it called.
Ahhh! Don't use that in a car! Those are for solid copper 120v residential and commercial building applications.
Stranded copper used in vehicles needs to be crimped with a crimp cap, barrel connector or soldered.
Those connectors are for connections on residential wiring where the conductors are solid and they will be exposed to zero moisture and vibration. Never, EVER to be used on a vehicle. Actually they shouldn't be used in residential but try telling the inspector that your industrial terminal strips are 1000x better as they mark a "not to code" on their sheet...sigh.
Anyway, solder joints, remove flux and shrink down adhesive lined heat shrink.
Or crimp, and use dielectric grease in the crimp w/heat shrinkable crimps or apply heat shrink after.
harbor freight sells some awesome heat shrink crimp/butt connectors.
my method is to feed the wiring and plastic coding all the way thru the connector(uses next size larger) out the other end to be twisted and then soldered.. then feed the solder joint back to the middle of the heat shrink chrimp.. and then crimp the solder. at least when people are watching.
i really like your halos, were did you get them? did you make them like david haynes. or premade?
Last edited by lastphaseofthis; Jul 3, 2015 at 11:36 AM.
the outer ring "halo" effect being lit by 3 LEDs would probably annoy me after a while. you can see the light dim from the source at 1 o'clock to the 7 o'clock position.
also the reflectors are a personal opinion. i don't like the non diffused look without them.
Last edited by RotaryEvolution; Jul 7, 2015 at 09:32 AM.
i really like your halos, were did you get them? did you make them like david haynes. or premade?
Ebay. Maybe some day when I have time I can make some from scratch. It would probably look better.
To be honest, I'm going to redo the whole thing eventually, when I can make some of my own. These will work for now.
Originally Posted by marclong
Entire project seems to destroy the look of the original. It gives it a "cheap ****" look to me. But that's just my opinion. Good writeup though.
As they say, to each their own. At least I'm not tinting the lenses black or spray painting the inside of the housing chrome for the ghetto rice look. If I wanted the look of the original, I would have stuck with my crappy s4 tails.
Originally Posted by Lyger
the outer ring "halo" effect being lit by 3 LEDs would probably annoy me after a while. you can see the light dim from the source at 1 o'clock to the 7 o'clock position.
I guess I don't see what you are talking about. There are more than 3 leds lighting the ring, my crappy camera doesn't really take good photos.
Originally Posted by jjwalker
Ahhh! Don't use that in a car! Those are for solid copper 120v residential and commercial building applications.
Well I guess its a good thing I haven't gone that far yet. Both taillights haven't been attached for their final placement yet anyway. Too many irons in the fire to finish this project.
Nice, I think they look great! Can you take some pics from further away or how they look when the car is actually in a parking lot or something?
I can take some from further away, but as for a parking lot that's not possible at the moment as there is no engine in the engine bay, and my wife frowns on using her truck for anything other than shopping trips to Kohl's let alone towing something .
Originally Posted by Aaron Cake
My first shipment of LEDs from China is available at the post office now for the LED tail lights I am building for my Cosmo.
Nice! You wouldn't believe the ignorance of some of the people that leave around here. I've been to a few local car meets with my FD, one of the most common questions I get are "What year is your Mustang"?. Keep in mind my FD is visually 100% stock. When I say its a Mazda, either they don't believe me or they say that all that "Chinese car manufacturer stuff like that is junk." People wonder why I'm an introvert
My first shipment of LEDs from China is available at the post office now for the LED tail lights I am building for my Cosmo.
Hopefully I'm not dragging this up from the dead but did you find out about insurability on the street with this mod? Also lights look really good nice work!
Hopefully I'm not dragging this up from the dead but did you find out about insurability on the street with this mod? Also lights look really good nice work!
Non DOT/MOT lights mean show car only. Or, collector car insurance which usually places limits on use (ie. no driving every day to work). I'm fine with this as with 3 cars, my Cosmo won't be an everyday driver.
Now...one little thing is that from the exterior, the light lens still has the DOT/MOT markings if all you are doing is putting LEDs behind it. I will leave that up to interpretation.
Hopefully I'm not dragging this up from the dead but did you find out about insurability on the street with this mod? Also lights look really good nice work!
Thanks! I asked my insurance company (the local agent, not calling the corporate office) what was the legality/insurance concerns about this and she said it isn't a problem as long as 1) it is DOT approved led set you are installing (seeing as how I used DOT approved semi truck lights thats not an issue) 2) They are installed and maintained so they are visible (of course). Check with your local insurance and/or law enforcement before doing it. Something else to consider, I live in the middle of no where. They have no other FC's or any Rx7s to use as comparison, and let's face it, if they google search "rx7 tail lights" they aren't going to see many stock tail lights for the fc.
Only problem is that by removing the diffuser, and then placing the truck/trailer lights behind the RX-7 lens, the assembly is no longer that which was approved by DOT and thus isn't legal to run.
Only problem is that by removing the diffuser, and then placing the truck/trailer lights behind the RX-7 lens, the assembly is no longer that which was approved by DOT and thus isn't legal to run.
I get what you are saying, but i don't buy that. how can (whom ever is in charge ) determine at by putting a DOT LED behind a clear plastic lens now makes it not DOT.
...
if we got rid of the diffuser and the lens, or just attached the DOT LEDS to the outside of the lens. then thats legal?
i would fight in court to the death. jury trial. no jury would find these mods to be less then the output of the "DOT compliant"
i guess the take away is.. **** dot. as long as they look good and bright and mostly factory, cops are NOT going to care.. i wonder what it takes to get a set of aftermarket lights dot'd?
edit then i found this:
This is a messed up situation. Headlights can meet DOT standards and be sold as DOT approved without ever being legal on any vehicle. The problem is that the DOT standard calls for minimum requirements for intensity and pattern, but those requirements are not enough to certify lighting on any particular vehicle. The vehicle has to go through all the testing with those lights in place to be actually legal. In the US any aftermarket exterior lighting is illegal on any vehicle because it is an unauthorized modification to a federally mandated safety system. However, enforcement varies and if the lighting you want to use looks like it belongs there and is not glaring you probably will not have trouble.
Last edited by lastphaseofthis; Aug 16, 2015 at 08:15 AM.


 ) Take out the diffusers. They look like this:


 .
. When I say its a Mazda, either they don't believe me or they say that all that "Chinese car manufacturer stuff like that is junk." People wonder why I'm an introvert


