When you click on links to various merchants on this site and make a purchase, this can result in this site earning a commission. Affiliate programs and affiliations include, but are not limited to, the eBay Partner Network.
That replaces the main camber link, which adjusts camber on both rear wheels at the same time. Theoretically it should adjust them the same amount, but in practice that link is mounted off-center so it will likely cause some uneven camber. Not enough to really worry about for most of us just driving on the street.
If only one of your rear wheels has the camber issue then you need to look at what's bent or worn. There is a small link on the inner end of each rear control arm, and this link will also adjust camber (for each wheel individually). From the factory they are non-adjustable, so if there is something seriously worn or bent on yours then it could be causing your camber issue.
It's worth putting the car on stands and inspecting everything in the rear suspension before you spend any money on this issue.
AWR used to make (can check if they still do but I doubt it) individual camber adjusters for each trailing arm to fix the problem of uneven camber per side.
my buddy designed the part shop max suspension and said the individual adjusters aren�t necessary if all other bushings were perfect. Just mind their definition of �all other bushings� were heim joints with no actual rubber. I�ve since gotten rid of the awr links and run the part shop max everything in the rear and do not have mismatched rear camber.
That replaces the main camber link, which adjusts camber on both rear wheels at the same time. Theoretically it should adjust them the same amount, but in practice that link is mounted off-center so it will likely cause some uneven camber. Not enough to really worry about for most of us just driving on the street.
If only one of your rear wheels has the camber issue then you need to look at what's bent or worn. There is a small link on the inner end of each rear control arm, and this link will also adjust camber (for each wheel individually). From the factory they are non-adjustable, so if there is something seriously worn or bent on yours then it could be causing your camber issue.
It's worth putting the car on stands and inspecting everything in the rear suspension before you spend any money on this issue.
Thanks for the info, with my exhaust system removed I have room to poke around the rear suspension. You call the part to be replaced "the main camber link", is this the "sublink" mentioned in the workshop manual?
All my suspension parts are original other than the DTSS bushing delete. So, all the parts are suspect, I will have to go to an alignment shop to fix the problem.
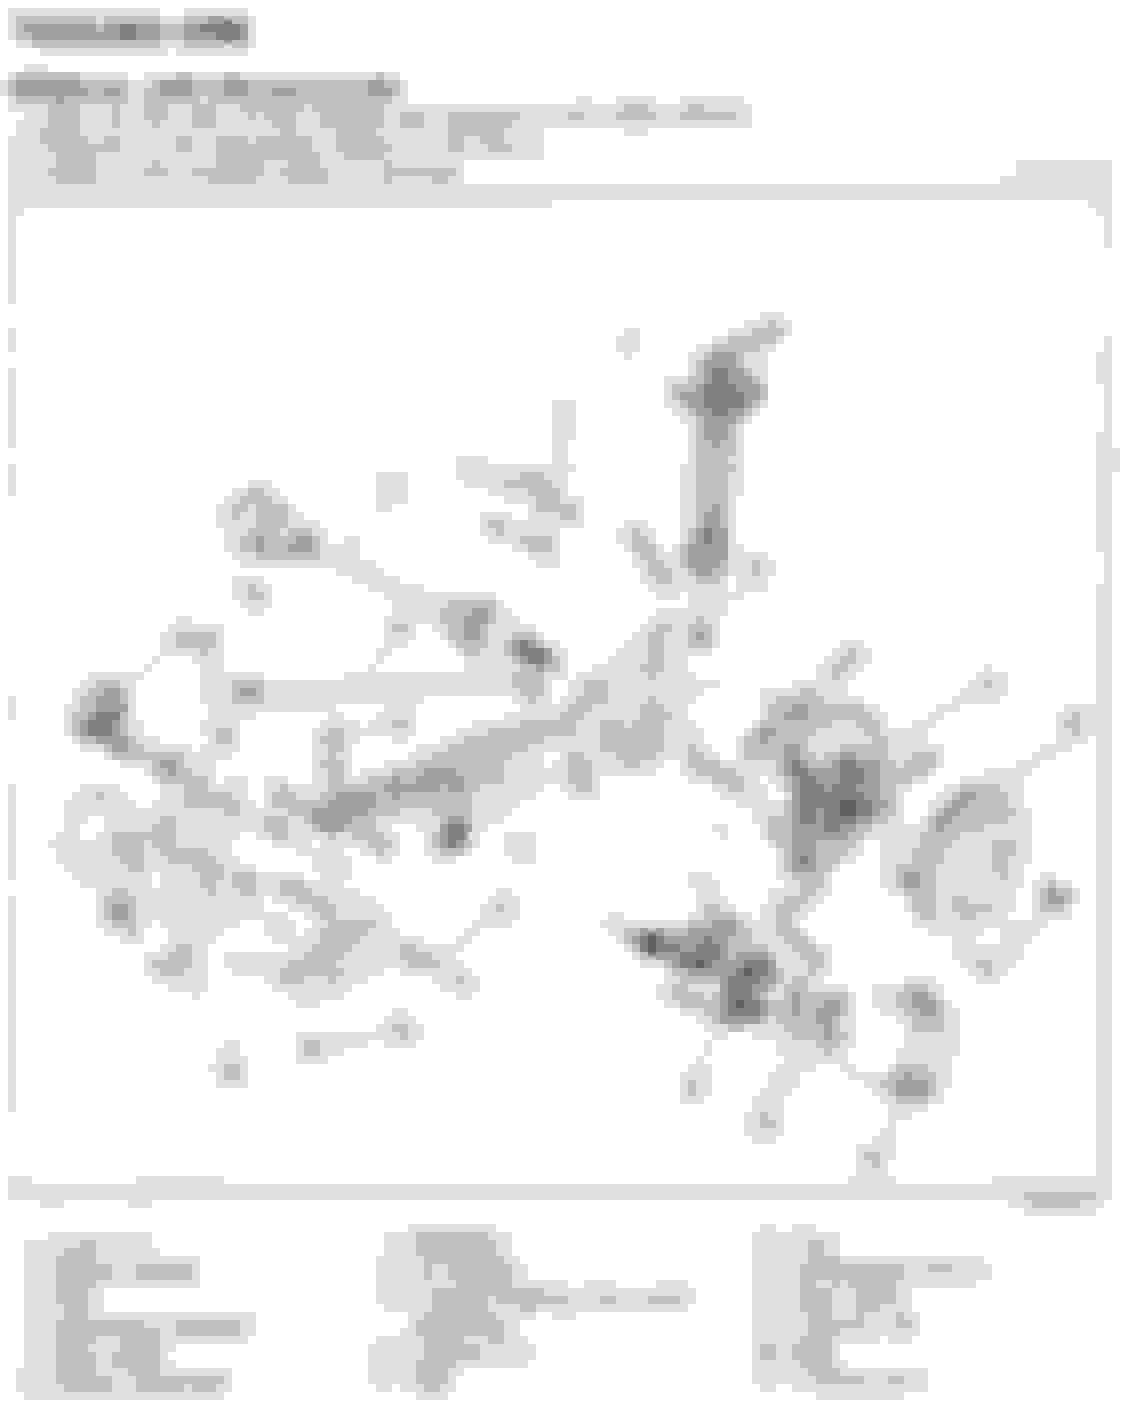
The service manual terminology can be a bit confusing sometimes. I added a picture here so we're on the same page:
In this picture, the "sublink" isn't named, but it's the long vertical link that sits between 13 and 10 in this diagram. That's the part that you replace with the aftermarket adjustable link you posted, and it's what I called the main camber link before.
Camber is not factory adjustable. With aftermarket parts it can be adjusted in two ways:
1. If you have camber issues on one wheel (which is your current problem) there's something wrong with part 15 on the diagram. If you look at this diagram it's confusing, but it all makes a lot more sense if you look at the rear suspension in-situ. Imagine the knuckle (9, Triaxial floating hub outer assembly) and the trailing arm (17) as one unit. The only reason they are separate in the first place is the DTSS function that you've now deleted, so as far as geometry is concerned they can be considered as one. When you modify the length of that inner link (15), you can change camber on the one wheel. If you shorten the link it will pull the inner part of the arm closer to the subframe and the top of the wheel will tilt outwards (positive camber). If you lengthen the link it will do the opposite and give you negative camber.
I don't actually know of any adjustable replacements for these links on the market anymore. The AWR one DR_Knight mentioned doesn't seem to be in production any longer. Mazdatrix used to make some (although I didn't like their design), also out of production. The only available links are shorter than OEM but set length, so they would work but you'd still need the rear adjuster to actually adjust unless you knew the length you need in advance.
In your case I suspect the link is broken, or something else is wrong. I snapped one once (it was home-made, not OEM, long story) and it caused the exact symptoms you're having. Hard to say until you inspect it.
2. If you want to adjust camber on both wheels (not your stated problem, but you're working on a restoration and when people replace shocks they often get lowering springs which cause negative camber) you need the main camber link. The subframe is mounted in the front with two rubber bushings. This is the round part above part 12 in the diagram. There's enough flex in those bushings to allow the rear of the subframe to pivot up and down a bit, so you can lengthen or shorten the rear link to alter camber on both wheels.
There are many adjustable links on the market for this. The only one I would purchase is the Mazdatrix one that has rubber bushings, but I am currently running an aluminum one with heim joints like you photographed. It works, but transfers noise and vibration from the subframe to the body. The intuition is the same; shorter link -> more positive camber, longer link -> more negative camber.
Did you (or do you intend to) install lowering springs? If not then you shouldn't need any camber adjustment at all. The link you photographed will add that function if you need to for some reason.
This is great stuff for me, as an old DYI'er a little knowledge is dangerous!
I don't plan on installing any lowering springs, the original springs seemed to have lost some of their height over the years. If I replace them with new stock height springs will this help with the camber problem?
I will search around for some shorter control links, I thought I came across some adjustable control links, there was a comment that you might need to hammer the floor pan to make room for them. Your advice that the control link being damaged, is the main cause of my negative camber on only one wheel is pointing me in the right direction.
I found a set of AE rims and put them on my GXL! Needed a 10mm wheel spacer on the front and a 5mm spacer at the rear. I replaced the front lugs with longer ones and need to do the back lugs because I lost 5mm of lug nut engagement. When an impact wrench is used to tighten the nuts they strip the threads off the lugs! Luckily it only damaged one lug.
I was amazed how much heavier the AE rims are compared to my GXL rims. My plan is to get a set of real studded snow tires mounted onto the stock rims and a nice set of directional VR speed tires for the AE rims. $$$
I used to love having Trans-am's and Camero's try and follow me around curves in town! I will miss that bit of rear steering!
Here is a question I have not looked into yet. Can my AAS shock absorbers be rebuilt by someone? I think they are gas filled and still kinda work?
This is great stuff for me, as an old DYI'er a little knowledge is dangerous!
I don't plan on installing any lowering springs, the original springs seemed to have lost some of their height over the years. If I replace them with new stock height springs will this help with the camber problem?
If both of the rear wheels are experiencing some negative camber, and by the same amount, then probably. First thing to do is figure out why one wheel is experiencing more than the other, then maybe get an alignment and see if the camber lands within spec before spending any money.
But I would just get the Mazdatrix adjustable link with the rubber bushing, rather than replacing the springs. I don't know what OEM springs cost but the adjustable link is almost certainly going to be cheaper.
The other thing that is nice about the adjustable link is that you always have that adjustment for the future. Decide you want lowering springs and the flexibility is there for you.
Originally Posted by gsmithrx7
I will search around for some shorter control links, I thought I came across some adjustable control links, there was a comment that you might need to hammer the floor pan to make room for them. Your advice that the control link being damaged, is the main cause of my negative camber on only one wheel is pointing me in the right direction.
I think you would need to hammer the floor-pan to gain more adjustment with the subframe link (the one I called the main camber link). This is because at a certain point you tilt the subframe so far it starts to collide with the body, and you need more clearance to achieve more tilt.
I don't think the individual control links would require hammering since they just raise the control arm up closer to the subframe, not the subframe closer to the body. But I could be wrong since my control links aren't much shorter than stock.
Originally Posted by gsmithrx7
I found a set of AE rims and put them on my GXL! Needed a 10mm wheel spacer on the front and a 5mm spacer at the rear. I replaced the front lugs with longer ones and need to do the back lugs because I lost 5mm of lug nut engagement. When an impact wrench is used to tighten the nuts they strip the threads off the lugs! Luckily it only damaged one lug.
I was amazed how much heavier the AE rims are compared to my GXL rims. My plan is to get a set of real studded snow tires mounted onto the stock rims and a nice set of directional VR speed tires for the AE rims. $$$
I did that for a few years when I daily drove my car. With winters on the stock wheels it was very manageable in the winter.
Are you sure you need spacers with the AE wheels? Comparing a GXL trim car with a Turbo II or 10 AE car, the hubs brakes and suspension are identical. I'm not sure why a spacer would be required unless you like the wheel flush against the outside of the wheel-well.
I would avoid using an impact wrench to install lug nuts in the future, and instead use a torque wrench. I usually run all the lugs down by hand to avoid crossing threads, use my impact on setting 1 which maxes out around 30-40 ft-lbs, and then torque to about 80 ft-lbs using a torque wrench.
The impact wrench might apply too much torque and stretch / damage the studs.
Originally Posted by gsmithrx7
I used to love having Trans-am's and Camero's try and follow me around curves in town! I will miss that bit of rear steering!
The DTSS feels really nice when it's working. It's unfortunate the replacement bushings aren't sold separately from the hubs. Once the bushings go bad we have no option other than to delete the DTSS.
Originally Posted by gsmithrx7
Here is a question I have not looked into yet. Can my AAS shock absorbers be rebuilt by someone? I think they are gas filled and still kinda work?
I've never tried it, but I assume they could? Last I looked at a set of AAS shocks, it looked like a set of adjustable shocks with a stepper motor on top that adjusts the firmness.
I see no reason they couldn't be rebuilt, but then it might be cost prohibitive compared to just replacing. Best thing to do would probably be to find a performance shop near you that rebuilds shocks and give them a call.
Im running these, forgot since I installed them ~10 years ago. I just set them equal on both sides in an effort to upgrade from the factory bushings. Glad they�re still available, totally forgot about them.
I do remember the install wasn�t 100% straightforward, and adjusting them is a bit of a pain since you have to rotate the metal sleeve.
The DTSS feels really nice when it's working. It's unfortunate the replacement bushings aren't sold separately from the hubs. Once the bushings go bad we have no option other than to delete the DTSS
The AE rims are 7" wide compared to the GXL 6" rims. With 215mm tires they made contact with the inside of the wheel well at the rear. So, I added a 5mm spacer for clearance, works fine. I was thinking of running 225mm tires on the rear if there is room, might need a 10mm or 15mm spacer for clearance? I like the look of the tires flush with the fenders! We will see.
The AE rims are 7" wide compared to the GXL 6" rims. With 215mm tires they made contact with the inside of the wheel well at the rear. So, I added a 5mm spacer for clearance, works fine. I was thinking of running 225mm tires on the rear if there is room, might need a 10mm or 15mm spacer for clearance? I like the look of the tires flush with the fenders! We will see.
that is weird, they should just go on and fit. 225 is no problem at all in the rear, but you'd ideally want an 8" wheel
Alright, I was under the car today and had some time to get some good pictures for you. It seems like you already get how most of it works, but I figure it makes this thread more useful for people searching in the future.
So I took this picture under my car today. The parts are as follows:
A: The part I have previously called the "Main Camber Link". Mine is an aftermarket adjustable unit. It connects the rear of the subframe on the left side of the diff up to the chassis. Shortening this link will raise the rear of the subframe and reduce negative camber.
B. The smaller links that allow you to individually adjust camber per-wheel. OEM is non-adjustable, mine are shortened but also non adjustable (made of Miata sway-bar endlinks).
C. Toe link. Not really part of your original question, but this is the part that you saw pictured in gold above.
To see how it all works, that's best done with the subframe out of the car. I took this photo not long ago:
A. Not pictured, more to come on that.
B. The individual camber links I mentioned. If you look at this picture (and imagine the hub as part of the control arm, which it basically is once DTSS is deleted), shortening that link will raise the control arm up a bit at that end, tilting the top of the hub outward. That means less negative camber. So shorter link -> Camber less negative, longer link -> camber more negative.
C. The toe rod. Not adjustable from the factory, but as you've seen there are aftermarket ones available that can be adjusted. Shortening it will pull the back of the hub inwards towards the car, causing toe-out on that wheel. Lengthening it will push the back of the hub outwards away from the car, causing toe-in. Shorter link -> toe-out, longer link -> toe-in
D. Factory toe adjustment. The nice thing is that this eccentric bolt is here from the factory, meaning you don't need the above link to be adjustable. If you loosen the nut and rotate the eccentric bolt, it rides in a slot on the subframe that will move the bushing further forward or back in it's mount. Rotating this eccentric bolt will push the back of the hub backwards or forwards similarly to the toe-rod above.
Lastly, here's the adjustable link (A) next to the OEM piece. You can see how much shorter it had to be to pull out the negative camber I got from my lowering springs. I'm not even running coilovers, so my car isn't that low. I think the GF210 springs I have are a 1" drop? Anyways, when the link is bolted in and the two lock nuts are loose, you can use a 17mm wrench on the body of the adjuster to lengthen or shorten it. The threads on one side of the adjuster are left-hand to allow this.
Hope this helps
It sure does! Thanks!
So we have a way to correct the toe-in, caster, and camber on an old suspension. This is what I needed.
There are all kinds of replacement parts to choose from which makes restoring the rear suspension a bit easier.
My days of 7000 rpm starts are over but I want to be able to have my tires wear evenly with the occasional 135 mph run on the highway!
The RX-7 was much ahead of it's time and needs to be appreciated for what it is. So all of our efforts to preserve these vehicles are worth the effort!
So we have a way to correct the toe-in, caster, and camber on an old suspension.
I don't think there's any way to adjust caster on our rear suspension actually. Caster will change as you adjust the other settings, but I don't think it can be changed on it's own.