
BOV will not release after old tech did work on it. Now w/pictures of vacs $ for help

Thread Starter
Its an addiction.
Joined: May 2002
Posts: 575
Likes: 0
From: Central Florida
Ok so after a mechanic removing my turbo manifold and the turbo/exhaust, he fixed the leak that was there where there is a ring or rubber part that was busted that was causing coolant and i smelled gas. That was fixed. but now if you already aren't involved in helping. the BOV doesn't let off any more. The boost guage shows it spooling up but it releases so slow and the boost gauge spudders down after i let off.
everyone wanted pics so i thought i'd start a thread here to make it easier with pictures.
I don't know what is setup wrong here. If you want pictures of something ill go run out and take it and post it right away!
this is a new thread and the old one that started this whole thing is this one. but I want to have all discussion now that there are pics and I can take new ones for those who are willing to help. I'm willing to paypal someone if it really is a vac line problem and they show me how to get my car back to releasing through the BOV.
https://www.rx7club.com/2nd-generation-specific-1986-1992-17/took-family-mechcanic-now-spudders-blowoff-doesnt-left-off-boost-842853/ <-- old -

the lower nipple is for vacuum...thats where mine is hooked up to and it works great. i dont think ive ever seen so many t's off one vacuum source before. i would try and simplify everything by running them from at least 2 vacuum sources, you probably have a leak somewhere in that mess.
Thread Starter
Its an addiction.
Joined: May 2002
Posts: 575
Likes: 0
From: Central Florida
the lower nipple is for vacuum...thats where mine is hooked up to and it works great. i dont think ive ever seen so many t's off one vacuum source before. i would try and simplify everything by running them from at least 2 vacuum sources, you probably have a leak somewhere in that mess.
im going insane lol i don't understand why this is so difficult.
On the top of the HKS SSQV bov is a nut and a hex keyed screw. you need to adjust that so the BOV can do its job. It sounds like its adjusted too far in and is holding boost. loosen the 10mm nut then back the screw out a little bit, tighten the nut, then go for a test drive to see if it adjusted enough to make a difference. Repeat the process until its venting as it used to.
Edit: But also you should try to simplify all those vac lines, though not till you get the bov issue settled. Seems to me that the old mechanic tightened it down because he is unfamiliar with that particular bov's operational characteristics, or was tired of hearing the sound during his own testing.
Edit again: The SSQV bov is somewhat finicky. If you loosen the screw too far the bov will vent too early and 'leak' under boost. If you tighten it too much the bov will vent too late or not at all. I had a similar experience when I replaced the BOV on my Conquest, the screw was set to full loose an was causing an intake leak, learned that it was set loose from the seller I bought it from an he informed me of how to adjust it so it would work properly.
Trending Topics
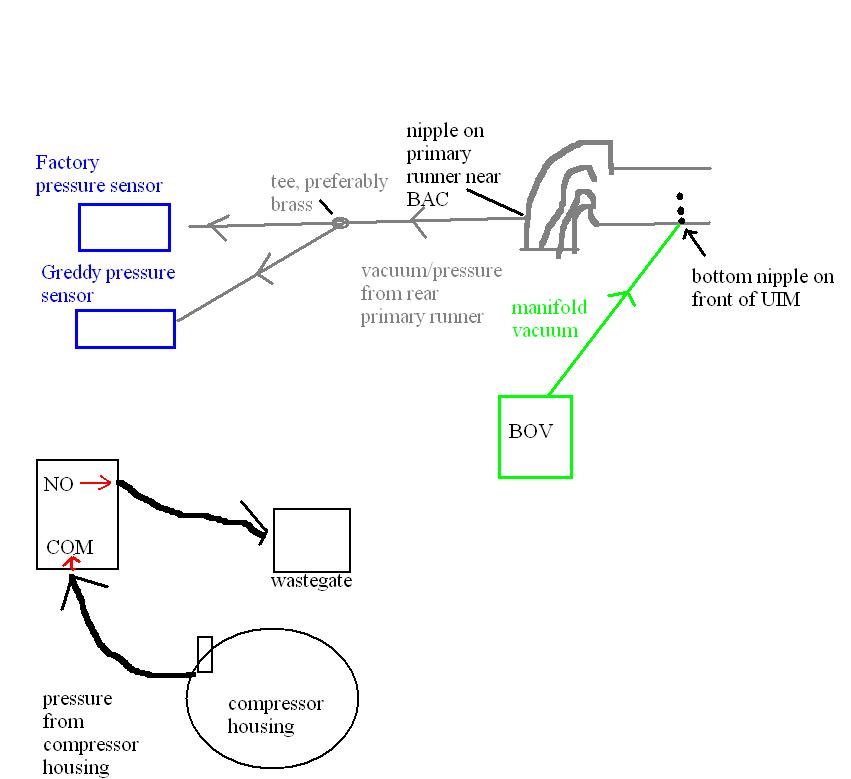
The bottom vac line on the UIM is linked to a pipe that goes to a stock piece with like 8 of them, the one above it is linked to my greddy boost controller and goes inside my firewall to the unit in the dash, the one above that goes to where i cant see or get my hand in and this on in the pic was connected to the 1st one that u see on top.
im going insane lol i don't understand why this is so difficult.
im going insane lol i don't understand why this is so difficult.
if its not the nut on top of the bov like ^ suggested, i would try and sort out that whole mess you have there.
did you actually change the vac line like i suggested? it sounds like you didnt.
Thread Starter
Its an addiction.
Joined: May 2002
Posts: 575
Likes: 0
From: Central Florida


So I'm really bored at work right now and I decided to spoon-food you the information you need for vacuum routing.
Now here's a great trick for adjusting a BOV that I use. Pressurize the turbo inlet using a pressure tester like the one here (or build your own): www.boostpro.net/prodtester.html , universal tester at the bottom. A tire compressor should be able to get the job done even. You will need a reducer coupler to make that tester work. Gradually increase the pressure on the tester until your boost gauge in the car is at the target boost you are running.
Feel the outlet of the BOV to see if air is leaking. If air is leaking, tighten it right up to the point where it stops leaking, and then a small bit after that for good measure. If air is not leaking but you are concerned the BOV isn't blowing off, loosen the BOV adjustment until it starts leaking. Then tighten it back up a bit until it stops leaking and you have a little stiffness as a "safety margin."
I accidentally posted this in your old thread, sorry about that.
Thread Starter
Its an addiction.
Joined: May 2002
Posts: 575
Likes: 0
From: Central Florida
So I'm really bored at work right now and I decided to spoon-food you the information you need for vacuum routing.
Now here's a great trick for adjusting a BOV that I use. Pressurize the turbo inlet using a pressure tester like the one here (or build your own): www.boostpro.net/prodtester.html , universal tester at the bottom. A tire compressor should be able to get the job done even. You will need a reducer coupler to make that tester work. Gradually increase the pressure on the tester until your boost gauge in the car is at the target boost you are running.
Feel the outlet of the BOV to see if air is leaking. If air is leaking, tighten it right up to the point where it stops leaking, and then a small bit after that for good measure. If air is not leaking but you are concerned the BOV isn't blowing off, loosen the BOV adjustment until it starts leaking. Then tighten it back up a bit until it stops leaking and you have a little stiffness as a "safety margin."
I accidentally posted this in your old thread, sorry about that.
Now here's a great trick for adjusting a BOV that I use. Pressurize the turbo inlet using a pressure tester like the one here (or build your own): www.boostpro.net/prodtester.html , universal tester at the bottom. A tire compressor should be able to get the job done even. You will need a reducer coupler to make that tester work. Gradually increase the pressure on the tester until your boost gauge in the car is at the target boost you are running.
Feel the outlet of the BOV to see if air is leaking. If air is leaking, tighten it right up to the point where it stops leaking, and then a small bit after that for good measure. If air is not leaking but you are concerned the BOV isn't blowing off, loosen the BOV adjustment until it starts leaking. Then tighten it back up a bit until it stops leaking and you have a little stiffness as a "safety margin."
I accidentally posted this in your old thread, sorry about that.
Thank you for taking your time to help me, its very appreciated. I am going to get on this right now and try to resolve this issue. Thank you again.
on S5s this is where the fuel injector air bleeds go, there is 1 for the secondaries and 1 for the primaries. I'm not sure if S4s have them or not though. They are important however and are not emissions related.

Thread
Thread Starter
Forum
Replies
Last Post
trickster
2nd Generation Specific (1986-1992)
25
Jul 1, 2023 04:40 PM