
Battery Relocate

Battery Relocate
I'm preparing to relocate my battery to the passenger bin and have a specific question, to wit...where did you transition from inside to outside the cabin?
I've read the results that the search function provides but this detail is missing from most of the write ups (except for Aaron's).
Casual inspection leads me to think that the easiest exit point would be the driver's side of the bin floor and a run down the transmission tunnel with the brake and fuel lines but this seems kinda dicey in the event of a catastrophic wiring failure.
Aaron's method looked the safest but also the most difficult...that area of the firewall is pretty crowded (both inside and outside) and awkward to access unless the car was stripped (which mine is not).
So...if you've done the relocate, how did you deal with this and would you do it the same way again?
I routed mine through the speedometer cable hole in the firewall, then under the middle console, and then through a hole into the bin. The only visible part of the cable is behind the seat where it goes behind the carpet into the bin
No rotary, no problems?
Joined: Nov 2004
Posts: 1,567
Likes: 0
From: Dubuque, IA
I will be following Ted's writeup for battery relocation posted on his website. The only differences that I'm making to his setup is how I'm mounting the battery. Otherwise, my cable will be run across the rear crossmember, then run along the driver's side kick panel, and then through the firewall near the fuse box with the rest of the main wiring for the car. It looks crowded in there, but there's enough room to run a 2 gauge cable through there. Also, I HIGHLY recommend the welder's cable. You can actually bend the stuff to the shape you want it to sit, and it's very easy to work with, even with it being 2 gauge. So much easier to work with than regular automotive 2 gauge wiring. I can't imagine why you'd want to run the cable underneath of the car. 
mine is ran through the firewall on the driver side wire harness (just had to move the coil out of the way untill it is ran thorugh). then down along the floor inside the cabin.
Banned. I got OWNED!!!
Joined: Mar 2006
Posts: 1,970
Likes: 1
From: Connecticut
I ran my starter and power cable thru the bin on the drivers side using on of these guys

It clamps down to the sheetmetal, I used a little sealer, than the wire is pushed through and the seal tighened to splash proof status. Ran the cable along with the brake/fuel lines. I'm going to be re-addressing your concerns with some custom mounts for the fuel (larger diameter) and keeping the wire in place with some stainless steel cushion clamps.
As for my alt cable, that passes through where the speedometer cable used to be but I used this guy from summit, This could also be used to pass through firewall in just about any location
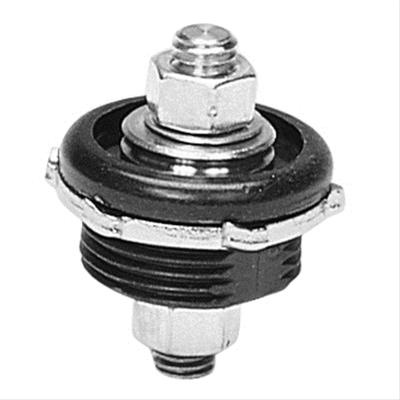
No rotary, no problems?
Joined: Nov 2004
Posts: 1,567
Likes: 0
From: Dubuque, IA

Trending Topics

Junior Member
Joined: Aug 2006
Posts: 43
Likes: 0
From: huntsville, alabama
its like doin a amp and subs just find a gromet in fire wall or drill a hole i used the em harness gromet (gromet tool) and ran it through there.
if you have any rcas/ speaker wire for a 4 channel amp youll want to keep it away from those
if you have any rcas/ speaker wire for a 4 channel amp youll want to keep it away from those
I'm not arguing, nor have I decided to do it that way yet, just saying....
i ran mine from the bin, to the driver-side floor and then drilled a hole by the tranny. I used a rubber grommet to fill the hole, and used metal clamps and sheet metal skrews (came with Moroso kit from Summit) to make sure the cable stays snug against the bottom of the floor.
No need to worry about 'road debris' Its protected by the tranny 'housing' built into the floor.
Check the link below my sig for detail pics
No need to worry about 'road debris' Its protected by the tranny 'housing' built into the floor.
Check the link below my sig for detail pics
Banned. I got OWNED!!!
Joined: Dec 2006
Posts: 26
Likes: 1
I ran mine across the firewall so it came in on the Passenger's side (nothing behind the dash so I had plenty of holes) then ran it along the passenger's side floor, underneath the FG bin walls and into the battery. I don't know if I have pics.
No rotary, no problems?
Joined: Nov 2004
Posts: 1,567
Likes: 0
From: Dubuque, IA

still no?...
i dont know why I was having problems linking that jpg.... usually works just fine.
go to www.87rx7.blogspot.com and scroll down a little. Its near all the interior replacement stuff...
i dont know why I was having problems linking that jpg.... usually works just fine.
go to www.87rx7.blogspot.com and scroll down a little. Its near all the interior replacement stuff...
It's better to keep this line as short as possible. I'm not sure if I would run it across the fire wall esp on a turbo just because of the heat in that area
On the drivers side of the fire wall there is a wiring harness and grommet there close to the clutch master cylinder

Put a slit in the top if it about 3/4 of an inch long. Use a razor blade and just carefully cut into it so you don't go slicing wires on the inside. Once you have the slit in there start fishing your wire through the hole. it's a pretty tight fit and you might have to use some wd-40 or some kind of silicone lube to slide it through there.

The wire should come out directly above the fuse panel by your driver side foot rest. it's fun to get to so be prepared to lay on your back and crawl up under your dash. If your a big guy, find someone small to shove up in there

pull some more wire through the grommet. at this point you can take off your kick panel and scuff panel, un-hook the carpet and roll it back to reveal the flimsy particle board wire channel

Be very careful when you pop out the plastic rivet things that hold the particle board in place. use a flat head screw driver, i broke the board in one area. Now run your wire down inside the channel

Now you can slide your seat all the way forwards, unbolt the fiberglass storage bin and run your wire under it to your passenger bin. Make sure to remove the carpet bucket from the passenger bin. You can also put your carpet back down in the front and bolt the bins back down. See how nice the wire transitions. you'll never see it with the carpet there

Now the fun part. Set your battery in the storage been and measure around it. Get a small piece of 1/2" or 3/4" particle wood and cut it out to the dimensions of your storage bin and also to the size of your battery. Run out to an audio shop that sells carpet for boxes or use the carpet storage basket that you removed earlier to wrap your wood insert. Grind off some paint somewhere under the basket to run your ground. you can buy a grounding lug from e-bay or the audio shop you got the carpet at Phoenix gold makes a very nice one that screw down with self tappers andyou run the wire into it and tighten it up. I would also recommend a battery tray from auto zone or any other parts store that you can bolt down to set the battery in. Then screw the wood insert you made into the storage bin. slide your battery down in, clamp it down to the battry tray, hook up your wires, make sure to install a circut breaker, 150amp minimum (it's a good time to re-wire the fuel pump if you hadn't done so. thats my green wire)

Then all you need to do it pick out a location up front to mount your distribution block. clean off a good area for your ground wires and hook up everything you have disconnected. then your set to go(also a very good time to put new starter and alternator wires, the big red ones, and new ground wires.)

On the drivers side of the fire wall there is a wiring harness and grommet there close to the clutch master cylinder
Put a slit in the top if it about 3/4 of an inch long. Use a razor blade and just carefully cut into it so you don't go slicing wires on the inside. Once you have the slit in there start fishing your wire through the hole. it's a pretty tight fit and you might have to use some wd-40 or some kind of silicone lube to slide it through there.
The wire should come out directly above the fuse panel by your driver side foot rest. it's fun to get to so be prepared to lay on your back and crawl up under your dash. If your a big guy, find someone small to shove up in there
pull some more wire through the grommet. at this point you can take off your kick panel and scuff panel, un-hook the carpet and roll it back to reveal the flimsy particle board wire channel
Be very careful when you pop out the plastic rivet things that hold the particle board in place. use a flat head screw driver, i broke the board in one area. Now run your wire down inside the channel
Now you can slide your seat all the way forwards, unbolt the fiberglass storage bin and run your wire under it to your passenger bin. Make sure to remove the carpet bucket from the passenger bin. You can also put your carpet back down in the front and bolt the bins back down. See how nice the wire transitions. you'll never see it with the carpet there
Now the fun part. Set your battery in the storage been and measure around it. Get a small piece of 1/2" or 3/4" particle wood and cut it out to the dimensions of your storage bin and also to the size of your battery. Run out to an audio shop that sells carpet for boxes or use the carpet storage basket that you removed earlier to wrap your wood insert. Grind off some paint somewhere under the basket to run your ground. you can buy a grounding lug from e-bay or the audio shop you got the carpet at Phoenix gold makes a very nice one that screw down with self tappers andyou run the wire into it and tighten it up. I would also recommend a battery tray from auto zone or any other parts store that you can bolt down to set the battery in. Then screw the wood insert you made into the storage bin. slide your battery down in, clamp it down to the battry tray, hook up your wires, make sure to install a circut breaker, 150amp minimum (it's a good time to re-wire the fuel pump if you hadn't done so. thats my green wire)
Then all you need to do it pick out a location up front to mount your distribution block. clean off a good area for your ground wires and hook up everything you have disconnected. then your set to go(also a very good time to put new starter and alternator wires, the big red ones, and new ground wires.)
more room in the engine bay, looks nicer. less wear on charge wire (no hot engine bay exposure)
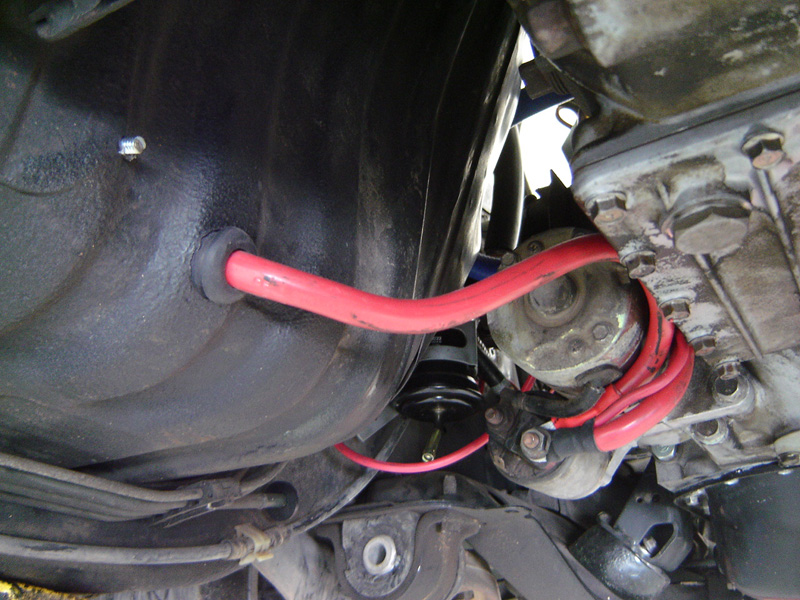
I relocated my oil filter and catch can to the batery area.
no problem if you need a jump...
I relocated my oil filter and catch can to the batery area.
no problem if you need a jump...

Banned. I got OWNED!!!
Joined: Dec 2006
Posts: 26
Likes: 1
since I've relocated the battery I've never needed a boost. I have an optima yellow top so it always starts on me. I relocated the battery to clean up the engine bay and my IC pipes have a clear route.
I put my battery in the drivers side bin and ran the wires through the floor using rubber grommets and then followed the metal fuel lines to the drivers side of the engine bay. Hey Clokker if you're at the next mile high rotary club meeting in Denver I'll show you how mine is done exactly. (if you haven't already got it done by then)
Gee folks, thanks for all the great responses.
Although I have yet to finalize exactly how I'm going to do the job, I figured I'd better start getting the materials together, just in case I get ambitious over the holiday weekend.
The battery terminals and lugs were no problem (I found some at a race shop that are already pre-fluxxed/solder filled-just heat and insert cable end) and the adhesive filled heatshrink was pretty easy as well.
The 1/0 cable on the other hand...
I guess it's been a while since I had to buy anything made of copper, so while I was aware of the price rise, the real world effect hadn't hit home yet.
Jeebus! This stuff has gotten to be expensive!
NAPA wanted $7/ foot and even the local welding supply house was asking $3.50/foot.
Suddenly, this pain in the *** project was turning into an expensive PITA...so expensive, especially for what boils down to an aesthetic modification, that I reconsidered doing it at all.
Fortunately, my last stop- an ancient "surplus store" that I remember going to 50 years ago as a kid- had the very end of a roll of welders cable.
Miraculously, it was marked at $1.25/ foot and I bought the whole thing- just over 26 feet.
Ted's site says you need 30'- which seems excessive at first blush- so now my cable routing will be influenced by the amount of cable I have to work with.
Several years ago I machined a billet aluminum battery box (specifically for an Optima battery) which I never used, so that will be going in this project.
All I need now is the breakers and I figure a auto stereo shop might be my best bet for those (at least locally).
Meanwhile- as if all this running around weren't enough- I've been stripping a TII at the junkyard.
Along with the intake mod (already done), the AC delete and conversion to manual steering (already done) and the battery relocation (in the works)- the final part of my engine bay renovation is installing an efan.
The hangup here is not the fan itself (I have three to choose from) but how to trigger it.
Well damn, isn't it convenient that the TII has the optional fitting (and the sensor) for the AC fan?
Of course, the alloy upper hose neck (where the fitting is located) won't bolt to my NA waterpump housing so I had to nab the whole assembly.
All I've had to do is drill/tap/plug the turbo water return line at the lower hose area (and clean and paint, obviously) to make this suitable for my NA application.
And while I was at it I couldn't resist the aluminum Turbo hood and matching headlight covers (the car is black and mine is Blaze Red unfortunately, but these are in much better shape than mine, so...) and the PS muffler heatshield (removed by a PO when installing a single exhaust).
Total for all these parts (hood and latch, light covers, waterpump housing/ upper hose neck and heatshield)?
$50.
Plus tax.
God, you just gotta love the junkyard.
Keep the cable routing ideas coming, please.