
Battery Relocate

No rotary, no problems?
Joined: Nov 2004
Posts: 1,567
Likes: 0
From: Dubuque, IA
It's better to keep this line as short as possible. I'm not sure if I would run it across the fire wall esp on a turbo just because of the heat in that area
On the drivers side of the fire wall there is a wiring harness and grommet there close to the clutch master cylinder

Put a slit in the top if it about 3/4 of an inch long. Use a razor blade and just carefully cut into it so you don't go slicing wires on the inside. Once you have the slit in there start fishing your wire through the hole. it's a pretty tight fit and you might have to use some wd-40 or some kind of silicone lube to slide it through there.

The wire should come out directly above the fuse panel by your driver side foot rest. it's fun to get to so be prepared to lay on your back and crawl up under your dash. If your a big guy, find someone small to shove up in there

pull some more wire through the grommet. at this point you can take off your kick panel and scuff panel, un-hook the carpet and roll it back to reveal the flimsy particle board wire channel

Be very careful when you pop out the plastic rivet things that hold the particle board in place. use a flat head screw driver, i broke the board in one area. Now run your wire down inside the channel

Now you can slide your seat all the way forwards, unbolt the fiberglass storage bin and run your wire under it to your passenger bin. Make sure to remove the carpet bucket from the passenger bin. You can also put your carpet back down in the front and bolt the bins back down. See how nice the wire transitions. you'll never see it with the carpet there

Now the fun part. Set your battery in the storage been and measure around it. Get a small piece of 1/2" or 3/4" particle wood and cut it out to the dimensions of your storage bin and also to the size of your battery. Run out to an audio shop that sells carpet for boxes or use the carpet storage basket that you removed earlier to wrap your wood insert. Grind off some paint somewhere under the basket to run your ground. you can buy a grounding lug from e-bay or the audio shop you got the carpet at Phoenix gold makes a very nice one that screw down with self tappers andyou run the wire into it and tighten it up. I would also recommend a battery tray from auto zone or any other parts store that you can bolt down to set the battery in. Then screw the wood insert you made into the storage bin. slide your battery down in, clamp it down to the battry tray, hook up your wires, make sure to install a circut breaker, 150amp minimum (it's a good time to re-wire the fuel pump if you hadn't done so. thats my green wire)

Then all you need to do it pick out a location up front to mount your distribution block. clean off a good area for your ground wires and hook up everything you have disconnected. then your set to go(also a very good time to put new starter and alternator wires, the big red ones, and new ground wires.)

On the drivers side of the fire wall there is a wiring harness and grommet there close to the clutch master cylinder
Put a slit in the top if it about 3/4 of an inch long. Use a razor blade and just carefully cut into it so you don't go slicing wires on the inside. Once you have the slit in there start fishing your wire through the hole. it's a pretty tight fit and you might have to use some wd-40 or some kind of silicone lube to slide it through there.
The wire should come out directly above the fuse panel by your driver side foot rest. it's fun to get to so be prepared to lay on your back and crawl up under your dash. If your a big guy, find someone small to shove up in there
pull some more wire through the grommet. at this point you can take off your kick panel and scuff panel, un-hook the carpet and roll it back to reveal the flimsy particle board wire channel
Be very careful when you pop out the plastic rivet things that hold the particle board in place. use a flat head screw driver, i broke the board in one area. Now run your wire down inside the channel
Now you can slide your seat all the way forwards, unbolt the fiberglass storage bin and run your wire under it to your passenger bin. Make sure to remove the carpet bucket from the passenger bin. You can also put your carpet back down in the front and bolt the bins back down. See how nice the wire transitions. you'll never see it with the carpet there
Now the fun part. Set your battery in the storage been and measure around it. Get a small piece of 1/2" or 3/4" particle wood and cut it out to the dimensions of your storage bin and also to the size of your battery. Run out to an audio shop that sells carpet for boxes or use the carpet storage basket that you removed earlier to wrap your wood insert. Grind off some paint somewhere under the basket to run your ground. you can buy a grounding lug from e-bay or the audio shop you got the carpet at Phoenix gold makes a very nice one that screw down with self tappers andyou run the wire into it and tighten it up. I would also recommend a battery tray from auto zone or any other parts store that you can bolt down to set the battery in. Then screw the wood insert you made into the storage bin. slide your battery down in, clamp it down to the battry tray, hook up your wires, make sure to install a circut breaker, 150amp minimum (it's a good time to re-wire the fuel pump if you hadn't done so. thats my green wire)
Then all you need to do it pick out a location up front to mount your distribution block. clean off a good area for your ground wires and hook up everything you have disconnected. then your set to go(also a very good time to put new starter and alternator wires, the big red ones, and new ground wires.)

OK...at the risk of seeming stupid, would this work?
BATTERY--->BREAKER--->STARTER MOTOR
...all 1/0 gauge welder's cable, terminated at the SM's positive terminal.
Then just connect the stock harness to the SM's positive terminal as well and trim it after the various connections to eliminate the stock battery terminal.
So essentially the engine bay harness remains completely stock, it's just drawing power from the connection at the starter motor instead of the bay mounted battery.
For some reason this seems too simple so there must be something wrong with it...
Hit me.
Joined: Feb 2001
Posts: 29,798
Likes: 128
From: London, Ontario, Canada
Generally you should not use the starter terminal as a voltage source for the rest of the electrical system. It causes a lot of noise and voltage drop as the engine is cranked. You'll notice the stock system runs a line directly from the battery to the starter, then another wire to the fuse box.
No rotary, no problems?
Joined: Nov 2004
Posts: 1,567
Likes: 0
From: Dubuque, IA
Mine will be setup as:
Battery > Breaker > Line > Breaker > Starter and other components
This setup gives extra insurance in the case that the battery shorts out and won't blow the rest of the circuit, or that the other components blow out but won't harm the battery. Also, this makes it very easy to hook up other components by simply terminating them at the breaker in the engine bay. IMO, Ted's setup is the best way to go.
Joined: Feb 2001
Posts: 29,798
Likes: 128
From: London, Ontario, Canada
Personally I still think the two breaker approach is major overkill. One breaker at the battery to protect the whole system from a major short, then another smaller breaker (75-90A) at the alternator + to protect from shorts between it and the chassis.
I'm not sure what you mean by a "battery shorting out and blowing the rest of the system" or "other components blowing and needing to protect the battery". The breakers are in place to protect the wiring and prevent a fire.
Regardless, none of the breakers should be in the engine bay as they need to be protected from nasties (even if they are sealed). Also it's best to connect the output of the breaker to a distribution panel and then run your accessories (from a fuse box of course...) from that.
Generally you should not use the starter terminal as a voltage source for the rest of the electrical system. It causes a lot of noise and voltage drop as the engine is cranked. You'll notice the stock system runs a line directly from the battery to the starter, then another wire to the fuse box.
I knew it was too easy.
No rotary, no problems?
Joined: Nov 2004
Posts: 1,567
Likes: 0
From: Dubuque, IA
Personally I still think the two breaker approach is major overkill. One breaker at the battery to protect the whole system from a major short, then another smaller breaker (75-90A) at the alternator + to protect from shorts between it and the chassis.
I'm not sure what you mean by a "battery shorting out and blowing the rest of the system" or "other components blowing and needing to protect the battery". The breakers are in place to protect the wiring and prevent a fire.
Regardless, none of the breakers should be in the engine bay as they need to be protected from nasties (even if they are sealed). Also it's best to connect the output of the breaker to a distribution panel and then run your accessories (from a fuse box of course...) from that.
I'm not sure what you mean by a "battery shorting out and blowing the rest of the system" or "other components blowing and needing to protect the battery". The breakers are in place to protect the wiring and prevent a fire.
Regardless, none of the breakers should be in the engine bay as they need to be protected from nasties (even if they are sealed). Also it's best to connect the output of the breaker to a distribution panel and then run your accessories (from a fuse box of course...) from that.
Also, I remember reading Ted's reasoning behind it, but can't seem to find the thread back about him explaining it. So Ted, if you're around, please explain it again. I understand what the breakers are there for. In my younger (and stupider days), I once ran a hot wire from the battery and forgot to shield it and melted the wire after I grounded it out. I've since learned from my mistakes.
You do make a good point about protecting the breaker, but IMO, if it's on the strut tower and away from debris and fluids, there shouldn't be a need to worry about it, especially if you have sealed or waterproof breakers. That is also a good idea about running a wire from the breaker to a distribution block, and then to your fused circuits. I'd imagine this would help in a few ways, but the only one I can think of now is less "strain" on the contacts of breaker because you don't have 4909787 lugs attachted to it. But honestly, what would the real importance be behind using the distribution block?
Joined: Feb 2001
Posts: 29,798
Likes: 128
From: London, Ontario, Canada
The distribution block makes the wiring job neater and allows you to run as many taps off the breaker as you want. Really only a few connections should come off the distro block because you will run a thick wire to a fuse box, and then all your accessories off that fuse box.
Today I decided to get off my toches and actually get started on this relocation project.
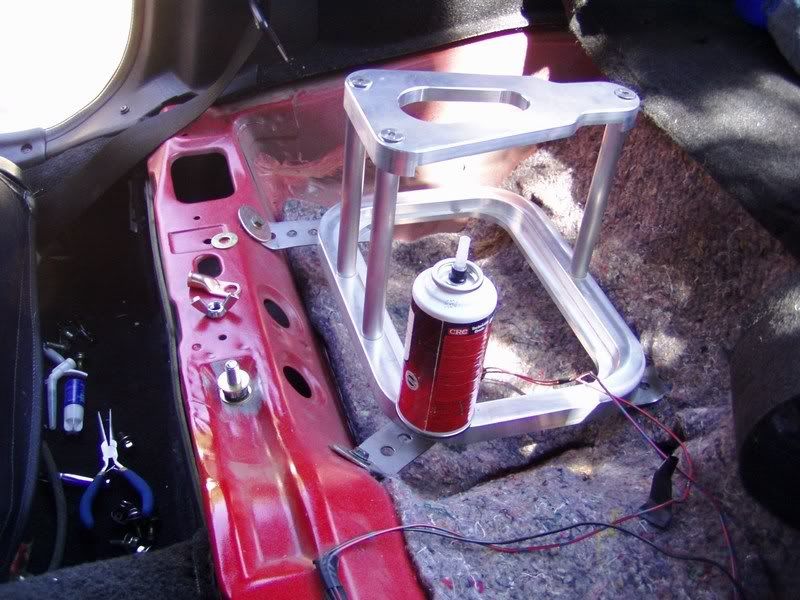
I realized that no matter how the cabling is routed, the battery box itself is only going to go in one place so there was no reason to procrastinate.
The battery tray is one I machined a few years ago to go into my 240Z, but that project kinda fizzled out and the part was never installed.
Because it would have been completely visible in the Datsun (and just because I could), the part was made fancier than necessary.
The design was copied from a part I saw in a catalog and is specific to the Optima battery.
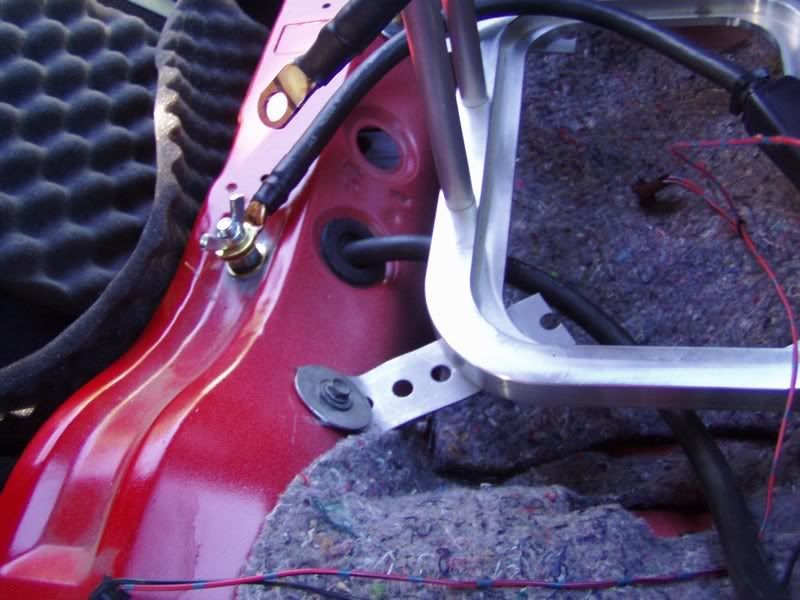
The bottom plate was already drilled/tapped so all I had to do to mount it in RX was make some extension arms (the Datsun had a flat floor where I'd planned on mounting this) and drill a few holes.
It was pretty simple and the final result is rock steady- probably stronger than the stock mount really...
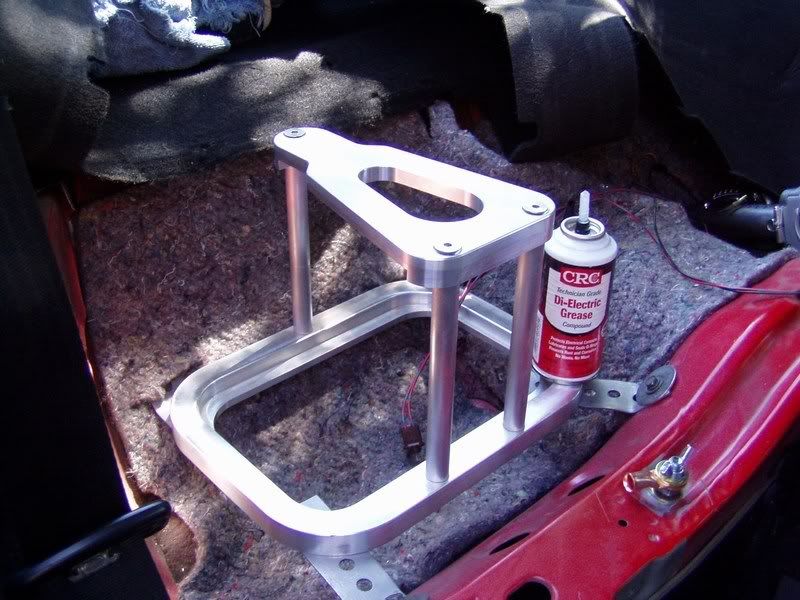
And a shot focusing on the new grounding stud...
It now seems most logical to run the cable down the driver's side of the cabin and pass through the firewall at the wire harness grommet- basically, just like cloudzero did it.
I still need to figure out what to do with it when it terminates in the engine bay but I can get all the cable run inside the cabin and then ponder my options.
Once I acquire (whatever) parts to finish the end and wire the efan relay(s), I'll be set and can just drop the battery into it's new home.
Thanks for all the help guys.
I realized that no matter how the cabling is routed, the battery box itself is only going to go in one place so there was no reason to procrastinate.
The battery tray is one I machined a few years ago to go into my 240Z, but that project kinda fizzled out and the part was never installed.
Because it would have been completely visible in the Datsun (and just because I could), the part was made fancier than necessary.
The design was copied from a part I saw in a catalog and is specific to the Optima battery.
The bottom plate was already drilled/tapped so all I had to do to mount it in RX was make some extension arms (the Datsun had a flat floor where I'd planned on mounting this) and drill a few holes.
It was pretty simple and the final result is rock steady- probably stronger than the stock mount really...
And a shot focusing on the new grounding stud...
It now seems most logical to run the cable down the driver's side of the cabin and pass through the firewall at the wire harness grommet- basically, just like cloudzero did it.
I still need to figure out what to do with it when it terminates in the engine bay but I can get all the cable run inside the cabin and then ponder my options.
Once I acquire (whatever) parts to finish the end and wire the efan relay(s), I'll be set and can just drop the battery into it's new home.
Thanks for all the help guys.
No rotary, no problems?
Joined: Nov 2004
Posts: 1,567
Likes: 0
From: Dubuque, IA
The distribution block makes the wiring job neater and allows you to run as many taps off the breaker as you want. Really only a few connections should come off the distro block because you will run a thick wire to a fuse box, and then all your accessories off that fuse box.

No rotary, no problems?
Joined: Nov 2004
Posts: 1,567
Likes: 0
From: Dubuque, IA
Woo hoo, my setup is also just about finished. I just have to run the wire from the fuse box to the breaker and then make my new starter cables and my car should be ready to rock. Amazing how much more room is in there after you take the battery out. Only bad thing is is that now the coil pack is out in the middle of no-where. Time to relocate that too.
OK then.
All the inner cabin cabling is run using cloudzero's (and many others, no doubt) route.
I was able to get through the main wiring harness grommet (below the clutch MC) without cutting it although it wasn't easy by myself as the grommet neck is pretty thick and fits very tightly to the harness bundle. Inserting a small wire would be simple but cramming welders cable through there was really asking a lot. I went from the inside to the outside of the firewall...not sure if the opposite way would have been any better. Two people could have made easy work of it, I think.
As if the grommet experience wasn't aggravating enough, I decided to run the cable through the floor brace as it transitioned from the driver's side rocker panel to the passenger bin. There are internal braces that must be navigated through but all in all, not too tough.
It enters here...
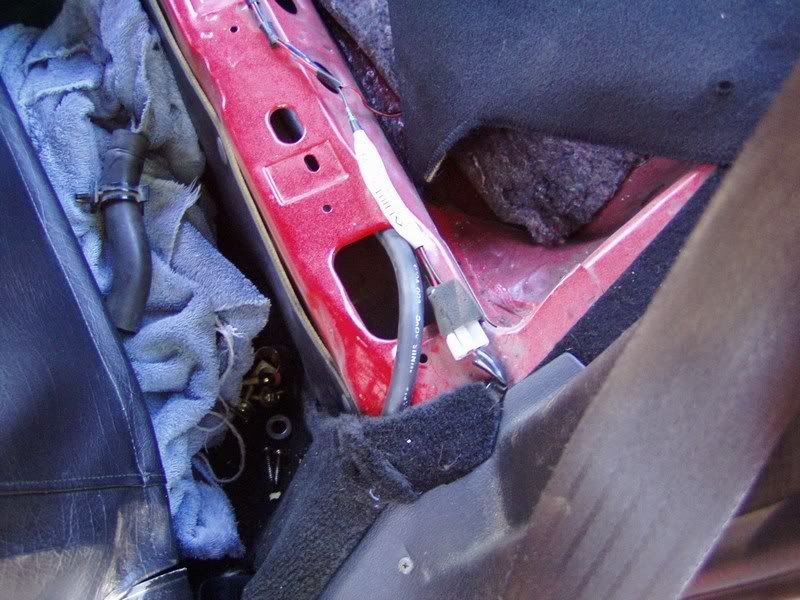
And exits here...
The lip around the entry hole was later cushioned with c-channel molding to prevent chafing of the cable (unlikely as I think it may be- better safe than sorry).
The battery negative and positive cables were fabricated and the breaker (200A) installed in the bin.
No pics of that yet, I'll wait till the battery is actually installed in it's new home.
The bin structure has been reinstalled and all the carpeting vacuumed as well, so the interior phase is complete.
It only took twice as long as I expected, so about normal.
Tomorrow I need to purchase the terminal box for the engine compartment and fab up the engine bay wiring and this phase of the bay renovation will be done.
YAY!
All the inner cabin cabling is run using cloudzero's (and many others, no doubt) route.
I was able to get through the main wiring harness grommet (below the clutch MC) without cutting it although it wasn't easy by myself as the grommet neck is pretty thick and fits very tightly to the harness bundle. Inserting a small wire would be simple but cramming welders cable through there was really asking a lot. I went from the inside to the outside of the firewall...not sure if the opposite way would have been any better. Two people could have made easy work of it, I think.
As if the grommet experience wasn't aggravating enough, I decided to run the cable through the floor brace as it transitioned from the driver's side rocker panel to the passenger bin. There are internal braces that must be navigated through but all in all, not too tough.
It enters here...
And exits here...
The lip around the entry hole was later cushioned with c-channel molding to prevent chafing of the cable (unlikely as I think it may be- better safe than sorry).
The battery negative and positive cables were fabricated and the breaker (200A) installed in the bin.
No pics of that yet, I'll wait till the battery is actually installed in it's new home.
The bin structure has been reinstalled and all the carpeting vacuumed as well, so the interior phase is complete.
It only took twice as long as I expected, so about normal.
Tomorrow I need to purchase the terminal box for the engine compartment and fab up the engine bay wiring and this phase of the bay renovation will be done.
YAY!
w00t!
She's done!
Well, at least Phase One (isn't there always a Phase Two?) of the battery relocate is done and the the car runs fine.
This morning I set out in search of a junction block for the engine bay- optimist that I am I assumed this would be easy but Noooo!, it wasn't.
I could have purchased a Rockford Fosgate piece but the $54 price tag seemed a trifle excessive and it wasn't really weatherproof, so I passed.
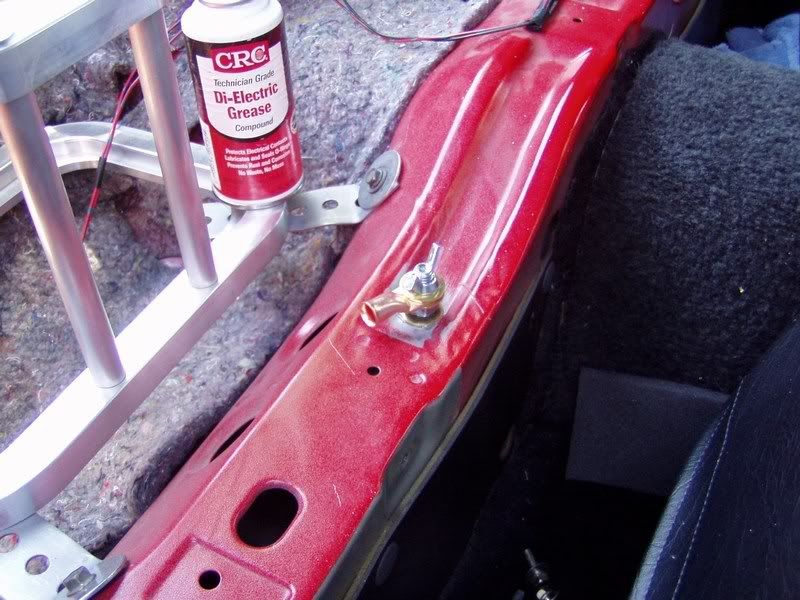
I finally settled on a single 3/8" terminal stud which was only $10 and it's mounting holes miraculously lined up with a pair of threaded holes on the frame rail.
My stock engine bay wiring is all in good shape and I've suffered none of the grounding issues that seem to plague so many, so I basically kept everything as it was.
Redoing the battery, alternator and fuse block wiring will be Phase Two of this project but there is no immediate need to do so and I needed this mod done so I could proceed to the efan install (which was the ultimate point of all my recent work...the Domino Effect in practice).
Here is the battery in it's new home...
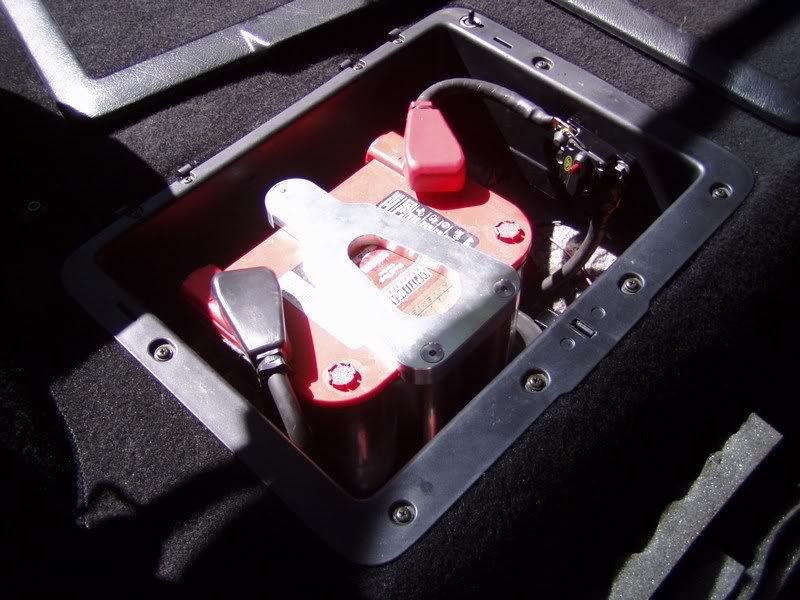
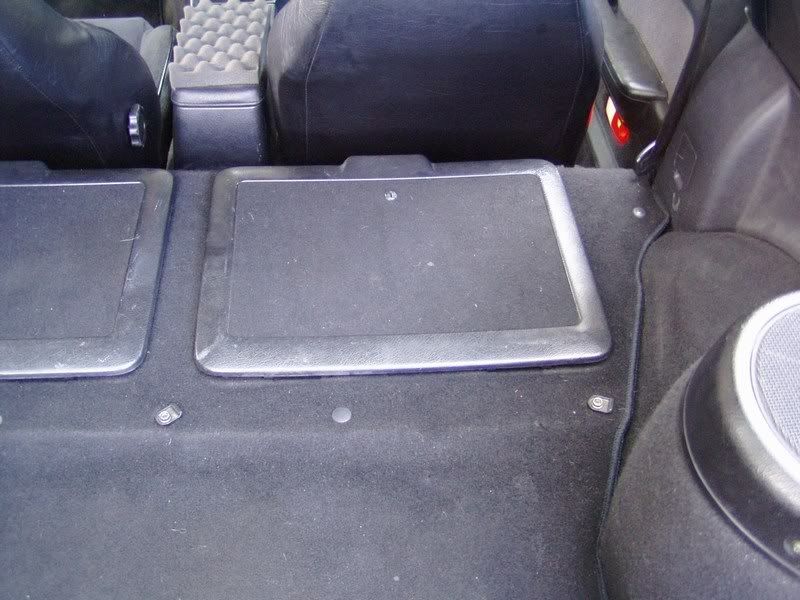
And yes, the bin cover does close...
Up front in the engine bay, the stock negative cable was simply terminated at the ground point on the strut tower...
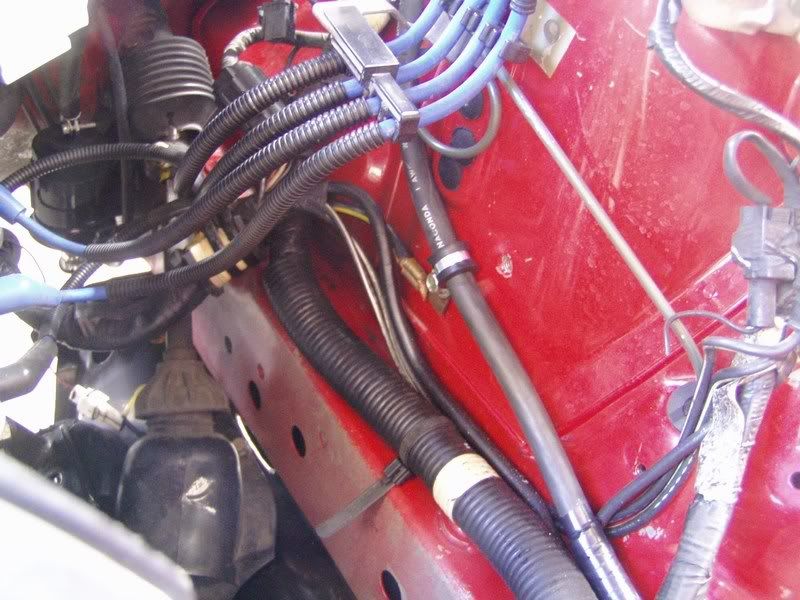
The battery/alternator positive cable was shortened, terminated with a lug and mates to the cable from the battery at this stud...
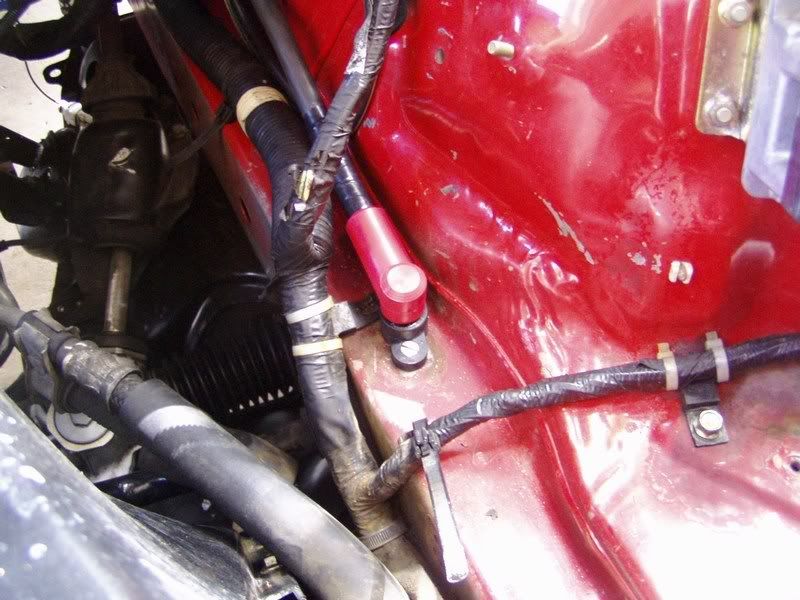
I took her out for a short spin during which I ran the high beams and blower motor and repeatedly hit the brakes- basically the worst case scenario, amp draw-wise (I have no stereo) and the alternator (a 100A FD unit) never wavered, putting out it's usual 14.1 amps.
None of the cabling felt warm to the touch afterwords so I'm pretty sure I'm good to go.
Only time will tell, of course.
Again, thanks for all the input to my questions and good luck to those who do this in the future.
She's done!
Well, at least Phase One (isn't there always a Phase Two?) of the battery relocate is done and the the car runs fine.
This morning I set out in search of a junction block for the engine bay- optimist that I am I assumed this would be easy but Noooo!, it wasn't.
I could have purchased a Rockford Fosgate piece but the $54 price tag seemed a trifle excessive and it wasn't really weatherproof, so I passed.
I finally settled on a single 3/8" terminal stud which was only $10 and it's mounting holes miraculously lined up with a pair of threaded holes on the frame rail.
My stock engine bay wiring is all in good shape and I've suffered none of the grounding issues that seem to plague so many, so I basically kept everything as it was.
Redoing the battery, alternator and fuse block wiring will be Phase Two of this project but there is no immediate need to do so and I needed this mod done so I could proceed to the efan install (which was the ultimate point of all my recent work...the Domino Effect in practice).
Here is the battery in it's new home...
And yes, the bin cover does close...
Up front in the engine bay, the stock negative cable was simply terminated at the ground point on the strut tower...
The battery/alternator positive cable was shortened, terminated with a lug and mates to the cable from the battery at this stud...
I took her out for a short spin during which I ran the high beams and blower motor and repeatedly hit the brakes- basically the worst case scenario, amp draw-wise (I have no stereo) and the alternator (a 100A FD unit) never wavered, putting out it's usual 14.1 amps.
None of the cabling felt warm to the touch afterwords so I'm pretty sure I'm good to go.
Only time will tell, of course.
Again, thanks for all the input to my questions and good luck to those who do this in the future.
No rotary, no problems?
Joined: Nov 2004
Posts: 1,567
Likes: 0
From: Dubuque, IA
Nice setup Clokker, turned out pretty good. Definitely Ted's setup is the best way to run the wires for relocating. I'll put the pictures up of my setup tomorrow once I finish zip-tieing my wires up and clean up everything and make sure all my connections are good. I'm very very happy with how it turned out. The only problem I had in the end is that when I shut the lid on my storage bin it would trigger the kill switch on the breaker I have mounted, but that was easily solved by cutting a small hole on the underside of the lid to make room for the button. My results are the same as your Clokker, no voltage drops anymore. The only time I lose voltage anymore is when I switch between modes on my AAS. Other than that, lights, brakes, high beams, nothing takes it down from 14.5. I absolutely love this mod, and like how it not only helps with performance, but also it's a nice show mod too.
Joined: Feb 2001
Posts: 29,798
Likes: 128
From: London, Ontario, Canada
That's well done. It's nice to see someone doing electrical work correctly for a change.
(Just yesterday I was at a car show and nearly vomited from all the botched battery relocates and rewires. It's amazing how much people who should know better don't actually...)
(Just yesterday I was at a car show and nearly vomited from all the botched battery relocates and rewires. It's amazing how much people who should know better don't actually...)
Well thank you, Mr. Cake.
I'm quite chuffed.
I wish my efan install was going as well but naturally, it's not. Those stupid radiator hose locations/angles make creating a decent shroud very difficult.
One perseveres though, eh?
I'm quite chuffed.
I wish my efan install was going as well but naturally, it's not. Those stupid radiator hose locations/angles make creating a decent shroud very difficult.
One perseveres though, eh?
Yes good job on the install, looks very nice, and i'm jealous that your battery box looks nicer than mine =). Anyways depending on what fan you are using and if you have the stock or aftermarket radiator i have a good shroud design that fits perfectly over the stock or with some slight modding over a koyo radiator just fine. I can get some pics and measures of it for you
No rotary, no problems?
Joined: Nov 2004
Posts: 1,567
Likes: 0
From: Dubuque, IA
Here ya go.
I did a lot of rewiring and reworking, so I'll just let the pictures speak for themselves. Just a note, I do not have the battery surround done yet. I can't find a local place that sells the foam material that I want to cover it with, so I'm still looking. Other than that, the setup is all done. Onto the pictures:


Comments are welcome.
I did a lot of rewiring and reworking, so I'll just let the pictures speak for themselves. Just a note, I do not have the battery surround done yet. I can't find a local place that sells the foam material that I want to cover it with, so I'm still looking. Other than that, the setup is all done. Onto the pictures:
Comments are welcome.
Boy, you certainly went the extra mile on your install, Icewolf- looks nice.
Coupla questions...
Where did you source your circuit breakers?
What is going on over on the passenger side?
Cloudzero...I'd 'preciate any ideas/plans you've got on the shroud.
I have V.1 of mine done and installed but it suffers aesthetically.
Coupla questions...
Where did you source your circuit breakers?
What is going on over on the passenger side?
Cloudzero...I'd 'preciate any ideas/plans you've got on the shroud.
I have V.1 of mine done and installed but it suffers aesthetically.
No rotary, no problems?
Joined: Nov 2004
Posts: 1,567
Likes: 0
From: Dubuque, IA
Thanks for the kind words Clokker. I am very pleased with how the surround turned out, and can't wait to get it finished with some nice gray foam material to match the rest of the carpet. I made sure that I left space on the surround for when I build my stereo system and can bolt my other breakers etc. for that. I really need to get my engine bay repainted so that I can make the install look even nicer. I'm missing a lot of paint on my driver's frame rail because a bunch of PS fluid got on it and ate a lot of the paint.
I made sure that all my connections were soldered correctly as well as greased and heat shrinked. All of my grounds were stripped to bare metal and covered with grease. It took me longer than I expected to finish all this, but at least I know things are done the right way. I was fortunate enough to already have a Dremel and lots of wire wheels and grinding tools for it, so that helped speed things up. I also had an electric drill and bits too. For my parts list:
30 feet of 2 gauge welder's cable - local welding supply shop
2 Bussman 150 Amp circuit breakers - Advance Auto Parts
12 2 gauge cable lugs - O'Reiley Auto Parts
2 gold plated battery terminals - Advance Auto Parts
MSD spark guard di-electric grease - some online store
Optima Yellow Top deep cycle battery D34/78 - Advance Auto Parts
Propane torch with pencil tip - Advance Auto Parts
.065" rosin core solder - Radio Shack
3/4" heat shrink tubing - Lowe's Home Improvement
piece of 3/4" plywood - free scrap piece from local lumber yard
misc. nuts, bolts, and washers to mount breakers - local hardware store
This was enough to put the battery into the passenger storage bin and make a surround for it. Also, I was able to make new starter cables, and run a new wire from the fuse block to the breaker. Also, I was able to re-do and clean up a lot of the grounds on the car. I am very happy with how things turned out. I haven't blown either of the breakers yet after starting the car at least 10 times now, and haven't had any problems whatsoever.
The passenger side pictures of the re-wiring I did. If you seen the thread of me trying to figure out where my wires went for the water thermo sensor, you'd understand. I ended up taking the entire harness apart on that side of the car to find my wires. I removed my rat's nest and emissions, so I had a ton of wires that I removed from that part of the harness because they weren't needed anymore. After doing that, I re-wired and re-routed the harness to help hide it better. I also had pictures in there of my new grounds and also of my stock exhaust manifold that I was able to heat wrap and coated with the silicone sealer spray.
If you wouldn't mind...
What did you have to pay for the cable and breakers?
(All off the previous writeups about this were before the abrupt rise in copper prices which now makes the cable a rather significant expense...).
And, just for future reference...
I only ended up using @15" of cable since I reused all the engine bay harnesses.
With the remainder I could get ambitious and redo the starter leads but I'll save that for another day.
No rotary, no problems?
Joined: Nov 2004
Posts: 1,567
Likes: 0
From: Dubuque, IA
The cable wasn't too pricey, I think it was like $1.80 per foot. Rising copper costs have really brought the price of it up. But then again, it's much easier to work with and doesn't rub through near as easy as the standard 2 gauge wiring does, not to mention the standard stuff was at least $2.00 per foot everywhere I looked. The breakers were something like $22.00 a piece I believe. I actually still have a couple feet of cable left over from the whole thing, so realistically you'd only need about 28 feet to re-do everything that I did.
The Mountain Dew can is my catch-can for the PCV system. I removed my charcoal canister and use that instead to catch all the **** that comes out of the crankcase. Currently I have nothing holding down the battery, and I know I'm going to get **** for it. I haven't quite found a setup to hold down the battery that I liked that really doesn't mess up the flow of the things. At the momment the battery is sitting on a wooden spacer that I made to fit the storage bin. I was thinking of bolting the spacer to the floor and then using the wing type attachment that came with the battery to hold it in place. I'm not really worried about it right now because the battery does not move AT ALL in the position it is in now. The only time I'd have to worry about it is if I rolled the car. What I was going to start doing is locking the bin just in case that would happen.
The Mountain Dew can is my catch-can for the PCV system. I removed my charcoal canister and use that instead to catch all the **** that comes out of the crankcase. Currently I have nothing holding down the battery, and I know I'm going to get **** for it. I haven't quite found a setup to hold down the battery that I liked that really doesn't mess up the flow of the things. At the momment the battery is sitting on a wooden spacer that I made to fit the storage bin. I was thinking of bolting the spacer to the floor and then using the wing type attachment that came with the battery to hold it in place. I'm not really worried about it right now because the battery does not move AT ALL in the position it is in now. The only time I'd have to worry about it is if I rolled the car. What I was going to start doing is locking the bin just in case that would happen.