
** HELP** changed tps and its still like this (video in post)

Thread Starter
Full Member
Joined: Dec 2004
Posts: 188
Likes: 0
From: los angeles
yeah im sure i got the plugs in the rite places lolz ... but i did hear some clicking sounds on the trailing coil the other day when i was trying to start my car
Thread Starter
Full Member
Joined: Dec 2004
Posts: 188
Likes: 0
From: los angeles
The LEAD coils sparkplug wires go to the bottom two sparkplugs and frankly it matters not if you swap those two wire around because they fire at the same time.
The TRAIL sparkplug wires DO matter as to which upper sparkplugs they go to. The most fwd of the sparkplug wires at the coil, goes to the most fwd sparkplug (upper plugs) on the top.
The other trail sparkplug wire goes to ...........yes, there.
The TRAIL sparkplug wires DO matter as to which upper sparkplugs they go to. The most fwd of the sparkplug wires at the coil, goes to the most fwd sparkplug (upper plugs) on the top.
The other trail sparkplug wire goes to ...........yes, there.
Thread Starter
Full Member
Joined: Dec 2004
Posts: 188
Likes: 0
From: los angeles
Investigate the trailing coil. I had very similar problems, my tach went out and shortly after it started bogging when I hit the gas. Solved both problems by redoing the ground found underneath the trailing coil.
Couldn't hurt to check the plugs after you do that too, as it sounds like they've been working pretty hard and might be in need of a cleaning.
Couldn't hurt to check the plugs after you do that too, as it sounds like they've been working pretty hard and might be in need of a cleaning.
Thread Starter
Full Member
Joined: Dec 2004
Posts: 188
Likes: 0
From: los angeles
my car has this same problem when the car is first started up, but after it warms up it goes away...could i have the same problem ? my wires are fairly new , plugs are kinda old , and i do have a spare maf somewhere that i could see if swapping fixed the problem.
my tach has recently started getting jumpy and i also am driving with no o2 sensor cuz the connector is broken
my tach has recently started getting jumpy and i also am driving with no o2 sensor cuz the connector is broken
Thread Starter
Full Member
Joined: Dec 2004
Posts: 188
Likes: 0
From: los angeles
Joined: May 2006
Posts: 3,881
Likes: 3
From: Jacksonville, Tampa & Tallahassee
From: http://www.aaroncake.net/RX-7/grounding.htm
3. Drivers Shock Tower Ground Block
This is a ground that almost none of the other grounding writeups even mentions. If you look directly at the top of the drivers shock tower near the area where the trailing coil is mounted you should find a white connector seemingly plugged into nowhere on the inner side of the tower. Leading to this connector is a thick bundle of black ground wires. This connection grounds systems throughout the car yet is often overlooked because most don't even know it exists. Repairing this ground is simple can cure multiple issues (particularly with in-dash circuits).
This image shows the ground connector between the trailing coil and shock tower:
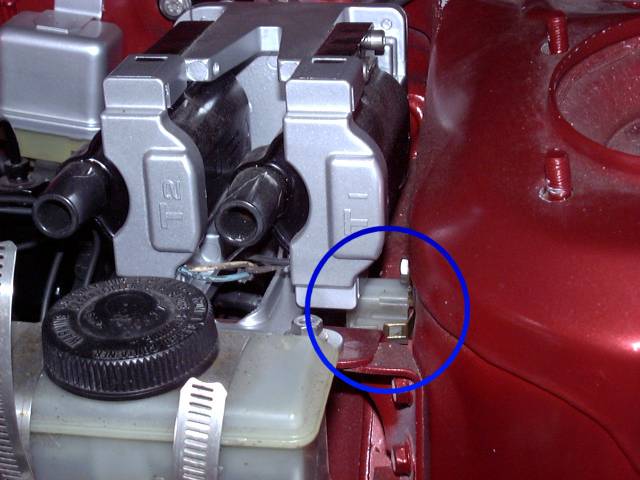
To access this ground you will probably want to remove the trailing ignition coil for space. With the trailing coil out of the way, the connector can be disconnected. Now you will see that the connector plugs into a large copper grounding block covered in spade connectors. That block is held onto the shock tower by a single M6x1.0 bolt. Remove that bolt and then remove the ground block.
The block is made of copper and can thus be easily cleaned on a wire wheel mounted on a drill or grinder. Do be careful since more then once I have experienced the wire wheel catching on the block and flinging it towards my face. Generally this is not fun. Once the bock is shiny, set it aside and turn your attention to the car. Chase the threads in the shock tower with a tap and clean the area around the hole down to bare metal with a wire brush.
Contact cleaner is the preferred method of cleaning the harness connection but be aware that some contact cleaners destroy plastic. Make sure to read the instructions. Liberally soak the connectors in cleaner and then blow dry after 30 seconds or so. Repeat this several times in about 10 minutes to try and dissolve all the crud and corrosion. Contact cleaner is nasty stuff so keep it out of your eyes when you blow off the connector. Most of the time the wiring here is in good shape so all that's required is a cleaning. If you have damaged connections then the offending spade will need to be pulled out of the connector, recrimped and reinserted. Lacking the special crimper required, you may simply want to separate the damaged wire from the harness and secure to the ground block mounting bolt with a ring terminal.
Now that everything is clean, you can reassemble the ground. Coat a new stainless steel M6x1.0 bolt liberally with dielectric grease. Cover the copper ground block with the same grease and use the bolt to secure the ground block to the shock tower. Make sure that plenty of grease got between the block and tower. Squeeze grease into every contact on the harness, packing it in tightly with your finger. Reconnect the harness and make sure it is latched on tightly.
Reinstall the trailing coil if you removed it. Remember to use antiseize on the bolts, and dielectric grease on all connectors (especially the plug wire boots).
3. Drivers Shock Tower Ground Block
This is a ground that almost none of the other grounding writeups even mentions. If you look directly at the top of the drivers shock tower near the area where the trailing coil is mounted you should find a white connector seemingly plugged into nowhere on the inner side of the tower. Leading to this connector is a thick bundle of black ground wires. This connection grounds systems throughout the car yet is often overlooked because most don't even know it exists. Repairing this ground is simple can cure multiple issues (particularly with in-dash circuits).
This image shows the ground connector between the trailing coil and shock tower:
To access this ground you will probably want to remove the trailing ignition coil for space. With the trailing coil out of the way, the connector can be disconnected. Now you will see that the connector plugs into a large copper grounding block covered in spade connectors. That block is held onto the shock tower by a single M6x1.0 bolt. Remove that bolt and then remove the ground block.
The block is made of copper and can thus be easily cleaned on a wire wheel mounted on a drill or grinder. Do be careful since more then once I have experienced the wire wheel catching on the block and flinging it towards my face. Generally this is not fun. Once the bock is shiny, set it aside and turn your attention to the car. Chase the threads in the shock tower with a tap and clean the area around the hole down to bare metal with a wire brush.
Contact cleaner is the preferred method of cleaning the harness connection but be aware that some contact cleaners destroy plastic. Make sure to read the instructions. Liberally soak the connectors in cleaner and then blow dry after 30 seconds or so. Repeat this several times in about 10 minutes to try and dissolve all the crud and corrosion. Contact cleaner is nasty stuff so keep it out of your eyes when you blow off the connector. Most of the time the wiring here is in good shape so all that's required is a cleaning. If you have damaged connections then the offending spade will need to be pulled out of the connector, recrimped and reinserted. Lacking the special crimper required, you may simply want to separate the damaged wire from the harness and secure to the ground block mounting bolt with a ring terminal.
Now that everything is clean, you can reassemble the ground. Coat a new stainless steel M6x1.0 bolt liberally with dielectric grease. Cover the copper ground block with the same grease and use the bolt to secure the ground block to the shock tower. Make sure that plenty of grease got between the block and tower. Squeeze grease into every contact on the harness, packing it in tightly with your finger. Reconnect the harness and make sure it is latched on tightly.
Reinstall the trailing coil if you removed it. Remember to use antiseize on the bolts, and dielectric grease on all connectors (especially the plug wire boots).

Full Member
Joined: Sep 2009
Posts: 117
Likes: 1
From: NY

Thread
Thread Starter
Forum
Replies
Last Post
trickster
2nd Generation Specific (1986-1992)
25
Jul 1, 2023 04:40 PM
ncds_fc
New Member RX-7 Technical
1
Aug 15, 2015 10:06 AM