
Tips - Installing & Removing Transmission - Documentation

Thread Starter
knowledge junkie
Joined: Mar 2001
Posts: 5,595
Likes: 6
From: Atlanta, GA
tips - Installing & Removing Transmission - documentation
Since this isn't covered well in the FAQ or while searching:
My experience is with the 1989-1992 non-turbo manual transmissions.
Key Search Terms: reinstall transmission, reinstalling transmission, uninstall transmission, uninstalling transmission, install transmission, installing transmission, remove transmission, removing transmission, unbolt transmission, unbolting transmission, replace transmission, replacing transmission, repair transmission, repairing transmission
Automatic VS Manual Transmission
The automatic is much easier to remove & install as there's no shifter housing case bolted ontop of the rear transmission housing like with the manual transmission. The automatic aligns correctly with the input shaft & sits parallel with the back of the engine... so it just slides right on.
To de-install the manual transmission:
- Jack up car as far as possible (extra tall jack stands GOOD, banging elbows bad).
- USE PENETRATING OIL (pblaster) on all bolts. I'd soak it several times several days before so it comes off like BUTTA.
- Remove exhaust (soak those rusty bolts ALLOT).
- Remove exhaust shielding (soak those bolts too otherwise you'll snap them)
- Drain transmission
- Mark driveshaft position on the rear diff
- Remove driveshaft
.
- Remove the cheesy 18 gauge transmission top to firewall ground. Just disconnect the plastic connector from the firewall, don't try to unscrew it from the transmission.
- Remove the clutch slave cylinder from the top of the transmission from above the engine (removing the oil filter is a good idea & cover the mount with a paper towel).
- Convertible guys - remove the front Subframe & smaller center body brace.
- Remove starter including the pass through bolt. You'll probably want to put a wrench on the rear head of the bolt and use a socket on the front nut.
- Disconnect wiring (those red snap-connectors are reversible, no worries).
.......it takes some work to remove the gunked up connectors. You might try spraying them with carb cleaner and then wd-40. I used some nice vice grips ... the "round long jaw" type that do a good job of gripping without squeezing the connectors.
- Loosen only the 5-6 bolts from the underside. I found removing the top bolt was easier from on top of the engine. Pulling the oil filter out & covering the housing with a paper tower will keep you from banging your knuckles.
- Support transmission with a transmission jack (don't even think about using a normal jack ... you'll drop it & bust your @$$). I like to have the jack in the back of the transmission, but my friend swears by having the back under the front of the car.
- From inside the car, pop off the plastic/rubber shifter surround (don't remove the leather shifter boot). Pull up on the inner rubber boot until you can see the 3-4 shifter selector bolts. 2 of the 3 bolts come out with a normal ratchet/socket. That 3rd bolt really requires a "flexhead ratcheting wrench" and if you try to force a socket in there you'll break the plastic console. You might try getting the box end (closed end) of an undersized wrench on there. I don't think an offset wrench or normal / solid ratcheting wrench will help. If you really get stuck, a smaller vice grip might do it.
- Once the bolts are out, the shifter & ball should pull right out.
- Remove the transmission bolts... be careful to label / write the lengths & positions down as the length�s vary and it's easy to swap the "top bolt" and "lower starter bolt"... which won't work.
- With the transmission supported & "chained down" to the transmission jack, remove the rear transmission support assembly & slowly pull back on the transmission as far as possible. Now's a good time to slightly drop/lean the rear of the transmission down so the shifter case/housing doesn't bang against the top of the transmission tunnel & shifter hole.
If the transmission doesn't come out by hand all the way, get your thin/wide flat style prybar out. I'd recommend NOT prying on the back of the engine, but put a brass bar or some spacer between your prybar and the engine. A few light pry-s & the transmission should pop right off. Note the lower transmission drain plug makes the transmission sit awkward. Be sure it's chained down good before lowering it.
- You may have to jackup the front of the car, remove the side jack, and pull the transmission out through the front of the car.
.
.
.
Clutch & Transmission maintenance
- With the transmission out, now's a good time to inspect the clutch & flywheel. If you�re replacing the clutch (or just removing to inspect it) you need to get that plastic centering tool from autozone before reinstalling the clutch.
- If you are replacing the clutch, be sure to check minimum thickness. If the rubber grommets are absolutely level with the clutch disk material, you need a new clutch. Note there's only like 1/16 inch of material there anyway normally.
- If you are replacing the clutch, MAKE SURE you have the OEM flywheel machined (aftermarket flywheels you might need to replace the replaceable flywheel surfaces). Napa can do this, but you'll find a better deal at a "mom & pop" machine shop in your area.
.....You'll want a friend with an air compressor and 350-450 ft-lb impact gun to come over and remove the flywheel nut for you.
- If you are replacing the clutch, get the "FULL CLUTCH KIT" that includes a new release bearing (hooks to the input shaft), needle bearing, etc...
- If you are replacing the clutch, you'll need a needle bearing puller tool to pull the needle bearing out of the back of the engine. I borrowed one from a friend. Some people say the "rent-a-bearing-puller" from autozone works, but you might have to "grind down" some of the teeth. My "350 ft-lb impact gun" friend had one thank goodness, so it was easy to remove & install.
- I also replaced the rear dust seal (correct name??) on the back of the engine that's easy to pull & re-install.
- Besides the needle bearing & rear dust seal, you'll also want to replace the transmission's rear oil seal. That seal is round & prevents oil from leaking out where the driveshaft connects to the back of the transmission. The FSM says to re-install it while on the car (for dust & oil spillage reasons I guess).
- Also make sure the rubber transmission mounts are still in decent shape (not torn / loose / broken).
Prepping to re-install the transmission
First let's talk about some important things to consider (ie some are optional, but if you want to DO IT RIGHT it's really good advice).
Prepping for removing
- Write down details on EVERYTHING you remove. That includesevery bolt, nut, & fastener. You want to list the metric lenght of the bolt, size of the bolt shaft (8mm, 10mm), size of the head (12mm, 14mm), thread pitch of the threads (1.25 pitch, 1.5 pitch), and number stamped on top of the bolt.
- If you separate wiring harness connectors, buy some paint pens and paint each conector a different color on both sides of the connector.
- If there's a wiring manager you remove, bend, loosen, write down which one that is and where it's at
- If you remove a ground or wire connect to a bolt, write down where that goes.
- Put all the fasteners & bolts back on the car after your remove something. It's a quick & easy way to keep your work area straight.
Prepping for install
- My personal rule of thumb is "If you remove it, clean, sand, & paint it." Now's a good time to pressure wash or hand wash all the stuff you just removed (0.25cents / minuet at the local self-wash). That will get all the grime & crap off. I also like to scrub down everything with a "brillo" pad and Dish Detergent. Then everything gets sanded with a "wire wheel" attached to my drill. I also use a dremel with the flat & cone style micro wire wheel bits, but that's optional.
- Autozone & walmart sell "aluminum paint" that replaces the OEM stuff. You can also spray on a "clear coat" for some BLING appeal & to help keep dirt from settling in (kina like wax). Be sure to plug the screw holes with a paper towel or balling up some painters tape. That includes the threaded screw holes around where the starter mount holes.
- For the rubber pieces, I "brillo pad + dish detergent" those as well and lightly sand if anything's caked on. Then use some "wax based" tire shine that won't wear off (I like Turtle Wax tire shine).
- Try not to get water into the starter
- In a perfect world, you would replace that wonderful zink anti-rust coating on all your bolts & nuts with a DIY zink coating kit. But doing that is a really a "nut up" restore and takes a while. I make due with cleaning the threads of the bolt with my dremel sander's micro-wire wheel brush, sanding the bolt heads, tips, & ends, and painting them before re-installing (don't paint the threads). Some of the paint does rub off when you torque the nut, but it's at least some protection.
.
.
- You need to sand down (small wire wheel & drill or use a dremel) all the grounding areas (metal on metal contract). That includes the main ground coming out of the wiring harness on the left side of the engine. Sand the brass/copper connector and the bolt hole. I also like to sand around the holes on the back of the starter since the starter only has a positive power connector on it.
.
.... I also like to remove the plastic connectors on the wiring harness & sand/clean the contracts. This includes lightly sanding the plastic connectors & spraying them with clear paint for some protection. I use a mechanics "pick set" to get the wiring harness contacts out of the connectors. BTW - I was thinking of using conductive grease to cut down on corrosion on the connectors, but I need to ask a few pros about this before attempting it.
- Sand down the top-transmission to firewall ground where it connects to the transmission.
- Sand down the ground thingy that connects to the slave cylinder bolt hole. Also sand down the slave cylinder bolt hole.
.
- Now lets talk about cleaning up your fasteners threads (bolts & nuts) to avoid stripping out your screws or damaging the bolt holes. You'll need a basic Metric ONLY tap & die set and buy a M10 x 1.25 thread pitch tap & also a die if the kit doesn't have one (Sears sells them separate). Matching the bolt to the tap should be fairly easy by comparing the threads (should line up nicely with the bolt & tap side by side). I also bought a "thread pitch ruler / gauge" like this one: www.boltdepot.com/thread-gauges.aspx
..... You'll want to tap the transmission mount bolt holes, the tap the engine-transmission mount holes. You might also need to tap the heat shield holes & cleanup the heat shield bolts with the appropriate die.
...... Use carb cleaner to cleanout the holes & the tap bit before tapping & after using the tap. Be sure to use WD-40 as a "cutting oil" and spray in the holes & on the tap. Tapping the holes may require several passes if it gets too hard to turn the tap. Be sure your perfectly centered when starting the tap. If you feel too much resistance, stop immediately so you won't screw up the threads. Note I use a SAE socket & wrench on the taps, the Tap & Die kit's normal bit mount tool sucks.
- Finally be sure to cleanup any grease & oil on the back of the engine. I had gunked up grease on that lip on the back of the engine.
Re-installing the transmission
A few things to consider:
Be sure you have a torque wrench. I like the 1/2" socket size that measures up to 150 ft-lbs. Be sure you have a 3" and 6" 1/2" socket sized extensions. Also be sure you SRPAY WD-40 on the bolts & screw holes before you torque them down so they torque accurately. I normally don't use any thread-locking compound unless the book says to.
I like to put a dab of paint on each nut/bolt I torque for easy recognition of what fasteners have been torqued.
.
- If you've painted & cleaned up the transmission, then go buy a cheese ultra-thick blanket from walmart. Wrap the transmission, put it on the transmission jack, and then chain the transmission to the jack (nothing's going to scuff this setup).
- If you haven't already, replace the needle bearing on the back of the engine (I also replaced the dust seal surrounding the needle bearing).
- Install the flywheel (again with the 350 ft-lb gun). I did NOT use any blue thread locker like the FSM says. A friend said it's not worth it, the locknut tightens when the engine spins, and you'll never get it back off with any thread locker installed.
- Install the clutch using that centering tool you got from the FULL CLUTCH KIT. Be sure to check the writing on the clutch that says "engine side" and "transmission side."
- Once you lock down the clutch cover, you can remove the tool. Be sure to torque the bolts to the correct ft-lbs.
- Install the new release bearing from the clutch kit. As the FSM says Be sure to use grease on the input shaft splines, clutch fork mounts, ball, and ball socket.
- Once you get the transmission under the car, raise it up and try to get the input shaft slightly in.
- Take the "really long" bolts you removed and screw them into the lower bolt holes to "guide the transmission in." Leave the bolts loose and only tighten them enough to keep the bolt from slipping out of the hole.
- Get the transmission centered & as close to the engine as possible (you'll have like 3/4" on bottom and 2" on top).
- Jack up the back of the transmission until it's almost touching the top of the transmission tunnel
- You don't have to "tilt" the engine like previously mentioned to make the transmission go on.
- Clean the driveshaft's transmission connector with carb spray & then spray it down with WD40
- Insert the driveshaft into the back of the transmission and push the transmission up & forward using the driveshaft as a handle / lever. You may need to turn the driveshaft slightly as well.
..... The transmission shifter housing should finally go into the gear selector hole.
- Once the transmission slips into the hole and is correctly lined up, put the correct bolts into the lower holes. Then put the correct (previously documented by you) top bolt in (from above). Then loosely put the rest of the bolts in. Be sure to put one of the bolts through the wiring harness ground on the left/drivers side of the transmission before torquing it down.
- Torque the bolts correct ft-lbs (no torque pattern that I know of).
- Re-install starter (be sure to clean the started contacts, relay connector, the copper bolts on the starter, the nut-washers, and the wiring harness connectors).
- Install the lower starter bolt.
- For the upper starter bolt, be sure to stick it in from the front of the engine through the wiring harness support bracket. Put the nut on the top and torque appropriately.
- Re-connect the top-transmission to firewall ground
- Re-connect the slave cylinder.
- Re-install the transmission mount assembly.
- Now it's time to remove & reinstall that rear oil seal in the back of the transmission (I haven't done this yet on my car, in progress). I believe you just tap it out with a flat blade screw driver and tap in a new one with a rubber mallet. Note autozone is the only place I found that has an aftermarket rear oil seal. It's round and I think is sold by "east bearings" or something like that.
- Reconnect the back of the driveshaft using the alignment marks you made.
- Fill the transmission (if you want to flush, replace the tranny gear oil after 300 miles). You'll want one of those "piston push/pull" type of oil fillers. That lets you push the oil into the transmission & differential from below the car ... through a tube into the diff / transmission. I like the "barrel style" ones that's just a piston, shaft, push/pull handle, and plastic connector tube. (not the pump or siphon feed). I bought mine at autozone.
.... You might need to use some teflon tape on the oil drain & filler plugs.
.... This might be a good time to switch to some Redline MT-90 synthetic gear oil.
.....This might be a good time to drain & refill the rear diff with some synthetic like Redline 75W90 (use copper crush washers on the differential drain & fill plugs).
OK I think that's everything.

Lives on the Forum
Joined: Feb 2004
Posts: 5,721
Likes: 3
From: Coldspring TX
Nice book, lol...
Addendums: 1) might as well change the front tranny seal also, while you have her out, this one requires another tranny pull should she leak, whereas the aft seal can be replaced with tranny in situ...
2) inspect the tranny front cover "ball" that the fork arm pivots on (for the throwout bearing), once they get really worn (it's not hard to tell, there will be "ridges" where it should be round), the alignment of the throwout bearing into the pressure plate suffers, and leads to premature failure....
3) on some trannys, not all of the bellhousing and starter bolts have the same thread pitch, so be careful if retapping all of the the threaded holes with the same tool...
Banned. I got OWNED!!!
Joined: Jan 2004
Posts: 2,040
Likes: 5
From: Knoxville, TN 37916
Originally Posted by WAYNE88N/A
Nice book, lol...
Addendums: 1) might as well change the front tranny seal also, while you have her out, this one requires another tranny pull should she leak, whereas the aft seal can be replaced with tranny in situ...
2) inspect the tranny front cover "ball" that the fork arm pivots on (for the throwout bearing), once they get really worn (it's not hard to tell, there will be "ridges" where it should be round), the alignment of the throwout bearing into the pressure plate suffers, and leads to premature failure....
3) on some trannys, not all of the bellhousing and starter bolts have the same thread pitch, so be careful if retapping all of the the threaded holes with the same tool...
Addendums: 1) might as well change the front tranny seal also, while you have her out, this one requires another tranny pull should she leak, whereas the aft seal can be replaced with tranny in situ...
2) inspect the tranny front cover "ball" that the fork arm pivots on (for the throwout bearing), once they get really worn (it's not hard to tell, there will be "ridges" where it should be round), the alignment of the throwout bearing into the pressure plate suffers, and leads to premature failure....
3) on some trannys, not all of the bellhousing and starter bolts have the same thread pitch, so be careful if retapping all of the the threaded holes with the same tool...
Thread Starter
knowledge junkie
Joined: Mar 2001
Posts: 5,595
Likes: 6
From: Atlanta, GA
Yeah writing down the "bolt details" as you go (mentioned above) should avoid mixing up threads & bolts. I didn't change the tranny seal behind the throwout bearing because my tranny wasn't leaking that I could tell. Hopefull it's sill sealed... or I'll have to later replace it if it leaks. I swapped on a new rear tranny housing & shifter select rod after this particular convertible's driveshaft broken & took the shifter case with it. I sealed up 2 sections in the rear, the remaining sections are bolted separately and didn't need new sealant.
- I should also mention... don't paint the front cover ball, don't paint the ball's socket in the fork arm.
- I didn't record which bolts went whear on the bell housing, so my "top bolt" sticks out 3/4" which may be wrong. opps
- I should also mention... don't paint the front cover ball, don't paint the ball's socket in the fork arm.
- I didn't record which bolts went whear on the bell housing, so my "top bolt" sticks out 3/4" which may be wrong. opps
Lives on the Forum
Joined: Feb 2004
Posts: 5,721
Likes: 3
From: Coldspring TX
Lol, yeah, that's how I found out about the different threads...After pulling different rx-7 trannies at least 4 or 5 times over the years, I figured during my rebuild I could figure out where all the bolts went back without having to mark them, as I did all the previous times...Live and learn
Yep, Hermit, the lower starter bolt...You win the kupie doll for the day
Yep, Hermit, the lower starter bolt...You win the kupie doll for the day
Trending Topics
 .
.

Thread Starter
knowledge junkie
Joined: Mar 2001
Posts: 5,595
Likes: 6
From: Atlanta, GA
Few more things:
- The wires coming out of the tranmission sensors are VERY easy to break off, so be careful when removing/installing the transmission:
- I noticed exposed metal wiring on the transmission sensors & the slave cylinder ground. Clean this wiring section and do like mazda & use some silicon to seal those wires. I also like to use "liquid electrical tape" to replace the cracked rubber shielding before using the silicon.
- You should clean the wiring coming off the transmission and re-sand the contacts as mentioned above. You can help protect it with by wrapping it in some "heat shrink wrap" and a hitting it with a heat gun/hair drier or similar wrap.
- The OEM "dangling wires" sucks. Manage those suckers with some small zip ties and zip it to the body close by.
Rotary Enthusiast
Joined: Dec 2002
Posts: 1,228
Likes: 0
From: Darwin, NT, Australia
Originally Posted by WAYNE88N/A
Lol, yeah, that's how I found out about the different threads...After pulling different rx-7 trannies at least 4 or 5 times over the years, I figured during my rebuild I could figure out where all the bolts went back without having to mark them, as I did all the previous times...Live and learn
Yep, Hermit, the lower starter bolt...You win the kupie doll for the day
Yep, Hermit, the lower starter bolt...You win the kupie doll for the day
Hmm good, so i'm not the only one that found this out the hard way........

Thread Starter
knowledge junkie
Joined: Mar 2001
Posts: 5,595
Likes: 6
From: Atlanta, GA
Big tip:
- Loosen the upper oil filer bolt on the transmission when the tranny is OUT of the car.
This is a square bolt, so it's really easy to round the edges and make it impossible to get a wrench on there
- If the bolt won't come out & the transmission's still in the car, remove the starter and SOAK the oil filer bolt with PB Blaster. I ended up using a torch (not propane, a hotter gas torch) to heat the transmission case around the bolt. Then using some 10" Vice Grips, I finally got it off. Hitting the vice grips with a deadblow hammer didn't work, nor did putting a pipe extension on the vice grips. The metal in the filer bolt is too soft.
- If the bolt's already getting rounded, replace it. You might have to special order it, but you'll be glad if you do.
- Don't put thread lock or use thread tape on the bolt, it's tapered so it will seal itself.
- To cleanup the threads, don't spray carb cleaner in the transmission hole (and you can't re-tap the hole because 1) it's tapered and 2) you don't want metal shavings in the transmission). I'm going to just keep screwing, unscrewing, & cleaning the oil filer bolt until both the threads on the bolt & oil filer hole are clean.
Notice even the edges on the "new" plug are starting to round after removing it once.
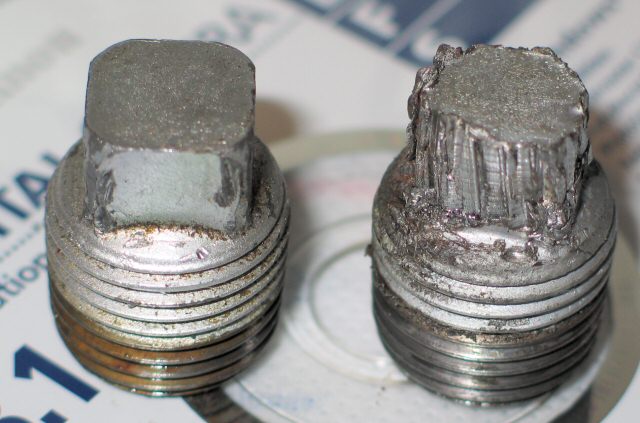
Key search words: transmission oil filer hole, oil filer, bolt for oil filer, filer hole, filer bolt, filler hole, filler bolt.
- Loosen the upper oil filer bolt on the transmission when the tranny is OUT of the car.
This is a square bolt, so it's really easy to round the edges and make it impossible to get a wrench on there
- If the bolt won't come out & the transmission's still in the car, remove the starter and SOAK the oil filer bolt with PB Blaster. I ended up using a torch (not propane, a hotter gas torch) to heat the transmission case around the bolt. Then using some 10" Vice Grips, I finally got it off. Hitting the vice grips with a deadblow hammer didn't work, nor did putting a pipe extension on the vice grips. The metal in the filer bolt is too soft.
- If the bolt's already getting rounded, replace it. You might have to special order it, but you'll be glad if you do.
- Don't put thread lock or use thread tape on the bolt, it's tapered so it will seal itself.
- To cleanup the threads, don't spray carb cleaner in the transmission hole (and you can't re-tap the hole because 1) it's tapered and 2) you don't want metal shavings in the transmission). I'm going to just keep screwing, unscrewing, & cleaning the oil filer bolt until both the threads on the bolt & oil filer hole are clean.
Notice even the edges on the "new" plug are starting to round after removing it once.
Key search words: transmission oil filer hole, oil filer, bolt for oil filer, filer hole, filer bolt, filler hole, filler bolt.
Uggh, he made it sound so easy... I put a clutch in my vert, and I swear I have nightmares about how terrible it was, lol.
I didn't use a 'transmission jack'... So yeah, I pretty much wanted to kill myself. A frikkin' hundred pound hunk of metal, rolling around on my shoulder and falling on my nuts, while I'm laying there helpless being crushed by my cold hearted nemesis...
Using the driveshaft as a 'guide' is something that would've been a helpful tip when re-alligning the transmission. Taller jack stands would've been awesome too.
Definitely remove the clutch nonsense, other-wise it's going to be a VERY tight squeeze when dropping the tranny.
Full Member
Joined: Sep 2004
Posts: 158
Likes: 1
From: Slinger, WI
yea, im currently replacing my clutch, and i got it all apart, new clutch on, raised up the trans with two jacks(my brother let his friend use his tranny jack) and that is as far as i can get. no matter what i've tried, i can't seem to get the tranny to go back on. my brother suggested using some longer bolts to pull the tranny to the engine, but that didnt work. does any1 have any suggestions??? i did take the alignment tool out, and tried to use the driveshaft, but none of it worked. any help would be greatly appreciated--thanx
Joined: Feb 2001
Posts: 29,798
Likes: 128
From: London, Ontario, Canada
Great writeup. As soon as the thread dies down and people stop asking questions, I'll move a copy to the Archives.
Please, since this is being archived, keep the images working.
Please, since this is being archived, keep the images working.
Thread Starter
knowledge junkie
Joined: Mar 2001
Posts: 5,595
Likes: 6
From: Atlanta, GA
Originally Posted by Aaron Cake
Great writeup. As soon as the thread dies down and people stop asking questions, I'll move a copy to the Archives.
Please, since this is being archived, keep the images working.
Please, since this is being archived, keep the images working.
well i did this today and ill i gotta sya is GOOD LUCK!!lol, make SURE you have a jack for the tranny!it took me and a frien almost 6 hours!!! of course we didnt remove the hole assembly to the shifter, just the shifter itself! we had to wrestle that thing in. all in all it was a normal tranny install if ya know what i mean! this thread definately helped!
AND MAKE SURE YOU LEAVE IT IN GEAR SO THAT WHEN YOU USE THE DRIVESHAFT TO ALLIGN IT ITLL TURN IT.
AND MAKE SURE YOU LEAVE IT IN GEAR SO THAT WHEN YOU USE THE DRIVESHAFT TO ALLIGN IT ITLL TURN IT.