
Setting TDC on a 20B

Thread Starter
Joined: Jan 2002
Posts: 1,433
Likes: 0
From: Apple Valley area in MN
Setting TDC on a 20B
I had the front cover of the main pulley attached and set to Leading just as you would when you mess around with the stock CAS. I removed the front cover of the main pulley to install the Electromotive crank trigger wheel and the rear wheels turned on me so now the motor has turned and I don't know where my mark is anymore and thus...don't have a clue how to get it back to leading and/or TDC.
So...how do you bring the motor back to TDC? Leading is really irrevelent because I can set it wherever I want by using the new crank trigger wheel, however, if I could get it back, wouldn't it make it easier to get it to TDC if I knew what the original L mark was as well?
Or, is there just a simple procedure necessary to rotate the motor to TDC and I can calculate my angle degrees on the crank trigger wheel from that point?
*yes I did search a little but most of the info had to do with timing, not setting the motor to TDC*


Joined: Mar 2001
Posts: 31,851
Likes: 3,239
From: https://www2.mazda.com/en/100th/
i think you can only put the main pulley on one way, like any other 89+ rotary. oh and if it matters the 89-98 mpv has a distributor block off plate, they use the same head for both sides.
mike
mike
Try this: remove the L1 plug and try to look into the hole. If you can see a rotor face, you're close. If you can't get your head or a mirror down there, just poke something it there to feel the face. Next, lineup the stock pulley to the closest bolt by rotating the engine slowly by hand. This should be the right one since any others would be 90� too far (that's how it is on older engines). Make the rotor face come as close to the hole and then the compression dish will cause the object you're holding to dip inwards a little. Then, take it back off and put the crank wheel on. Lastly, put the pulley back on and tighten down. If that doesn't help you, then maybe I'm thinking of a different TEC kit.
Last edited by Jeff20B; Jul 31, 2002 at 01:34 AM.
rebreaking things
Joined: Apr 2006
Posts: 866
Likes: 0
From: Manhattan
Hello everyone:
I want to confirm that I understand what the marks on the 20b pulley represent before I start working on a custom bracket for the 60-2 trigger wheel sensor.
Here is a picture of a stock 20b pulley taken looking at it from the front of the car.

(1.) = 20 degrees BEFORE TDC. Meaning when (1.) lines up with the trigger at 12 o'clock one of the faces of rotor #1 is 20 degrees before TDC in the housing/peak compression.
(2.) =5 degrees BEFORE TDC. Meaning when (2.) lines up with the trigger at 12 o'clock one of the faces of rotor #1 is 5 degrees before TDC in the housing/peak compression.
(3.) =????
All of these marks are relative to the reference at 12 o'clock right?
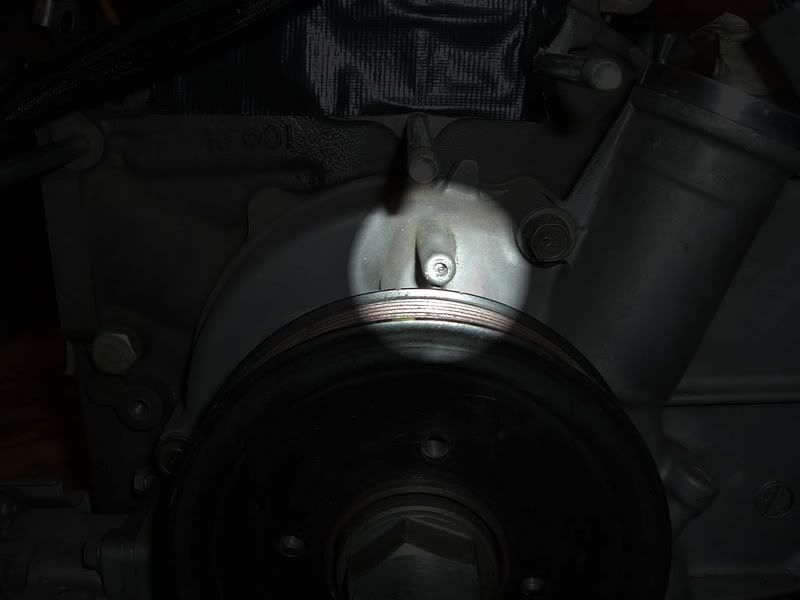
If this is correct the distance between (1.) and (2.) is 15 degrees correct?
Here is a good thread on the subject: https://www.rx7club.com/showthread.p...ghlight=timing
I want to confirm that I understand what the marks on the 20b pulley represent before I start working on a custom bracket for the 60-2 trigger wheel sensor.
Here is a picture of a stock 20b pulley taken looking at it from the front of the car.
(1.) = 20 degrees BEFORE TDC. Meaning when (1.) lines up with the trigger at 12 o'clock one of the faces of rotor #1 is 20 degrees before TDC in the housing/peak compression.
(2.) =5 degrees BEFORE TDC. Meaning when (2.) lines up with the trigger at 12 o'clock one of the faces of rotor #1 is 5 degrees before TDC in the housing/peak compression.
(3.) =????
All of these marks are relative to the reference at 12 o'clock right?
If this is correct the distance between (1.) and (2.) is 15 degrees correct?
Here is a good thread on the subject: https://www.rx7club.com/showthread.p...ghlight=timing
Trending Topics

'Tuna'
Joined: Feb 2001
Posts: 4,637
Likes: 3
From: Miami,Fl,USA
Originally Posted by CMonakar
Hello everyone:
I want to confirm that I understand what the marks on the 20b pulley represent before I start working on a custom bracket for the 60-2 trigger wheel sensor.
Here is a picture of a stock 20b pulley taken looking at it from the front of the car.
(1.) = 20 degrees BEFORE TDC. Meaning when (1.) lines up with the trigger at 12 o'clock one of the faces of rotor #1 is 20 degrees before TDC in the housing/peak compression.
(2.) =5 degrees BEFORE TDC. Meaning when (2.) lines up with the trigger at 12 o'clock one of the faces of rotor #1 is 5 degrees before TDC in the housing/peak compression.
(3.) =????
Turning the motor clockwise the first timing mark (5 deg ATDC) that comes up has allready gone pass 'TDC'.
You can either use a degree wheel or use a divider and measure the distance between the two factory marks. Since the distance between the two factory marks equal 15 degrees just calculate what the distance would be for every 5 degrees and then you can scribe the 'TDC' position on the pulley.

Lives on the Forum
Joined: Feb 2001
Posts: 26,664
Likes: 23
From: n
That weird yellow / green mark # "3." is just to give you an idea where T1 is firing at.
If you shoot T2 and T3, they should be bottom right and bottom left respectively when you fire the timing gun.
-Ted
If you shoot T2 and T3, they should be bottom right and bottom left respectively when you fire the timing gun.
-Ted
Joined: Mar 2001
Posts: 31,851
Likes: 3,239
From: https://www2.mazda.com/en/100th/
also if you're marking up the pully, its not a bad idea to mark tdc for #2 and 3, if only to make sure its all firing correctly.
on mine i think i used different colors for each rotor. #1 has the marks and is precise, but the other 2 were just to check.
120 degrees, peace sign, dude
on mine i think i used different colors for each rotor. #1 has the marks and is precise, but the other 2 were just to check.
120 degrees, peace sign, dude

Thread
Thread Starter
Forum
Replies
Last Post
stickmantijuana
Engine Management Forum
11
Nov 9, 2015 01:15 PM