Help - moding my subframe for PS rack and full LIM

Help - moding my subframe for PS rack and full LIM
So I'm now wondering if this is all going to fit. I put together a mock short block to try and see if the steering mount relocation I've been working on is going to clear or not.... Outlook not so good.
This is the subframe I was thinking I would try and replicate

So I tacked the pockets together on mine, glued the cutouts in, and fit it to my FD.

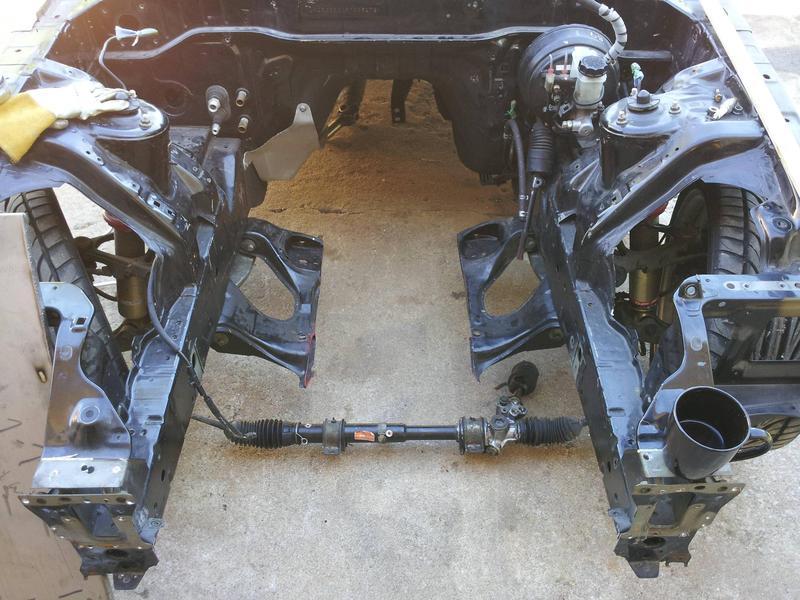
The trans is in the stock FD location. Rack mounts have been moved down .5" in the rear, and oriented the same as stock.
Then I check how the clearance looked.

=(
And 2 reference shots of the stock PS rack on the stock subframe


I didn't actually fit the rack since the cutouts wont hold it, but it looks like the oil pan is still in the way. I thought by moving the rack down .5", you were able to both keep the full LIM and clear the stock PS rack? Is there something that I'm missing? Should I move the mounts lower? What's the lower limit for how far I can sit the engine down on the subframe without impacting something drive train related?
This is the subframe I was thinking I would try and replicate
So I tacked the pockets together on mine, glued the cutouts in, and fit it to my FD.
The trans is in the stock FD location. Rack mounts have been moved down .5" in the rear, and oriented the same as stock.
Then I check how the clearance looked.
=(
And 2 reference shots of the stock PS rack on the stock subframe
I didn't actually fit the rack since the cutouts wont hold it, but it looks like the oil pan is still in the way. I thought by moving the rack down .5", you were able to both keep the full LIM and clear the stock PS rack? Is there something that I'm missing? Should I move the mounts lower? What's the lower limit for how far I can sit the engine down on the subframe without impacting something drive train related?


not a bad way to get around a problem. ...finish this and let's see how you turn out.
in my case, I moved the engine so far back that this *probably* wasn't an idea I could have got away with.
in my case, I moved the engine so far back that this *probably* wasn't an idea I could have got away with.
Shortning the lim will move the torque peak up the rpm band however, if your boosting the engine, boost, a/r size, & turbo selection are what's really what's gonna determine where your power band falls. Send your lim off to have Logan modify for and save yourself the hastle.

Shortning the lim will move the torque peak up the rpm band however, if your boosting the engine, boost, a/r size, & turbo selection are what's really what's gonna determine where your power band falls. Send your lim off to have Logan modify for and save yourself the hastle.
Also, dry sump seems overkill for a street car.
Trending Topics
So, I answered my own question after some fitment tonight. Unless I'm way off base, lowering the mounts will not clear the stock power steering rack for an engine mounted in the stock location.
I started by first figuring the lowest I could go on the mounts. It turns out .5" is just about the lowest you can go since the housing for the quill hits the subframe. Kinda had a duh moment after I got the rack in.

Then I put my mockup short block in and took a look underneath


Not even close. The driver's side of the engine hangs a little lower than the passenger, so I tried wiggling and still no dice. Also, the trans is still lifted higher than usual, so even if I did get it to fit it probably still wouldn't have cleared once I lowered it to clear the hood.
I suppose I'll just depower the rack and call it a day, unless someone tells me otherwise. It'd be just as much work to move the fitting to the back side to keep the PS + deal with the pump + lines + etc. Maybe I'll add it again as a winter project. Though I could move the engine back 6"...... =P
I started by first figuring the lowest I could go on the mounts. It turns out .5" is just about the lowest you can go since the housing for the quill hits the subframe. Kinda had a duh moment after I got the rack in.
Then I put my mockup short block in and took a look underneath
Not even close. The driver's side of the engine hangs a little lower than the passenger, so I tried wiggling and still no dice. Also, the trans is still lifted higher than usual, so even if I did get it to fit it probably still wouldn't have cleared once I lowered it to clear the hood.
I suppose I'll just depower the rack and call it a day, unless someone tells me otherwise. It'd be just as much work to move the fitting to the back side to keep the PS + deal with the pump + lines + etc. Maybe I'll add it again as a winter project. Though I could move the engine back 6"...... =P
Well the decision to keep it was twofold. One, I thought it would be easier from a fabrication standpoint (on the initial assumption that all I had to move was the rack). Less welding, easier metal, etc. Two, I thought it would be easier from a tuning standpoint. It's easy to just to force more air down the long runners on the top end to get the HP goal. I figured it would be much harder to regain low end grunt after chopping the runners shorter.
Also, dry sump seems overkill for a street car.
Also, dry sump seems overkill for a street car.
You have to understand though that the bottom end torque loss from shortening the LIM will only be minimal since your dealing with a larger displacement engine (unlike a torque-less 13b). The lim is the easiest route because your not having to fool with the bumpsteer correction.
Maybe. They're also insanely expensive.
So I made progress. It looks like every 20b mounted in the stock location, that I could find, either has a new rack or the PS fitting moved. Busted out my trusty cutoff tool..

...aaaand fixed. I'll clean that up when I take the rack apart to de-power it.

I've now got lots of clearance, so I lowered the engine as far down as I could. It's now hitting the driver's side rack bracket/brace area. Can't go lower unless I cut that up too.

Getting closer. I pulled the hoist off and supported the engine/trans from underneath. Then I tried to fit the hood.
It doesn't fit......argh. It's like an .5"+ too tall on both the front and rear intake runners.
Both IronMdnX and bewtew have kept the full LIM with no cowl in the hood or anything. Searching through their builds, bewtew is on the stock subframe with a different rack, and I think IronMdnX is on a pettit subframe w/ the stock PS rack with the fitting moved. What am I doing wrong? Is there some trick to cutting the support out from under the hood? Need to go lower somehow?
So I made progress. It looks like every 20b mounted in the stock location, that I could find, either has a new rack or the PS fitting moved. Busted out my trusty cutoff tool..
...aaaand fixed. I'll clean that up when I take the rack apart to de-power it.
I've now got lots of clearance, so I lowered the engine as far down as I could. It's now hitting the driver's side rack bracket/brace area. Can't go lower unless I cut that up too.
Getting closer. I pulled the hoist off and supported the engine/trans from underneath. Then I tried to fit the hood.
It doesn't fit......argh. It's like an .5"+ too tall on both the front and rear intake runners.
Both IronMdnX and bewtew have kept the full LIM with no cowl in the hood or anything. Searching through their builds, bewtew is on the stock subframe with a different rack, and I think IronMdnX is on a pettit subframe w/ the stock PS rack with the fitting moved. What am I doing wrong? Is there some trick to cutting the support out from under the hood? Need to go lower somehow?
After messing with this for 2 solid nights, I'm getting ready to give up on using the mostly stock subframe layout. I did a whole bunch of cutting (detailed later) and the hood now latches on the first click, but hits on the front of the UIM.
About half way through yesterday's work, I decided to attack the problem from the other direction. I pulled the rack out, put the engine in, and latched the hood shut. Then I raised the engine until there was as small of a clearance between the hood and UIM as I was comfortable with. Currently there's less than a finger's width between the highest part of the UIM and the hood support.
Then I measured the clearance between the oil pan and the SF. (The new photo didnt make it to photobucket so I'm using the old one.

- The red line from the bottom of the pan lip to the SF is about 1" or maybe a little less.
- I've cut additional metal at the blue arrows. Only the metal parallel with the ground remains on the SF. I've cut the bottom half of the mounts as well up to that Y.
- I cut a window on the outside of the driver's rack mount so the housing for the quill can sit lower inside the SF
-I've also clearanced 1/4" off the aluminum boss for the driver's side rack mount. The cast aluminum semi-cylinder on the outside of the boss is now resting on the subframe. It will have to get ground off to mount any lower.
- When I lined everything up, to looks like everything in line with those mounting tabs (yellow circle) on the front to the subframe will have to go. Even if the rack was to mount level with the bottom of the SF, I still don't think it will clear. The pic I took last night shows how ridiculous the positioning is.
- Also, it looks like the green distance between the top and bottom of the mounts I cut out is too tall, even resting on the bottom of the SF.
Taking a closer look at bewtew's SF....

You can see that his rack (AtomicRex though) is clearly mounted behind the bulge in the oil pan. The front bulge also looks unmodified. It also looks like his fabricator took everything off the front of the subframe, possibly including some of the front cross member as well. This is probably what I will end up trying next. The unfortunate side effect is that I think this will tuck the rack further back than stock. I'm not sure what kind of side effect that will have on the steering.
Anyone have any other ideas?
About half way through yesterday's work, I decided to attack the problem from the other direction. I pulled the rack out, put the engine in, and latched the hood shut. Then I raised the engine until there was as small of a clearance between the hood and UIM as I was comfortable with. Currently there's less than a finger's width between the highest part of the UIM and the hood support.
Then I measured the clearance between the oil pan and the SF. (The new photo didnt make it to photobucket so I'm using the old one.
- The red line from the bottom of the pan lip to the SF is about 1" or maybe a little less.
- I've cut additional metal at the blue arrows. Only the metal parallel with the ground remains on the SF. I've cut the bottom half of the mounts as well up to that Y.
- I cut a window on the outside of the driver's rack mount so the housing for the quill can sit lower inside the SF
-I've also clearanced 1/4" off the aluminum boss for the driver's side rack mount. The cast aluminum semi-cylinder on the outside of the boss is now resting on the subframe. It will have to get ground off to mount any lower.
- When I lined everything up, to looks like everything in line with those mounting tabs (yellow circle) on the front to the subframe will have to go. Even if the rack was to mount level with the bottom of the SF, I still don't think it will clear. The pic I took last night shows how ridiculous the positioning is.
- Also, it looks like the green distance between the top and bottom of the mounts I cut out is too tall, even resting on the bottom of the SF.
Taking a closer look at bewtew's SF....
You can see that his rack (AtomicRex though) is clearly mounted behind the bulge in the oil pan. The front bulge also looks unmodified. It also looks like his fabricator took everything off the front of the subframe, possibly including some of the front cross member as well. This is probably what I will end up trying next. The unfortunate side effect is that I think this will tuck the rack further back than stock. I'm not sure what kind of side effect that will have on the steering.
Anyone have any other ideas?
Not to sound like a smart *** but send the LIM off to Defined Autoworks. It just seems like you are creating problems were none exist.
There are plenty of issues to deal with without making new ones!!
Being on my 3rd engine swap in 5 years I have learned where to let stuff go...
1989 GTUs 20B N/A 5 years
1997 Ford F-350 Cummins 12V 1 year
1987 4Runner GM L92 with 6L80E transmission - Starting in 1 month
There are plenty of issues to deal with without making new ones!!
Being on my 3rd engine swap in 5 years I have learned where to let stuff go...
1989 GTUs 20B N/A 5 years
1997 Ford F-350 Cummins 12V 1 year
1987 4Runner GM L92 with 6L80E transmission - Starting in 1 month
Perhaps this guy knows just how long his manifold needs to be and the stock length was it.
I simply refuse to follow someone else's footsteps. I did NOT cut my intakes simply because they work for MY needs - not Logan's.
I can tell you this, when I get into my car, it's just want I wanted and I did it.. not my endless bank account or my ability to follow someone else's trail. I suspect this OP suffers from the same disorder.
Look at the amount of work he's putting into it?!
Now on to something that might help him... have you considered using a smaller diameter piece of tubing for the steering rack? Disassemble it, understand how it works, de-power it ...then you'll realize you can use a smaller diameter tube and gain some room.
I've put the engine where it needed to be, ensured the driveline was where it needed to be (angle/pinion) etc. the steering rack placement is solved with some re-engineering and math skills (or the ability to use google).
Keep down the path, you'll figure it out.
Further, dont be afraid to hack stuff up - I've got 6 subframes i nthe garage hacked up and a few other trial/error parts - it'll all be worth while, i think, once you get where you'd like to be.
Well maybe you don't have the complete picture here?
Perhaps this guy knows just how long his manifold needs to be and the stock length was it.
I simply refuse to follow someone else's footsteps. I did NOT cut my intakes simply because they work for MY needs - not Logan's.
I can tell you this, when I get into my car, it's just want I wanted and I did it.. not my endless bank account or my ability to follow someone else's trail. I suspect this OP suffers from the same disorder.
hwnd we are one in the same (as far as doing things our own way) but, the 1st word in this thread is Help! So the ones that think they can will come in and give their input on the subject. Whether he accepts the advice of others or not is his choice. If he really wanted to do things his own way, then why start this thread? No offense to the Op but he obviously doesn't have a clue (hence the thread title).
Personally I've done some really crazy outrageous stuff with my 20b intake system. Starting a thread asking for "Help" didn't seem necessary because I'm trying to do some things that really haven't been done successfully before. The OP however is trying to do something that has been done over and over and over. He's asked for help yet he has continued to do things his own way (which is perfectly fine). In the end who's time do you think he's wasting?
For whatever it's worth, I had to cut 1.75" out of my LIM to fit under a Scoot-style hood with the Defined mounts, which essentially leaves the engine right where you're trying to have it. This is with the PS rack lines relocated, mind you. In other words, you're going to need to come up with ~1.75" to keep the intake as it comes, by some combination of rack movement, line reconfiguration, diameter reduction, oil pan modification, and/or magic.
With all the work you're doing, you might more strongly consider trying to retain the front cover location as it comes in the FD, as opposed to the rear iron location.
Good luck. Keep us posted.
-ryan
With all the work you're doing, you might more strongly consider trying to retain the front cover location as it comes in the FD, as opposed to the rear iron location.
Good luck. Keep us posted.
-ryan
Last edited by calculon; Feb 3, 2012 at 12:59 PM.
Well maybe you don't have the complete picture here?
Perhaps this guy knows just how long his manifold needs to be and the stock length was it.
I simply refuse to follow someone else's footsteps. I did NOT cut my intakes simply because they work for MY needs - not Logan's.
I can tell you this, when I get into my car, it's just want I wanted and I did it.. not my endless bank account or my ability to follow someone else's trail. I suspect this OP suffers from the same disorder.
Look at the amount of work he's putting into it?!
Now on to something that might help him... have you considered using a smaller diameter piece of tubing for the steering rack? Disassemble it, understand how it works, de-power it ...then you'll realize you can use a smaller diameter tube and gain some room.
I've put the engine where it needed to be, ensured the driveline was where it needed to be (angle/pinion) etc. the steering rack placement is solved with some re-engineering and math skills (or the ability to use google).
Keep down the path, you'll figure it out.
But that being said I find your comment about endless bank account and follow someone else's trail a bit snarky. But whatever, say what you feel...I sure as **** will.
I don't know if that comment was a reference towards me but if you knew anything about me other than your preconcieved ideas from a few post you would know that neither describe me in anyway. But I do know when to hand off certain tasks to people that know more than I know. I don't have anything to prove...especially with my car.

The statement, "I simply refuse to follow someone else's footsteps", can lead to a lot of unnecessary effort. I say that totally understanding the balance between being uniquely creative and being a sheep. You are using round wheels, front engine, rear drive layout aren't you??
Actually if I personally had gone with the paths of others I wouldn't have let Logan work with my car. Remember I started collaborating with Logan almost 5 years ago. Logan was a kid with some different ideas back then.
Anyway, I still stand behind my statement. The OP said he didn't want to loose low down torque. It seems to me that is the more important question. Will he really lose low down torque to make that much of a difference? Enough difference to go through what looks like a pretty messy process that seems to be getting messier. If the answer is yes then your idea of creating a new power steering rack might be perfect. I would look to the root of the exercise he is taking on. A reassessment might be the correct thing at this time or not.
Like I said, after a few years in engine swap world you learn where to let **** go and get on with it. I want to drive mine not a endless continuation of tweaks that go on forever. I know how that goes too!
I save the endless tweaks for my own conscious evolution!! That might involve hacking up multiple subframes or letting it go..that's up to the individual.
Blah, Blah..good luck.
hwnd: I admire your creative ingenuity, drive and passion for your project!!
@Chris - I was talking about those guys who have spent real money (upwards to 6 figures and beyond) for a 3rotor swap. I realize, very much so, that some can simply afford to do that and its good in their minds to have a "no stress build" or w/e they got from it.
But what I'm really driving at here is this:
I've spent many nights (albeit not back to back nights) just looking at the car's current problems / tasks / goals. I sometimes grab a chair, sit and think / daydream through these situations and make some notes on the car's journal.
I'll sketch out crude drawings of stuff I want to see done (my subframe for example) and carry on to build a mock-up then scrap it for the real deal with those lessons learned. I fully understand that not many of us can visualize or have the time to allow their mind to wander aimlessly through fields of "wow that would be cool to have on this engine!".
I did the same thing with the exhaust manifold, i sat down, on the ground, in front of the car and pictured where I wanted to see the manifold and turbo.. I pictured the path that the air (incoming) might take (into the turbo) ..I tried to visualize other paths that looked less "dramatic".
anyhow, most of you might not get why I do this but this odd process allows me to get creative in how I might achieve a goal with a problem I'm facing. There really is something here to be gained - and that is: "I tried, I saw, I did".
and to me, thats more important than "I cant fix this, what did someone else do?".
I wasn't taking cheap-shots at anyone, hell I dont have the budget like Calculon does - he's total baller, true player ways.
I do much the same process you speak of in different parts of my life. Visualization is a key to much success!!
I won't go into what I spent...cough, couch, stupid money, cough, cough.
Like I said, I admire that ability to work on the car like you speak of. I have friends that are fabricators. While I myself am a parts changer but also a broad stroke dreamer on these projects.
One thing for sure...none of us are sheep or we wouldn't be dealing with 20B RX7s!!
Ok, wow, this got off track a bit, but there are many valid points. I guess let me get my thoughts out there.
I originally wanted to mount the 20b using the stock location, stock LIM, stock oill pan and stock PS rack. I wanted to, through modification of the subframe only, turn my stock subframe into a subframe that would allow this. The Pettit one comes pretty close to those requirements which is why I've mentioned it. Same with bewtew's solution. Other products out there require modding one or more other things to get the same result. Bottom line is that I wanted to mod the subframe. That's why the thread title is "...mod my subframe..." not "...mod my LIM..." I would have also gladly accepted "I tried that, didn't work, here's why."
I would also argue that gathering information off a forum for planning a project like this is a game of incomplete information. People's build threads are sometimes light on technical details. To remedy that, the kind of help I was looking for was the kind that calculon provided. I was also looking for any potential tricks that people may employ that aren't documented anywhere else. Like a hypothetical way to adjust the PPF to get the trans to sit differently. Stuff like that. I did listen and respond to other suggestions with what I felt were valid points or concerns.
Finally, I do have that desire to do it myself. Years earlier when I was still first doing research, I ran across patman's build. He had something in his sig I think that said 'designed by me, built by me, tuned by me.' I read that and was like, hell yea, that's what I'm talking about. In this case, I could just send this out, but it wouldn't help increase my skills for the next time I want to change something. I want to move further skill wise than where I am now, which is in between 'parts changer' and where hwnd, t-von, and many others sit. My FD is the first opportunity for me to do this.
EDIT: I've got no problem scrapping this if I've gone down the wrong path and it just won't work.