
Blondes subframe

Thread Starter
watashi no shichi
iTrader: (4)
Joined: May 2005
Posts: 1,770
Likes: 6
From: San Francisco
Blondes subframe
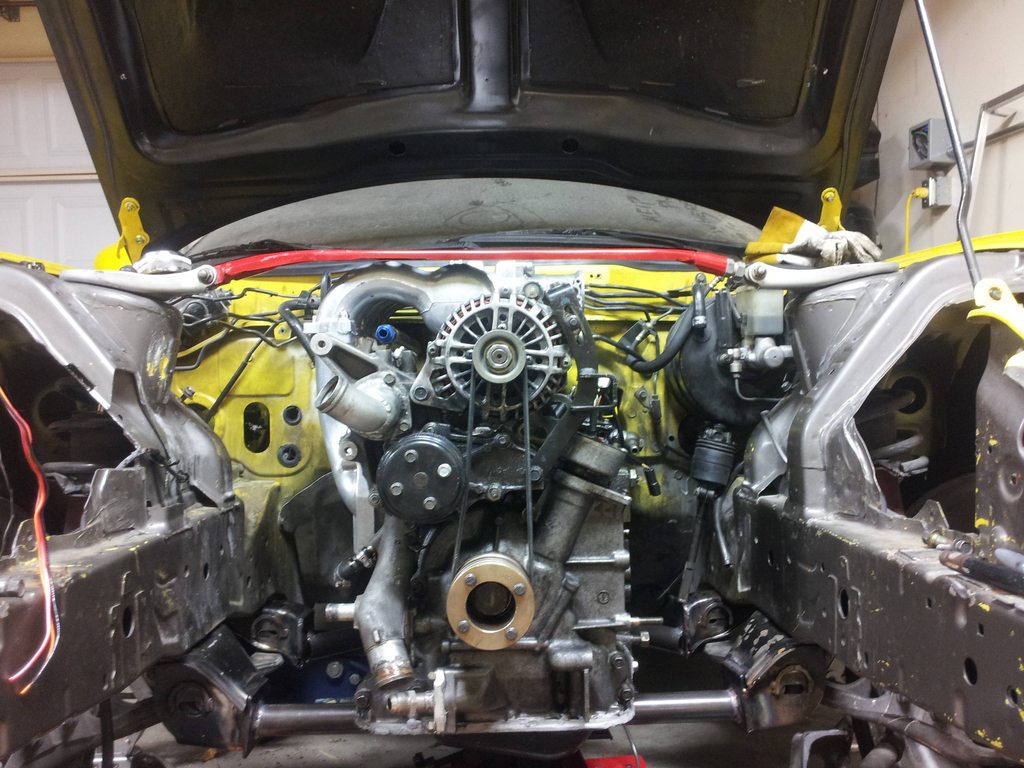
Something I've been fiddling with:

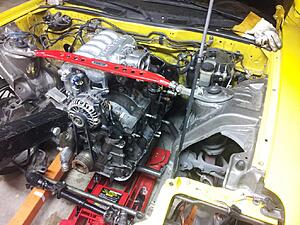
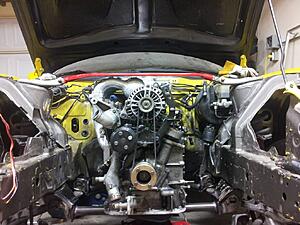

Just some pics of crap in my garage.
I decided to share this to show the sub-frame and how it has turned out so far.
I think I've maybe spent $200 for an extra sub-frame and 4130 chromoly plate & tubing (cheap to build).
The intake is uncut and clears the strut-brace "good enough" for me. I'll deal with the rack and stuff later this week. :-)
^ Nice work. That's really how these subframes usually get built. Cut some stuff up and start positioning and fitting the engine.  Looks like you moved the engine back a bit?
Looks like you moved the engine back a bit?


Thread Starter
watashi no shichi
iTrader: (4)
Joined: May 2005
Posts: 1,770
Likes: 6
From: San Francisco
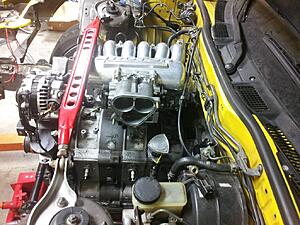
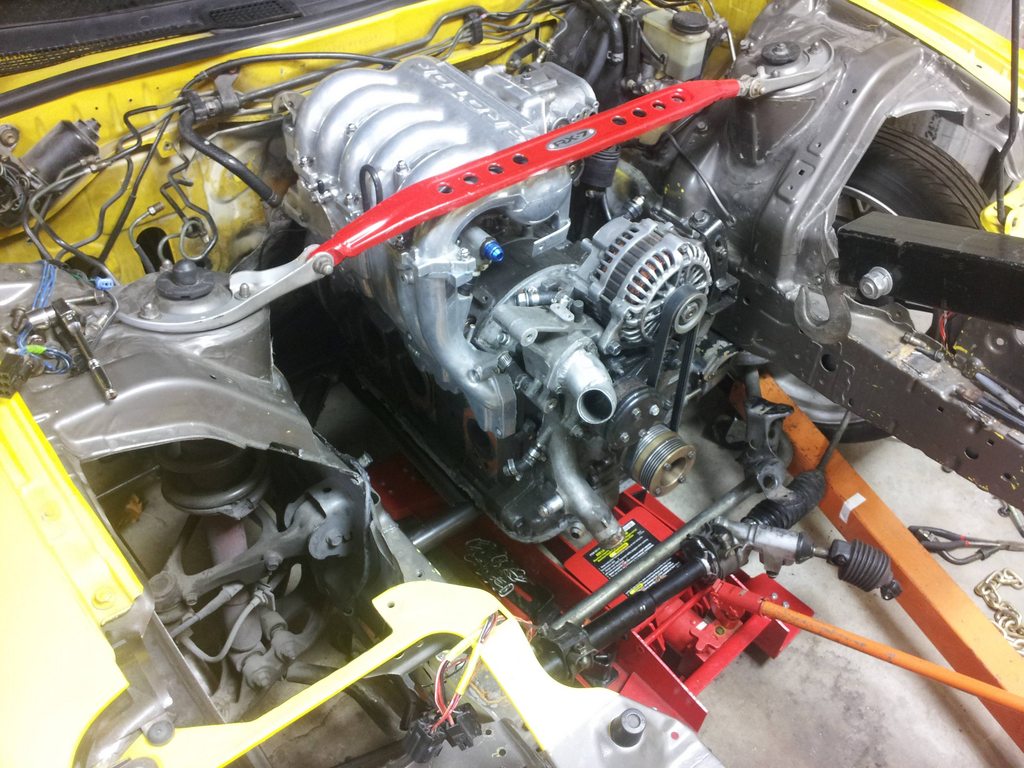
it is hard to tell but the intake is actually touching the hard-lines on the firewall.
The engine-hoist hook on the back of the intake can't be taken off as its too close to the firewall to even get the bolts out. I did made it this way, wasn't a mistake. I wanted to see how far back I could get the engine and how low. it's level and almost dead center but hard to get that from the half-*** photos I took.
thanks bud!
Don't worry about the quality just yet. The engineering behind the fabrication is what's most important. Too many people get all caught up in how GOOD something looks. To me, looks mean nothing if it's engineered like ****. If you keep the engine in that partial moved back position, what do you plan to do about the tranny and drive shaft?
If you keep the engine in that partial moved back position, what do you plan to do about the tranny and drive shaft?
Thread Starter
watashi no shichi
iTrader: (4)
Joined: May 2005
Posts: 1,770
Likes: 6
From: San Francisco
Don't worry about the quality just yet. The engineering behind the fabrication is what's most important. Too many people get all caught up in how GOOD something looks. To me, looks mean nothing if it's engineered like ****. If you keep the engine in that partial moved back position, what do you plan to do about the tranny and drive shaft?
If you keep the engine in that partial moved back position, what do you plan to do about the tranny and drive shaft?it will involve making the connecting rod shorter and moving the gear position sensor arms around but it'll work - i hope.
Trending Topics
Looking good.
I'm glad that you decided to share this as I've just gotten another subframe to cut up to make mine. I wanted to do something like this (more fab than just moving the rack mounts down), but I was worried about my ability to get major suspension components located back into positions that didn't compromise the handling. I have some questions for you in that regard.
When you bolted the 4 corners of the SF that touch the LCAs back to the frame, does that effectively locate those mounting points without any other setup? If not, what did you do to check positioning?
I'm impressed that you got the engine to mount so low that the plenum clears the strut tower brace. When you go to mount the rack to that front bar, how far (if you know) will that drop the rack down? Also, I wasn't sure what effect a misalignment of the rack fore/aft/or bias to one side would have. How are you locating the stock position x y and z, or are you mitigating the effects of moving it around?

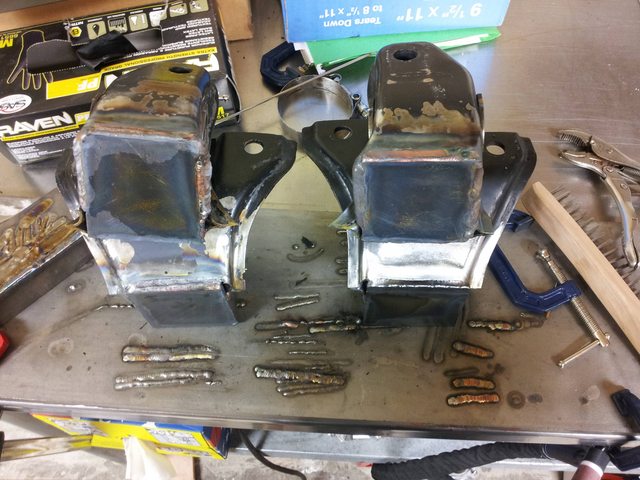
20B FD Subframe
Here's a pic of one I got several years ago.
Note that one horn is a bit lower than the other. Bump steer correction?
I built one just like it but with the horns level with one another. I still have both of them, gathering dust together.
Note that one horn is a bit lower than the other. Bump steer correction?
I built one just like it but with the horns level with one another. I still have both of them, gathering dust together.
Thread Starter
watashi no shichi
iTrader: (4)
Joined: May 2005
Posts: 1,770
Likes: 6
From: San Francisco
Thread Starter
watashi no shichi
iTrader: (4)
Joined: May 2005
Posts: 1,770
Likes: 6
From: San Francisco
Looking good.
I'm glad that you decided to share this as I've just gotten another subframe to cut up to make mine. I wanted to do something like this (more fab than just moving the rack mounts down), but I was worried about my ability to get major suspension components located back into positions that didn't compromise the handling. I have some questions for you in that regard.
When you bolted the 4 corners of the SF that touch the LCAs back to the frame, does that effectively locate those mounting points without any other setup? If not, what did you do to check positioning?
I'm impressed that you got the engine to mount so low that the plenum clears the strut tower brace. When you go to mount the rack to that front bar, how far (if you know) will that drop the rack down? Also, I wasn't sure what effect a misalignment of the rack fore/aft/or bias to one side would have. How are you locating the stock position x y and z, or are you mitigating the effects of moving it around?
I'm glad that you decided to share this as I've just gotten another subframe to cut up to make mine. I wanted to do something like this (more fab than just moving the rack mounts down), but I was worried about my ability to get major suspension components located back into positions that didn't compromise the handling. I have some questions for you in that regard.
When you bolted the 4 corners of the SF that touch the LCAs back to the frame, does that effectively locate those mounting points without any other setup? If not, what did you do to check positioning?
I'm impressed that you got the engine to mount so low that the plenum clears the strut tower brace. When you go to mount the rack to that front bar, how far (if you know) will that drop the rack down? Also, I wasn't sure what effect a misalignment of the rack fore/aft/or bias to one side would have. How are you locating the stock position x y and z, or are you mitigating the effects of moving it around?
Well the lower control arms aren't "perfect" anyhow considering they're stuffed with thick bushings.. which says to me that I'm "okay" with some slop in there. But in short, I cut just enough off leaving only 2" of material hanging out past the frame-rails (did this for all four).
in short, it was pretty simple (to me) and took an elementary route:
- 28" between frame rails
- engine is 13" wide (roughly)
- center of frame-rails is at 14" (my desire is to have engine dead center)
which leaves roughly 7.5" on either side of the engine. since i left 2" of meat hanging off the control arm brackets - i'm down to 5.5" +/- of play. so from there, i dry fitted crap in, used a square & level to make things really straight (maybe that was overkill?) and spot-welded around to keep things held together.
looking back, i would have bolted a plate to the "top side" of the control arm mounts so that when I cut 'em on the horizontal band saw - i'd have results with a vertical-level mounts which would mean my tubing (being with a straight cut) would have mated 100% vs. my 85% :-)
The steering rack of the least of my worries at this point. why?
well, I'm no smarty-pants but I'll be able to recalculate the proper position for the rack.
its moving forward on the horizontal plane , leaving the vertical plane still at 0*;
as i currently understand (which isn't much at this point), i'll likely cut and reweld spindles and have 'em heat treated.. though i'm only guessing at that currently.

Rotary Enthusiast
Joined: Aug 2008
Posts: 1,101
Likes: 13
From: Portsmouth UK
Will be keeping an eye on this as I am about to start my 20B conversion! Trying to decide if I keep the box in the same place and move the rack or lift the engine.. or move the engine back a bit and try to just move the rack a touch like you are doing?
First major engine conversion for me so I want to try and keep it relatively simple!
Good luck with yours.
Lee
First major engine conversion for me so I want to try and keep it relatively simple!
Good luck with yours.
Lee
When moving the rack mounts directly down, you run into bumpsteer issues. For other directions I would guess similar issues (since you're running out of length moving any direction), but I'm not sure what other impacts it may have.

Thread Starter
watashi no shichi
iTrader: (4)
Joined: May 2005
Posts: 1,770
Likes: 6
From: San Francisco


Rotary Enthusiast
Joined: Aug 2008
Posts: 1,101
Likes: 13
From: Portsmouth UK
Are you planning on sticking with the stock power rack or going for a manual type rack? How far do you think you got the engine back and down? It looks relatively Stock 13B position in the pictures? If it is possible I was hoping to mount mine 13B OEM position and not mess with the box/shifter/prop etc. Instead I have a plan to move the rack depending on how far it needs to move to do this!? I guess I will be finding out soon enough!
Thread Starter
watashi no shichi
iTrader: (4)
Joined: May 2005
Posts: 1,770
Likes: 6
From: San Francisco
Are you planning on sticking with the stock power rack or going for a manual type rack? How far do you think you got the engine back and down? It looks relatively Stock 13B position in the pictures? If it is possible I was hoping to mount mine 13B OEM position and not mess with the box/shifter/prop etc. Instead I have a plan to move the rack depending on how far it needs to move to do this!? I guess I will be finding out soon enough!

Thread
Thread Starter
Forum
Replies
Last Post