
Write up - FC subframe swap (how I did it)

go for it
I say go for it. You can buy a welder, an entire front suspension with bigger brakes, etc. and you'll learn a skill that will open up a whole new world of possibilities. All for less that the ReSpeed kit that is really more geared toward the track. I'm sure it's a very good kit but it is really expensive for a crossmember and a couple of arms.
Just my opinion but DON'T buy a harbor freight welder. Buy the Lincoln. I've run at least 50 lbs of wire through mine and except for one little setscrew has never let me down in the 6 years I've had it.
Just my opinion but DON'T buy a harbor freight welder. Buy the Lincoln. I've run at least 50 lbs of wire through mine and except for one little setscrew has never let me down in the 6 years I've had it.
Old [Sch|F]ool


Joined: May 2001
Posts: 12,876
Likes: 575
From: Cleveland, Ohio, USA
Plus, it's hard to screw up a rack. Find a good box lately?
Plus, the FC suspension options are just plain better.
Remember the limiting factor is tire grip. I am sure you can lock up your stock brakes all day as well.
Oddly enough, the only thing I miss about the FB suspension was the brakes. They were easier to modulate. I am thinking it's a pad composition issue, my brake supplier must have used a better material on the FB pads than the FC.
All the same, I'm working on putting the 4-pot calipers on the 4-lug rotors. I want the light calipers but they must fit under 14" wheels.
Joined: Apr 2006
Posts: 3,740
Likes: 6
From: Las Vegas, NV
Gonna Buy a welder, tools, learn to weld, and then go through the process
of upgrading to a "used" car's steering. On top of all that, you'd lose your beautiful wheels.
For your situation - get the respeed steering kit and call it a day. You don't need TII brakes, unless you are REPEATEDLY braking hard, as in a road course. Remember the limiting factor is tire grip. I am sure you can lock up your stock brakes all day as well.
Just good ventilated rotors, upgraded pads, and SS brake lines. TII brakes are not going to stop you any faster, they will just prevent fade over stock.
I *wish* I had gone that way in the first place.
I can buy a welder and tools needed, do the swap, and be under 1500$. I'll also get Turbo II brakes, plus 5x114.3. I know braking will be improved by the simple fact that once done my next set of tires will be better tires and wider in the front.
The FC subframe swap will consist of used parts, but they were all under lots of R&D with mazda and made it to the production line.
I say go for it. You can buy a welder, an entire front suspension with bigger brakes, etc. and you'll learn a skill that will open up a whole new world of possibilities. All for less that the ReSpeed kit that is really more geared toward the track. I'm sure it's a very good kit but it is really expensive for a crossmember and a couple of arms.
Just my opinion but DON'T buy a harbor freight welder. Buy the Lincoln. I've run at least 50 lbs of wire through mine and except for one little setscrew has never let me down in the 6 years I've had it.
Just my opinion but DON'T buy a harbor freight welder. Buy the Lincoln. I've run at least 50 lbs of wire through mine and except for one little setscrew has never let me down in the 6 years I've had it.

Joined: Aug 2011
Posts: 3,078
Likes: 42
From: Cambridge, Minnesota
Hey guys, kinda pulling this thread back from the dead.
82transam I'm on the brink of getting a complete TII without a title for a swap and I will be chopping the thing up to part it out and selling everything I won't be using. So the subframe swap is definitely something I want to accomplish.
I just came up with a few questions that could help clarify some points about the swap:
1. Did you use a 1st gen crossmember in this swap or am I just missing where the motor bolts to the subframe? In post #1 you said it's "an easy way to to mount the FC engine/steering/brakes" so I would think you could mount the engine straight from the FC subframe to the subframe in the FB but I just want to make sure I'm right.
2. Did you use the FC TII oil pan in the swap since you could keep the FC steering or did you swap to the FB GSL-SE pan because the FC would get in the way?
3. GSL-SE front cover, 12a front cover, or keep the TII front cover for this swap? Since the front cover has the mounts would I need to keep the front cover to mount correctly to the subframe?
4. When you did this with the 1/2" spacer in the first pic of post #1 did the engine and transmsision end up straight and level as they should be? I'm asking so I can get the engine and tranny in right the first time. I know you have to have a custom trans mount and redrill the shift shaft to maintain correct shifter location (or cut the tunnel as some people do) and I'd just like to take my driveshaft to a drivetrain shop and have them swap out the front yoke and be done with that issue.
5. For the rear, did you just have a machine shop redrill the rear axles and discs and press in new studs or use wheel adapters - I couldn't find it in this thread.
I got the info from these postings Rear 5 Lug FC Conversion
I hope my questions aren't stupid, I've researched approximately 16hrs on doing the swap and this post is the first I've posted.
If I'm going to do a TII conversion I'm going to do it this way the first time and be done.
Thanks in advance, I know it's a lot to ask but I'd really appreciate help from someone who obviously knows what they're doing
Austin
Thread Starter
Joined: Feb 2002
Posts: 8,389
Likes: 120
From: North Jersey
No problem on digging up the thread
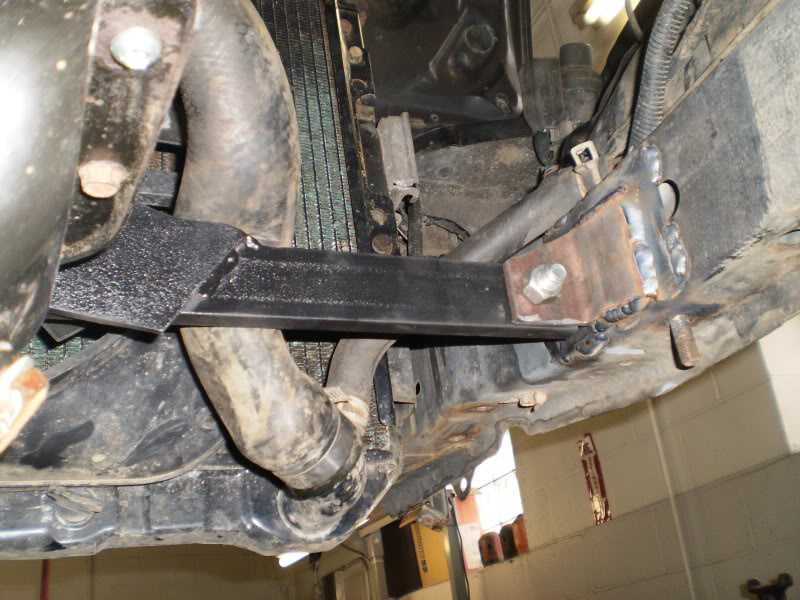
If you are doing the FC subframe swap then basically forget all about the FB cross member, the SE oil pan, the FB front cover etc. You don't need any of it. The FC engine remains completely stock (FC oil pan, FC front cover, FC motor mounts etc) and it all just bolts to the FC subframe just as it would in a FC.
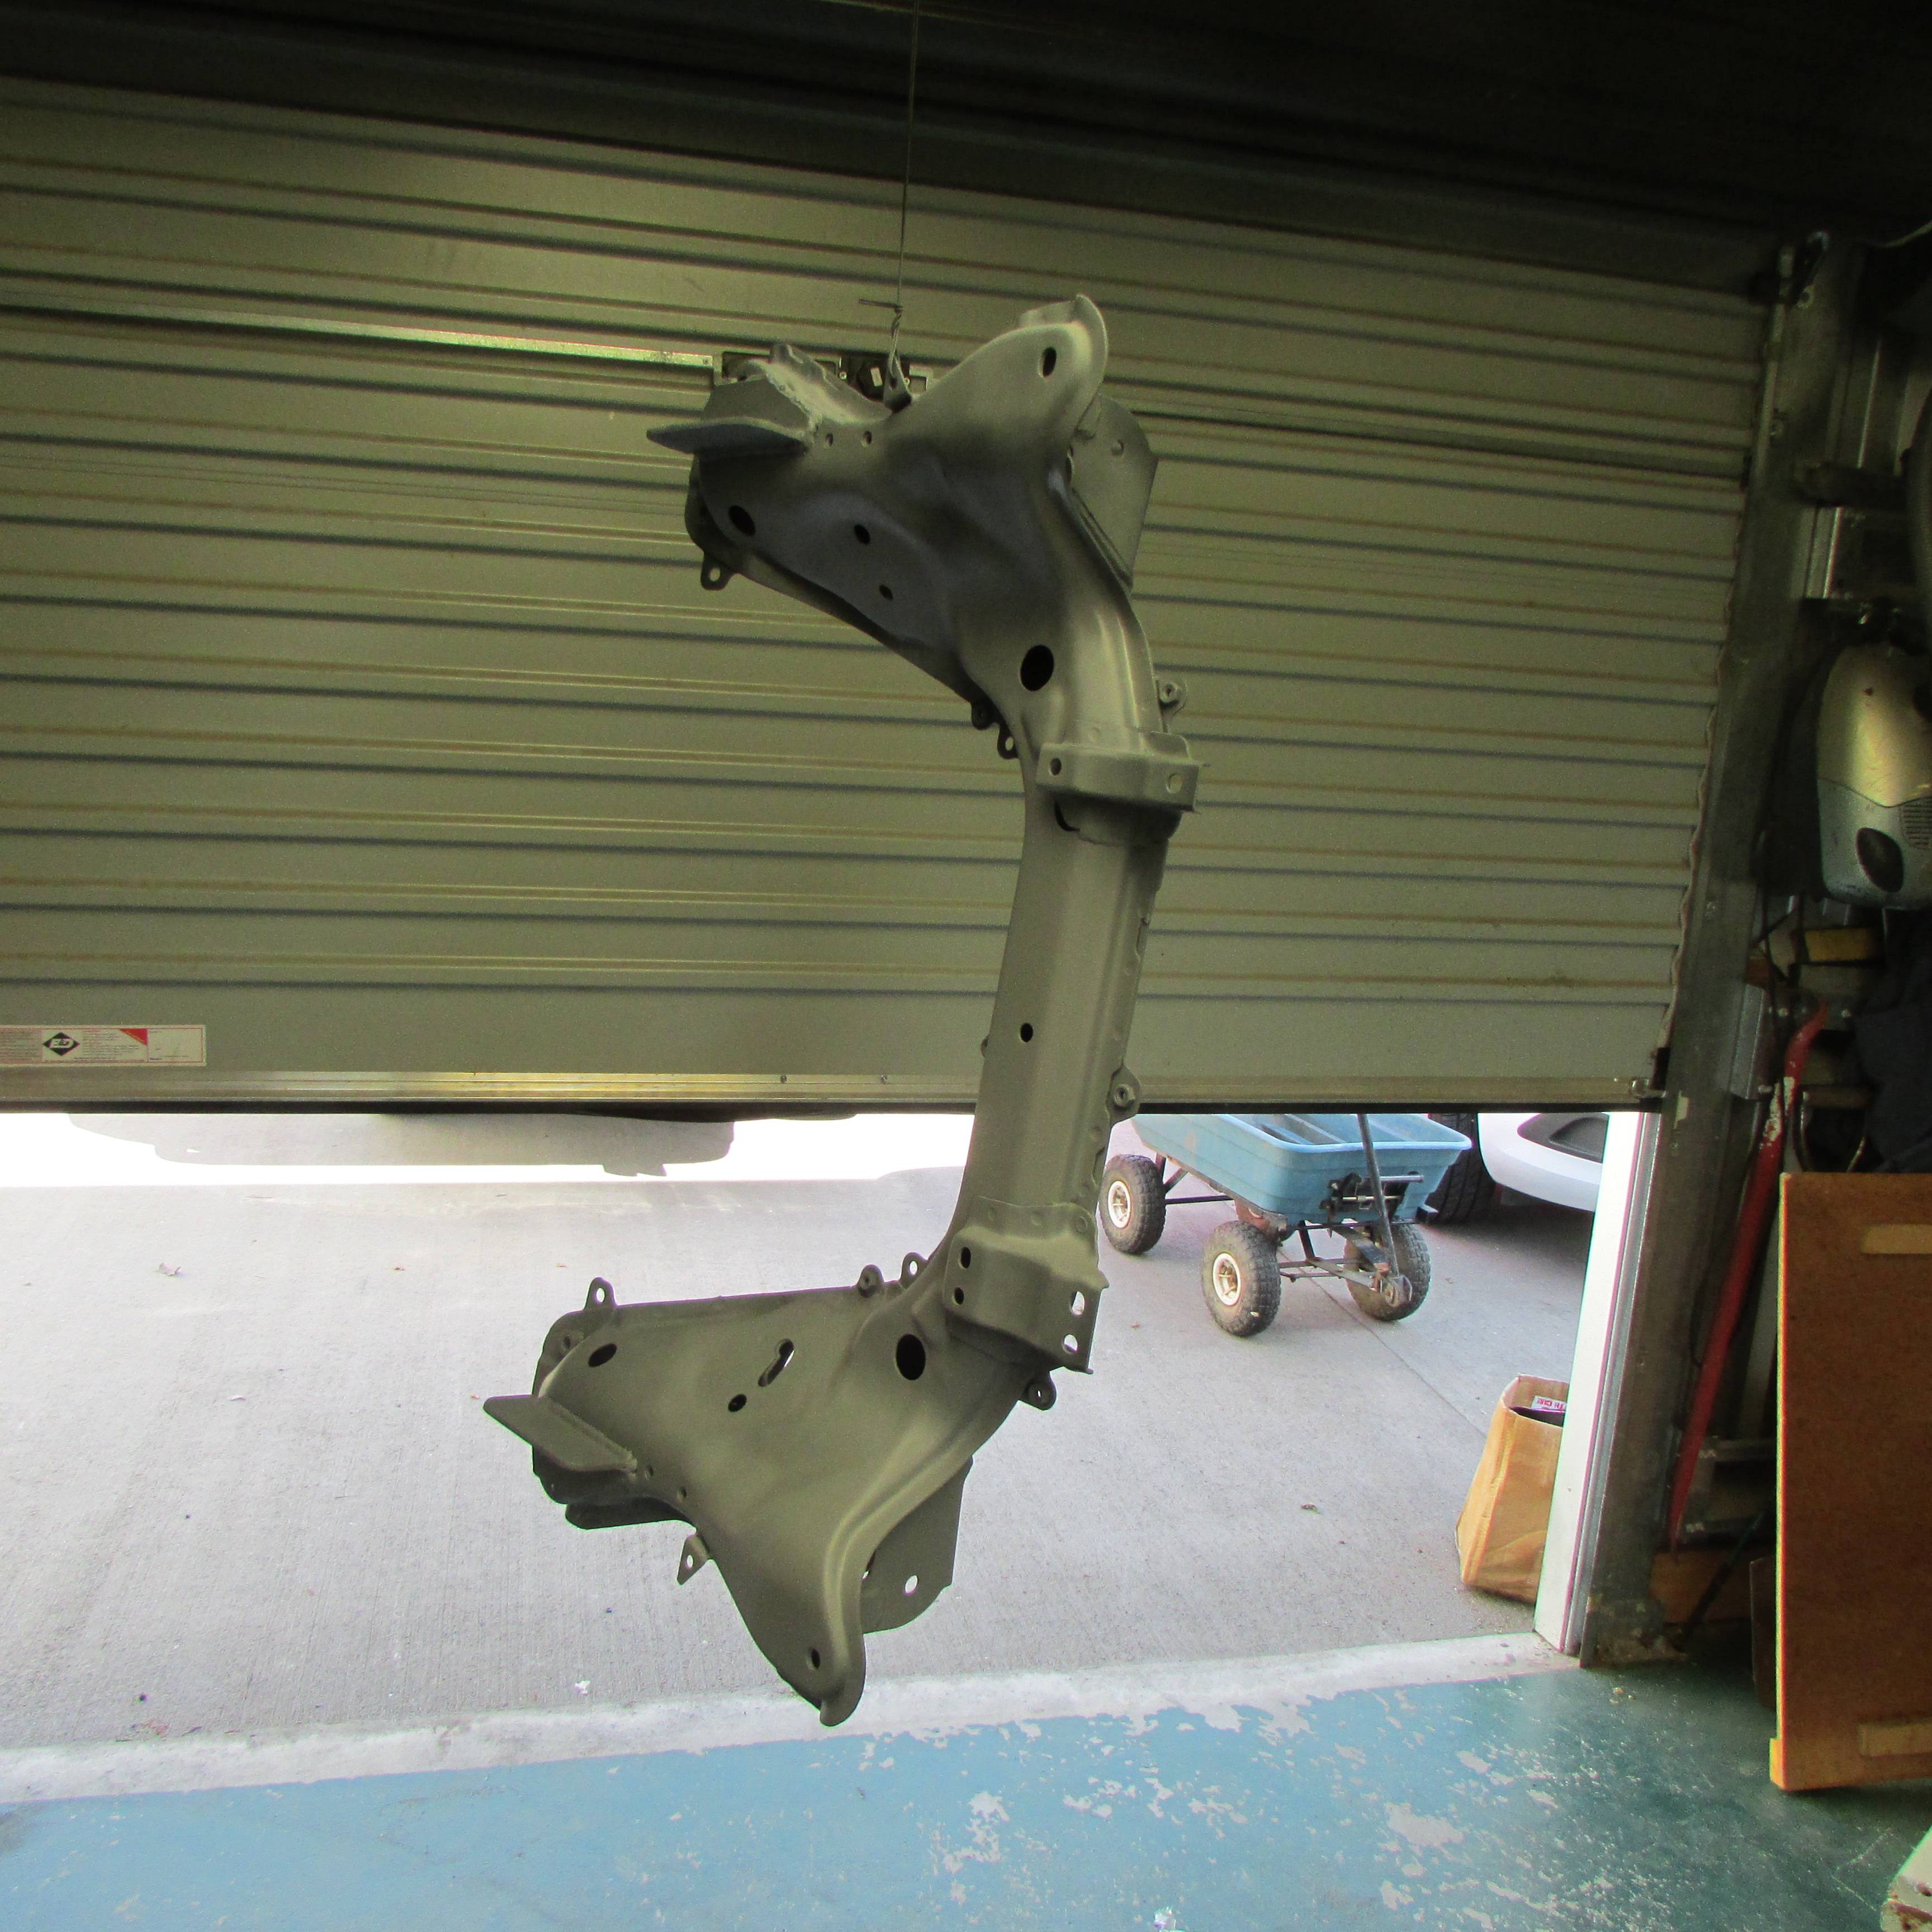
The 1/2" spacer is to get the FC subframe to sit flush against the FB's frame rails. There is some debate about this measurement however so it's your call. Peejay used 1" square tubing, in my calculation that is too big, but the 1/2" I used is a tad too short. Somewhere in the middle (3/4") is probably best... Once you see the FC subframe it should all make sense. The FB frame rails are straight, whereas the FC's have a curve, so the subframe is not flat.
The rear axles/brake kit are from Re-speed, although given their track record as of late I'd be hesitant to recommend them unfortunately...
Hope that clears up any confusion you have. Once you have that FC in front of you it should start to become clearer
If you are doing the FC subframe swap then basically forget all about the FB cross member, the SE oil pan, the FB front cover etc. You don't need any of it. The FC engine remains completely stock (FC oil pan, FC front cover, FC motor mounts etc) and it all just bolts to the FC subframe just as it would in a FC.
The 1/2" spacer is to get the FC subframe to sit flush against the FB's frame rails. There is some debate about this measurement however so it's your call. Peejay used 1" square tubing, in my calculation that is too big, but the 1/2" I used is a tad too short. Somewhere in the middle (3/4") is probably best... Once you see the FC subframe it should all make sense. The FB frame rails are straight, whereas the FC's have a curve, so the subframe is not flat.
The rear axles/brake kit are from Re-speed, although given their track record as of late I'd be hesitant to recommend them unfortunately...
Hope that clears up any confusion you have. Once you have that FC in front of you it should start to become clearer
Joined: Aug 2011
Posts: 3,078
Likes: 42
From: Cambridge, Minnesota
If you are doing the FC subframe swap then basically forget all about the FB cross member, the SE oil pan, the FB front cover etc. You don't need any of it. The FC engine remains completely stock (FC oil pan, FC front cover, FC motor mounts etc) and it all just bolts to the FC subframe just as it would in a FC.
The 1/2" spacer is to get the FC subframe to sit flush against the FB's frame rails. There is some debate about this measurement however so it's your call. Peejay used 1" square tubing, in my calculation that is too big, but the 1/2" I used is a tad too short. Somewhere in the middle (3/4") is probably best... Once you see the FC subframe it should all make sense. The FB frame rails are straight, whereas the FC's have a curve, so the subframe is not flat.
 Not that it matters, peejay's car is awesome, as well as yours so I'm sure it shouldn't make too much of a difference - it will end up in the same place
 Speaking of, ARCHIVE this already! It deserves it

Old [Sch|F]ool
Joined: May 2001
Posts: 12,876
Likes: 575
From: Cleveland, Ohio, USA
FWIW, I arrived at 1" (it's not square tubing, btw) by bolting the subframe up tight and then measuring the gap in the rear.
I may be spacing the rear down further by an inch or two, depending on how PITA it'd be to make wedges. Geometry experiment thing...
I may be spacing the rear down further by an inch or two, depending on how PITA it'd be to make wedges. Geometry experiment thing...
Thread Starter
Joined: Feb 2002
Posts: 8,389
Likes: 120
From: North Jersey
Oh my bad, I thought you had square tubing and welded a bolt inside it to create a stud to attach the subframe too...
If I were to do mine again I'd forget the rear stud and instead make tabs off the subframe that would attach it to the steering box/idler arm mounting points, and as mentioned earlier make the spacer a bit bigger, like 3/4"..
Either way I'm happy with my setup, so I won't be changing anything for a while
Joined: Aug 2011
Posts: 3,078
Likes: 42
From: Cambridge, Minnesota
Side note, I'm a child of the sand in central MN here and I've grown up riding 4 wheelers and dirt bikes so your Rally videos really make me smile - keep up the good work and keep filming!
Oh my bad, I thought you had square tubing and welded a bolt inside it to create a stud to attach the subframe too...
If I were to do mine again I'd forget the rear stud and instead make tabs off the subframe that would attach it to the steering box/idler arm mounting points, and as mentioned earlier make the spacer a bit bigger, like 3/4"..
Either way I'm happy with my setup, so I won't be changing anything for a while
If I were to do mine again I'd forget the rear stud and instead make tabs off the subframe that would attach it to the steering box/idler arm mounting points, and as mentioned earlier make the spacer a bit bigger, like 3/4"..
Either way I'm happy with my setup, so I won't be changing anything for a while
Speaking of, what did you use for the spacer?? The post doesn't say and I'm very curious if you just used a few pieces of flat steel and welded them on the subframe. It also looks like where the idler arm and steering box bolt to the frame would make awesome locations for tabs - as you mentioned.
Thanks again guys, appreciate it

Old [Sch|F]ool
Joined: May 2001
Posts: 12,876
Likes: 575
From: Cleveland, Ohio, USA
Yeah, going off of the three steering-mount holes on either side would be ideal, but making a bracket was easier.
Bracket is three pieces of 1"x1/8" angle iron, I just bolted it to the subframe and welded it at the car until the two of them reached an agreement to work together
Bracket is three pieces of 1"x1/8" angle iron, I just bolted it to the subframe and welded it at the car until the two of them reached an agreement to work together
Thread Starter
Joined: Feb 2002
Posts: 8,389
Likes: 120
From: North Jersey
^Ah ok, I was kinda close lol
As for my spacer I just got some 1/4 flat stock and welded two pieces together to get the 1/2"... I've since gotton a better welder setup and some other toys (plasma cutter) and would do it differently, but again it's been working very well so no need to "fix" it at this point lol.
Peejay's solution to have a captured stud (just a bolt welded in) on his spacer and have the whole thing welded onto the car (my spacer is welded to the subframe) is nice and clean too. You have lots of options
Old [Sch|F]ool
Joined: May 2001
Posts: 12,876
Likes: 575
From: Cleveland, Ohio, USA
It's super easy to drop the subframe, too - four nuts and it's out. Well, aside from the junk attaching to the control arms anyway
I scavenged the hardware from the now-unused sway bar/tension rod mounts. (I don't have a sway bar) Then I turned around and ended up putting the brackets back on as a convenient place to attach the skidplate, but it's only held on by two bolts on each side.
I scavenged the hardware from the now-unused sway bar/tension rod mounts. (I don't have a sway bar) Then I turned around and ended up putting the brackets back on as a convenient place to attach the skidplate, but it's only held on by two bolts on each side.
Joined: Aug 2011
Posts: 3,078
Likes: 42
From: Cambridge, Minnesota
As for my spacer I just got some 1/4 flat stock and welded two pieces together to get the 1/2"... I've since gotton a better welder setup and some other toys (plasma cutter) and would do it differently, but again it's been working very well so no need to "fix" it at this point lol.
Peejay's solution to have a captured stud (just a bolt welded in) on his spacer and have the whole thing welded onto the car (my spacer is welded to the subframe) is nice and clean too. You have lots of options
Peejay's solution to have a captured stud (just a bolt welded in) on his spacer and have the whole thing welded onto the car (my spacer is welded to the subframe) is nice and clean too. You have lots of options
It's super easy to drop the subframe, too - four nuts and it's out. Well, aside from the junk attaching to the control arms anyway
I scavenged the hardware from the now-unused sway bar/tension rod mounts. (I don't have a sway bar) Then I turned around and ended up putting the brackets back on as a convenient place to attach the skidplate, but it's only held on by two bolts on each side.
I scavenged the hardware from the now-unused sway bar/tension rod mounts. (I don't have a sway bar) Then I turned around and ended up putting the brackets back on as a convenient place to attach the skidplate, but it's only held on by two bolts on each side.
That skidplate mount is a very good idea, will be repainting and re-installing mine as well.

Junior Member
Joined: Mar 2015
Posts: 4
Likes: 0
From: eylria ohio
12a with fc subframe
Thanks for the positive feedback everyone!
twinkletoes - the only downside for you would be the loss of the 4x110 lug pattern. I've been doing quite a bit of thinking and comparing of parts to see how I can make this work on my other FB, which I'd like to keep 4x110 and 12a. The 12a would be doable, but as for keeping 4x110 I haven't come up with anything very good yet unfortunatly...
Anyway, glad everyone liked the writeup, guess its time to get working on the S5 T2 into FB wiring guide I've been meaning to do...
For both ways you have to make a custom oil pan.
1st way would be to just machine the bolt holes in the center iron on the side and bottom to accept fc mounts. Only problem with this is idk if the metal it there to do it in the bottom of the center iron I know the metal is there on the side on the block. This is the easiest way.
2nd way is use a 13b Center iron the holes would be there you'd just need the custom oil pan
Old [Sch|F]ool
Joined: May 2001
Posts: 12,876
Likes: 575
From: Cleveland, Ohio, USA
No 13B with the correct coolant seal grooves can use the FC motor mounts.
I am using a GSL-SE center housing with an FC left mount and a contraption made from an FC left mount on the right side, but it is less than strong and it is a constant source of problems. Mazda did the FC right side mount the way they did for a good reason! I think right now mine is bent and twisted so much that I have an old brake pad stuck between the mount and subframe as a way to level the engine.
One of my someday projects is to make new engine mounts using polyurethane bushings and 1/4" plate. Through bolt "spool" style not stud style. Of course, now that I'm going to be putting a T5 in it, I will be mounting the engine 6" further back, so it will be just as easy to simply use a timing cover mount on the FC subframe, which should work...
Junior Member
Joined: Mar 2015
Posts: 4
Likes: 0
From: eylria ohio
No 13B with the correct coolant seal grooves can use the FC motor mounts.
I am using a GSL-SE center housing with an FC left mount and a contraption made from an FC left mount on the right side, but it is less than strong and it is a constant source of problems. Mazda did the FC right side mount the way they did for a good reason! I think right now mine is bent and twisted so much that I have an old brake pad stuck between the mount and subframe as a way to level the engine.
One of my someday projects is to make new engine mounts using polyurethane bushings and 1/4" plate. Through bolt "spool" style not stud style. Of course, now that I'm going to be putting a T5 in it, I will be mounting the engine 6" further back, so it will be just as easy to simply use a timing cover mount on the FC subframe, which should work...
I am using a GSL-SE center housing with an FC left mount and a contraption made from an FC left mount on the right side, but it is less than strong and it is a constant source of problems. Mazda did the FC right side mount the way they did for a good reason! I think right now mine is bent and twisted so much that I have an old brake pad stuck between the mount and subframe as a way to level the engine.
One of my someday projects is to make new engine mounts using polyurethane bushings and 1/4" plate. Through bolt "spool" style not stud style. Of course, now that I'm going to be putting a T5 in it, I will be mounting the engine 6" further back, so it will be just as easy to simply use a timing cover mount on the FC subframe, which should work...
Last edited by ninjanickrx7; Nov 8, 2015 at 06:31 AM.
Old [Sch|F]ool
Joined: May 2001
Posts: 12,876
Likes: 575
From: Cleveland, Ohio, USA
What do you mean by no 13b with the correct coolant seals can use the fc mounts... if its a 13b from an fc it sure could and iv heard the fd center irons could mount to a fc subframe as well I have an fc center iron in front of me and the groves are in the center iron if im not mistaken they are the same in the 12a. So theoretically i could just build a 12a with a 13b center iron and it would mount right to my subframe swap. With a custom oil pan of course. Or it would be wayyyy easier to just machine the holes into a 12a center iron.
FD engines cannot bolt to an FC subframe.
Mazda did a major change in 1986, they moved the coolant seals from the rotor housings to the side housings. So you cannot mix and match between 12A and '86-up 13B. So no FC center housing in a 12A.
GSL-SE center housings are your only hope. They do not have the FC motor mount locations. They have the same left side mount provision, but they have something completely different on the right side, it is similar to the left side but different. There is no way to use an FC right side mount on a GSL-SE engine, or any other engine made with '85-earlier parts.
Just because it says "13B" doesn't mean interchangeable... there are four different species of 13B, '74-85, FC, FD, and RX-8. Cosmo is mostly like FD as far as swapping goes.
Junior Member
Joined: Mar 2015
Posts: 4
Likes: 0
From: eylria ohio
You are confused on a lot of things.
FD engines cannot bolt to an FC subframe.
Mazda did a major change in 1986, they moved the coolant seals from the rotor housings to the side housings. So you cannot mix and match between 12A and '86-up 13B. So no FC center housing in a 12A.
GSL-SE center housings are your only hope. They do not have the FC motor mount locations. They have the same left side mount provision, but they have something completely different on the right side, it is similar to the left side but different. There is no way to use an FC right side mount on a GSL-SE engine, or any other engine made with '85-earlier parts.
Just because it says "13B" doesn't mean interchangeable... there are four different species of 13B, '74-85, FC, FD, and RX-8. Cosmo is mostly like FD as far as swapping goes.
You missed what i meant by the fd center iron. All i meant was the meat is there and i asked my buddy russel and he said he believes the holes are there in the fd center iron like the 2nd gens not sure.
I was just hoping the same meat or metal in the iron would be there so that i could machine the holes and make a custom oil pan and bam 12a on 13b subframe without some jank front mount
I know it might not work but its the only solution ive come up with
Last edited by ninjanickrx7; Nov 8, 2015 at 03:34 PM.
Old [Sch|F]ool
Joined: May 2001
Posts: 12,876
Likes: 575
From: Cleveland, Ohio, USA
I tried extending the front cover mount to the body when I did the swap. That lasted one day, then I took it out and converted to FC mounts. At the time I had a Turbo II engine so it was easy for me
Here, an example of what not to do:
I don't know if this CAUSED the front O-ring to blow out, but I had no oil pressure after doing this, right after I rebuilt my engine has a half bridge. I replaced the front and rear stationary gears in-chassis and crossed fingers that the rotor bearings were still okay. (They were)
Here, an example of what not to do:

I don't know if this CAUSED the front O-ring to blow out, but I had no oil pressure after doing this, right after I rebuilt my engine has a half bridge. I replaced the front and rear stationary gears in-chassis and crossed fingers that the rotor bearings were still okay. (They were)
Senior Member
Joined: Apr 2002
Posts: 483
Likes: 44
From: Napier
No problem on digging up the thread
The 1/2" spacer is to get the FC subframe to sit flush against the FB's frame rails. There is some debate about this measurement however so it's your call. Peejay used 1" square tubing, in my calculation that is too big, but the 1/2" I used is a tad too short. Somewhere in the middle (3/4") is probably best... Once you see the FC subframe it should all make sense. The FB frame rails are straight, whereas the FC's have a curve, so the subframe is not flat.
The 1/2" spacer is to get the FC subframe to sit flush against the FB's frame rails. There is some debate about this measurement however so it's your call. Peejay used 1" square tubing, in my calculation that is too big, but the 1/2" I used is a tad too short. Somewhere in the middle (3/4") is probably best... Once you see the FC subframe it should all make sense. The FB frame rails are straight, whereas the FC's have a curve, so the subframe is not flat.
Being pedantic here too, but the FC front bolt holes are 8mm further apart than the FB ones... so either a big hammer or a bit of grinding helps when getting it all lined up.
I've made tabs on my subframe rather than using a spacer and bolt, and I moved the front bolt hole back with a new hole and crush tube. This is a RHD car too, but that hasn't made any difference so far.
Old [Sch|F]ool
Joined: May 2001
Posts: 12,876
Likes: 575
From: Cleveland, Ohio, USA
Yes, on my subframe I ovaled the front holes inwards and then welded a washer to the new hole location. I also ground down the outside of the subframe but it turned out the subframe would have cleared the FB body lip without the clearancing.
I'm not sure what you mean by leveling the rack. I would not assume that the rack mounting brackets are supposed to be parallel to the chassis rails or that they haven't been mangled in the past. To be honest I never even considered it, I just bolted the front bolts up hard and made my measurement.
IIRC the original writeup I saw on Mazspeed 15-odd years ago had the spacing as 1", also.
I want to experiment with adding more spacer back there to alter the control arm angle so it has more of an aft swing with bump, maybe get some of the initial bump harshness away, and then get the anti-squat back with more caster. I also want to get rid of the strut tops altogether and go with a single rod end so I can REALLY crank up the steering axis, so I can both have less static camber and also get positive camber at full droop, as ball joint lock is limiting my suspension travel (short FC control arms = suck) and a greater camber curve will allow me more travel before that happens...
Last edited by peejay; Jan 7, 2016 at 04:52 PM.
Senior Member
Joined: Apr 2002
Posts: 483
Likes: 44
From: Napier
Yeah I mean I am running on the assumption that the steering rack mounts would sit level with the car, but they could be a few degrees out, which would give you a different reading at the rear. The only way to tell would be to actually measure the chassis mount points on an FC as it sits level and determine how much lower the rear is. But as you've indicated it's a sliding scale and you can adjust it to get better results for whatever geometry you're aiming for.
peejay have you had any issues with bump steer? I've been told that it's not too much of a concern but I'm going to fit camber plates at the top in the hope that whatever additional bump steer occurs after the car is lowered can be ironed out.
peejay have you had any issues with bump steer? I've been told that it's not too much of a concern but I'm going to fit camber plates at the top in the hope that whatever additional bump steer occurs after the car is lowered can be ironed out.

Thread
Thread Starter
Forum
Replies
Last Post
gracer7-rx7
1st Generation Specific (1979-1985)
14
Sep 6, 2024 12:34 AM
Ey8s
1st Generation Specific (1979-1985)
81
Aug 2, 2017 08:53 AM
mellow65
1st Generation Specific (1979-1985)
13
Apr 22, 2011 08:24 AM
graffeedy5
1st Generation Specific (1979-1985)
52
May 18, 2010 08:10 PM