
Steering Gear Adjustment II

Thread Starter
Go Hawks!
iTrader: (1)
Joined: May 2004
Posts: 1,952
Likes: 3
From: Cedar Rapids, Iowa
Steering Gear Adjustment II
This thread will be used to document my efforts to adjust the steering box on my '85 GS. I know there are several places that this process has been described, but none with pictures. So I'm going to try to follow the MazSpeed article detailing the process, and take pictures as I go.
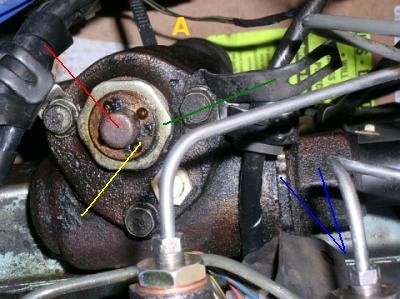
Picture A shows the location of the various adjustments. The red line points to the metal cap that needs to be removed to gain access to the 14mm lock nut. The green line points to the 40mm lock nut...I used a 1 9/16" socket with the chamfer gound off. I had to hit it for quite a while with the impact wrench to break it loose. The yellow line points to one of the adjustments (I'll detail this more when I get to the adjustment). The blue lines point to the locking ring and large adjustment nut.
Once I loosened the 40mm nut, I took off the cap in the center and tried to loosen the 14mm nut. But when I turn it, the whole adjustment turns (yellow line). I've hit it with PB Blaster several times and tried the impact...no luck. Any ideas how I can get this nut loose?
Rich
Last edited by 64mgb; Jan 11, 2006 at 09:41 PM.
Lives on the Forum
Joined: Jun 2004
Posts: 11,359
Likes: 14
From: Grand Rapids Michigan
Hmm, I also have a '85 GS. When I did mine (and it worked out great!) the only adjustments that I made were to loosen the 1 9/16ths nut and tighten the inner nut with the holes in it (yellow line) about 1/2 turn. Then I tightened the large nut back down (making sure the inner did not also turn) and took it for a drive to figure out if I was getting close. Never had to touch it again, it was perfect. It was like going from my '71 LeMans to a brand new Porshe (no kidding). Changed the entire personality of the car. No regrets here! lol. Good luck with it, and it's nice to finally see someone put together a decent write-up on this (with some nice pics). 
Thread Starter
Go Hawks!
iTrader: (1)
Joined: May 2004
Posts: 1,952
Likes: 3
From: Cedar Rapids, Iowa
Hey, would I be able to get a nut splitter on that 14mm nut to break it off? If so, I could break it off, clean up the threads, and put on a new nut. I've never used a nut splitter so I don't know if I'll be able to get one on that nut or not.
Rich
Rich

Senior Member
Joined: Mar 2005
Posts: 435
Likes: 0
From: PA
I doubt it. Those nut splitters are a bit bulky if I recall.
A friend just related a story on how they removed an oxygen sensor, which was so badly corroded that it looked like it was welded in, and not a separate piece: It took several episodes of HEAT and PB Blaster soakings. That's what it takes.
A friend just related a story on how they removed an oxygen sensor, which was so badly corroded that it looked like it was welded in, and not a separate piece: It took several episodes of HEAT and PB Blaster soakings. That's what it takes.
Thread Starter
Go Hawks!
iTrader: (1)
Joined: May 2004
Posts: 1,952
Likes: 3
From: Cedar Rapids, Iowa
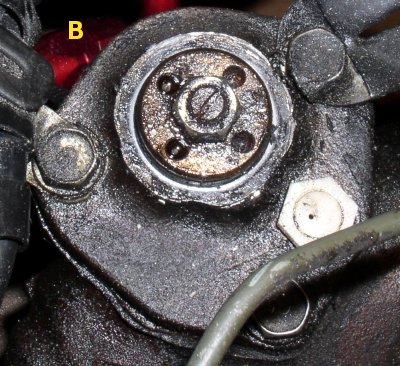
The PB Blaster and impact wrench did the trick on the 14mm nut. I did all three adjustments, but I have no idea if two of them are correct. I'll try again when I have a helper to continually test the steering effort as the adjustments are made. But for now, it's 100% better than it was, all the free play is gone. It was difficult to place the dial indicator so that it was stable, but I think I held it still enough to see that there was about 0.020 free play...far more than the 0.001 that the MazSpeed article (http://www.mazspeed.com/steeringgear.htm) calls out. I've attached a couple of pictures that show how I made the adjustments.
On the large (56mm, I think) nut on the steering column where it goes into the steering box, I used a large screwdriver and hammer, both on the locking ring and on the nut itself. It turned fairly easily. I only turned it about 1/4" and don't know if it made a difference or not.
On the large plug with the holes in it on the top of the steering box, I used a pair of needle nose pliers.
The way I ended up making the two adjustments on the top of the box was to adjust the large plug until the center (screw) adjustment made a difference when it was turned. It seemed that if the large plug was too far in or too far out, the screw adjustment didn't make any difference. Once I got it adjusted so the screw made a difference, I used the screw adjustment to remove all the free play from the pitman arm. A test drive verified that the steering is now much more responsive and predictable. Although the front end still vibrates badly between 40 and 50 mph, but at least it's controllable now and I won't be afraid to take it out on the road. Well, not because of the steering anyway.
Rich
Trending Topics


i need a 20b in my fb
Joined: Sep 2005
Posts: 160
Likes: 0
From: Quahog Rhode Island
im going to be trying this myself. in addition to the play in the wheel my collapseable steering colom is loose the pin is sheered off. i gotta bum rig this somehow. i can literaly pull my steering wheel a few inches towards me when im driving. any have this problem before. i bought the car like this and the door keys are different from the ignition so i know the previous owner was ****** with it. i missed a replacement colom on ebay with the gear for 130$ lol that sucks would have made life easier
Certified Old Fart
Joined: Oct 2004
Posts: 490
Likes: 0
From: Inkerman, On, South of Ottawa, the 2nd coldest Capital in the World
I just went at mine again today. I had tightened the preload too much, and the wheel wouldn't centre anymore. I did this just for kenetsu! (jk) I had the same trouble to get the 14 mm nut loosened. What I did was turn the plug out until it was loose, and that took the force off the shaft and 14mm nut and allowed me to loosen it. Right now I've got the preload (the plug) backed off from where it was, and there's no play left. Just have to wait for spring to drive it and see if the wheel centres now.
Mine does one thing that I've never seen mentioned anywhere. When you tighten the screw, I have to rock the steering wheel a couple of inches back and forth in order to get the steering play all out. Best I can describe it, the screw seems to bind and loosen in cycles. Anybody else have this happen?
64 mgb - you mentioned you didn't know if tightening the steering column did anything. You can tell when you're doing the adjustments - the steering column will start to get harder to turn (it will get some drag to it). You should tighten just until it starts to drag a little, then lock it down. To test the steering while making the adjustments, I open the window, wiggle the steering wheel with my right hand while tightening the screw with my left. I also jack the whole front end off the ground, and wedge my left leg against the tire as I wiggle the wheel. This seems to work really well when you have to work alone.
Lives on the Forum
Joined: Jun 2004
Posts: 11,359
Likes: 14
From: Grand Rapids Michigan
Just keep in mind that the little "plug" screw does not function the way that you would expect it to. On a typical steering box, this set screw (under the cap) is where you would adjust out the free play. But on the box that the 7 uses, it is not related to that adjustment at all. The free play is adjusted at the two points stated in my earlier post. True, there are a couple of other places recommended to adjust at Felix's website, but I never touched them and had excellent results. I've also read other posts where this was true. Just remember that adjusting that set screw will not give the results that you might expect.
Certified Old Fart
Joined: Oct 2004
Posts: 490
Likes: 0
From: Inkerman, On, South of Ottawa, the 2nd coldest Capital in the World
The plug (4 holes in it) sets the preload. The adjusting screw takes out the last of the free play. Just adjusting the the set screw has always left me with still having play, this is why I had to move on the adjusting the preload plug. Either way, the steering sucks compared to a rack! The slightest groove or dip in the pavement will pull my car over to the side very strongly. In the spring I'm going to get it aligned and see if that helps. The toe is setm but the caster and camber isn't and I beleive thats some of my problem.
Before messing around with the steering box, be sure to check the tire rod ends, idler arm, ball joints and tires first. I replaced several 1st gen steering boxes due to incorrect settings. Labor and rebuilt aint cheap.
Thread Starter
Go Hawks!
iTrader: (1)
Joined: May 2004
Posts: 1,952
Likes: 3
From: Cedar Rapids, Iowa
Hey Wacky - the manual says you have to remove the hood to remove the steering box. Is that true? It looks to me like you'd also have to remove the brake booster and master cylinder in order to angle it up and remove it. Do you?
I've been thinking about removing it to take it apart and clean it up good...there's junk on the threads in the filler hole, so I would bet it could use a good cleaning and inspection.
Also, I've been assuming that a person should not remove the cover from the steering box...is that true?
Thanks,
Rich
No need to remove the hood but be sure to use tall jack stands/car ramps as you will need the space to move around while under the car. Its easier to do it with the steering shaft separated (pix1) . The shorter, the better to prevent a struggle when pulling out the entire assembly. Plastic steering surround, steering wheel, ignition needs to come off. If the steering wheel doesnt come off in 1 or 2 blows, DONT FORCE IT or you will break the clips (pix 2). So use a steering wheel puller. if not, you will have that usual "OH ****, I dont think a RX-7 came with a telescopic steering wheel."
I have had a lot of success removing the steering wheel by pulling one side then the other firmly until it comes free, might take 15 or 20 tugs (hehe I said tugs) but it will seperate without needing a steering wheel puller.
