
Searched, 2GDFIS, I know theres thread but im not finding them


Searched, 2GDFIS, I know theres thread but im not finding them
Is there an easy way to do 2GDFIS? I want it for my leading.
I bought one and the guy said theres some mods I'd need to do to it and im not finding it, found a huge thread on a mod for a working 2GDFIS, a TT. but that just really confused me.
so if someone can walk me through how to get a 2GDFIS to work or direct me to a walk through thread id be super happy.

Senior Member
Joined: Sep 2004
Posts: 277
Likes: 1
From: Vancouver
so basically i just take out that little box inside? the resistor i guess?
and what do i attach in place of that yellow wire under the L2 L1 cover?
most of the pictures on that thread dont work..
and what do i attach in place of that yellow wire under the L2 L1 cover?
most of the pictures on that thread dont work..
DO NOT REMOVE THE BOX INSIDE THE COIL
all you do is plug + to + and - to -.
the box is the balast resistor? for the FC, if you ever decide to ditch the fC coil and go with something else, you can get your money back by keeping that lol.
just read this thread, is a lot simpler https://www.rx7club.com/1st-gen-archive-71/ignition-2gcdfis-diagram-correct-502148/
Looks like I'm gonna try 2GCDFIS in something. Finally. In a 1st gen mounted on the strut tower like Ray's. Thanks for posting the pics of your fusible links, Ray.
It appears the jury is in; the resistor is required in the circuit. That's fine. No cutting wires(Ever). I have to take the bottom plate off, determine whether mine is wired + or - at the resistor, and follow those wires at the outside harness. Sounds simple enough. I'll run the wires over from the stock leading FB coil to the 2nd gen harness (one goes to and from the resistor) and directly to the 2nd gen coil + and -. You can't get much simpler than that.
It appears the jury is in; the resistor is required in the circuit. That's fine. No cutting wires(Ever). I have to take the bottom plate off, determine whether mine is wired + or - at the resistor, and follow those wires at the outside harness. Sounds simple enough. I'll run the wires over from the stock leading FB coil to the 2nd gen harness (one goes to and from the resistor) and directly to the 2nd gen coil + and -. You can't get much simpler than that.
DO NOT REMOVE THE BOX INSIDE THE COIL
all you do is plug + to + and - to -.
the box is the balast resistor? for the FC, if you ever decide to ditch the fC coil and go with something else, you can get your money back by keeping that lol.
just read this thread, is a lot simpler https://www.rx7club.com/showthread.php?t=502148
all you do is plug + to + and - to -.
the box is the balast resistor? for the FC, if you ever decide to ditch the fC coil and go with something else, you can get your money back by keeping that lol.
just read this thread, is a lot simpler https://www.rx7club.com/showthread.php?t=502148
Trending Topics
the only thing you gotta do is pop it open to see which side the resistor is in, and then just follow the thread according to your situation.
the only thing you gotta rewire is the cables on the dizzy for the trailing side, move those to the leading, and you should be set.
the only thing you gotta rewire is the cables on the dizzy for the trailing side, move those to the leading, and you should be set.
To clarify the below statement..
You do not have to change the trailing coil wire or plug wires but is a "Recommendation".
You do not have to change the trailing coil wire or plug wires but is a "Recommendation".
the only thing you gotta do is pop it open to see which side the resistor is in, and then just follow the thread according to your situation.
the only thing you gotta rewire is the cables on the dizzy for the trailing side, move those to the leading, and you should be set.
the only thing you gotta rewire is the cables on the dizzy for the trailing side, move those to the leading, and you should be set.
so looks like iv got a negative version of the coil and it looks like i just switch the positive side to the negative and than unplug the negative side and thats where it looses me, i need to see a picture of a finished one but im not find it, all those threads are so old pics dont work on them
Looks like I'm gonna try 2GCDFIS in something. Finally. In a 1st gen mounted on the strut tower like Ray's. Thanks for posting the pics of your fusible links, Ray.
It appears the jury is in; the resistor is required in the circuit. That's fine. No cutting wires(Ever). I have to take the bottom plate off, determine whether mine is wired + or - at the resistor, and follow those wires at the outside harness. Sounds simple enough. I'll run the wires over from the stock leading FB coil to the 2nd gen harness (one goes to and from the resistor) and directly to the 2nd gen coil + and -. You can't get much simpler than that.
It appears the jury is in; the resistor is required in the circuit. That's fine. No cutting wires(Ever). I have to take the bottom plate off, determine whether mine is wired + or - at the resistor, and follow those wires at the outside harness. Sounds simple enough. I'll run the wires over from the stock leading FB coil to the 2nd gen harness (one goes to and from the resistor) and directly to the 2nd gen coil + and -. You can't get much simpler than that.

OK here's a question. If I run 2gcdfis and swap my trailing to my leading on the dizzy. can I leave the leading coil attached and run the wires from it to the 2g coil and have the stock leading fire the trailing? Making both leading and trailing fire at the same time??? Or will this burn out the ignitor?
edit. I'ts probably the same just put + to + and - to -. my mom can do this mod.
edit. I'ts probably the same just put + to + and - to -. my mom can do this mod.
Ok he's right. Those are very confusing. The positive resistor is much easyer. what those diagrams are saying is run the positive j-109 to the black(-) wire on the 2g coil. and a switched 12 volt to the positive. That doesn't make alot of sence. wheres the ground??
Heres what might work. It might not. if all else fails just forget about the 2g ignitor. Just wire it to the coil itself. I'm going to copy a pic and paint it to show you.
Heres what might work. It might not. if all else fails just forget about the 2g ignitor. Just wire it to the coil itself. I'm going to copy a pic and paint it to show you.
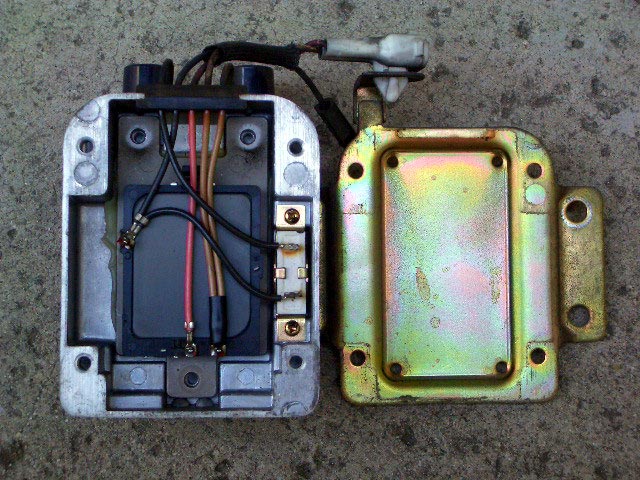
open up your 2g coil, i think for screws on the back plate is all it has, trust me this will save you a lot of time lol, and you can always get your money back if you decide to switch later on.
if it looks like this:
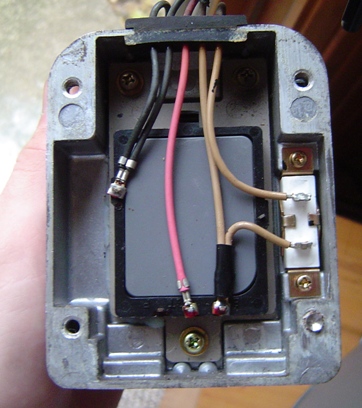
then do this:
1. If the resistor is on the + side:
In this case, the resistor is wired on the + side of the circuit. You will notice a tan wire comes in from the top of the coil, goes through the balast resistor, then goes to the coil +.
In this case:
1. remove the black wire from - terminal of 2g coil
2. connect - terminal wire from the stock leading coil to the - on the 2nd gen coil
3. connect 12v switched to the tan wire coming out of the top of the coil. You may need to cut the white connector or find a mating end.
if it looks like this:
then do this:
2. If the resistor is on the - side:
In this case, the resistor is wired on the - side of the circuit. You will notice a black wire comes in from the top of the coil, connects to 2nd gen ignitor, goes through the balast resistor, then goes to the coil -.
In this case:
1. remove the tan wire from + terminal of coil
2. connect 12v switched to coil +
or
1b. leave tan wire in place
2b. connect 12v switched to the tan wire that come out of the top of the coil
3. connect - terminal wire from the stock leading coil to the little black wire coming out of the top of the 2nd gen coil
you're trying to make it too hard...just + to + and - to -
if it looks like this:
then do this:
1. If the resistor is on the + side:
In this case, the resistor is wired on the + side of the circuit. You will notice a tan wire comes in from the top of the coil, goes through the balast resistor, then goes to the coil +.
In this case:
1. remove the black wire from - terminal of 2g coil
2. connect - terminal wire from the stock leading coil to the - on the 2nd gen coil
3. connect 12v switched to the tan wire coming out of the top of the coil. You may need to cut the white connector or find a mating end.
if it looks like this:
then do this:
2. If the resistor is on the - side:
In this case, the resistor is wired on the - side of the circuit. You will notice a black wire comes in from the top of the coil, connects to 2nd gen ignitor, goes through the balast resistor, then goes to the coil -.
In this case:
1. remove the tan wire from + terminal of coil
2. connect 12v switched to coil +
or
1b. leave tan wire in place
2b. connect 12v switched to the tan wire that come out of the top of the coil
3. connect - terminal wire from the stock leading coil to the little black wire coming out of the top of the 2nd gen coil
you're trying to make it too hard...just + to + and - to -
NO! You don't do this.
OK here's a question. If I run 2gcdfis and swap my trailing to my leading on the dizzy. can I leave the leading coil attached and run the wires from it to the 2g coil and have the stock leading fire the trailing? Making both leading and trailing fire at the same time??? Or will this burn out the ignitor?
edit. I'ts probably the same just put + to + and - to -. my mom can do this mod.
edit. I'ts probably the same just put + to + and - to -. my mom can do this mod.

Full Member
Joined: Oct 2007
Posts: 136
Likes: 1
From: Vancouver, BC Canada
I think he's referring to a few posts up where jinxed4dub asked if it would be ok to leave the stock leading coil attached to the 2nd gen coil and have it fire the trailing plugs (thus firing the tailing and leading at the same time)
and the negative coil i got ended up being broken, took it back and the guy gave me a new one, this one being a positive one.
super great guy, on these forums, wish i remembered how to do the trader score cuz iv got a few more to add to his
Yes I was referring to the firing of the leading and trailing at the same time.
ok so i got it all wired up and tested, havent driven with it yet cuz still have some problems with the exhaust and neighbors have cameras and phones ready if i drive it with the straight pipe again, and i am serious about that(3 police calls so far)
but anyway, i honestly didnt notice any difference in starting speed or sound so i have no idea what all of the hype was.... really hoping it performs notably better cuz at this point it doesnt seem worth the huge hastle of doing the work and $20 for the coil and the gas spent goint to exchange my first broken one.
and most of all taking away from other peoples time to help me set it all up