
Nikki carb modding


Thread Starter
Full Member
Joined: Mar 2011
Posts: 60
Likes: 0
From: Warner Robins, GA
Nikki carb modding
Hey guys. I have a 12a with a pretty big bridgeport on it. My bridgeport goes into the inner coolant o-ring but not into the water jacket like a monster port. I was wondering what i could do to mod my nikki carb to suit my engine. I have a holley 600 w/ racing beat manifold that I can get from ebay right now, but I dont wanna spend the money if i dont have to you know. Please help me with any knowledge you guys can give me about this because this will save me alot of unnecessary spending.
Thanks.
Thanks.
a nikki is to small in cfm's...i like holley's but can be a pain to tune unless you build a custom one...i say go with a weber ida it will last a long time . and when you decide to get a 13b all you have to do is get different chokes and jets...
a great threat on the right tubes to uses .....https://www.rx7club.com/1st-generation-specific-1979-1985-18/weber-emulsion-tubes-805950/page3/
Thread Starter
Full Member
Joined: Mar 2011
Posts: 60
Likes: 0
From: Warner Robins, GA
That is true mate. But I am only going to be ***** footing it for the most part because of me rear end. Its an open diff and I dont want to bust it open from punching the gas one too many times. lol! I know the nikki only flows like 313 cfm and that holley I can get can flow 600 cfm, but if I can save money by just modding the nikki and being able to run it safely then ill be pretty happy with that till i can get up the money for my weber deal. ( Thanks Robert ;-) )
http://www.sterlingmetalworks.com/th...ling_nikki.htm
He's not taking carbs anymore, but you can do most of those mods yourself if you're willing to put the time and effort into it. I'm currently building my own carb using a lot of the same ideas. Basically, you want to trim anything that's going to be an obstruction to airflow. The choke is a huge one, as are the arms holding the booster venturis. Also, port your manifold out a bit and remove the ACV butterfly. Here's what I did to mine: https://www.rx7club.com/1st-generation-specific-1979-1985-18/dimpled-12a-manifold-960175/ You'll probably need to rejet as well.
You can increase the flow a ton just by removing all the semi-useless crap in the carb and intake system. I can't tell you from experience that it will be enough to feed a hungry bridge since I'm on stock ports, but I've seen other people on here using Nikki's for bridgeports so it can at least work, even if it's not an optimal setup.


Joined: Mar 2001
Posts: 31,833
Likes: 3,232
From: https://www2.mazda.com/en/100th/
http://www.sterlingmetalworks.com/th...ling_nikki.htm
He's not taking carbs anymore, but you can do most of those mods yourself if you're willing to put the time and effort into it. I'm currently building my own carb using a lot of the same ideas. Basically, you want to trim anything that's going to be an obstruction to airflow. The choke is a huge one, as are the arms holding the booster venturis. Also, port your manifold out a bit and remove the shutter valve butterfly. Here's what I did to mine: https://www.rx7club.com/showthread.php?t=960175 You'll probably need to rejet as well.
You can increase the flow a ton just by removing all the semi-useless crap in the carb and intake system. I can't tell you from experience that it will be enough to feed a hungry bridge since I'm on stock ports, but I've seen other people on here using Nikki's for bridgeports so it can at least work, even if it's not an optimal setup.

Senior Member
Joined: Nov 2009
Posts: 346
Likes: 2
From: Australia
Depends how far you want to go. If you are willing to do it all yourself, grab a rebuild kit and pull the carby to pieces.
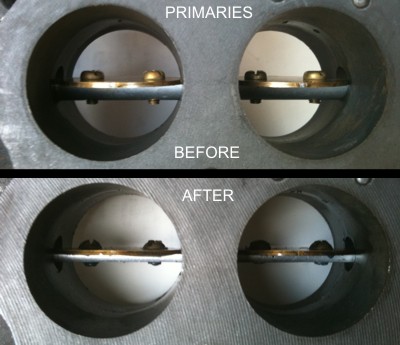
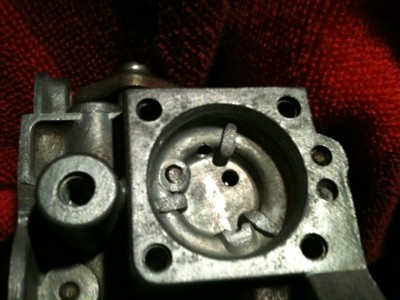
Biggest mods that will help you are thinning the throttle shafts and cutting the venturis.
For the throttle shafts, that means removing the butterflies carefully and cutting the shafts down with a bench grinder or whatever you have on hand. I thin both primary and secondary shafts to 2mm. Then the screws need to be filed back. Use some thread sealant when putting the butterflies back in, and snap the throttle open and shut a few times with the butterflies loosely attached to make sure they seat properly. Hold up the base section to the light and make sure the gap between butterflies and the throats is minimal and fairly even all around before tightening the screws.
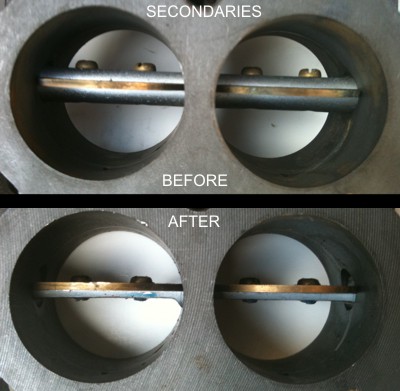
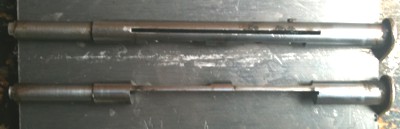
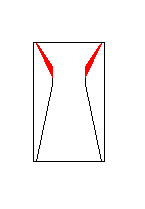
Secondary shaft before and after. The lower part is removed entirely by making two cuts inwards to the hollow inner section
As for venturis this will take a lot of setting up and improvisation, unless you have a lathe. I use a drill mounted upside down in a bench vise with a rubber door stop on the end which I have modified to hold the venturis properly. Then a rotary tool/ die grinder with tungsten cutting bit to remove the material. The venturis may be hard to remove, you can tap them out gently with a screwdriver + hammer or whatever works.
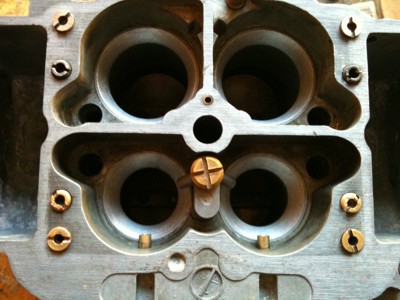
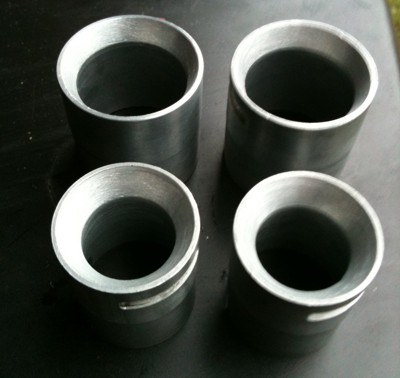
A simple guideline for cutting them is to cut down as far as the small holes on the inside of the thinnest part of the venturis. You don't want to bore them out any, just sharpen the inlet angle and make the entire inlet section straight rather than curved.
Remove the red material
Biggest mods that will help you are thinning the throttle shafts and cutting the venturis.
For the throttle shafts, that means removing the butterflies carefully and cutting the shafts down with a bench grinder or whatever you have on hand. I thin both primary and secondary shafts to 2mm. Then the screws need to be filed back. Use some thread sealant when putting the butterflies back in, and snap the throttle open and shut a few times with the butterflies loosely attached to make sure they seat properly. Hold up the base section to the light and make sure the gap between butterflies and the throats is minimal and fairly even all around before tightening the screws.
Secondary shaft before and after. The lower part is removed entirely by making two cuts inwards to the hollow inner section
As for venturis this will take a lot of setting up and improvisation, unless you have a lathe. I use a drill mounted upside down in a bench vise with a rubber door stop on the end which I have modified to hold the venturis properly. Then a rotary tool/ die grinder with tungsten cutting bit to remove the material. The venturis may be hard to remove, you can tap them out gently with a screwdriver + hammer or whatever works.
A simple guideline for cutting them is to cut down as far as the small holes on the inside of the thinnest part of the venturis. You don't want to bore them out any, just sharpen the inlet angle and make the entire inlet section straight rather than curved.
Remove the red material
Trending Topics
Senior Member
Joined: Nov 2009
Posts: 346
Likes: 2
From: Australia
So those are the two main mods. There are a few other small mods you can do as well.
Grinding down the stops on the accelerator pump inside cover will give you a longer AP stroke to smooth over the mechanical secondaries.
Grab yourself a 1mm drill bit and drill out the primary main fuel jets and also the primary main air jets (on top of the emulsion tubes).
Mechanical secondaries of course. There are guides around for this. I do a mod that makes the secondaries open earlier but its a lot of stuffing around.
Cutting the outer booster venturi support arms. These are only used to center the boosters, so they can be removed. Sterling files the inner support arms into an airfoil shape which you may like to do as well.
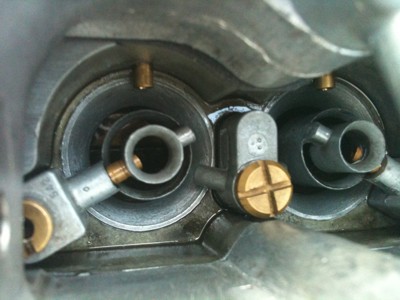
You can also cut back the OMP nozzles but I don't do this as I suspect it won't mix the oil properly with the fuel and prefer to be safe than sorry.
Also VERY lightly file/sand the booster inlets to clean them up a bit if they are damaged.
And that's about it.
Grinding down the stops on the accelerator pump inside cover will give you a longer AP stroke to smooth over the mechanical secondaries.
Grab yourself a 1mm drill bit and drill out the primary main fuel jets and also the primary main air jets (on top of the emulsion tubes).
Mechanical secondaries of course. There are guides around for this. I do a mod that makes the secondaries open earlier but its a lot of stuffing around.
Cutting the outer booster venturi support arms. These are only used to center the boosters, so they can be removed. Sterling files the inner support arms into an airfoil shape which you may like to do as well.
You can also cut back the OMP nozzles but I don't do this as I suspect it won't mix the oil properly with the fuel and prefer to be safe than sorry.
Also VERY lightly file/sand the booster inlets to clean them up a bit if they are damaged.
And that's about it.
Last edited by Oneiros; Aug 3, 2011 at 09:07 AM.
Nice stuff, Oneiros! I did all of that to my new carb. I'm still trying to get it running right. I bored out the venturis a bit. I didn't have any consistent or measured means of turning them, so I left them in the main body and did them by eye with a dremel. I left the primary diameter alone and increased the secondary diameter by about a mm. We'll see how that works out. I also completely removed the oil inlet tubes since I've blocked off the OMP. This carb is kind of a test platform... I might build another one with the remaining parts and apply what I've learned from this build.
I'm thinking about putting some JBweld down in the screws on the throttle plates to permanently lock them in place. Maybe even in the gap between the shaft and the plate itself. I knew when I put those in that I wasn't going to take them back out anyway.
Senior Member
Joined: Nov 2009
Posts: 346
Likes: 2
From: Australia
Nice stuff, Oneiros! I did all of that to my new carb. I'm still trying to get it running right. I bored out the venturis a bit. I didn't have any consistent or measured means of turning them, so I left them in the main body and did them by eye with a dremel. I left the primary diameter alone and increased the secondary diameter by about a mm. We'll see how that works out. I also completely removed the oil inlet tubes since I've blocked off the OMP. This carb is kind of a test platform... I might build another one with the remaining parts and apply what I've learned from this build.
Now that is a good idea. I will look into that for sure!

I've been worried about that with mine. Before the butterflies were seated properly, I noticed that one primary would open before the other. That means the shaft was flexing enough to open the rear one while the front one remained stuck. Scary?
I'm thinking about putting some JBweld down in the screws on the throttle plates to permanently lock them in place. Maybe even in the gap between the shaft and the plate itself. I knew when I put those in that I wasn't going to take them back out anyway.
I'm thinking about putting some JBweld down in the screws on the throttle plates to permanently lock them in place. Maybe even in the gap between the shaft and the plate itself. I knew when I put those in that I wasn't going to take them back out anyway.
P.S. all this info I have comes from Sterling's site and discussions with him, along with my own experience + R&D from selling modified Nikki's for a little over a year now in Australia.

I opened the inlet angles of the primary and secondary venturis as well. It looked like there was a lot of room for improvement there. I got a chance to really put the throttle down tonight and it made me smile. My car has always been weak on the top end. Not anymore
Sterling's site is an amazing asset to the first gen community. I wouldn't have known where to start without it.
Sterling's site is an amazing asset to the first gen community. I wouldn't have known where to start without it.
Senior Member
Joined: Nov 2009
Posts: 346
Likes: 2
From: Australia
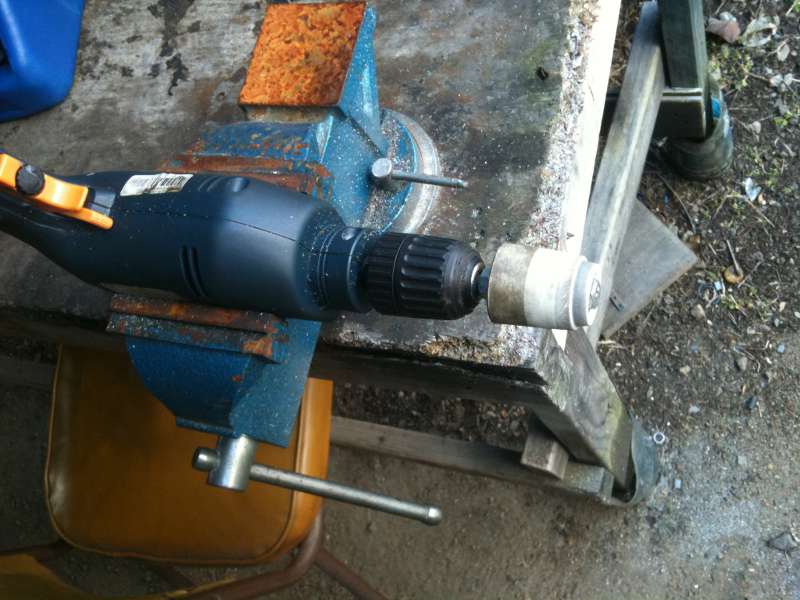
This is how I cut the venturis - the drill in the bench vice and a rubber door stop with a bolt through it. The venturis slide over the door stop. It takes a few minutes to adjust them so they are on straight, the rubber allows for this easily. Then I use a rotary tool, or dremel / die grinder / or whatever you want, with a tungsten bit to cut the material off, while the drill is locked on low speed. The aluminium from the venturis often gets caught up in the bit so I have to clean it a few times on each venturi. Then I use a sanding bit on the rotary tool to clean it up, and finally some fine wet/dry sandpaper to smooth it over.

Thread Starter
Full Member
Joined: Mar 2011
Posts: 60
Likes: 0
From: Warner Robins, GA
Thanks soo much for this stuff guys. Im really happy that I asked this question. Im feeling a little more confident about rebuilding this block now with the exception that i cut through the inner coolant o-ring ( not into the water jacket ). 2 questions though, 1, what jets would i use for my style of ports and 2. would i need to devcon my water jackets that are near the ports where the housings have been cut?
http://www.ausrotary.com/viewtopic.p...3584&start=100
This is the link on ausrotary.com that has the pics of the ports that I cut. Those are before I opened the intake ports up. lol!
http://www.ausrotary.com/viewtopic.p...3584&start=100
This is the link on ausrotary.com that has the pics of the ports that I cut. Those are before I opened the intake ports up. lol!
Senior Member
Joined: Nov 2009
Posts: 346
Likes: 2
From: Australia
Thanks soo much for this stuff guys. Im really happy that I asked this question. Im feeling a little more confident about rebuilding this block now with the exception that i cut through the inner coolant o-ring ( not into the water jacket ). 2 questions though, 1, what jets would i use for my style of ports and 2. would i need to devcon my water jackets that are near the ports where the housings have been cut?
http://www.ausrotary.com/viewtopic.p...3584&start=100
This is the link on ausrotary.com that has the pics of the ports that I cut. Those are before I opened the intake ports up. lol!
http://www.ausrotary.com/viewtopic.p...3584&start=100
This is the link on ausrotary.com that has the pics of the ports that I cut. Those are before I opened the intake ports up. lol!

Be careful that you go straight in with that bit... it doesn't take much to seriously overdo it. My stock main fuel jets are 92/160 and the air jets are 70/140 ('85 spec). So using the 1mm bit would give me 100/160 for fuel and 100/140 for air. That's quite a jump on the air bleed but the SA stockers were 90 so I guess that's not too extreme.
Another option (although a bit expensive) for fuel jets is Mazdatrix: http://www.mazdatrix.com/c-3.htm
I have an extra set or two of stock jets so I might go ahead and drill them.
Another option (although a bit expensive) for fuel jets is Mazdatrix: http://www.mazdatrix.com/c-3.htm
I have an extra set or two of stock jets so I might go ahead and drill them.
Thread Starter
Full Member
Joined: Mar 2011
Posts: 60
Likes: 0
From: Warner Robins, GA
 But I also want to know about the ports that i cut also. Because if I have to devcon the block then ill just use my bridgeported 13b and try to make an adaptor of some sort to make it all work.