
"Maybe I went too far this time..."

Thread Starter
Joined: Jun 2008
Posts: 8,376
Likes: 30
From: Chino Hills, CA
"Maybe I went too far this time..."
Ok, so I've got this reputation (somewhat deserved, I suppose) for being willing to try to make anything I can't immediately find available to buy or trade. Stu and Ray in particular seem to enjoy tweaking me about it - - I'm not sure exactly why. I mean, doesn't everyone hand-pour their own plastic parts?  Or reassemble a burned-out gas tank float mechanism from parts from multiple failed ones?
But even I got to admit, this time I may have pushed my envelope a bit.
Got this project going on: I want to change my electric window switches to match as closely as possible what would have been used for electric windows in an SA, if they'd been available. And I also want to replace my shift surround, which is cracked and has lost a lot of chrome (currently concealed behind chrome tape). But I can't do one until I do the other.
I converted my windows to electric years ago, and at the time I figured the best place to mount my switches was in two of the three coin holders in the SA shift surround. This was before I knew how rare those puppies would get - I wouldn't dare cut one up today.
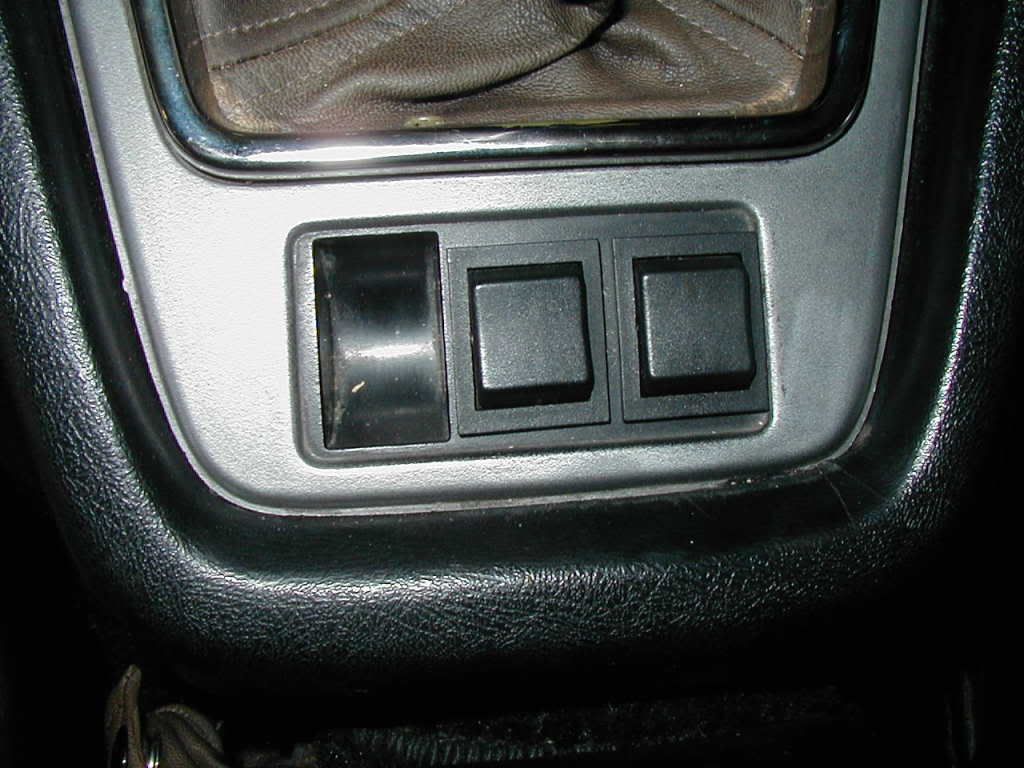
They look pretty nice there, next to my made-it-myself (brown... wtf was I thinking?) leather shift boot - - but now I've got this "originalist" bug that's pushing me to make the car look as period-correct as possible, even if the thing I want to do to it wasn't available on SA's at the time.
Frankly, I think it was the damned shift **** that got me started. But I digress.
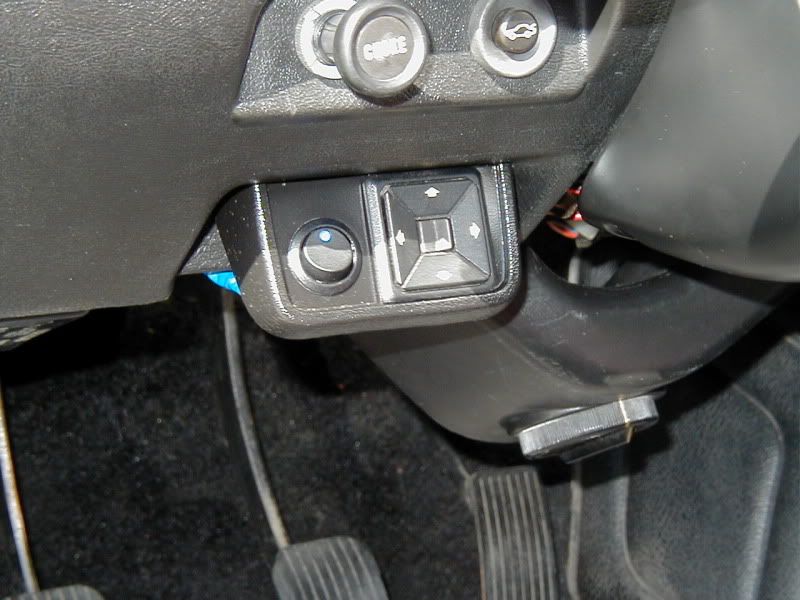
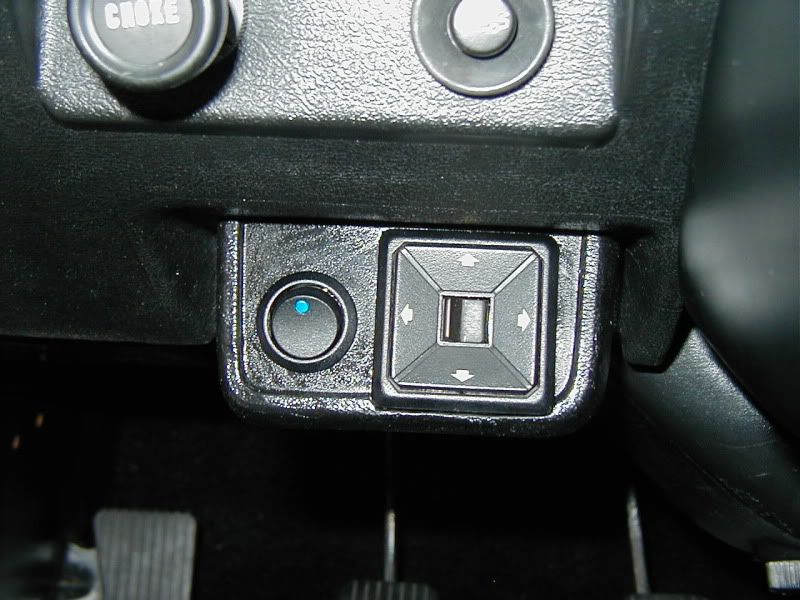
But now... now I've got this really great-condition shift surrround that Stu found for me, and I can't use it because I'd lose my window switches. I've also finally got an SA-correct mirror control switch ('80 LS spec) that, mated with my hand-made bracket reproduction for same, will let me replace the FB mirror control I'm using now. But that means losing my fog-light switch, since I put them both in my did-it-myself replica LS switch bracket:
Short Version, I need room for more switches. And I want to make it look as "factory-right" as possible, even if these options weren't all offered for the SA. And as always I try to keep my mods 'reversible'.
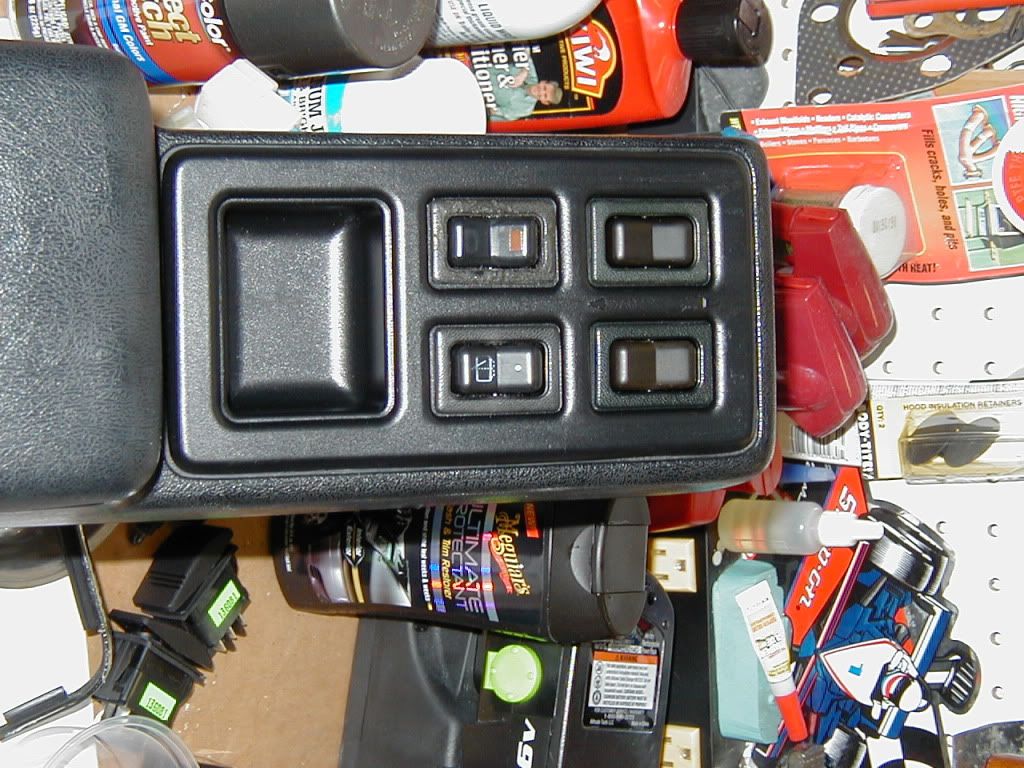
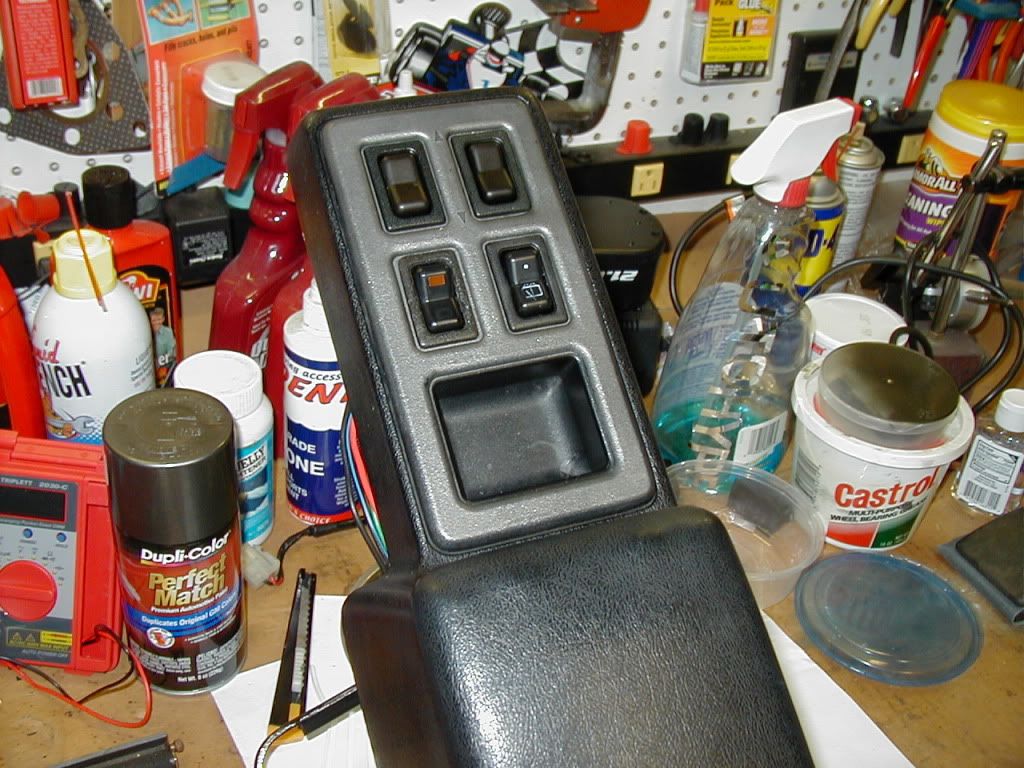
So, I started looking at the possibilities, and decided the switch panel from the center console of an 81-82 GSL would fit the bill; it's only one year "off" from SA-correct.
With a little hidden dremel modding of the center console, it will drop in where the existing ashtray is, and it will provide me with the two window switches, as well as the lighted 'defog' switch which is perfect for my fog lights, plus one other position to be used later. Yet if I ever go back to original, the ashtray covers all the mod-work beautifully.
Took a while to find one, but Wackyricer came through for me, and I drove up across town Wed night to pick it up.
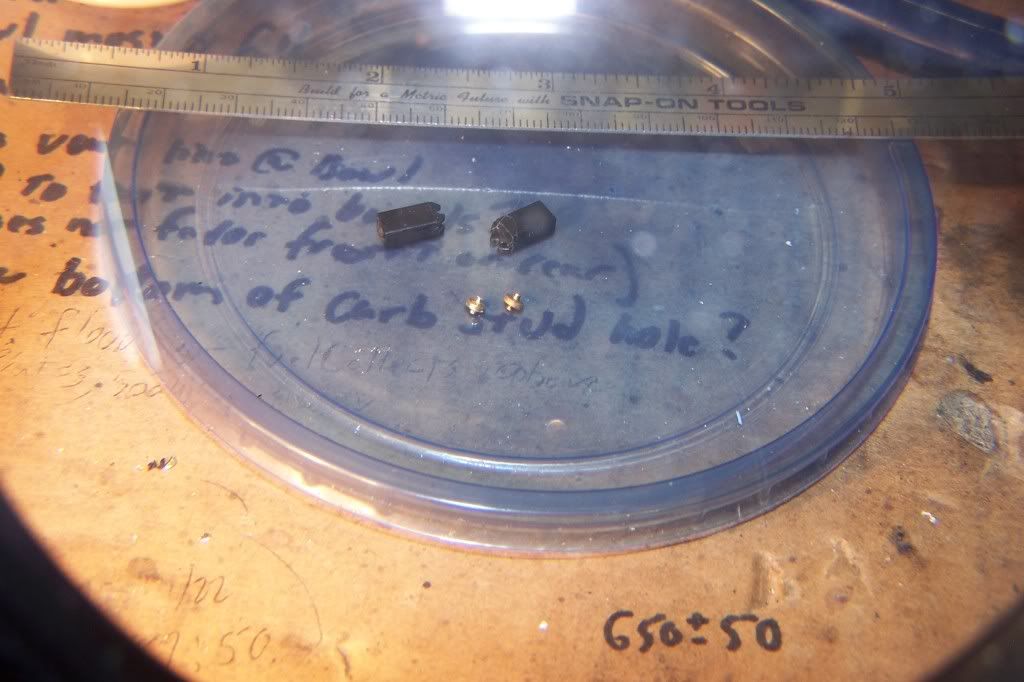
It's in pretty nice shape (needs paint), and the switches seemed pretty OK too, though one was a bit sticky. So I tore it down to clean it.
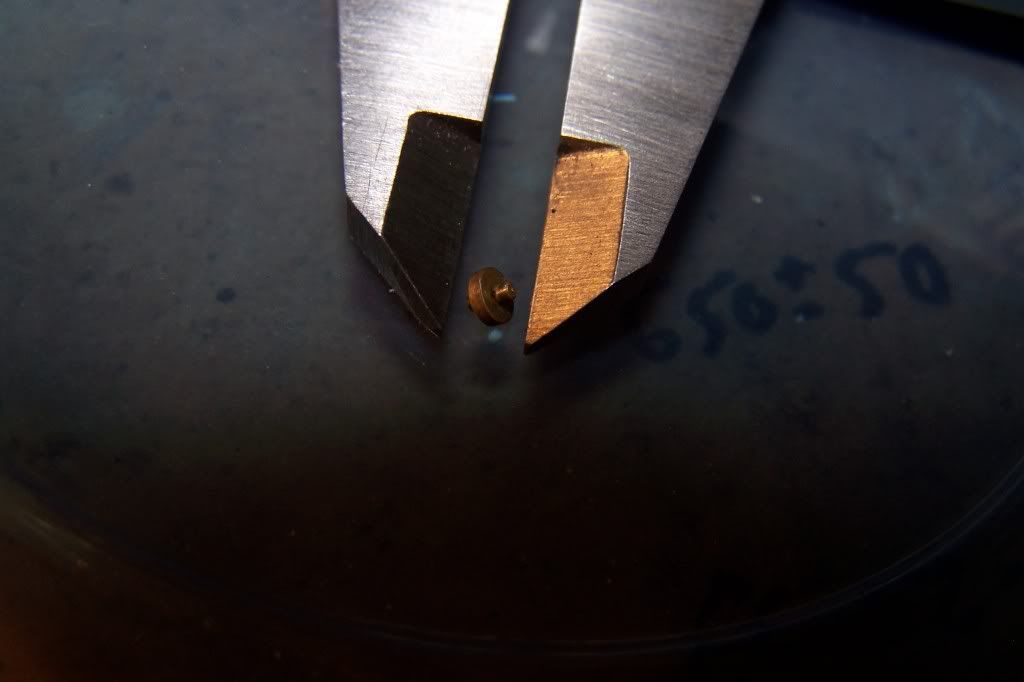
After disassembling it, I discovered that one of the tiny brass rollers that go at the tip of the spring-loaded operating levers inside the switch was missing.

They look like this: Slightly less than 3mm in diameter.
Rather than start hunting again for another switch, the Mr. Wizard bug bit me hard: I decided to make a new roller.
Unfortunately, I don't have a lathe. Closest thing I have is a dremel, and that goes a bit fast for small stuff like this.
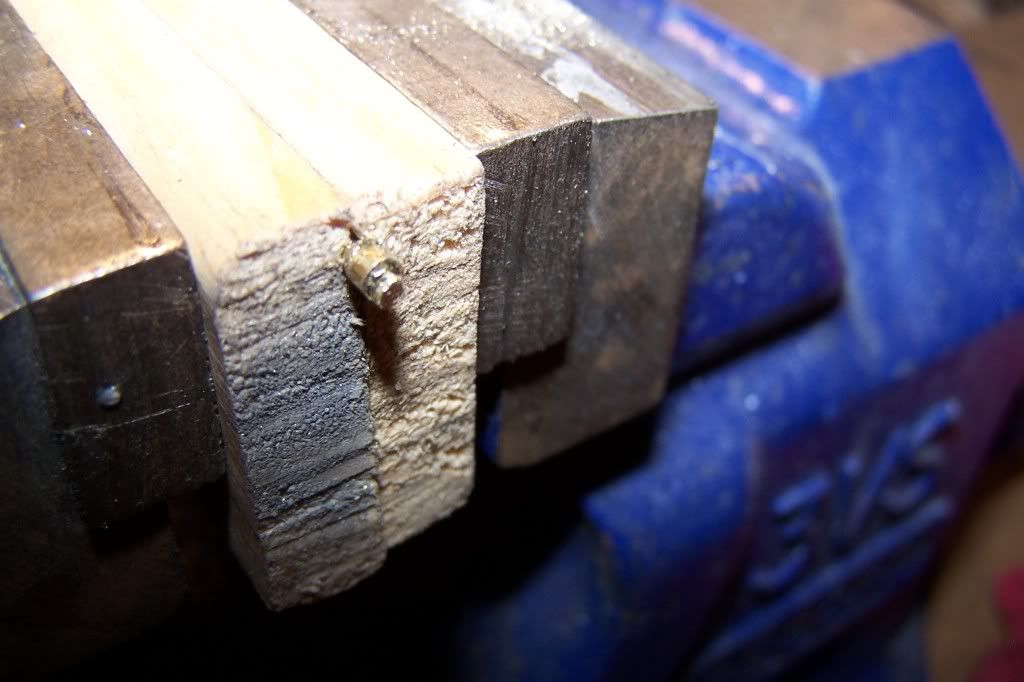
So, after carefully measuring the three rollers I did have (two switches worth, minus one) I started off with a brass wood screw of roughly the right diameter, and sawed off the head.

With the screw locked in the vise in a pair of woodblocks, and my trusty "hobby magnifying visor" strapped to my forehead, I started cutting axle flanges into it with an old points-cleaning file:
Front:
And back:
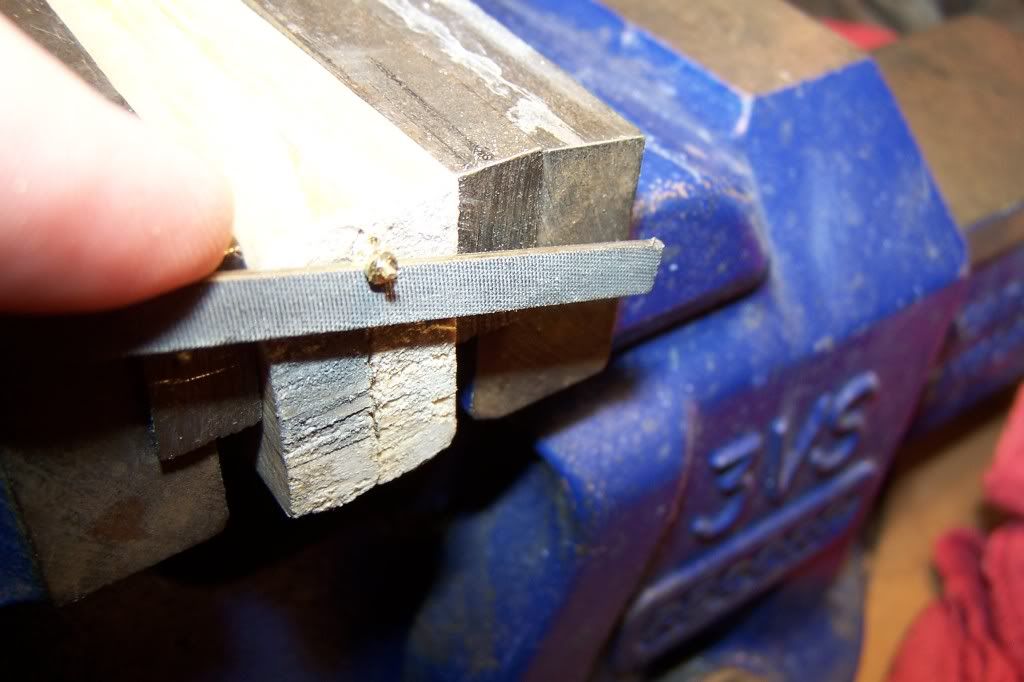
Once it was almost done, I had to true up the axles while rolling it in my fingers, and then trim to length:
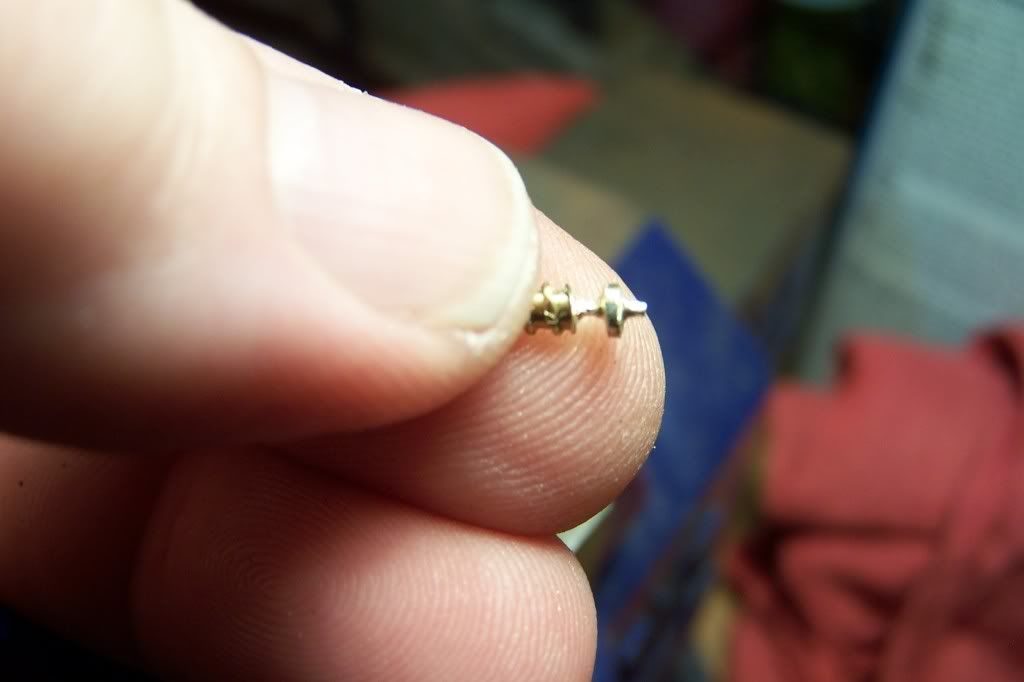
About an hour after starting, I am rewarded with a nicely functioning if somewhat rude looking roller:
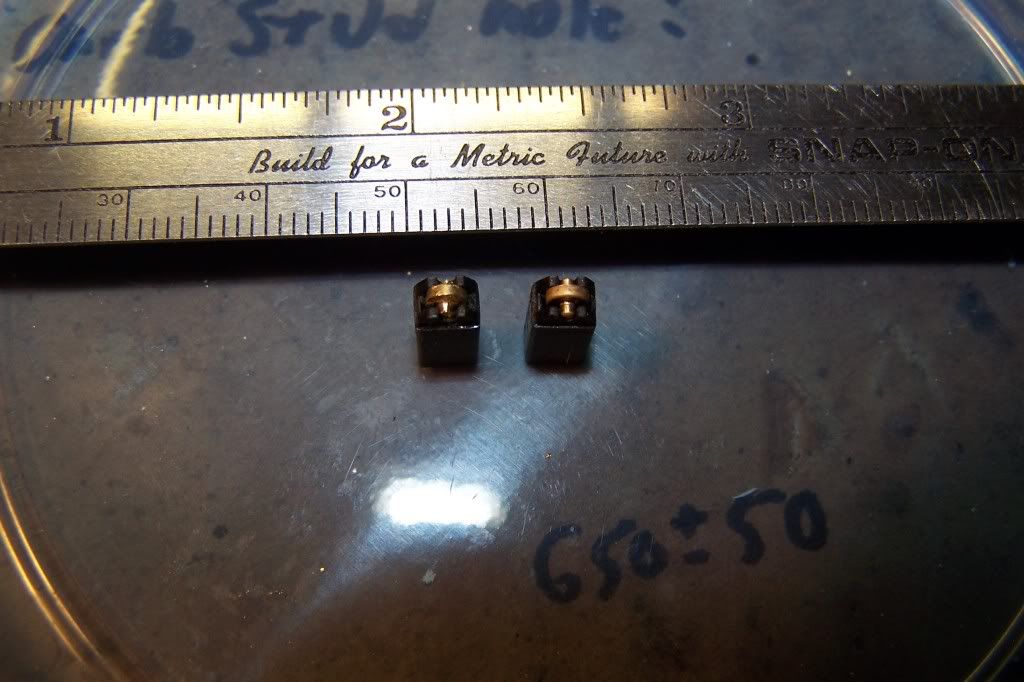
Fits just dandy, too:
So, in this thread, talk about the stuff that desperation or insanity drove you to make when you perhaps more wisely should have just bought a new one!
Or reassemble a burned-out gas tank float mechanism from parts from multiple failed ones?But even I got to admit, this time I may have pushed my envelope a bit.
Got this project going on: I want to change my electric window switches to match as closely as possible what would have been used for electric windows in an SA, if they'd been available. And I also want to replace my shift surround, which is cracked and has lost a lot of chrome (currently concealed behind chrome tape). But I can't do one until I do the other.
I converted my windows to electric years ago, and at the time I figured the best place to mount my switches was in two of the three coin holders in the SA shift surround. This was before I knew how rare those puppies would get - I wouldn't dare cut one up today.
They look pretty nice there, next to my made-it-myself (brown... wtf was I thinking?) leather shift boot - - but now I've got this "originalist" bug that's pushing me to make the car look as period-correct as possible, even if the thing I want to do to it wasn't available on SA's at the time.
Frankly, I think it was the damned shift **** that got me started. But I digress.
But now... now I've got this really great-condition shift surrround that Stu found for me, and I can't use it because I'd lose my window switches. I've also finally got an SA-correct mirror control switch ('80 LS spec) that, mated with my hand-made bracket reproduction for same, will let me replace the FB mirror control I'm using now. But that means losing my fog-light switch, since I put them both in my did-it-myself replica LS switch bracket:
Short Version, I need room for more switches. And I want to make it look as "factory-right" as possible, even if these options weren't all offered for the SA. And as always I try to keep my mods 'reversible'.
So, I started looking at the possibilities, and decided the switch panel from the center console of an 81-82 GSL would fit the bill; it's only one year "off" from SA-correct.
With a little hidden dremel modding of the center console, it will drop in where the existing ashtray is, and it will provide me with the two window switches, as well as the lighted 'defog' switch which is perfect for my fog lights, plus one other position to be used later. Yet if I ever go back to original, the ashtray covers all the mod-work beautifully.
Took a while to find one, but Wackyricer came through for me, and I drove up across town Wed night to pick it up.
It's in pretty nice shape (needs paint), and the switches seemed pretty OK too, though one was a bit sticky. So I tore it down to clean it.
After disassembling it, I discovered that one of the tiny brass rollers that go at the tip of the spring-loaded operating levers inside the switch was missing.
They look like this: Slightly less than 3mm in diameter.
Rather than start hunting again for another switch, the Mr. Wizard bug bit me hard: I decided to make a new roller.
Unfortunately, I don't have a lathe. Closest thing I have is a dremel, and that goes a bit fast for small stuff like this.
So, after carefully measuring the three rollers I did have (two switches worth, minus one) I started off with a brass wood screw of roughly the right diameter, and sawed off the head.
With the screw locked in the vise in a pair of woodblocks, and my trusty "hobby magnifying visor" strapped to my forehead, I started cutting axle flanges into it with an old points-cleaning file:
Front:
And back:
Once it was almost done, I had to true up the axles while rolling it in my fingers, and then trim to length:
About an hour after starting, I am rewarded with a nicely functioning if somewhat rude looking roller:
Fits just dandy, too:
So, in this thread, talk about the stuff that desperation or insanity drove you to make when you perhaps more wisely should have just bought a new one!
Glen - you Old School Genius. Brilliant of course, as we all expect. Brave man holing the near-unobtainium shift panel. The installation Mazda should have done! Speaking of which - attached is a copy of the installation Mazda DID do:
1980 SA SE Limited came with Power Windows (and leather, and rear wiper!). The only SA to be so-equipped. Excerpt from the JDM owner's manual I happen to, er, have handy. Note the OEM rockers were mounted in the driver's DOOR ahead of the door release. Passenger had a single in the same place.
Any pics of the wire harness install you built to power them?? Thanks for sharing. Hope to see your Baby in person one day...
Stu Aull
80GS
Alaska


Amazing. I've salvaged a few dimmer switches and broken ignition points in my time but nothing like that.
But since you want a story, I'll have to go back to my early days of auto mechanics and my '69 VW bug, which was only 2 years old at the time (I was 18). I had virtually no automotive experience, not even a relevant shop class, and I was using that "How to Keep your VW Alive: A Manual of Step by Step Procedures for the Complete Idiot" to get some clue about how to do things like change the oil and spark plugs, etc.
So anyway it didn't take me long to strip out the spark plug threads in one of those cast aluminum heads the old VW's had. You could spin the plug with your fingers. Not finding a procedure for the situation in my "Idiot's" manual, I did the next best thing.
I found a short stick of wood about a foot long and just wide enough to slip into the spark plug hole and push against the top of the plug so that it stayed in place in the cylinder head. Then I wedged the stick against the side of the engine bay to hold the plug in snugly.
It worked. And that's how I drove that car until it's demise a couple years later.
Not stock, not vintage, but do I get some credit for originality?
Thread Starter
Joined: Jun 2008
Posts: 8,376
Likes: 30
From: Chino Hills, CA
Glen - you Old School Genius. Brilliant of course, as we all expect. Brave man holing the near-unobtainium shift panel. The installation Mazda should have done! Speaking of which - attached is a copy of the installation Mazda DID do:
1980 SA SE Limited came with Power Windows (and leather, and rear wiper!). The only SA to be so-equipped. Excerpt from the JDM owner's manual I happen to, er, have handy. Note the OEM rockers were mounted in the driver's DOOR ahead of the door release. Passenger had a single in the same place.
Any pics of the wire harness install you built to power them?? Thanks for sharing. Hope to see your Baby in person one day...
Stu Aull
80GS
Alaska
1980 SA SE Limited came with Power Windows (and leather, and rear wiper!). The only SA to be so-equipped. Excerpt from the JDM owner's manual I happen to, er, have handy. Note the OEM rockers were mounted in the driver's DOOR ahead of the door release. Passenger had a single in the same place.
Any pics of the wire harness install you built to power them?? Thanks for sharing. Hope to see your Baby in person one day...
Stu Aull
80GS
Alaska
If I ever re-work my door panels, now I know exactly how they should look... reversed left-for-right.
I don't have any pictures of the re-wire in progress; I did it long before I was worrying about documenting my work. A window harness is really simple, though; two wires from motor to switch, Power and ground to switch, DPDTCO switch wired as crossover, inline fuse holder. I did it all up in split flex tube and tape wrapped it.
Absolutely. I'm amazed that a stick could hold the combustion pressure!
Trending Topics
Thread Starter
Joined: Jun 2008
Posts: 8,376
Likes: 30
From: Chino Hills, CA
1) I found it would require a third hand I didn't have, as I had no good way to rigidly mount the dremel in the vise without risking damaging it.
2) The idea of the possible ballistic exit of the screw from the dremel while I'm working with my face a couple inches away through magnifying specs, was a bit unnerving... dremels turn waaaay too fast, even on slow, for that kind of fine work.
3) Cutting the first axle might not have been too bad... but cutting the second axle meant SOME part would have to get cut free in the process, or else I'd be chucking it on the wheel portion, which is less than 1mm thick. See 1 and 2 above.
I have a large drill press; and thought of using it in the same fasion, but there's a huge difference between the support given by a three-finger drill chuck versus a lathe collet. And the view angle would be not good, working up under the chuck.
Dragons' Breath
Joined: Sep 2010
Posts: 1,129
Likes: 2
From: Pump Handle, SK. Canada
+1 I love it when people make stuff D.D. ..  and that little stuff can be a real bitch .. When I took my mvmr years back the shop teacher gave us a piece of 1/2 inch square stock, a flat bastard file ,drill bits and taps and told us to go make a 3/8 nut with course threads .. I remember there was the guys that did well and the guys that failed,failed miserably there were no fair ones, either good or crap .. one looked a lot like a chubby washer.. but we all passed ..
Thread Starter
Joined: Jun 2008
Posts: 8,376
Likes: 30
From: Chino Hills, CA
OK; project moving along... now I'm trying to decide on the color for the switch carrier panel:
Since the ashtray that normally sits in that spot on an SA is black, and since the door-mounted switches on the JDM Limited were on a black panel as Stu pointed out, it could be argued that the appropriate color would be black:

However, since 1980 was the first year US cars had the silver-painted radio and shift surrounds, and the original color for the switch panel on the SE's was likewise silver (with a black coin well), then the argument could be made that had Mazda done what I'm doin on an '80, the switch carrier would have been silver:
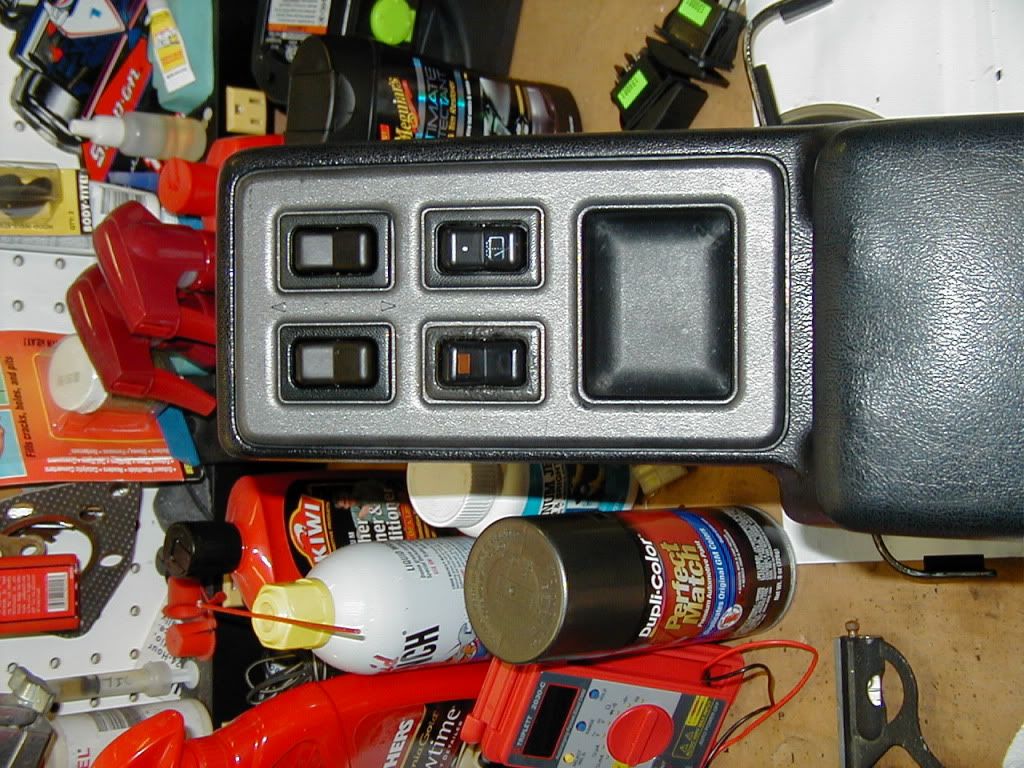
Gaugh, hate decisions like this. Opinions?
Since the ashtray that normally sits in that spot on an SA is black, and since the door-mounted switches on the JDM Limited were on a black panel as Stu pointed out, it could be argued that the appropriate color would be black:
However, since 1980 was the first year US cars had the silver-painted radio and shift surrounds, and the original color for the switch panel on the SE's was likewise silver (with a black coin well), then the argument could be made that had Mazda done what I'm doin on an '80, the switch carrier would have been silver:
Gaugh, hate decisions like this. Opinions?


Joined: Mar 2001
Posts: 31,857
Likes: 3,243
From: https://www2.mazda.com/en/100th/
when i see this thread i think to myself, no way!
um i like the black. i do see the argument for silver, and actually it looks fine too, but since that area in every SA was black, you could say that black was more SA correct, and silver is more FB correct.
um i like the black. i do see the argument for silver, and actually it looks fine too, but since that area in every SA was black, you could say that black was more SA correct, and silver is more FB correct.
Amazing. I've salvaged a few dimmer switches and broken ignition points in my time but nothing like that.
But since you want a story, I'll have to go back to my early days of auto mechanics and my '69 VW bug, which was only 2 years old at the time (I was 18). I had virtually no automotive experience, not even a relevant shop class, and I was using that "How to Keep your VW Alive: A Manual of Step by Step Procedures for the Complete Idiot" to get some clue about how to do things like change the oil and spark plugs, etc.
So anyway it didn't take me long to strip out the spark plug threads in one of those cast aluminum heads the old VW's had. You could spin the plug with your fingers. Not finding a procedure for the situation in my "Idiot's" manual, I did the next best thing.
I found a short stick of wood about a foot long and just wide enough to slip into the spark plug hole and push against the top of the plug so that it stayed in place in the cylinder head. Then I wedged the stick against the side of the engine bay to hold the plug in snugly.
It worked. And that's how I drove that car until it's demise a couple years later.
Not stock, not vintage, but do I get some credit for originality?
But since you want a story, I'll have to go back to my early days of auto mechanics and my '69 VW bug, which was only 2 years old at the time (I was 18). I had virtually no automotive experience, not even a relevant shop class, and I was using that "How to Keep your VW Alive: A Manual of Step by Step Procedures for the Complete Idiot" to get some clue about how to do things like change the oil and spark plugs, etc.
So anyway it didn't take me long to strip out the spark plug threads in one of those cast aluminum heads the old VW's had. You could spin the plug with your fingers. Not finding a procedure for the situation in my "Idiot's" manual, I did the next best thing.
I found a short stick of wood about a foot long and just wide enough to slip into the spark plug hole and push against the top of the plug so that it stayed in place in the cylinder head. Then I wedged the stick against the side of the engine bay to hold the plug in snugly.
It worked. And that's how I drove that car until it's demise a couple years later.
Not stock, not vintage, but do I get some credit for originality?
You indeed do. That sir, is clutch
Joined: Jul 2002
Posts: 7,301
Likes: 3
From: District of Columbia
I've sersonally bought multipule switches and disassemblem them and combined to make the perfect switches for my old FB. It makes a world of difference having the switches all refreshed.
Thread Starter
Joined: Jun 2008
Posts: 8,376
Likes: 30
From: Chino Hills, CA
I'm going with the black for now; The silver one, freshly painted, goes into the reserve stock.
I'd had one good panel & no switches for months, planning it for this project using aftermarket switches, only to think I had ruined it while trying to heat it to get a warp out, but I fixed it. One of the switch holes promptly shrank & lost shape when the plastic got a bit too hot.
So I got another plate from Wacky (along with the genuine switches - yes!). I took a mold impression of the switch hole and surrounding area from the new plate using heat-set modeling clay ("Fimo") from Michael's crafts, baked it hard, and then re-heated the melted plate area while pushing it onto this temp mold. Stretched it back into shape just fine.
I've posted them in some other threads, but here you go, courtesy of P-Bucket:
SA-style mirror control bracket:
First one re-carved and painted to hold an FB-style switch, before I got my honest SA switches (Good thing I made a couple extras, heh) Shortly after the pic was taken, I trimmed the edges of the FB switch to make it fit inside the frame of the bracket.

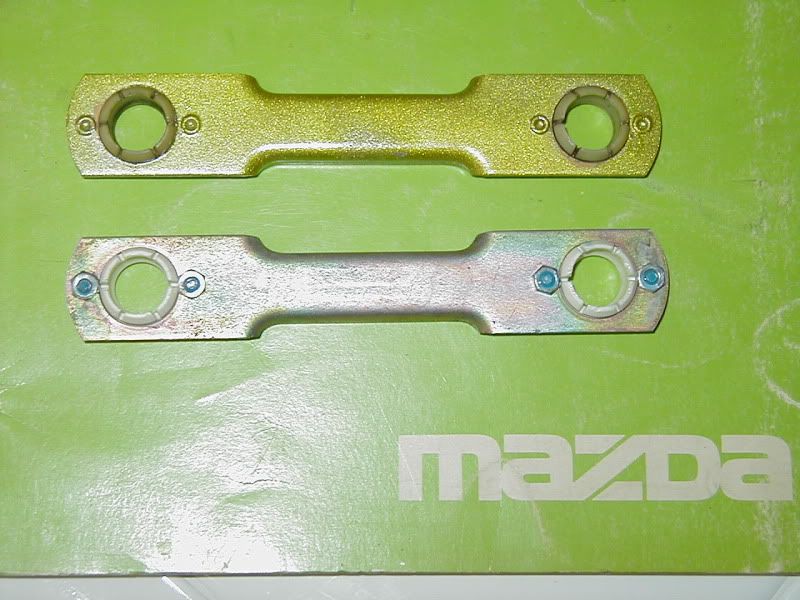
Headlight arm bushings:


I'd had one good panel & no switches for months, planning it for this project using aftermarket switches, only to think I had ruined it while trying to heat it to get a warp out, but I fixed it. One of the switch holes promptly shrank & lost shape when the plastic got a bit too hot.
So I got another plate from Wacky (along with the genuine switches - yes!). I took a mold impression of the switch hole and surrounding area from the new plate using heat-set modeling clay ("Fimo") from Michael's crafts, baked it hard, and then re-heated the melted plate area while pushing it onto this temp mold. Stretched it back into shape just fine.
SA-style mirror control bracket:
First one re-carved and painted to hold an FB-style switch, before I got my honest SA switches (Good thing I made a couple extras, heh) Shortly after the pic was taken, I trimmed the edges of the FB switch to make it fit inside the frame of the bracket.
Headlight arm bushings: