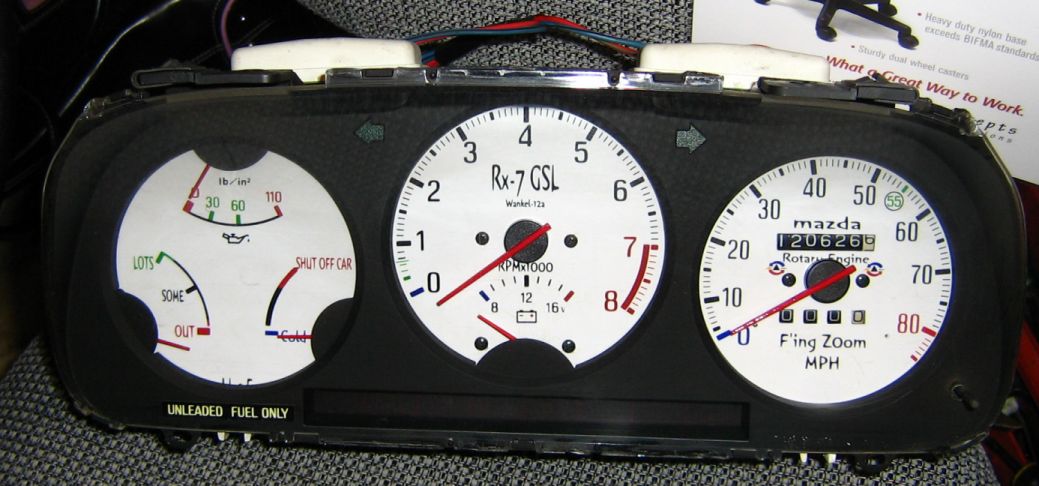
Made custom "Autometer C2" inspired gauges for stock cluster :D
 08-17-08, 03:30 AM
#1
lol wut
Thread Starter

Made custom "Autometer C2" inspired gauges for stock cluster :D
Just finished up the water/fuel set for the stock 84-85 gauges.
Before I start cutting the original gauges, is there any way to remove the needles without breaking them on the speedo and tach? I searched around a good bit and checked out the FSM but didn't find anything.
Going to print them on thick photo paper and put it where the old gauges were. I'll be using the white on black style just like the original. The other image is just to compare the accuracy of mine as compared to the stock gauges.
The little dots are the alignment holes. Scanned at 300dpi.
Take a look see.
Last edited by esmith972; 08-17-08 at 03:46 AM.
 08-17-08, 04:47 AM
#3
lol wut
Thread Starter
Here's the oil and volts.
Nevermind, I got the needles off. Move the needles gently back and forth and look on the backside for the moving cylinder. Hold that with your thumb as you move the needle back and forth and pull up at the same time.
Nevermind, I got the needles off. Move the needles gently back and forth and look on the backside for the moving cylinder. Hold that with your thumb as you move the needle back and forth and pull up at the same time.
Last edited by esmith972; 08-17-08 at 05:05 AM.
08-17-08, 06:06 AM
#5
lol wut
Thread Starter
Two options for the speedo.
1) 0, 20, 40, 60, etc. - one size
2) 0, 10, 20, 30, 40, etc. - alternating sizes
I'm leaning more to #2 since it's closer to the C2 speedo.
1) 0, 20, 40, 60, etc. - one size
2) 0, 10, 20, 30, 40, etc. - alternating sizes
I'm leaning more to #2 since it's closer to the C2 speedo.
Last edited by esmith972; 08-17-08 at 06:15 AM.
08-17-08, 12:01 PM
#6
FNZOOM
iTrader: (1)
Join Date: Jun 2007
Location: MN
Posts: 154
Likes: 0
Received 0 Likes
on
0 Posts
hello,
Are you removing the old guages entirely and replacing with the thick photo paper? or are you removing the paint on the old guage faces and glue'ing the new faces on?
I did something like that on an 82', and had problems with the lighting, mostly fixed now.
Things I learnt hardway:
Photopaper needs to be satin or flat or sunlight from the 6'clock can white em out.
Backlit guages are painted up because the light coming through is uneven, they use light catching material to make the display glow from behind.
Around were the mile displays and other dials showing through, they are ambient lit, so when changed to white guages the light will show through around the dials far brighter than around the edges of the same display guage.
If you sand down the original guage face to remove the paints, becareful not to groove it, that will = darklines.
If you glue the new face onto the original 'sanded' down guage, use very thin photopaper, or the needles might catch when the paper swells from humidity.
Photo paper should not have inking on the back, if you go backlit whiteface you might Kodak showing through
If you glue, use the glue that is used to adhere fabric onto materials, it works well, doesnt stink once its cured, and can be found in aerosol bottle which makes an even coat really easy.
If you paint your needles, i suggest fingernail polish, if you want it perfect get the non gloss so you can sand down imperfections, and then gloss or satin or whatever.
btw, expect to trouble shoot it a lot, so dont screw it all in right away!
gl2ya, I can attach an image of what I did if the OP asks, but I dont want to distract the muse
Trending Topics
08-17-08, 02:11 PM
#8
lol wut
Thread Starter
mxd, I plan on just using glossy and running it through the print cycle a few times to make it dark enough. Oh yeah, go ahead and post those pictures, I'd like to see if it's worth it.
 08-17-08, 04:30 PM
#12
lol wut
Thread Starter
Bud Scott, thanks. 
mxd, awesome man. The gas gauge is the best part. How did the gauges look lit up? Could you see the fiber strands?
mxd, awesome man. The gas gauge is the best part. How did the gauges look lit up? Could you see the fiber strands?
Last edited by esmith972; 08-17-08 at 04:52 PM.
08-17-08, 05:44 PM
#14
lol wut
Thread Starter
Just fixed the tach. Didn't realize I didn't have redline on there. 
If a mod wants to, replace the original tach images with these and combine all of the pictures into the first post.
If a mod wants to, replace the original tach images with these and combine all of the pictures into the first post.
 08-17-08, 08:01 PM
#16
FNZOOM
iTrader: (1)
Join Date: Jun 2007
Location: MN
Posts: 154
Likes: 0
Received 0 Likes
on
0 Posts
thanks,
will post a pic, but need some time, and a lense that diffuses well.
removed backlighting, and removed the yellow tint lense from the front lighting. Need to find a heat resistant white lense for the front lighting to improve the saturation. White guages do not match the rest of the orange lighting so it looks out of place, working on that too.
08-19-08, 03:01 AM
#17
lol wut
Thread Starter
Alright, tomorrow is d-day. I'll post pictures once I'm done installing it. My dad was able to print them on his laser printer for test fitting. Found out I made two mistakes. The speedo didn't have the alignment posts and the water/fuel was set to 72dpi (not sure why either, I remember re-saving everything to 300dpi. Good ol' Photochop)
I've also got red LEDs coming from superbrightleds.com. We will see how those turn out though.
I've also got red LEDs coming from superbrightleds.com. We will see how those turn out though.
08-19-08, 03:25 AM
#18
lol wut
Thread Starter
I actually contacted the guy that makes the carbon fiber "RX-7 Club" stickers to see if he could do that. The local vinyl shops around here are a little pricey.
08-19-08, 03:59 PM
#21
lol wut
Thread Starter
Hyper4mance2k, just noticed your name. Creative. :P
I took your advice. They look even more epic now. Below is the "finished" set.
Everyone is more than welcome to use them, modify, whatever. My only requirement is that you post a picture of your complete set. If you want the PSD, PM me. The only problem is I can't send the font considering I spent $34 on it. It's "Serpentine Bold Oblique." And FYI, that is the exact font they used on the C2 gauges. Cool huh?
 08-19-08, 05:54 PM
#24
Rotary Freak
iTrader: (19)
Join Date: Oct 2007
Location: Colorado Springs, CO
Posts: 2,014
Likes: 0
Received 0 Likes
on
0 Posts
This is really cool. How did you get these scaned? Did you disassemble the gauges and lay it on a flatbed scaner?
I have an '83 with the 130 mph speedo. I want to do mine like the Auto meter ES guages.
How did you find out what text they use?
I have an '83 with the 130 mph speedo. I want to do mine like the Auto meter ES guages.
How did you find out what text they use?