
Install question for someone with Ground Control camber plates

Install question for someone with Ground Control camber plates
I picked up a set of used Ground Control camber plates for Gus, and I'm trying to figure out exactly how they are supposed to go on the car. I have some questions that need cleared up. If someone has installed these before and can chime in I would appreciate it. I want to be certain that I have installed them correctly.
Question 1
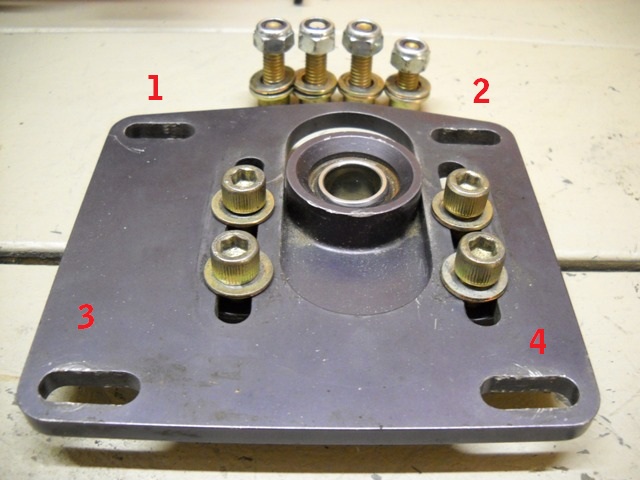
There are four bolts that mount the camber plates to the strut tower. You can see them in the background of the picture below. One of the four bolts is shorter than the other three. Which location is it supposed to go in and why? #1, 2, 3, or 4? Is it supposed to be shorter, or did the previous owner screw something up there?
Question 2
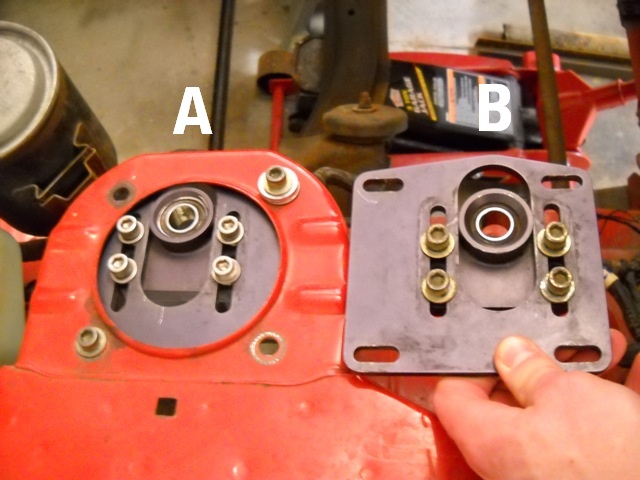
I'm not sure which way these things are supposed to go on the car. I'm thinking that configuration A is correct? Or do I have them flip flopped and I should actually use configuration B? Which one is the right camber plate for the passenger side strut tower?
Question 3
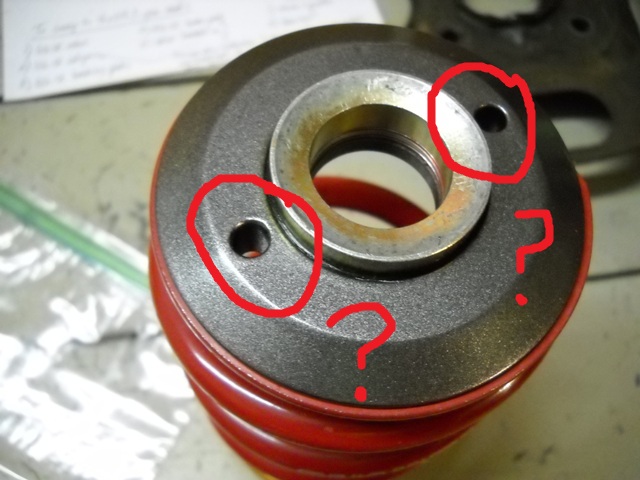
There are two little holes on the top hat for the spring. What are they for? Is something supposed to go thru them? I can't figure out for the life of me why they are there. Am I missing something here?
Question 4
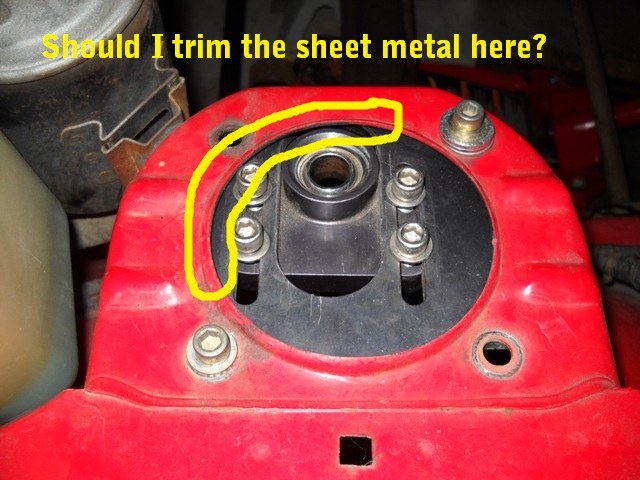
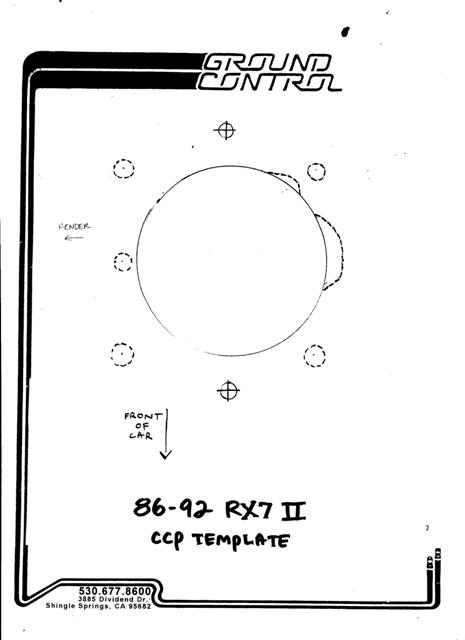
Ground control provides a cutting template for the strut towers for extreme camber adjustment. They sent it to me as a JPG. The diagram they sent me actually says it is for 1986-1992, but they told me that it works the same for 1979-1985. I attached it below. They told me that cutting the strut towers is only necessary in extreme applications. Is there any reason why I should need to cut the strut towers? I'm not planning on doing anything crazy. Do you guys normally cut yours when you install camber plates, or is it not really necessary?
Thanks in advance for the help. Any input that anyone can provide would be appreciated, assuming you know what you're talking about.
Jamie
Question 1
There are four bolts that mount the camber plates to the strut tower. You can see them in the background of the picture below. One of the four bolts is shorter than the other three. Which location is it supposed to go in and why? #1, 2, 3, or 4? Is it supposed to be shorter, or did the previous owner screw something up there?
Question 2
I'm not sure which way these things are supposed to go on the car. I'm thinking that configuration A is correct? Or do I have them flip flopped and I should actually use configuration B? Which one is the right camber plate for the passenger side strut tower?
Question 3
There are two little holes on the top hat for the spring. What are they for? Is something supposed to go thru them? I can't figure out for the life of me why they are there. Am I missing something here?
Question 4
Ground control provides a cutting template for the strut towers for extreme camber adjustment. They sent it to me as a JPG. The diagram they sent me actually says it is for 1986-1992, but they told me that it works the same for 1979-1985. I attached it below. They told me that cutting the strut towers is only necessary in extreme applications. Is there any reason why I should need to cut the strut towers? I'm not planning on doing anything crazy. Do you guys normally cut yours when you install camber plates, or is it not really necessary?
Thanks in advance for the help. Any input that anyone can provide would be appreciated, assuming you know what you're talking about.
Jamie


Heres what I know about your camber plates. Q#1 My GC camber plates bolts are all the same lenght , so I don' t think it matters where it goes.
Q#2 "A" is correct for max Camber/ Caster.
Q#3 No you aren't missing any thing, I have used the holes to ziptie the spring to the perch to keep it together when they are out of the car.
Q#4 You don't need to cut the strut tower unless you are runnig slick for autox and need the extra camber/caster. hope this helps.
I picked up a set of used Ground Control camber plates for Gus, and I'm trying to figure out exactly how they are supposed to go on the car. I have some questions that need cleared up. If someone has installed these before and can chime in I would appreciate it. I want to be certain that I have installed them correctly.
Question 1
There are four bolts that mount the camber plates to the strut tower. You can see them in the background of the picture below. One of the four bolts is shorter than the other three. Which location is it supposed to go in and why? #1, 2, 3, or 4? Is it supposed to be shorter, or did the previous owner screw something up there?
Question 2
I'm not sure which way these things are supposed to go on the car. I'm thinking that configuration A is correct? Or do I have them flip flopped and I should actually use configuration B? Which one is the right camber plate for the passenger side strut tower?
Question 3
There are two little holes on the top hat for the spring. What are they for? Is something supposed to go thru them? I can't figure out for the life of me why they are there. Am I missing something here?
Question 4
Ground control provides a cutting template for the strut towers for extreme camber adjustment. They sent it to me as a JPG. The diagram they sent me actually says it is for 1986-1992, but they told me that it works the same for 1979-1985. I attached it below. They told me that cutting the strut towers is only necessary in extreme applications. Is there any reason why I should need to cut the strut towers? I'm not planning on doing anything crazy. Do you guys normally cut yours when you install camber plates, or is it not really necessary?
Thanks in advance for the help. Any input that anyone can provide would be appreciated, assuming you know what you're talking about.
Jamie
Sorry, on question 2 I should have been clearer. I'm not asking about the position of the sliding spherical bearings. I understand that moving them towards the inside of the strut tower will increase negative camber. I want to know if I have the mounting plates flipped the right way. See the angled point that sticks out to the inside of the strut tower? Should that go on the front, or the back?
Lives on the Forum
Joined: Jun 2004
Posts: 11,359
Likes: 14
From: Grand Rapids Michigan
Looks like you're all set, but I'll add one not.
Question 3: Those holes allow you to wire or zip-tie the spring to the cap. Seems to be optional. I installed zipties on mine, but they broke in short order. No issues after years of driving on them.
.
Question 3: Those holes allow you to wire or zip-tie the spring to the cap. Seems to be optional. I installed zipties on mine, but they broke in short order. No issues after years of driving on them.
.
Oh, you're supposed to leave the zip ties on there? I thought the zip ties were just to hold everything in place while you assemble it. What is the purpose of leaving them zip tied together? Seems like a crappy way of designing a product if they are counting on them staying there and not breaking...
Trending Topics
Oh, you're supposed to leave the zip ties on there? I thought the zip ties were just to hold everything in place while you assemble it. What is the purpose of leaving them zip tied together? Seems like a crappy way of designing a product if they are counting on them staying there and not breaking...
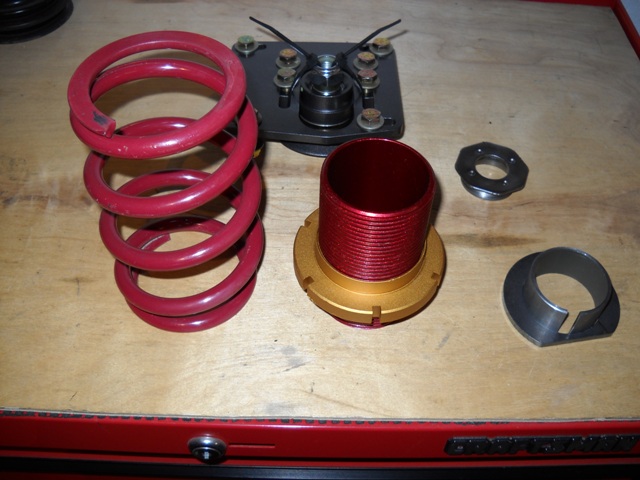
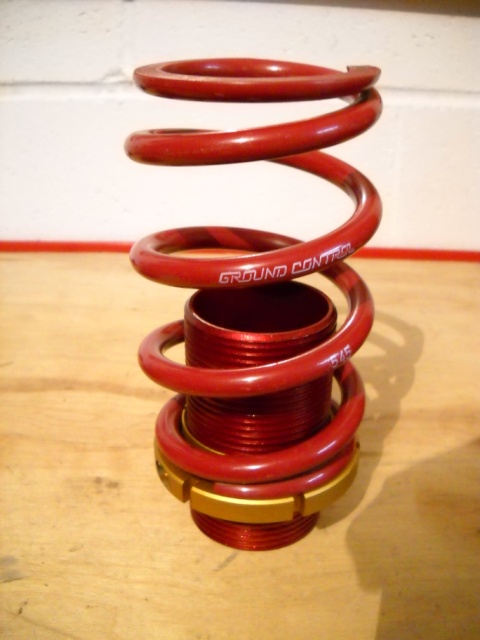
Here is some follow up information that some others have requested. When I bought my GC coilover/camber plate kit used, I was a little confused about what exactly is supposed to be included in the kit. Here is a picture of what you should have for one of the front struts. This should be a complete setup. To my knowledge, everything is finally here.
You should have the following:
1) Adjustable spring perch (the gold thing)
2) Threaded tube (red thing)
3) Coil spring (obvious)
4) Weld on coilover perches (round adapter, and flat plate)
5) Strut cartridge cap? (I think this actually comes with your struts, but included it just in case)
6) Camber plate (will detail the components of this below)
The back of the Ground Control kit is just two Eibach progressive springs. They have dead coils in them that you can cut to adjust the ride height without screwing up the spring rate. There aren't any adapters or coilovers for the rear end of the Ground Control kit. Just the two springs. So there isn't really any adjustability. You cut the springs once, and are stuck at that height from then on.
I got rid of the Eibach springs in the back and will be using a ReSpeed kit in the back so I can adjust the ride height whenever I want.
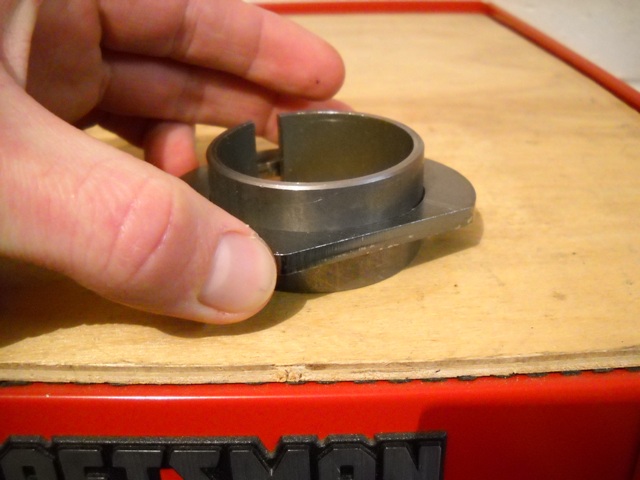
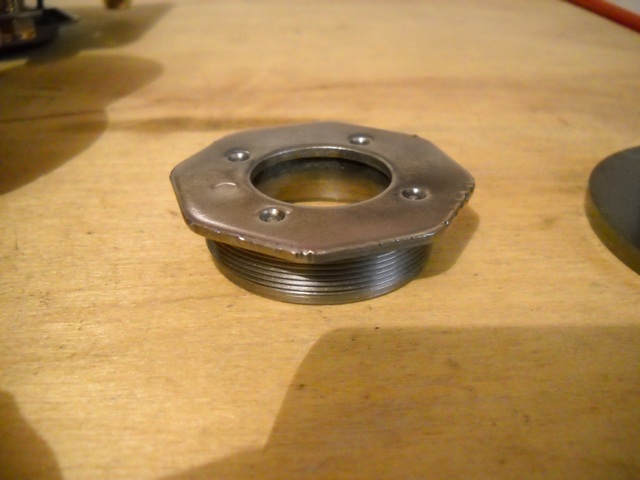
The picture below shows the two weld-on steel pieces that serve as the lower perch for the coilovers. This is what you will actually weld to your strut tubes, after you cut the old OEM spring perches off with a grinder. If you bought your coilover kit used, you can still buy these metal pieces from Ground Control. I called them and told them I needed just the weld on adapter plates for a 1985 Rx-7. They sent me four total pieces (two of each shape). It was pretty cheap too. I think I paid $18 for all of them. Make sure that you weld the perch in the middle of the cylindrical adapter like I show in the picture below. Also, when you weld the perch on to the strut tube, make sure that you have the flat edge of the perch facing where your brake rotor goes. Some people forget to line it up, and weld it on. Then realize later that they didn't have it rotated correctly to match up with the brake rotor. So be careful.
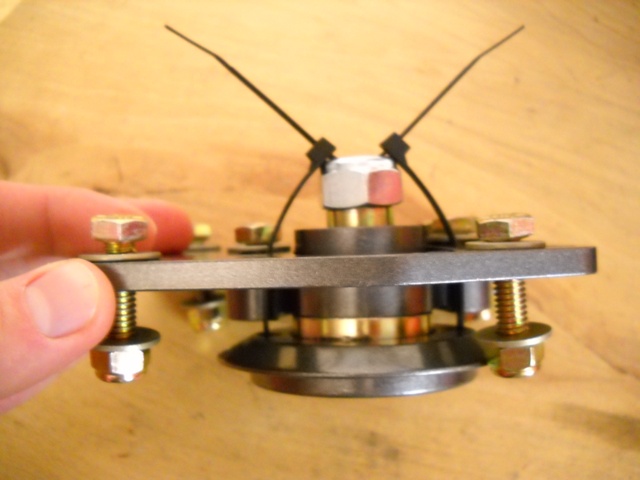
Below is a picture of the camber plate from the side. Starting at the bottom and working your way up to the top you have:
1) Spring top hat (with two alignment holes for zip ties)
2) Sliding plate with spherical bearing inside
3) Flat metal mounting plate (with Grade 8 mounting hardware)
4) Bronze spacer (this sits on top of the spherical bearing and keeps the mounting nut on the top of the strut rod from hitting the spherical bearing when it rotates around. Without it the nut on the end of the strut rod would hit the sliding plate that the spherical bearing is mounted in and gouge it all up.)
5) Strut rod nut (This might come with your strut cartridges also?)
I replaced all the hardware in my camber plates also because it was pretty nasty. I used new Grade 8 hex bolts, washers, and nylon locknuts. The mounting bolts in my picture are 1/4" longer than the ones that Ground Control provides you with normally. I'm going to be using a strut bar, with 1/4" thick mounting plates, so I needed hardware that was 1/4" longer than what Ground Control sends to account for it. It's all standard thread, so it's pretty easy to find at your local hardware store. Cost me about $8-10 to replace it all. Make sure you use nylon lock nuts on the back of the hex bolts. You don't want them loosening up. You could use a regular lockwasher too if you wanted.
You should have the following:
1) Adjustable spring perch (the gold thing)
2) Threaded tube (red thing)
3) Coil spring (obvious)
4) Weld on coilover perches (round adapter, and flat plate)
5) Strut cartridge cap? (I think this actually comes with your struts, but included it just in case)
6) Camber plate (will detail the components of this below)
The back of the Ground Control kit is just two Eibach progressive springs. They have dead coils in them that you can cut to adjust the ride height without screwing up the spring rate. There aren't any adapters or coilovers for the rear end of the Ground Control kit. Just the two springs. So there isn't really any adjustability. You cut the springs once, and are stuck at that height from then on.
I got rid of the Eibach springs in the back and will be using a ReSpeed kit in the back so I can adjust the ride height whenever I want.
The picture below shows the two weld-on steel pieces that serve as the lower perch for the coilovers. This is what you will actually weld to your strut tubes, after you cut the old OEM spring perches off with a grinder. If you bought your coilover kit used, you can still buy these metal pieces from Ground Control. I called them and told them I needed just the weld on adapter plates for a 1985 Rx-7. They sent me four total pieces (two of each shape). It was pretty cheap too. I think I paid $18 for all of them. Make sure that you weld the perch in the middle of the cylindrical adapter like I show in the picture below. Also, when you weld the perch on to the strut tube, make sure that you have the flat edge of the perch facing where your brake rotor goes. Some people forget to line it up, and weld it on. Then realize later that they didn't have it rotated correctly to match up with the brake rotor. So be careful.
Below is a picture of the camber plate from the side. Starting at the bottom and working your way up to the top you have:
1) Spring top hat (with two alignment holes for zip ties)
2) Sliding plate with spherical bearing inside
3) Flat metal mounting plate (with Grade 8 mounting hardware)
4) Bronze spacer (this sits on top of the spherical bearing and keeps the mounting nut on the top of the strut rod from hitting the spherical bearing when it rotates around. Without it the nut on the end of the strut rod would hit the sliding plate that the spherical bearing is mounted in and gouge it all up.)
5) Strut rod nut (This might come with your strut cartridges also?)
I replaced all the hardware in my camber plates also because it was pretty nasty. I used new Grade 8 hex bolts, washers, and nylon locknuts. The mounting bolts in my picture are 1/4" longer than the ones that Ground Control provides you with normally. I'm going to be using a strut bar, with 1/4" thick mounting plates, so I needed hardware that was 1/4" longer than what Ground Control sends to account for it. It's all standard thread, so it's pretty easy to find at your local hardware store. Cost me about $8-10 to replace it all. Make sure you use nylon lock nuts on the back of the hex bolts. You don't want them loosening up. You could use a regular lockwasher too if you wanted.
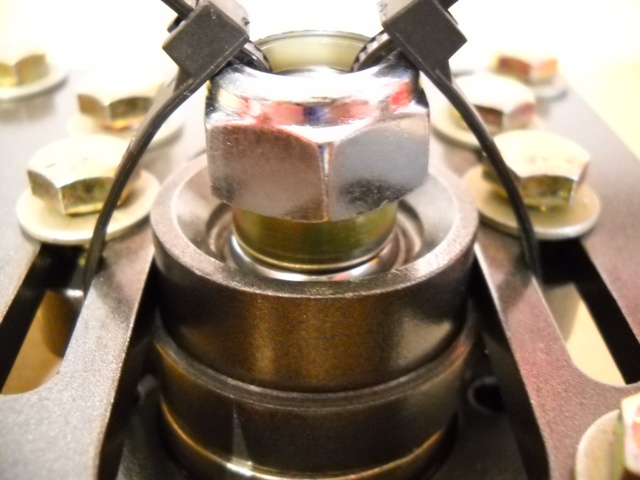
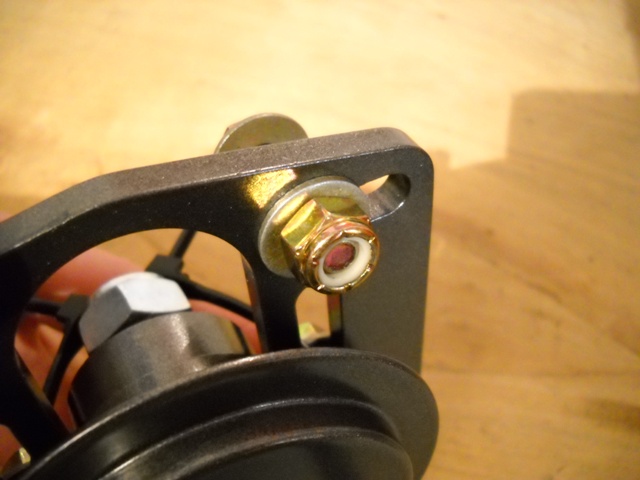
Here are a few more detailed pictures that show the camber plates. You can see the bronze spacer that goes underneath the strut rod mounting nut better in the top picture.


Joined: Mar 2001
Posts: 31,835
Likes: 3,233
From: https://www2.mazda.com/en/100th/
thats pretty much it. the spring perch can be welded on anywhere, but usually its done so the coil over sleeve is flush with the top of the strut. the lower you go, the lower your car sits, so if its really low you might need a longer spring, like mike #2
Thanks for the tip.
Jamie
Joined: Mar 2001
Posts: 31,835
Likes: 3,233
From: https://www2.mazda.com/en/100th/
its not super important, because its height adjustable, but flush with the gland nut is about right.
the GC collars are a 1.0 thread pitch, so 4 turns is an inch.
the GC collars are a 1.0 thread pitch, so 4 turns is an inch.

Thread
Thread Starter
Forum
Replies
Last Post