
How-To: GSL-SE Front End Swap

Thread Starter
Go Hawks!
iTrader: (1)
Joined: May 2004
Posts: 1,952
Likes: 3
From: Cedar Rapids, Iowa
How-To: GSL-SE Front End Swap
I just swapped the front end from my GSL-SE parts car into my GS project car and decided to do a writeup on it.
First, raise the front end and support it with jackstands. I use the outer part of the crossmember to support the front end...just don't use the control arms, since they need to be free to move.
Obviously, this is what it looks like before you start:
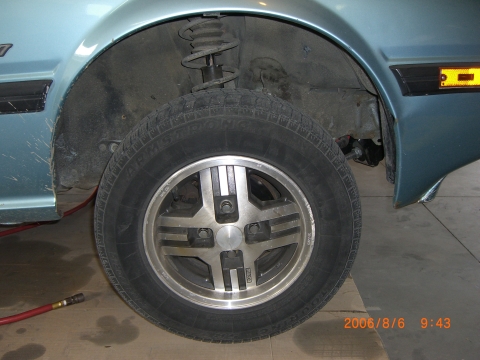
And with the wheel removed:

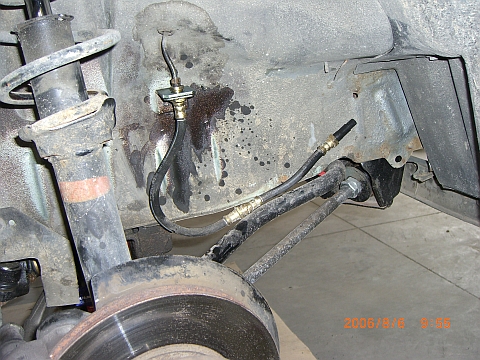
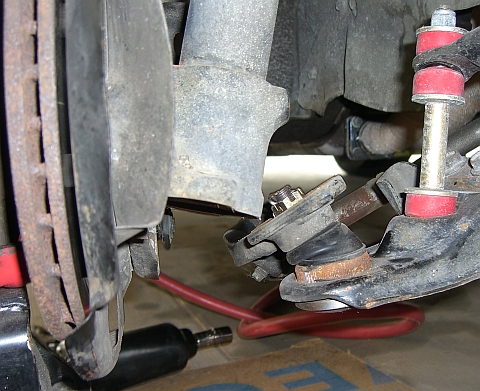
The first thing I did was remove the brake hose from the caliper. To do this, you'll have to disconnect it from the hard line first and cap off the hard line (I got some caps from AutoZone...they don't seal completely, but good enough that you won't lose much fluid). Then remove the retaining clip from the strut tower and remove the hose from the bracket. Then you can remove the hose from the caliper. Cap the hole in the caliper, then reattach the hose to the hard line and cap the end of the hose. The caps I got seal the hose end better than they seal the hard line end.
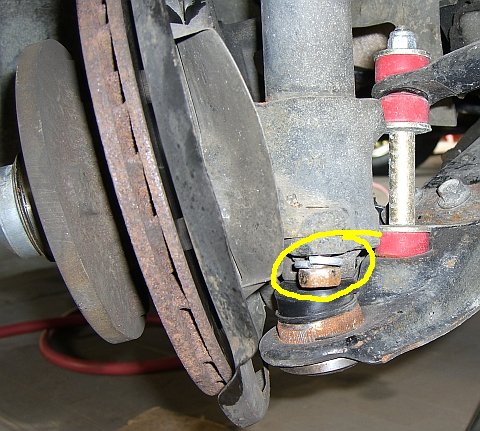
Then, remove the two bolts that connect the steering arm to the bottom of the strut tower. In this picture I've circled the front one. The front bolt is shorter than the rear one...remember this when you reassemble it. This may require some hammering on a wrench or a good impact wrench to get these loosened.
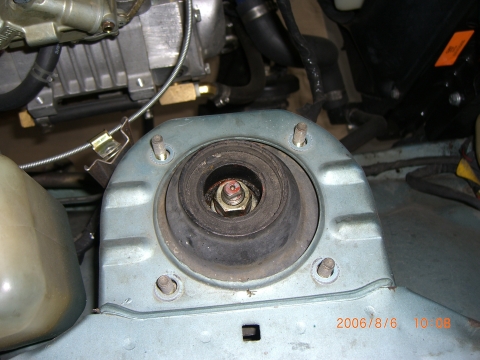
Leave the strut assembly resting on the steering arm for now, and remove the 4 nuts at the top of the strut tower, inside the engine bay. I put a mark on one of the studs so I knew how it was situated and could install it in the parts car the same way (likewise for the one coming from the parts car).
TO BE CONTINUED
Rich
First, raise the front end and support it with jackstands. I use the outer part of the crossmember to support the front end...just don't use the control arms, since they need to be free to move.
Obviously, this is what it looks like before you start:
And with the wheel removed:
The first thing I did was remove the brake hose from the caliper. To do this, you'll have to disconnect it from the hard line first and cap off the hard line (I got some caps from AutoZone...they don't seal completely, but good enough that you won't lose much fluid). Then remove the retaining clip from the strut tower and remove the hose from the bracket. Then you can remove the hose from the caliper. Cap the hole in the caliper, then reattach the hose to the hard line and cap the end of the hose. The caps I got seal the hose end better than they seal the hard line end.
Then, remove the two bolts that connect the steering arm to the bottom of the strut tower. In this picture I've circled the front one. The front bolt is shorter than the rear one...remember this when you reassemble it. This may require some hammering on a wrench or a good impact wrench to get these loosened.
Leave the strut assembly resting on the steering arm for now, and remove the 4 nuts at the top of the strut tower, inside the engine bay. I put a mark on one of the studs so I knew how it was situated and could install it in the parts car the same way (likewise for the one coming from the parts car).
TO BE CONTINUED
Rich
Thread Starter
Go Hawks!
iTrader: (1)
Joined: May 2004
Posts: 1,952
Likes: 3
From: Cedar Rapids, Iowa
Now put a floor jack under the outer part of the hub and raise it enough to allow the bottom of the strut assembly to clear the nut holding the ball joint on the steering arm...you may need to wedge something between the control arm and the crossmember to prevent the control arm from raising with the strut assembly. Then slowly pull the bottom of the strut assembly away from the steering arm. Once it's clear, slowly lower the jack while holding the spring, and gradually pull it out of the fender.

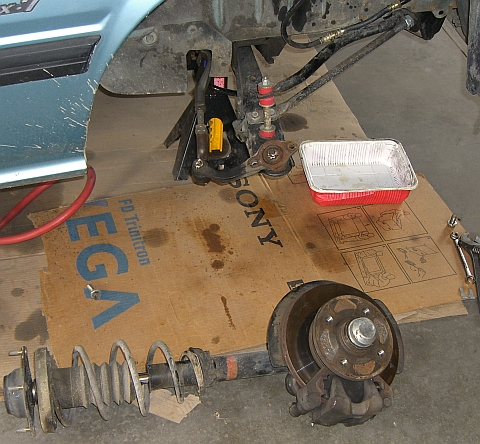
That's all there is to it! As the workshop manuals always say "assembly is in reverse order" After I got done I decided that this whole process would probably be made easier if the sway bar was disconnected from the control arm, especially for reassembly. I still need to put the SE front end on the left side of my project car, so I'll try that tonight.
Rich
That's all there is to it! As the workshop manuals always say "assembly is in reverse order"
After I got done I decided that this whole process would probably be made easier if the sway bar was disconnected from the control arm, especially for reassembly. I still need to put the SE front end on the left side of my project car, so I'll try that tonight.Rich
Thread Starter
Go Hawks!
iTrader: (1)
Joined: May 2004
Posts: 1,952
Likes: 3
From: Cedar Rapids, Iowa
Originally Posted by blwfly
awsome seems so simple
is this so u could change the stud patern up front change or is the gslse fronts better than stock gs?
is this so u could change the stud patern up front change or is the gslse fronts better than stock gs?

And yes, it is very easy.
Rich
Like he sead it is preaty simple we swaped GSL-SE whole suspension into an SA and it was preaty ease to do other than the fackt that we replaced all the bushings and I mean all of them that was the fun part I got to burn stuff. But other than that it is preaty straith forward take one out put the other one in and you are done.
Senior Member
Joined: Jun 2005
Posts: 413
Likes: 0
From: Columbiana, AL
Originally Posted by rotarycrazy
Like he sead it is preaty simple we swaped GSL-SE whole suspension into an SA and it was preaty ease to do other than the fackt that we replaced all the bushings and I mean all of them that was the fun part I got to burn stuff. But other than that it is preaty straith forward take one out put the other one in and you are done.
Trending Topics
Originally Posted by Mazda12AGS
You know sometimes I wonder if we need to teach a typing and spelling class on this website. Its not just him, it is alot of people on here.
I second that. It should be one of the stickies at the top of the forum. There should be a post typed improperly (on purpose by a forum member), then the same post typed correctly below so people can see how much easier it is to read a properly structured post. Then, below, people should take all of the Newb posts (without forum names prefferably (SP?)) that aren't in proper english and post them up as examples of not to do. I bet we could rival JimLab's RX-V8-7 in size of a thread.
Good writeup. Add another thing that I want to do to my car once I get this Fuc*ing timing issue fixed (still working on it everyone, still can't get the dizzy out of the block). THANK YOU!
Thread Starter
Go Hawks!
iTrader: (1)
Joined: May 2004
Posts: 1,952
Likes: 3
From: Cedar Rapids, Iowa
Amen! While spelling and punctuation are not things that will bring the world to an end, it would be nice if people would proof-read their posts before submitting, and make corrections where necessary. Spelling is just a matter of paying attention in school...if you didn't, well, it's probably too late to do anything about it until the forum incorporates a built-in spell-checker.
Anyway, back to the front end swap. I put the left side on last night. Before doing so, I loosened the nut on the sway bar end link to allow the control arm to hang lower...MUCH easier.
Oh, yea, I forgot to give rx7doctor props fo this. I asked him a bunch of questions before I started, and as usual, he was very patient with me and gave me all the info I needed...thanks Doc!
Rich
Yea its much much easier to get everything in there if you loosen either the sway bar or the tension rods, or both. I replaced the control arm bushing and ball joint while I was at it when doing this on both my cars, so I ended up installing the strut, knuckle arm, control arm all as one assembly. Pretty simple, doesn't take a whole lot of time, sandblasting and cleaning up all the old parts takes all the time....
Thread Starter
Go Hawks!
iTrader: (1)
Joined: May 2004
Posts: 1,952
Likes: 3
From: Cedar Rapids, Iowa
Originally Posted by 82transam
Yea its much much easier to get everything in there if you loosen either the sway bar or the tension rods, or both. I replaced the control arm bushing and ball joint while I was at it when doing this on both my cars, so I ended up installing the strut, knuckle arm, control arm all as one assembly. Pretty simple, doesn't take a whole lot of time, sandblasting and cleaning up all the old parts takes all the time....
Rich
Joined: May 2002
Posts: 5,972
Likes: 37
From: Ottawa, Soviet Canuckistan
Good job Rich 
And good to know I'm not the only one who abhors bad spelling, punctuation and grammar.
In the Canadian sub-forum I'm known as the "EliteHardcoreCanuckSpellingSquad"
Jon
And good to know I'm not the only one who abhors bad spelling, punctuation and grammar.
In the Canadian sub-forum I'm known as the "EliteHardcoreCanuckSpellingSquad"
Jon

RX Heaven
Joined: Jul 2006
Posts: 28
Likes: 0
From: Buffalo,NY
Great write-ups and pics guys. Piece a cake once you get into it.Just had to knock some rust off my tools and my get my automotive brain back in gear. Feels good to be playing with the cars again. Got away from it for too long. Thanks for the spelling lesson also. Before I could only say RX7, now I can spell it.
Thread Starter
Go Hawks!
iTrader: (1)
Joined: May 2004
Posts: 1,952
Likes: 3
From: Cedar Rapids, Iowa
Originally Posted by Manntis
With your permission I'd like to archive this on rotorhead.ca
Rich
add to cart
Joined: Jun 2002
Posts: 4,181
Likes: 0
From: Saskatoon, SK & Montreal, PQ


Thread
Thread Starter
Forum
Replies
Last Post
trickster
2nd Generation Specific (1986-1992)
25
Jul 1, 2023 04:40 PM
Azevedo
Other Engine Conversions - non V-8
26
Mar 1, 2019 09:19 PM
JIMMY54
1st Generation Specific (1979-1985)
2
Aug 12, 2015 05:40 PM