
How can i hollow this j-109?

Thread Starter
'Nothing like a rotary'
Joined: Jul 2006
Posts: 464
Likes: 0
From: worcester, mass
How can i hollow this j-109?
hi everyone, i recently replaced my trailing igniter because it was bad, so i have an extra igniter. i wanted to convert to DLIDFS, so insted of buying a new one or finding a new one i was wonderin if i could hollow it out and fix it. has anyone done it before? can i get the steps please? thanks.

Rotary Enthusiast
Joined: Dec 2004
Posts: 1,025
Likes: 0
From: Campbell, CA
Originally Posted by Jozay721
hi everyone, i recently replaced my trailing igniter because it was bad, so i have an extra igniter. i wanted to convert to DLIDFS, so insted of buying a new one or finding a new one i was wonderin if i could hollow it out and fix it. has anyone done it before? can i get the steps please? thanks.
dilifids aint to hard read up there plenty of info
Thread Starter
'Nothing like a rotary'
Joined: Jul 2006
Posts: 464
Likes: 0
From: worcester, mass
yeah it looks real easy, all i got to do is get another coil nd fix this ignitor, but thanks u two for the ingo anyways. Those pics helped out alot zerano. thanks again.
Thread Starter
'Nothing like a rotary'
Joined: Jul 2006
Posts: 464
Likes: 0
From: worcester, mass
but if i dont gut it how am i gonna fix it because its a bad ignitor, or does that onnector thing ur talkin about get passed the bad ignitor?because im tryin to convert to dlidfs, so i need this ignitor workin.
Trending Topics
Thread Starter
'Nothing like a rotary'
Joined: Jul 2006
Posts: 464
Likes: 0
From: worcester, mass
o ok i got it, so u dont need to gut it thats what u mean. ok i get it. i already took all the stuff out of mine though, so im gonna try to work with it after i solder it up. thanks everyone. 
Last edited by Jozay721; Aug 3, 2006 at 09:47 PM.
Oh, I see what you were asking. The J-109 ignitors usually either work or they don't work. It sounds like yours was bad.
It's never a good idea to gut a good ignitor. What's more, it's not even necessary to gut one in order to have DLIDFIS. Tht's the point I was alluding to above.
It's never a good idea to gut a good ignitor. What's more, it's not even necessary to gut one in order to have DLIDFIS. Tht's the point I was alluding to above.
Thread Starter
'Nothing like a rotary'
Joined: Jul 2006
Posts: 464
Likes: 0
From: worcester, mass
yeah! now we understand each other, so now u know what im sayin, jeff do u have good pics of a succesful dlidfs without the msd, u know just regular, i saw ur website on yahoo with the diagram, and i just wanna get some ideas for the wiring, thanks
I've never hooked up DLIDFIS in a 1st gen (no pics). DLIDFIS and the MSD are quite different. I'm not sure where you got that they were one in the same.
The wiring is straight forward. I try to spell it out on my geocities page. Since I wasn't making specific diagrams for any one type of vehicle, it requires the reader to comprehend the setup and do it himself.
As for ideas I can give you, if you want to use J-109 ignitors, you can find the small female quickdisconnects at a local car stereo shop. I've test fitted them to the pins on the back of the ignitors before crimping because the rolled-over edges of the quickdisconnects are usually too tight when new. It takes a little spreading. Also, no need for mic cable. Uh, I can't think of anything else.
Have fun.
Thread Starter
'Nothing like a rotary'
Joined: Jul 2006
Posts: 464
Likes: 0
From: worcester, mass
qucik female disconnects, so uve never done it on a first gen huh, ok thats cool, ill figure it out one way or another. thanks for the info anyways, and i plan to have lots of fun

Full Member
Joined: Feb 2006
Posts: 90
Likes: 0
From: Pittsburgh
Gut J-109
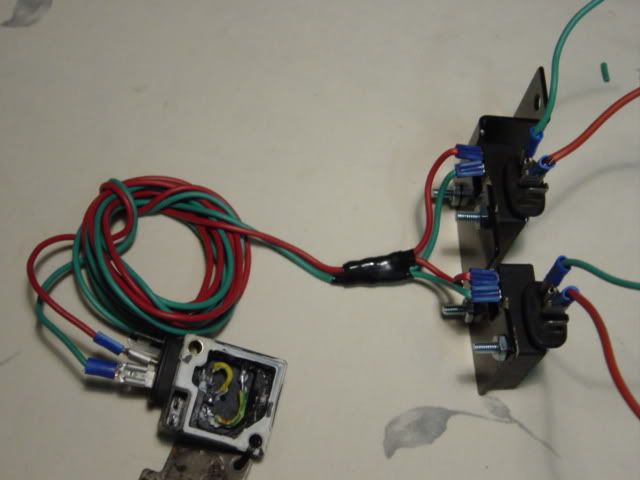
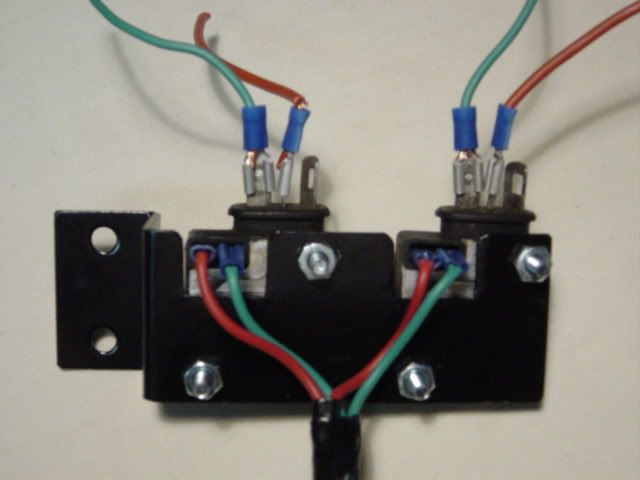
I made up the system Jeff20B outlined for my 2nd gen. It worked fine but the small connectors to the dizzy were a source of problems (another place to loosen). I eventually gutted two bad J-109s and secured them to the dizzy with their screws - no problems since. Use a heat gun to remove the back. The inside will have a silicone slime you must dig out then wipe with parts cleaner. Check continuity and solder the proper terminal ends with a short 1/2" piece of wire. I tried grinding the componets from the aluminum cover until I discovered it is in ceramic. Take a hammer and crack the ceramic and remove the circuit board. I filled the entire cavity with RTV for insulation and a glue for the cover. I have put on about 1000 mi since I did this with no adverse effects. PS After I put the two larger spade connectors on top I used a large piece of heat shrink around the wires AND the metal bracket to secure the wires in place and prevent vibration from loosening them.

Thread Starter
'Nothing like a rotary'
Joined: Jul 2006
Posts: 464
Likes: 0
From: worcester, mass
wow! thats all i can say, that looks freakin great and u used three ignitors, one on the dizzy and two next to the coils im gueesin?, but u ont need an extra one right, ur just ussin that to get a connection right?

Thread
Thread Starter
Forum
Replies
Last Post
Kyo
2nd Generation Specific (1986-1992)
3
Aug 14, 2015 02:00 PM