
Headlight linkage bushings


Joined: Jun 2008
Posts: 8,376
Likes: 30
From: Chino Hills, CA
I don't want to accidentally run afoul of the vendor rules on the site, here, so this is probably a good time to ask folks to PM me if interested. I'll go make sure there's room in my in-box.

I really appreciate this thread . this seems to be a common problem but let me tellyou what I did recently. Such a cheap easy fix ( so far) It is really simple....I took a zip tie, put it on very tight and I greased it....I know, I know....what the ???? but it works...so far...it did not come off and it seens to work just fine......and it cost $0....I mean, what does a zip tie really cost... I used a thick one, not a thin zip tie..
anyway....don't you guys laugh too hard...
chris
anyway....don't you guys laugh too hard...
chris
Joined: Jun 2008
Posts: 8,376
Likes: 30
From: Chino Hills, CA
Anything that works, works, Chris. No laughing on my part; I know too many tricks involving duct tape and zip-ties. It's a good thing Costco sells zip-ties by the pound.
To better illustrate how the 'large' bushings are installed (via epoxy), I popped one of my test rods off the car and shot a couple pix. This one's been installed for about a year.
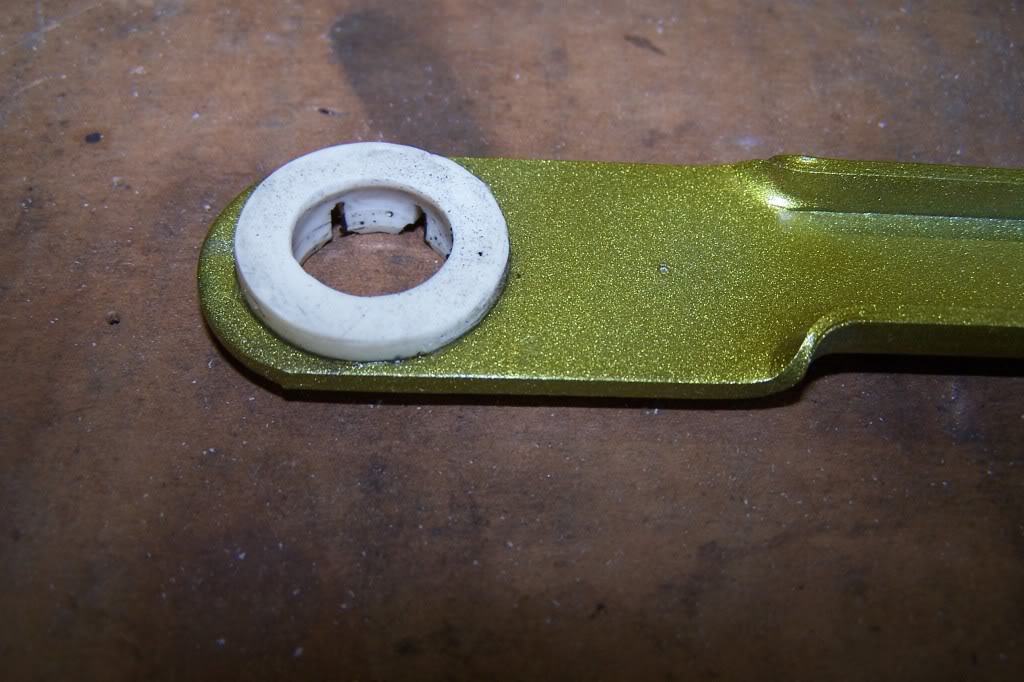
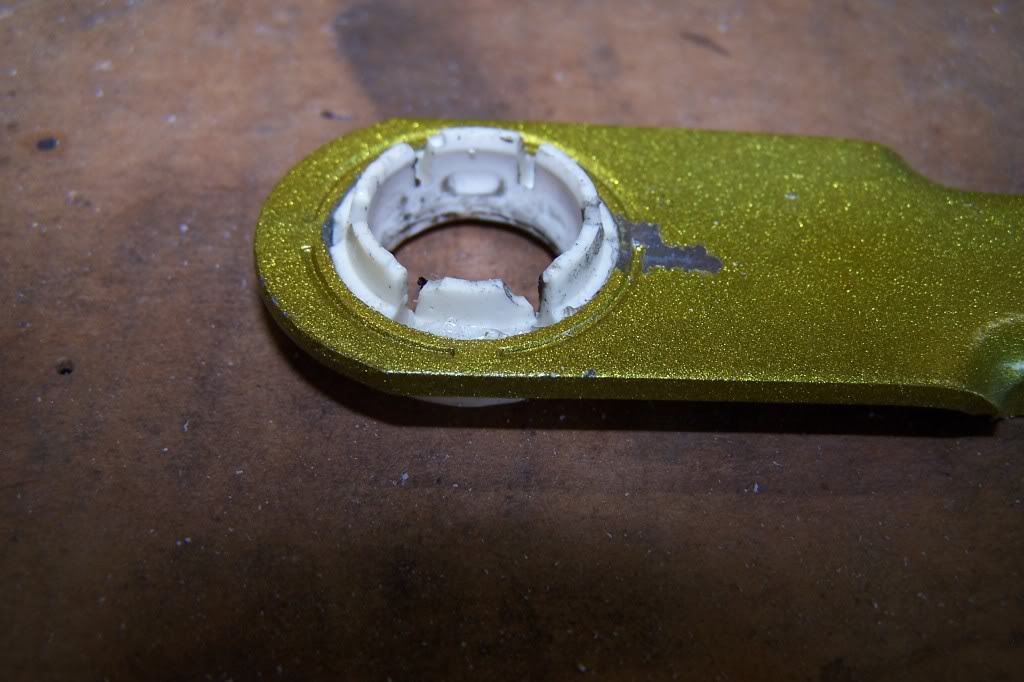
Essentially, the rod gets a thin layer of epoxy for about 1/4" surrounding the back side of the hole, and the new bushing snaps through the hole & is held by the epoxy. A little lithium grease on the inner surface & then they just snap over the pivot *****.
You can see where I had trouble with the first ones with trapped air making the corners look like something had taken bites out of them. Solved that by using a toothpick on each pouring to 'tickle' the bubbles out & up to the surface; ones I'm making now have much cleaner corners.
I ran off a half-dozen sets last weekend; mold is still holding up OK, and I still have my original 'master' bushings so I can make a new mold if need be. The silicone molds do wear out over time & use. I'm trimming and sanding that last batch this week, & they'll start going to folks probably by this weekend.
The wife says it looks like I'm making candy, heh. It's a good thing I'm not trying to make a business out of this, as the amount of hand-work involved would probably make them cost too much to sell at a profit. I'd need a much more time efficient process to make it pay. As it is, I'm happy to be filling a need for the first-gen community & covering costs pretty well.
To better illustrate how the 'large' bushings are installed (via epoxy), I popped one of my test rods off the car and shot a couple pix. This one's been installed for about a year.
Essentially, the rod gets a thin layer of epoxy for about 1/4" surrounding the back side of the hole, and the new bushing snaps through the hole & is held by the epoxy. A little lithium grease on the inner surface & then they just snap over the pivot *****.
You can see where I had trouble with the first ones with trapped air making the corners look like something had taken bites out of them. Solved that by using a toothpick on each pouring to 'tickle' the bubbles out & up to the surface; ones I'm making now have much cleaner corners.
I ran off a half-dozen sets last weekend; mold is still holding up OK, and I still have my original 'master' bushings so I can make a new mold if need be. The silicone molds do wear out over time & use. I'm trimming and sanding that last batch this week, & they'll start going to folks probably by this weekend.
The wife says it looks like I'm making candy, heh. It's a good thing I'm not trying to make a business out of this, as the amount of hand-work involved would probably make them cost too much to sell at a profit. I'd need a much more time efficient process to make it pay. As it is, I'm happy to be filling a need for the first-gen community & covering costs pretty well.
Full Member
Joined: Sep 2010
Posts: 135
Likes: 0
From: USA
Thanks a lot Glenn. I tried the epoxy and I guess I didn't let it harden enough and it came off. So i guess I will try again when I get more epoxy. The quality is high on the pieces and I almost feel bad putting them on.
Joined: Jun 2008
Posts: 8,376
Likes: 30
From: Chino Hills, CA
No problem, sir; Glad I could help.
Make sure the rods and the parts are well clean before applying the epoxy; there might be a little mold release agent still on the bushings, could make them slippery.
Make sure the rods and the parts are well clean before applying the epoxy; there might be a little mold release agent still on the bushings, could make them slippery.
Joined: Jun 2008
Posts: 8,376
Likes: 30
From: Chino Hills, CA

Joined: Jun 2008
Posts: 8,376
Likes: 30
From: Chino Hills, CA
I've nearly got all the currently-requested sets poured, should finish with that tonight, then trimming/sanding/packing.
I can tell the molds are starting to wear a bit at this point; still working OK but a little more cleaning up will be required by hand. Not surprising; I'll have done something like 24, 25 sets out of one mold casting!
I can tell the molds are starting to wear a bit at this point; still working OK but a little more cleaning up will be required by hand. Not surprising; I'll have done something like 24, 25 sets out of one mold casting!

Rotary Enthusiast
Joined: Jul 2002
Posts: 1,119
Likes: 4
From: Virginia
Looking forward to trying these out. Thanks DD.
I was looking at just making my own linkage rods with spherical bearings or rod ends (as I did many years ago). For the wipers that might be a better alternative. It would be less expensive than a stock replacement, and much stronger.
I was looking at just making my own linkage rods with spherical bearings or rod ends (as I did many years ago). For the wipers that might be a better alternative. It would be less expensive than a stock replacement, and much stronger.
wankel wankel
Joined: Oct 2005
Posts: 132
Likes: 0
From: topeka, ks - home of SCCA
RE: Sphericals
I'm also pondering the spherical linkages to replace the stock flat bar with urethane bushings, but would GLADLY purchase a set of the headlight bushings and try to wear them out for you. It's too hot around KS right now, but we do keep getting some rain and the wipers would be so nice to have back before the snow starts to fall, since the '83 GSL is my DD.

Joined: Jun 2008
Posts: 8,376
Likes: 30
From: Chino Hills, CA
Not currently, no - - I've sold or used all of the ones I'd made previously.
I will let you know if I have a chance to brew up another set, but unless I'm doing other casting work at the time, they are pretty time-consumptive to set up for and make. Never was a money-making proposition; just a chance to sell off extras at the time I was making the ones I needed, & recoup some project costs.
I will let you know if I have a chance to brew up another set, but unless I'm doing other casting work at the time, they are pretty time-consumptive to set up for and make. Never was a money-making proposition; just a chance to sell off extras at the time I was making the ones I needed, & recoup some project costs.
Joined: Jun 2008
Posts: 8,376
Likes: 30
From: Chino Hills, CA

acdelco d1906 Nkg 49034


Joined: Aug 2012
Posts: 1,166
Likes: 97
From: huntsville
Buy 3M Window-Weld Super Fast Urethane, Black, 10.5 fl oz Cartridge 08609 at Advance Auto Parts
can I coat the two pieces with a releasing agent (Pam, vegetable oil spray), dip them into the urethane, put them in proper position, wait for the urethane to cure, force the two pieces to move.....and bingo, I solved my window wiper bushing linkage problem??
can I coat the two pieces with a releasing agent (Pam, vegetable oil spray), dip them into the urethane, put them in proper position, wait for the urethane to cure, force the two pieces to move.....and bingo, I solved my window wiper bushing linkage problem??
Last edited by midnight mechanic; May 5, 2013 at 11:33 PM.
i think a 3d printer would work awesome you just need a rendering. you can print with abs plastic. some bearings have plastic cages made out of abs that the ***** ride in.
Buy 3M Window-Weld Super Fast Urethane, Black, 10.5 fl oz Cartridge 08609 at Advance Auto Parts
can I coat the two pieces with a releasing agent (Pam, vegetable oil spray), dip them into the urethane, put them in proper position, wait for the urethane to cure, force the two pieces to move.....and bingo, I solved my window wiper bushing linkage problem??
can I coat the two pieces with a releasing agent (Pam, vegetable oil spray), dip them into the urethane, put them in proper position, wait for the urethane to cure, force the two pieces to move.....and bingo, I solved my window wiper bushing linkage problem??

Joined: Jun 2008
Posts: 8,376
Likes: 30
From: Chino Hills, CA
Yes, but I lack a large-enough vacuum canister. I'll have to throw one together sometime. Cure time on the urethane is so short that I'd have to pump like hell to get decent vacuum, but it's worth a shot.
