
half bridge 12A, with a twist

Thread Starter
Joined: Aug 2001
Posts: 15,725
Likes: 91
From: Near Seattle
You know it. 
All that's left is to clean up an oil pan. Then it goes in the FB for a test run. I'll be pulling the current engine on the next nice day and dropping this one in.
All that's left is to clean up an oil pan. Then it goes in the FB for a test run. I'll be pulling the current engine on the next nice day and dropping this one in.
lol This thread wasn't about showing off a completed project. This thread was about the build progress. The PROGRESS. Which is progressing on time, on schedule. It's actually going kinda fast considering all that I've had to do to get the carbs working on the other engine so one would be ready for this half BP.
It's actually going kinda fast considering all that I've had to do to get the carbs working on the other engine so one would be ready for this half BP.
Thread Starter
Joined: Aug 2001
Posts: 15,725
Likes: 91
From: Near Seattle
This time we can blame it on the rain.
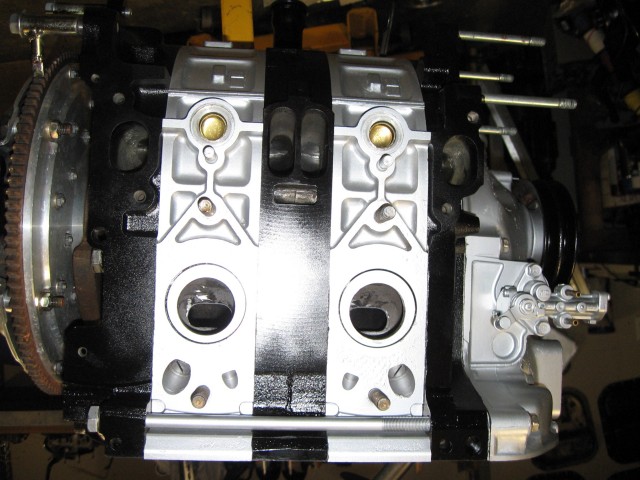
Completed engine, with freeze plugs just installed.

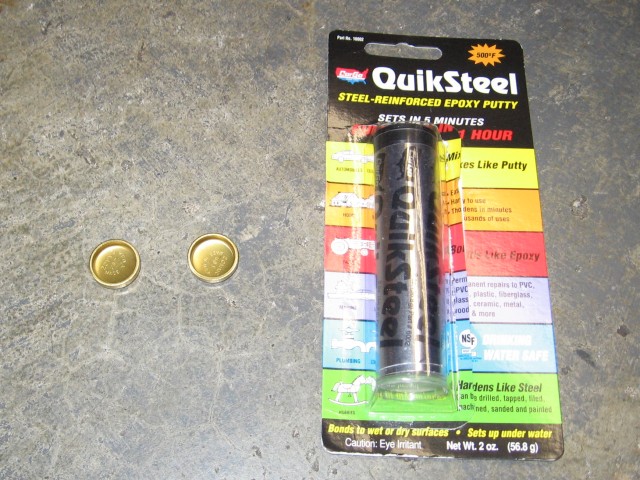
To do the cool manifold mod, get yourself some 20mm freeze plugs and some quicksteel

Goop the holes with a little RTV first. You'll thank me. It acts like a low speed lubricant and seals any imperfections. When I use RTV, these don't leak. Tap them in with a 12mm deepwell socket and BFH with medium to light taps (heavy hammer is better than a light hammer with heavy blows, more control this way).

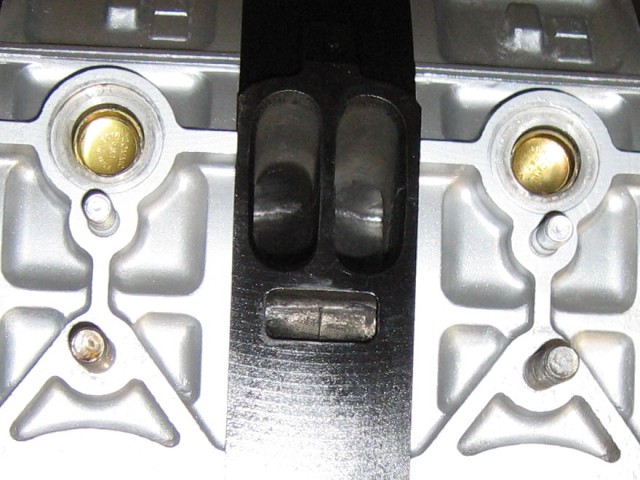
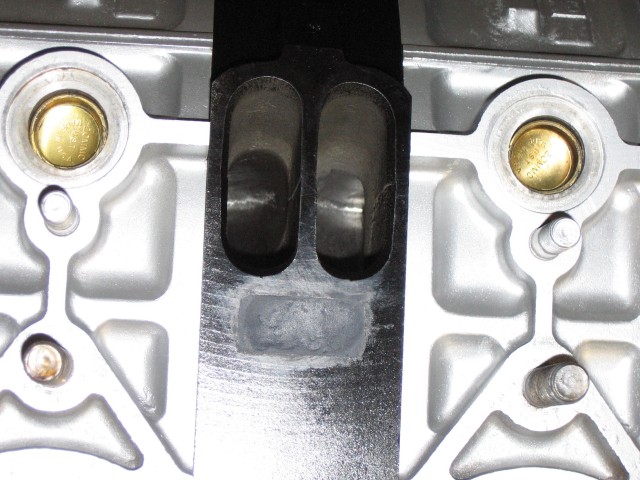
Clean out the ACV port really well, down to bare metal. I like a dremel with a small stone to get in the corners. This needs to be air-tight. I only had to use 1/3" tube of quicksteel here. Push it in and smooth it out before it hardens. I like to use a razor blade to pull it towards the corners and smooth it removing excess so it's flush. This begins to harden in a couple minutes. Be quick but careful.

Completed engine, with freeze plugs just installed.
To do the cool manifold mod, get yourself some 20mm freeze plugs and some quicksteel
Goop the holes with a little RTV first. You'll thank me. It acts like a low speed lubricant and seals any imperfections. When I use RTV, these don't leak. Tap them in with a 12mm deepwell socket and BFH with medium to light taps (heavy hammer is better than a light hammer with heavy blows, more control this way).
Clean out the ACV port really well, down to bare metal. I like a dremel with a small stone to get in the corners. This needs to be air-tight. I only had to use 1/3" tube of quicksteel here. Push it in and smooth it out before it hardens. I like to use a razor blade to pull it towards the corners and smooth it removing excess so it's flush. This begins to harden in a couple minutes. Be quick but careful.
Yeah the pics aren't showing. Probably a server issue. I did a quote on the post and
I see the IMG urls in there. Cut and pasted to a new tab and the pic can't be found.
You may need to just wait or bump a moderator to look into it.
I see the IMG urls in there. Cut and pasted to a new tab and the pic can't be found.
You may need to just wait or bump a moderator to look into it.
Thread Starter
Joined: Aug 2001
Posts: 15,725
Likes: 91
From: Near Seattle
They might be stored incorrectly in the databse, so not sure if a mod could fix it. I'll upload them again.
Completed engine, with freeze plugs just installed.
To do the cool manifold mod, get yourself some 20mm freeze plugs and some quicksteel
Goop the holes with a little RTV first. You'll thank me. It acts like a low speed lubricant and seals any imperfections. When I use RTV, these don't leak. Tap them in with a 12mm deepwell socket and BFH with medium to light taps (heavy hammer is better than a light hammer with heavy blows, more control this way).
Clean out the ACV port really well, down to bare metal. I like a dremel with a small stone to get in the corners. This needs to be air-tight. I only had to use 1/3" tube of quicksteel here. Push it in and smooth it out before it hardens. I like to use a razor blade to pull it towards the corners and smooth it removing excess so it's flush. This begins to harden in a couple minutes. Be quick but careful.
Thread Starter
Joined: Aug 2001
Posts: 15,725
Likes: 91
From: Near Seattle
Quicksteel is extremely stable. It goes in as a putty and holds onto the iron after you clean it up and leave it rough. Gotta get rid of carbon and oil inside the hole.
I've never used JB weld putty so I can't comment on any differences. I like quicksteel because it always works in this application. I use 1/3" to 1/2" tube per ACV port.
I've never used JB weld putty so I can't comment on any differences. I like quicksteel because it always works in this application. I use 1/3" to 1/2" tube per ACV port.
So there's no danger of it falling apart and going into the ACV port? I've been looking for a way to block my ACV port. I was thinking about JB Stick. But, if you've used this for a long time without any failures, maybe I should give it a try.
Thread Starter
Joined: Aug 2001
Posts: 15,725
Likes: 91
From: Near Seattle
I've used classic JB weld before, you know the thin two part epoxy that goes from black and white to gray, but haven't used any of their thick stick weld products.
Yeah, quicksteel has never failed in the ACV port. It doesn't break up or move, but surface prep is important to do, as I'm sure you're aware. It's never failed for me because I take my time prepping the inner surfaces to be filled.
I wouldn't trust it in a carb or intake manifold situation where it could come off and go into the engine. I don't port manifolds because of this. And if I boost prep a carb, I'll use block off plates or cut threads in holes and fill with bolts, screws, NPT plugs etc. As long as there is a way to positively tighten the object I'm using to plug the hole ie crush washer, lock washer or in the case of NPT, tight threads, that's what I use to physically prevent the object from falling out. However when it comes to the ACV port filled with quicksteel, even if it does come loose some day and start leaking, it can't fall into the port. I don't think it's physically possible to fall in due to the shape of the port, unless it breaks up, but once you mess with this stuff you'll see it's actually pretty strong and stable so it's very unlikely to break up.
Before you use it for the first time, do a test batch. Cut off a chunk from the tootsie roll and squish it (mix it) together as instructed (it's like mighty putty as seen on TV!). Then form it into a cylinder shape so you can easily hold it and break it later, but not too thin. Wait for it to fully harden. Then figure out ways to break it. Use fingers, pliers, bench vice. Feel how much effort it takes to break a section. Note how thin it is and figure how much stronger it will be if just a bit thicker. The ACV port is kinda big so that much quicksteel should be plenty stable there.
You can probably use mighty putty or JB stick weld but I prefer quckksteel because I've used it for a while and it always worls for me.
Nice write up. I'm planning on doing this after I finish my work on the manifold. I keep finding coolant up under my carb. Great idea, Mazda.
Where did you find those freeze plugs? The only ones I could find were out of a 350 V8 kit and they were way too big.
Edit: Err... I guess I'll be waiting for the rebuild to fill the ACV port, otherwise any grinding I do in there is going to get chunks of metal in my motor!
Where did you find those freeze plugs? The only ones I could find were out of a 350 V8 kit and they were way too big.
Edit: Err... I guess I'll be waiting for the rebuild to fill the ACV port, otherwise any grinding I do in there is going to get chunks of metal in my motor!

Joined: Mar 2001
Posts: 31,837
Likes: 3,233
From: https://www2.mazda.com/en/100th/
i wish i had thought of this earlier, but the later engines (86+) have front and rear rotor housings, and the difference is the air injection port is only drilled on one side. so if you have say an FD and swap rotor housings front and rear, it actually blocks off the air injection (and it'll never pass smog, ever)
the 81-85 engines, have both sides drilled so there is no front or rear.
the Thermal Reactor engines ARE sided, but i don't know how/where they connect, and more to the point, if you have TR rotor housings and an 81+ center, are they blocked off anyways?
Old [Sch|F]ool


Joined: May 2001
Posts: 12,866
Likes: 573
From: Cleveland, Ohio, USA
The thermal reactor engines pump air into the exhaust ports through the manifold flange... remember, the ACV first puts the air back to the heat exchanger, which then routes the air through the NLA-but-used-to-be-like-$1200 double wall downpipe, which then routed it through the thermal reactor, the little holes under the exhaust ports, then finally into the exhaust ports.
At least, that is how I remember it. No passthrough to the side housings. Now, I have never played with a '80 California engine, maybe those do.
What is sick is that the thermal reactor engines worked better than the catalyst engines at running clean, but the Fed said all cars had to have catalysts period.
Jeff, if you properly clean the surfaces, JB Weld is basically permanent. I use JB Kwik on manifolds because it is much easier to work with and even that gives me no problems. My 4 port-ized 6-port lower manifold has something like three cards worth of JB Kwik in it, filling in about 2/3rds of where the aux ports were as well as where I hacked the aux sleeve **** things off. No problems. I use Quik Steel mainly to extend a manifold to cover the ACV hole because it's easier to use when trying to make an outside element instead of filling in a hole.
Joined: Mar 2001
Posts: 31,837
Likes: 3,233
From: https://www2.mazda.com/en/100th/
The thermal reactor engines pump air into the exhaust ports through the manifold flange... remember, the ACV first puts the air back to the heat exchanger, which then routes the air through the NLA-but-used-to-be-like-$1200 double wall downpipe, which then routed it through the thermal reactor, the little holes under the exhaust ports, then finally into the exhaust ports.
At least, that is how I remember it. No passthrough to the side housings. Now, I have never played with a '80 California engine, maybe those do.
What is sick is that the thermal reactor engines worked better than the catalyst engines at running clean, but the Fed said all cars had to have catalysts period.
J
Thread Starter
Joined: Aug 2001
Posts: 15,725
Likes: 91
From: Near Seattle
You guys are correct. The 80 CA model did have intermediate ACV communication, so you need to fill the ACV port if using an 81+ intermediate or any older normal intermediate meaning, not an NO plate or something with a funky EGR on top like a 6 port 12A. The housings also had a through-hole like the 12AT housings and 6 port 12A housings, sorta. See here:
80 CA exhaust gasket

6 port 12A

12A turbo housing used with TR style gasket. Notice the leak?
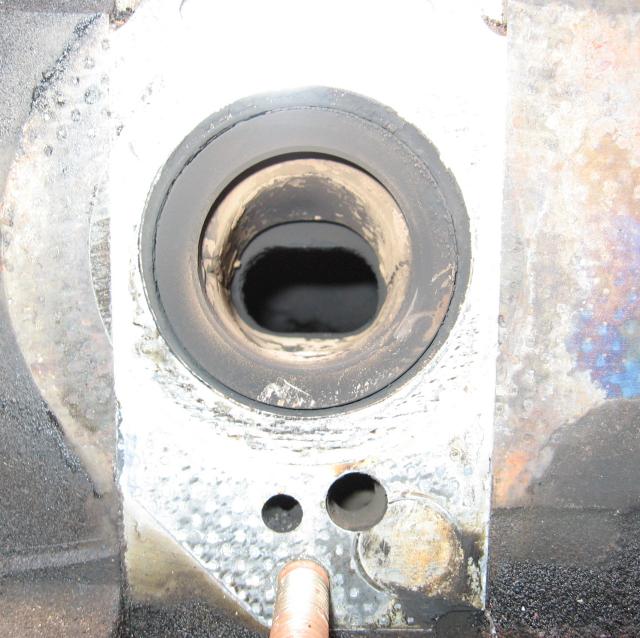
All other thermal reactor engines didn't communicate so you don't need to fill the ACV port on those (I didn't on my baja engine which has the housings from a 76 Cosmo engine). Just make sure the two 45 degree TR holes are covered by an RB exhaust flange. I haven't tried filling these holes yet, but have seen a set from a pineapple racing engine that have been filled with some sort of putty. Hmm...
My next engine build will have a set of J-spec TR 13B housings (they say Automobiles near the 13B mazDa) that are looking to be covered or blocked by something in a creative way. Or I'll use an RB flange.
Then in the future I've got a set of the 13B version of an 80 CA to build. Using them with a set of 74 3B plates which have an 81+ style ACV chamber, so they will be getting filled with quicksteel as the intake manifold is basically a 13B version of an SA channeled manifold, so no cover over the ACV port.
80 CA exhaust gasket
6 port 12A
12A turbo housing used with TR style gasket. Notice the leak?
All other thermal reactor engines didn't communicate so you don't need to fill the ACV port on those (I didn't on my baja engine which has the housings from a 76 Cosmo engine). Just make sure the two 45 degree TR holes are covered by an RB exhaust flange. I haven't tried filling these holes yet, but have seen a set from a pineapple racing engine that have been filled with some sort of putty. Hmm...
My next engine build will have a set of J-spec TR 13B housings (they say Automobiles near the 13B mazDa) that are looking to be covered or blocked by something in a creative way. Or I'll use an RB flange.
Then in the future I've got a set of the 13B version of an 80 CA to build. Using them with a set of 74 3B plates which have an 81+ style ACV chamber, so they will be getting filled with quicksteel as the intake manifold is basically a 13B version of an SA channeled manifold, so no cover over the ACV port.
Thread Starter
Joined: Aug 2001
Posts: 15,725
Likes: 91
From: Near Seattle
Hey I've got a cool update. I test fired the half BP then took it for a test drive. A few interesting observations. First of all, it was actually pretty hard to get started. Partly due to the krazy glue I had to use to keep the apex triangle tips in place. I decided to glue all six, so there were six potentially less than ideal sealing apex seals instead of the three rear seals that I was originally just going to glue. Gluing all six made stacking the engine easier though.
I suspect the other reason(s) for hard starting was that I didn't use oil on the rotor housings because of something Judge Ito said about doing a dry build to test compression so there was no oil to artificially boost the numbers. He got 125psi. I didn't check my numbers (needed a helper to crank the engine while I hold a gauge in a spark plug hole, blah). It would crank fast and be on the edge, but not start. I ended up trying some crappy starting fluid which did nothing, then some WD40 because I had some on hand. No luck. It was probably flooded by then so I pulled the plugs and yep, trailings were wet but leadings were ok. Cleaned and dried both, reinstalled. This time I poored a little bit of 20w50 down the carb primaries. Cranked a bit. Then cranked again and this time it roared to life.
This was just a test fire without a waterpump to make sure it would run. So then I grabbed a waterpump and clutch fan off the shelf and threw on an alternator, filled with coolant and this time just cranked it without anything added down the carb. It was able to fire up on its own. Heh, it just needed a little oil on the rotor housings. Now I know better for next time. Note the side plates did have oil, just not the housings. It's not really about oiling the housings so much as getting oil onto the apex seals to help free them from the glue. Ever seen the insides of a healthy engine? Hardly any oil in there - just a light film everywhere.
It was running for a while then stalled because the choke popped back in. The stock waterpump switch did it. Got it fired back up and this time kept it running with the choke held out with a piece of plastic bushing. I hopped out and started playing with the three screws. Cranked the throttle stop way up so I could let the choke **** fully in so it would stop running unsmoothly. Got it smooth then slowly reduced the idle speed to 1k.
It's pretty smooth for a BP, or is it? Gotta take this beast for a test drive! So I backed out of the driveway and carefully and slowly let the clutch out. Remember I'm testing an aluminum flywheel to see first hand why BDC and peejay both recommend a stock flywheel. It felt a little weak in the low end but accelerated beautifully. I took it up and down the street and then around the block, all the time varying the load and RPM while testing how well it returns to idle and how it handles occasional blasts up to 5k (this engine was perfectly running before so the bearings are healthy enough to do this so early after the build, in my opinion. Only things changed were apex seals and oil seals).
I noticed under light decel it wants to buck a little, but it's just fine and smooth under light cruise. This was the mark I was aiming for, to be a smooth daily driver, and I set out to prove this by using an aluminum flywheel. It passed with flying colors! I'm also using hockey puck motor mounts which are just about as close to solid as you can get without actually being solid. It's plenty smooth enough for me. The light bucking under light decel is not a big deal, really. I suspect when this engine goes to its new home, the stock flywheel and stock motor mounts will improve its manners to where you won't know it's a half BP until you step on it.
That brings me to my final observation. It throws you back in the seat when the secondaries open. You go along in 1st gear, up to about 4k or so, then punch it. Wow!
I'll start it up again soon. Gotta give it a total of four heat cycles, so maybe tomorrow.
By the way, my exhaust system is not ideal to take advantage of this engine's capabilities. The manifold is from a 6 port 12A and is quite small and restrictive. Then it goes through a 2" RE glasspack. Too small. Then it megaphones out to 3" to mate with an existing exhaust under the car. This creates backpressure as the slug of air can't get pushed out very well at low RPM. Then at high RPM the manifold is a restriction. If this engine recieved an RB "streetport" complete exhaust, it would fly.
clifs:
got the half BP runnin today
was hard to start at first, getting easier over time
tested aluminum flywheel
doesn't buck under steady cruise
will buck slightly under light decel only
exhaust system in car is not ideal, but this engine still kicks ***
needs three more heat cycles
needs RB exhuast system
A few interesting observations. First of all, it was actually pretty hard to get started. Partly due to the krazy glue I had to use to keep the apex triangle tips in place. I decided to glue all six, so there were six potentially less than ideal sealing apex seals instead of the three rear seals that I was originally just going to glue. Gluing all six made stacking the engine easier though. I suspect the other reason(s) for hard starting was that I didn't use oil on the rotor housings because of something Judge Ito said about doing a dry build to test compression so there was no oil to artificially boost the numbers. He got 125psi. I didn't check my numbers (needed a helper to crank the engine while I hold a gauge in a spark plug hole, blah). It would crank fast and be on the edge, but not start. I ended up trying some crappy starting fluid which did nothing, then some WD40 because I had some on hand. No luck. It was probably flooded by then so I pulled the plugs and yep, trailings were wet but leadings were ok. Cleaned and dried both, reinstalled. This time I poored a little bit of 20w50 down the carb primaries. Cranked a bit. Then cranked again and this time it roared to life.
This was just a test fire without a waterpump to make sure it would run. So then I grabbed a waterpump and clutch fan off the shelf and threw on an alternator, filled with coolant and this time just cranked it without anything added down the carb. It was able to fire up on its own. Heh, it just needed a little oil on the rotor housings. Now I know better for next time. Note the side plates did have oil, just not the housings. It's not really about oiling the housings so much as getting oil onto the apex seals to help free them from the glue. Ever seen the insides of a healthy engine? Hardly any oil in there - just a light film everywhere.
It was running for a while then stalled because the choke popped back in.
The stock waterpump switch did it. Got it fired back up and this time kept it running with the choke held out with a piece of plastic bushing. I hopped out and started playing with the three screws. Cranked the throttle stop way up so I could let the choke **** fully in so it would stop running unsmoothly. Got it smooth then slowly reduced the idle speed to 1k.It's pretty smooth for a BP, or is it? Gotta take this beast for a test drive! So I backed out of the driveway and carefully and slowly let the clutch out. Remember I'm testing an aluminum flywheel to see first hand why BDC and peejay both recommend a stock flywheel. It felt a little weak in the low end but accelerated beautifully.
I took it up and down the street and then around the block, all the time varying the load and RPM while testing how well it returns to idle and how it handles occasional blasts up to 5k (this engine was perfectly running before so the bearings are healthy enough to do this so early after the build, in my opinion. Only things changed were apex seals and oil seals).I noticed under light decel it wants to buck a little, but it's just fine and smooth under light cruise. This was the mark I was aiming for, to be a smooth daily driver, and I set out to prove this by using an aluminum flywheel. It passed with flying colors! I'm also using hockey puck motor mounts which are just about as close to solid as you can get without actually being solid. It's plenty smooth enough for me.
The light bucking under light decel is not a big deal, really. I suspect when this engine goes to its new home, the stock flywheel and stock motor mounts will improve its manners to where you won't know it's a half BP until you step on it. That brings me to my final observation. It throws you back in the seat when the secondaries open.
You go along in 1st gear, up to about 4k or so, then punch it. Wow!I'll start it up again soon. Gotta give it a total of four heat cycles, so maybe tomorrow.
By the way, my exhaust system is not ideal to take advantage of this engine's capabilities. The manifold is from a 6 port 12A and is quite small and restrictive. Then it goes through a 2" RE glasspack. Too small. Then it megaphones out to 3" to mate with an existing exhaust under the car. This creates backpressure as the slug of air can't get pushed out very well at low RPM. Then at high RPM the manifold is a restriction. If this engine recieved an RB "streetport" complete exhaust, it would fly.
clifs:
got the half BP runnin today
was hard to start at first, getting easier over time
tested aluminum flywheel
doesn't buck under steady cruise
will buck slightly under light decel only
exhaust system in car is not ideal, but this engine still kicks ***
needs three more heat cycles
needs RB exhuast system
Hooray! Congrats on a so-far-successful build. Can't wait to hear what it will do when broken in and made happier with an open exhaust system. And it idled pretty smooth at 1k?
Thread Starter
Joined: Aug 2001
Posts: 15,725
Likes: 91
From: Near Seattle
Thanks! Yes, I turned it down to 850 after the drive but turned it back up to 1k so it will be easier to start tomorrow. I suspect it can idle a lot lower but I'll explore that later.
I'm already mentally planning my next half BP. This one worked so well I should go for it.
I suspect it can idle a lot lower but I'll explore that later.I'm already mentally planning my next half BP. This one worked so well I should go for it.
Joined: Mar 2001
Posts: 31,837
Likes: 3,233
From: https://www2.mazda.com/en/100th/
clifs:
got the half BP runnin today
was hard to start at first, getting easier over time
tested aluminum flywheel
doesn't buck under steady cruise
will buck slightly under light decel only
exhaust system in car is not ideal, but this engine still kicks ***
needs three more heat cycles
needs RB exhuast system
Thread Starter
Joined: Aug 2001
Posts: 15,725
Likes: 91
From: Near Seattle
Thanks! This old school carb didn't come with a dashpot but one could be added, I think. But I've also got hockey puck motor mounts and an aluminum flywheel. When this engine goes to its new home, it will have stock motor mounts and a stock 81-82 flywheel to help absorb some of the bucking. But it's really not that bad. It is only slightly more noticeable than a typical carbed rotary at 2k under light decel, those buck too.
Hey what do you think of my next half BP? It will be a 4 port 13B, 76 reverse runner manifold, 76 Hitachi carb, RB light steel flywheel, full 2.5" exhaust, going into the MG Midget! According to Carl of PB & J Racing, the reverse runner manifolds flow the most. I compared this 76 Hitachi to a bunch of other Hitachis and this one seemed to have the best high RPM. I could leave the primaries (in the end plates) stock to take advantage of the factory calibrated carb and long runner primaries (max torque). Then for the secondaries flowing into the intermediate plate, I'd bridge them the same as I did before, and up the stock jet size from 130 to 150, and stock air bleeds from 90 to 80. I won't have to touch the primaries so it will drive nearly like a stocker. I'll break in this engine in my REPU which is getting a long primary exhaust like we talked about before consisting of 50" to 51" long primary tubes, collecting into 2.5", and I'll break in the light steel flywheel here too, so it's ready to drop in the MG.
The coolest part about this project is if it sucks, I have a spare intermediate plate to throw in. I've never tried a reverse runner manifold on a ported engine like this before, but it has fully separate runners, so you know what that means.

I need a new user title
Joined: Oct 2005
Posts: 2,646
Likes: 1
From: Yaizu, Japan
Joined: Mar 2001
Posts: 31,837
Likes: 3,233
From: https://www2.mazda.com/en/100th/
Thanks! This old school carb didn't come with a dashpot but one could be added, I think. But I've also got hockey puck motor mounts and an aluminum flywheel. When this engine goes to its new home, it will have stock motor mounts and a stock 81-82 flywheel to help absorb some of the bucking. But it's really not that bad. It is only slightly more noticeable than a typical carbed rotary at 2k under light decel, those buck too.
Hey what do you think of my next half BP? It will be a 4 port 13B, 76 reverse runner manifold, 76 Hitachi carb, RB light steel flywheel, full 2.5" exhaust, going into the MG Midget! According to Carl of PB & J Racing, the reverse runner manifolds flow the most. I compared this 76 Hitachi to a bunch of other Hitachis and this one seemed to have the best high RPM. I could leave the primaries (in the end plates) stock to take advantage of the factory calibrated carb and long runner primaries (max torque). Then for the secondaries flowing into the intermediate plate, I'd bridge them the same as I did before, and up the stock jet size from 130 to 150, and stock air bleeds from 90 to 80. I won't have to touch the primaries so it will drive nearly like a stocker. I'll break in this engine in my REPU which is getting a long primary exhaust like we talked about before consisting of 50" to 51" long primary tubes, collecting into 2.5", and I'll break in the light steel flywheel here too, so it's ready to drop in the MG.
The coolest part about this project is if it sucks, I have a spare intermediate plate to throw in. I've never tried a reverse runner manifold on a ported engine like this before, but it has fully separate runners, so you know what that means.
Hey what do you think of my next half BP? It will be a 4 port 13B, 76 reverse runner manifold, 76 Hitachi carb, RB light steel flywheel, full 2.5" exhaust, going into the MG Midget! According to Carl of PB & J Racing, the reverse runner manifolds flow the most. I compared this 76 Hitachi to a bunch of other Hitachis and this one seemed to have the best high RPM. I could leave the primaries (in the end plates) stock to take advantage of the factory calibrated carb and long runner primaries (max torque). Then for the secondaries flowing into the intermediate plate, I'd bridge them the same as I did before, and up the stock jet size from 130 to 150, and stock air bleeds from 90 to 80. I won't have to touch the primaries so it will drive nearly like a stocker. I'll break in this engine in my REPU which is getting a long primary exhaust like we talked about before consisting of 50" to 51" long primary tubes, collecting into 2.5", and I'll break in the light steel flywheel here too, so it's ready to drop in the MG.
The coolest part about this project is if it sucks, I have a spare intermediate plate to throw in. I've never tried a reverse runner manifold on a ported engine like this before, but it has fully separate runners, so you know what that means.