
half bridge 12A, with a twist


Thread Starter
Joined: Aug 2001
Posts: 15,725
Likes: 91
From: Near Seattle
Thanks! I got the housings painted and mostly ported. The stupid emissions tubes are gone now.  Only modern R5 engines had these funky tubes. I think it was Mazda's early attempt at feeding fresh air into the exhaust, or letting exhaust into the ACV chamber. Probably both. These engines had cats, not thermal reactors, and large 17.5mm oil pumps with nitrided side plates and thw 1980 style early electronic ignition (with the fender mounted ignitor box), so they're probably right around the years when we got the US-spec SA22C engines here. Mazda tends to introduce a new rotary to their home market a year or two before it comes over here, allowing them time to make improvements or upgrades etc.
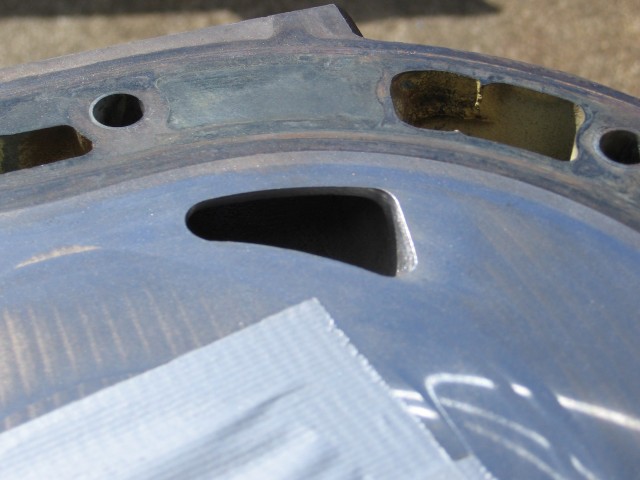
All that's left to do is to finish the exhaust ports with a Judge Ito style bevel and do a final cleaning of the sides of the rotor housings (coolant seal grooves). I'm still debating whether to clean the casting and factory machining marks from the primary ports. We think it will help VE and allow for a strong idle, pehaps even stronger than stock. My thought was the sharp 90 degree edges would give more turbulance, helping the idle, but I've had excellent idle results from port cleanup work before so I think I'll do it. Maybe later today.
Only modern R5 engines had these funky tubes. I think it was Mazda's early attempt at feeding fresh air into the exhaust, or letting exhaust into the ACV chamber. Probably both. These engines had cats, not thermal reactors, and large 17.5mm oil pumps with nitrided side plates and thw 1980 style early electronic ignition (with the fender mounted ignitor box), so they're probably right around the years when we got the US-spec SA22C engines here. Mazda tends to introduce a new rotary to their home market a year or two before it comes over here, allowing them time to make improvements or upgrades etc.All that's left to do is to finish the exhaust ports with a Judge Ito style bevel and do a final cleaning of the sides of the rotor housings (coolant seal grooves). I'm still debating whether to clean the casting and factory machining marks from the primary ports. We think it will help VE and allow for a strong idle, pehaps even stronger than stock. My thought was the sharp 90 degree edges would give more turbulance, helping the idle, but I've had excellent idle results from port cleanup work before so I think I'll do it. Maybe later today.
Old [Sch|F]ool


Joined: May 2001
Posts: 12,870
Likes: 574
From: Cleveland, Ohio, USA
Have you ever driven a high overlap rotary? At low load/low RPM, the bucking can be bad enough to break motor mounts and possibly U-joints. A heavier flywheel will damp out the heavily staccato torque output, which will be reversing between acceleration and deceleration.
Brap sounds cool. It is horrible to drive.
I will admit that the half bridge with 26lb flywheel is easier to coast/cruise while in the brap zone compared to with the aluminum flywheel. I never really do it because ever since my experiences with the carbureted peripheral port (which was BAD for bucking at anything less than full throttle), when I drive I basically keep the engine loaded down even if it means shifting at 1800-2000rpm in traffic, and then cruise in neutral. But I did do it a couple times with the GSL-SE flywheel and I found that the engine is a lot more pleasant while it is doing its "I am really unhappy about running right now" thing, compared with the aluminum flywheel.
Again, drivability has zero to do with power output and everything to do with manners.
Maybe this will shed more light on my philosophy of killing as much vacuum as possible on the secondary side at idle... the more the engine relies on the bridge ports for idling and light cruise, the lower the vacuum will be there and the less it will brap, and therefore the better it will drive. Basically I leave the primaries un-bridged because that way the fuel injectors are not exposed to high overlap, which makes tuning a lot easier.
Old [Sch|F]ool
Joined: May 2001
Posts: 12,870
Likes: 574
From: Cleveland, Ohio, USA
This time only bridge the secondaries (go bigger than BDC!) and go way out of your way to insure there is no communication from primary to secondary. Also run four injectors, staged, this time.  Get a newer MS if you have to. My 2.0 board works great with high z injectors staged to come on at 4k or whatever.
Get a newer MS if you have to. My 2.0 board works great with high z injectors staged to come on at 4k or whatever.No injected manifold has primary/secondary communication. The carb manifolds have to because the primary runners are too small to flow everything the primary barrels can flow, and vise-versa for the secondaries. And there's really nothing that can be done to fix that, because of the way the manifold is shaped - it would be very hard to make the primary runners larger in area without hurting flow quality.
(Two separate posts because it's two separate subjects!)
And whoever said that the FB intake manifolds have only one channel wasn't paying too much attention. There is a channel, it is just under the shutter valve. If the channel was above the shutter valve butterfly, it wouldn't work as intended, it would just force the air from the primary barrel to go to the secondary side instead of closing the rotor off entirely.
Thread Starter
Joined: Aug 2001
Posts: 15,725
Likes: 91
From: Near Seattle
Rotor housings ported and painted
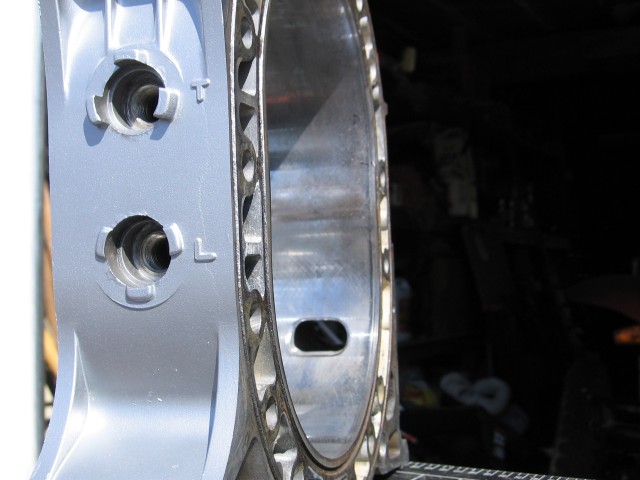
Emissions tubes removed (this works fine as proven on PercentSevenC's R5 13B with S5 turbo)

I decided it's best to clean up the primary ports
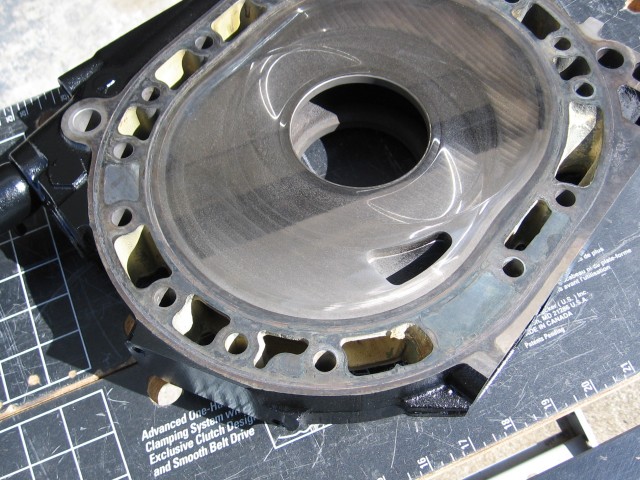
Very nice results (Sorry it's hard to see, the sun was really bright) but I've done cleanups like this before and the engine fired up first time in half a crank. No joke. It overpopulated my senses.
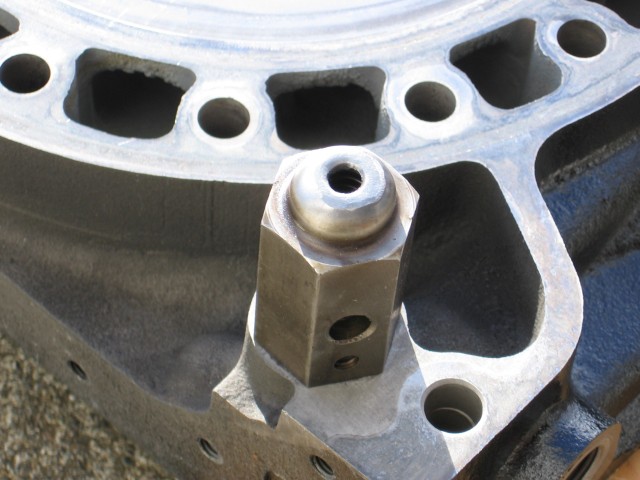
Smashed rear oil pressure regulator for higher oil pressure. It largely depends on bearing clearances, oil pump wear etc. The bearings of this engine are in excellent shape. The oil pump is a little worn though (scratches on the rotors) so I'll throw in a better looking one. I'd estimate this engine should make anywhere from 75 to 85 psi. Perfect for running 3mm Atkins apex seals up to 7500 to 8k.
Not pictured are the Atkins apex seals glued together with superglue (instant krazy glue is what I used). Thanks trochoid for the note about doing it on a pane of glass. It worked great! I trimmed the excess glue with a razor blade and I'll test fit them in the rotors today. I decided to do all six so I don't have to worry about the little triangle tips popping up while installing the intermediate plate. That's always a bother.
Did you guys hear about the BP 12A Judge Ito recently put in a B2200? He did a dry build (no oil or assembly lube) to get a true test of psi on a fresh rebuild without oil artificially increasing the number. It got 125psi. He said it fired up on half a crank. Hey that's familiar territory! When I build engines I use a little bit of 20w50 on the side plate faces and on the bearings so they're not dry and won't create a ton of friction (or heat which could cause the seals to bind/stick) during cranking to get oil pressure up before test firing. But that is all. Near smokeless first startup. Never a worry about oil fouled plugs or any other typical fresh rebuild problems that everyone always complains about. The amount of oil on everything is the same as a healthy running engine so I see no need for assembly lube and especially no need for vasoline. That stuff doesn't even really lube anything and I don't require it to hold in any seals, so I simply don't use it. Maybe a little wheel bearing grease to hold stubborn coolant seals in place, but that's it.
Emissions tubes removed (this works fine as proven on PercentSevenC's R5 13B with S5 turbo)
I decided it's best to clean up the primary ports
Very nice results (Sorry it's hard to see, the sun was really bright) but I've done cleanups like this before and the engine fired up first time in half a crank. No joke. It overpopulated my senses.
Smashed rear oil pressure regulator for higher oil pressure. It largely depends on bearing clearances, oil pump wear etc. The bearings of this engine are in excellent shape. The oil pump is a little worn though (scratches on the rotors) so I'll throw in a better looking one. I'd estimate this engine should make anywhere from 75 to 85 psi. Perfect for running 3mm Atkins apex seals up to 7500 to 8k.
Not pictured are the Atkins apex seals glued together with superglue (instant krazy glue is what I used). Thanks trochoid for the note about doing it on a pane of glass. It worked great! I trimmed the excess glue with a razor blade and I'll test fit them in the rotors today. I decided to do all six so I don't have to worry about the little triangle tips popping up while installing the intermediate plate. That's always a bother.
Did you guys hear about the BP 12A Judge Ito recently put in a B2200? He did a dry build (no oil or assembly lube) to get a true test of psi on a fresh rebuild without oil artificially increasing the number. It got 125psi. He said it fired up on half a crank. Hey that's familiar territory! When I build engines I use a little bit of 20w50 on the side plate faces and on the bearings so they're not dry and won't create a ton of friction (or heat which could cause the seals to bind/stick) during cranking to get oil pressure up before test firing. But that is all. Near smokeless first startup.
Never a worry about oil fouled plugs or any other typical fresh rebuild problems that everyone always complains about. The amount of oil on everything is the same as a healthy running engine so I see no need for assembly lube and especially no need for vasoline. That stuff doesn't even really lube anything and I don't require it to hold in any seals, so I simply don't use it. Maybe a little wheel bearing grease to hold stubborn coolant seals in place, but that's it.

Joined: Mar 2001
Posts: 31,837
Likes: 3,234
From: https://www2.mazda.com/en/100th/
i ran out of vaseline, and started using redline assembly lube instead, and much less smoke!
i also crank the engine with no plugs until there is oil pressure, so it does spit a lot of boogers out
i also crank the engine with no plugs until there is oil pressure, so it does spit a lot of boogers out
Joined: Mar 2001
Posts: 31,837
Likes: 3,234
From: https://www2.mazda.com/en/100th/
Drivability has nothing to do with low end torque.
Have you ever driven a high overlap rotary? At low load/low RPM, the bucking can be bad enough to break motor mounts and possibly U-joints. A heavier flywheel will damp out the heavily staccato torque output, which will be reversing between acceleration and deceleration.
Brap sounds cool. It is horrible to drive.
.
the odd part is when its idling normally, and you let the clutch out, it has like no power!
let the clutch out when its brapping, and its fine.
once your foot is off the clutch though, pj is right, peepers is nice about it.... mazda would have a graph of throttle position vs rpm vs brap.
Old [Sch|F]ool
Joined: May 2001
Posts: 12,870
Likes: 574
From: Cleveland, Ohio, USA
When I assemble an engine I put assembly grease on the bearings and the oil O-rings, I leave the side/corner/apex seals dry so they don't interfere with the sealant on the housing interfaces.
When I do this, you cannot turn the engine by hand! It's scary every time. After the engine has sat for a day or so, I squirt oil into all the ports and plug holes and spin the engine around until it's 100% smooth and I hear six strong "PAH" coming out of the exhaust ports.
So when I originally read about what Ito did, I was scared!
Thread Starter
Joined: Aug 2001
Posts: 15,725
Likes: 91
From: Near Seattle
I noticed that too. Right after my engines go together they are hard to spin by hand. Then after a day or two they get smooth on their own. It must be from the oil creeping across all the surfaces over time. Then I get six strong air whistle noises coming from the spark plug holes.
Old [Sch|F]ool
Joined: May 2001
Posts: 12,870
Likes: 574
From: Cleveland, Ohio, USA
I only let them sit so the sealant has time to set up before I let oil contact it, that's all.
My first engine (ten years ago last month) was with Hylomar and a Mazda engine gasket set, everything after that has been electric wire and Right Stuff. Although, I didn't do another engine until 2006 or so, whenever p-port phase 1 was completed.
After last year's plethora of engine rebuilds, I'm good and sick of trying to clean Right Stuff off of housings. Takes forever, requires lots of elbow grease and usually destroys a few wire brushes in the process. I'm going to try Hylomar and Viton cord now. Bought a bunch of it, made cutting guides out of 3/16" brake line just like we have at the machine shop for exact-fit cutting of stainless wire for block O-ringing.
Thread Starter
Joined: Aug 2001
Posts: 15,725
Likes: 91
From: Near Seattle
My first engine went together in 2003 and it had hylomar. I've never used wire as coolant seals. I've always saved up for a gasket set. It can get pricey.
The engine went together in 15 minutes and a few more minutes to torque the tension bolts. Having glued apex seals was pretty interesting for me. You just slide them in like carbons.
As I hand cranked it, it was stiff as I was expecting. Then I heard a ping. It was one of the apex seals separating. I cranked and poked a finger through the exhaust ports to feel each apex seal. Five were easy to push. One was stiff or kinda normal feeling. I assume the stiff one separated. I've had engines where one rotor had stiffer apex springs than the other.
How long does it take for the glue to weaken after fire up? Something tells me my goal of starting in half a crank might not happen if they take a while to separate. Thoughts?
Now I'm setting end play. Gonna aim for .002"
The engine went together in 15 minutes and a few more minutes to torque the tension bolts. Having glued apex seals was pretty interesting for me. You just slide them in like carbons.
As I hand cranked it, it was stiff as I was expecting. Then I heard a ping.
It was one of the apex seals separating. I cranked and poked a finger through the exhaust ports to feel each apex seal. Five were easy to push. One was stiff or kinda normal feeling. I assume the stiff one separated. I've had engines where one rotor had stiffer apex springs than the other.How long does it take for the glue to weaken after fire up? Something tells me my goal of starting in half a crank might not happen if they take a while to separate. Thoughts?
Now I'm setting end play. Gonna aim for .002"
Old [Sch|F]ool
Joined: May 2001
Posts: 12,870
Likes: 574
From: Cleveland, Ohio, USA
I never really had luck with gluing, I generally always just stuck the corner piece down in there and crossed fingers. Obviously, this works extremely easily with extended corner piece seals, but it can be done with Mazda seals too, thanks to the magic of coolant seal stick-up as well as the fact that the triangle piece is actually trapezoidal.
Just expect swearing when dropping the eccentric shaft in... unless you're 100% dead nuts, you'll bump the rotor and sometimes bumping the rotor makes a triangle piece fly off, usually down into one of the coolant jackets.
Now here's something that may blow your mind. It's really easy to put the seals in without gluing, if you put them in backwards. Put the triangle pieces in the rotors, add the rotor housing to the stack, slide in the apex spring with tweezers or a good needlenose, then slide the apex seal over the spring. Nothing can sproing or otherwise go anywhere. Of course, I found this out doing the current relieved half-bridge, so in other words, I discovered it on the last half of the last engine I've assembled so far...
Oh: My 4-port 13B will have a Nikki. Debating on whether it should be full- or half-bridge.
Thread Starter
Joined: Aug 2001
Posts: 15,725
Likes: 91
From: Near Seattle
Looks like someone wrote in BRAP.
Ok the end play is set. The front cover is on. The aluminum flywheel is on. I'll install the pressure plate tomorrow.
peejay, yeah I usually push the corner pieces down and hope for the best. That's why I like the Atkins long ones because they're less likely to pop out and down into the water jacket. I usually slather a bit of wheel bearing grease on them and across the corner seals to keep them from going too far if they do jump up. That's saved me a couple of times.
I lift the shaft up with a scizzor jack and a 1x1 block of wood to get the intermediate plate on. going up is easy. Putting it down while gravity is pulling the intermediate plate down isn't as it tends to bind on the dowel pins.
Upside down apex seals without glue eh? I might test that at some point if I do another half BP. It depends on how well this one works out. I've got a 4 port 13B that's getting a reverse runner 76 manifold. This means my intermediate plate would get the bridges. That would kinda make the engine incompatible if I ever had to swap on a normal manifold.
Which manifold will you use on your 4 port 13B? Is the engine a stretched 12A like you like to call the early 4 port 13Bs, or just a T2 that's missing a turbo? Hopefully your manifold will have zero communication.
One note about Nikkis. Most that you will find out there came stock on channeled manifolds. That means their fuel jets, air bleeds, idle circuits and slow air bleeds #1 and #2 are calibrated specifically for a channeled manifold.
The old school Nikki that came stock on my separate runner manifold turned out to run better on a channled manifold. It went from a high weak super rich idle, that you couldn't tune away using the three screws on the outside, to a low, strong, much smoother idle that doesn't stink anymore. It lets you rev strongly up to where the secondaries open and it's quite impressive to see without an air filter. One note is I swapped the primary #1 and #2 slow air bleeds to a set from a 79 parts carb (remember 79 manifolds have channels). For fuel jets this old school carb came stock with 94 primaries and 150 secondaries as it was intended to go on a separate runner manifold. The air bleeds were 80 primary and 160 secondary (that's big for air bleeds!). A typical channeled Nikki will have fuel jets of 92 primaries and 160 secondaries. The air bleeds can be 60, 70, 80 or 90 primary and secondaries will be 140 (or 120 in rare cases). See how channeled Nikkis have smaller primary and larger secondary fuel jets? So since the engine is ported, I kept the 94 primaries and swapped in some 160 secondaries. For air bleeds, I kept the 80 primaries and swapped in some 140 secondaries. Now it's just about as close to a 79 carb as you can get.
Likewise another old school Nikki that came on an early channeled manifold (glazedham42 now has the mani) ran very well on the separate runner manifold. Its idle was low, strong, smooth and didn't stink. What does that tell you? This carb had typical 92 primaries, 160 secondaries, the air bleeds were again typical 80 primaries and slightly rare 120 secondaries.
Because this other old school "channeled" carb is going on a separate runner manifold, I know I can get away with larger primary fuel jets, but instead of the secondaries needing to be 150s due to sep runners, since it's got bridgeported secondaries, I upped them the 170s. I can still swap them down to 160s if necessary. The primaries are supposed to be 94s but again since this carb is to be used at higher RPM, I chose to go with 95s. For air bleeds I think I went with 70 primaries to allow more fuel up high, but I may need to drop them down to 80s or 90s. Some tuning, once running, is in order. Secondary air bleeds have been swapped to 120s, but typical sep runner carbs have very high numbers on their secondary air bleeds; I'll have to get it running and see how close my educated guesses were.
Ok the end play is set. The front cover is on. The aluminum flywheel is on. I'll install the pressure plate tomorrow.
peejay, yeah I usually push the corner pieces down and hope for the best. That's why I like the Atkins long ones because they're less likely to pop out and down into the water jacket. I usually slather a bit of wheel bearing grease on them and across the corner seals to keep them from going too far if they do jump up. That's saved me a couple of times.
I lift the shaft up with a scizzor jack and a 1x1 block of wood to get the intermediate plate on. going up is easy. Putting it down while gravity is pulling the intermediate plate down isn't as it tends to bind on the dowel pins.
Upside down apex seals without glue eh? I might test that at some point if I do another half BP. It depends on how well this one works out. I've got a 4 port 13B that's getting a reverse runner 76 manifold. This means my intermediate plate would get the bridges. That would kinda make the engine incompatible if I ever had to swap on a normal manifold.
Which manifold will you use on your 4 port 13B? Is the engine a stretched 12A like you like to call the early 4 port 13Bs, or just a T2 that's missing a turbo? Hopefully your manifold will have zero communication.
One note about Nikkis. Most that you will find out there came stock on channeled manifolds. That means their fuel jets, air bleeds, idle circuits and slow air bleeds #1 and #2 are calibrated specifically for a channeled manifold.
The old school Nikki that came stock on my separate runner manifold turned out to run better on a channled manifold. It went from a high weak super rich idle, that you couldn't tune away using the three screws on the outside, to a low, strong, much smoother idle that doesn't stink anymore. It lets you rev strongly up to where the secondaries open and it's quite impressive to see without an air filter.
One note is I swapped the primary #1 and #2 slow air bleeds to a set from a 79 parts carb (remember 79 manifolds have channels). For fuel jets this old school carb came stock with 94 primaries and 150 secondaries as it was intended to go on a separate runner manifold. The air bleeds were 80 primary and 160 secondary (that's big for air bleeds!). A typical channeled Nikki will have fuel jets of 92 primaries and 160 secondaries. The air bleeds can be 60, 70, 80 or 90 primary and secondaries will be 140 (or 120 in rare cases). See how channeled Nikkis have smaller primary and larger secondary fuel jets? So since the engine is ported, I kept the 94 primaries and swapped in some 160 secondaries. For air bleeds, I kept the 80 primaries and swapped in some 140 secondaries. Now it's just about as close to a 79 carb as you can get.Likewise another old school Nikki that came on an early channeled manifold (glazedham42 now has the mani) ran very well on the separate runner manifold. Its idle was low, strong, smooth and didn't stink. What does that tell you? This carb had typical 92 primaries, 160 secondaries, the air bleeds were again typical 80 primaries and slightly rare 120 secondaries.
Because this other old school "channeled" carb is going on a separate runner manifold, I know I can get away with larger primary fuel jets, but instead of the secondaries needing to be 150s due to sep runners, since it's got bridgeported secondaries, I upped them the 170s. I can still swap them down to 160s if necessary. The primaries are supposed to be 94s but again since this carb is to be used at higher RPM, I chose to go with 95s. For air bleeds I think I went with 70 primaries to allow more fuel up high, but I may need to drop them down to 80s or 90s. Some tuning, once running, is in order. Secondary air bleeds have been swapped to 120s, but typical sep runner carbs have very high numbers on their secondary air bleeds; I'll have to get it running and see how close my educated guesses were.
Old [Sch|F]ool
Joined: May 2001
Posts: 12,870
Likes: 574
From: Cleveland, Ohio, USA
I put the eccentric shaft and center housing on as one assembly. One hand on the shaft, one hand on the housing, and the housing is steadied by my hip or my knee, depending on if I'm assembling the engine over a couple blocks of wood or if I have an actual engine stand.
One of these days I want to try stacking backwards, just because that will make it easier to drop the e-shaft in.
The jets and bleeds will not matter. I'm going to use a ported 12A manifold I think I still have lying around. (If not, I have like three 79-80 manifolds and two or three FB units) And the Nikki will be hulled out and used as a throttle body and a place to put an air filter, since I'm going to stay fuel injected. I never, ever, ever had dust ingestion problems with the Big Blue Donut and I want to use it again.
And this bad boy will mate the two: http://cgi.ebay.com/ebaymotors/ws/eB...=STRK:MEWNX:IT
That's why I am kind of thinking, just go with a mild full bridge.
Thread Starter
Joined: Aug 2001
Posts: 15,725
Likes: 91
From: Near Seattle
I always build engines with the front rotor and e-shaft already installed before the front rotor housing goes on. I'd hate to have a shaft not wanting to go in a rotor that's not perfectly centered when you've got the extra weight of an intermediate plate to deal with. I think of the bearings and how soft they are. If you force a shaft in, it can scrape across the bearing material. You've also got three loaded apex seals adding their own english to the equation.
Oh that's right. You had mentioned gutting a Nikki to use as a simple TB. You were thinking about going alpha-n due to a lack of TPS. Still planning on that? Or maybe a GM TPS?
Only problem with using an SA or FB manifold is the channels, and their primary runners flow so poorly that blocking the channles is a no-no, as you know. Hmm, maybe ask around the forum for a spare 70s Hitachi manifold with separate runners and just drill a Nikki stud pattern. I will do exactly that in a reverse runner manifold for a friend's planned blow through Nikki (it will allow a turbo to fit closer to the engine in a cramped engine bay). I had previously cut channels in it but decided that I'll use a sep runner carb, so I filled the channels with quicksteel (and a steel 6mm x 1.00 stud with a slot for a flat head screwdriver to crank it in there, and to add stability like a rebar, so if it does come loose it won't go into the engine). The nice thing about using a Nikki is I can re open the channels and not worry about the quicksteel coming loose. Oh and I have a drillpress now for straight accurate studs lol. The set I did last time would have required a couple of holes in the Nikki TB to be wallowed out a bit.
Or just go full bridge and be happy.
Oh that's right. You had mentioned gutting a Nikki to use as a simple TB. You were thinking about going alpha-n due to a lack of TPS. Still planning on that? Or maybe a GM TPS?
Only problem with using an SA or FB manifold is the channels, and their primary runners flow so poorly that blocking the channles is a no-no, as you know. Hmm, maybe ask around the forum for a spare 70s Hitachi manifold with separate runners and just drill a Nikki stud pattern. I will do exactly that in a reverse runner manifold for a friend's planned blow through Nikki (it will allow a turbo to fit closer to the engine in a cramped engine bay). I had previously cut channels in it but decided that I'll use a sep runner carb, so I filled the channels with quicksteel (and a steel 6mm x 1.00 stud with a slot for a flat head screwdriver to crank it in there, and to add stability like a rebar, so if it does come loose it won't go into the engine). The nice thing about using a Nikki is I can re open the channels and not worry about the quicksteel coming loose.
Oh and I have a drillpress now for straight accurate studs lol. The set I did last time would have required a couple of holes in the Nikki TB to be wallowed out a bit.Or just go full bridge and be happy.
Old [Sch|F]ool
Joined: May 2001
Posts: 12,870
Likes: 574
From: Cleveland, Ohio, USA
At any rate, doesn't matter. I'll just adapt the bad old plunger style TPS.
Only problem with using an SA or FB manifold is the channels, and their primary runners flow so poorly that blocking the channles is a no-no, as you know.
Why is that a problem? I proved that individual runners are bad for that manifold design. It's not the carb's fault, it's the manifold's fault. Nothing can be done about it but to roll with it.
Thread Starter
Joined: Aug 2001
Posts: 15,725
Likes: 91
From: Near Seattle
It's been a while since I messed with my MegaSquirt. lol
I meant the above in the context of using it on a half BP, but you said you're going full mild bridge so it doesn't matter. Use your ported manifold.
I meant the above in the context of using it on a half BP, but you said you're going full mild bridge so it doesn't matter. Use your ported manifold.
Joined: Mar 2001
Posts: 31,837
Likes: 3,234
From: https://www2.mazda.com/en/100th/
my engine build thing for years was a milk crate. it has a steel band around the top, and the holes for the handles are really big.
so you put the crate on its side, the front plate goes on such that the eshaft goes thru the hand hole.
when it comes time to put the center plate on, you can put the jack from the car in there and raise the shaft up right where you need it.
i do have the factory tool, which is a lot like the adapted engine stands people use. the front iron bolts up on the AC/PS bracket pad, and you just tilt the front plate at a 45 degree angle, move the eshaft and it will stay where it is.
its nice to build the engine on the stand, but its such a PITA to get the engine OFF the stand, i like the milk crate better
Old [Sch|F]ool
Joined: May 2001
Posts: 12,870
Likes: 574
From: Cleveland, Ohio, USA
Whine whine, two months... it was over a year for me to do my first peripheral port.
I think my one friend's Audi build thread has been going on for six years now. His goal this year is to drive it, but it still needs to be painted and wired and such, it's still a bare shell but at least he finally got done with the suspension and drivetrain. Oh yeah, he wants to redo the rear diff and mount arrangement, I forgot that part.
On Motorgeek there are currently like four or five short wheelbase Audi projects going on, all of them are ancient but still progressing It makes me laugh when people on other forums are all "Check out my modz thread yo, here's fifteen ultra high res pics of when I did the orange washer solvent mod" and then I go to MG and see "okay, I cut 13 inches of wheelbase out of my rare 30 year old Audi today and welded it back together, I took a couple blurry cell phone pics while I waited for a friend to help me get it off of the rotisserie I made last week"
I think my one friend's Audi build thread has been going on for six years now. His goal this year is to drive it, but it still needs to be painted and wired and such, it's still a bare shell but at least he finally got done with the suspension and drivetrain. Oh yeah, he wants to redo the rear diff and mount arrangement, I forgot that part.
On Motorgeek there are currently like four or five short wheelbase Audi projects going on, all of them are ancient but still progressing
It makes me laugh when people on other forums are all "Check out my modz thread yo, here's fifteen ultra high res pics of when I did the orange washer solvent mod" and then I go to MG and see "okay, I cut 13 inches of wheelbase out of my rare 30 year old Audi today and welded it back together, I took a couple blurry cell phone pics while I waited for a friend to help me get it off of the rotisserie I made last week"
Thread Starter
Joined: Aug 2001
Posts: 15,725
Likes: 91
From: Near Seattle
lol This thread wasn't about showing off a completed project. This thread was about the build progress. The PROGRESS. Which is progressing on time, on schedule. It's actually going kinda fast considering all that I've had to do to get the carbs working on the other engine so one would be ready for this half BP.
It's actually going kinda fast considering all that I've had to do to get the carbs working on the other engine so one would be ready for this half BP.