
got a ? for people with a 13B in a 12A car...

Thread Starter
Bimmer *****
Joined: Jun 2002
Posts: 2,199
Likes: 1
From: Plano, TX
got a ? for people with a 13B in a 12A car...
i've got my SE engine almost ready to go in(waiting for the paint on the motor mount to dry), and i'm worried about 1 thing... i've modified my motor mount as per i was told would work, basically hammered it flat... but i'm worried that the GSL-SE oil pan might not clear my 12A subframe? has anyone had a problem with this? if so, what did you do to fix it? only thing i could think would be a hammer and a lot of pounding lol... let me know
no clever remarks...
Joined: Dec 2004
Posts: 778
Likes: 0
From: WA State
You should not have an issue with it clearing if you nothed the motor mounts correctly to fit in the SE engine. In fact the SE oil pan is a recommended part to use when swaping a 13b into a 12a.
Thread Starter
Bimmer *****
Joined: Jun 2002
Posts: 2,199
Likes: 1
From: Plano, TX
Originally Posted by rmriggin
You should not have an issue with it clearing if you nothed the motor mounts correctly to fit in the SE engine. In fact the SE oil pan is a recommended part to use when swaping a 13b into a 12a.
 disassembled my water pump, it sure was rusty in there... its all cleaned up now, gonna be running evans NPG+, so i don't think rust will turn into an issue again... but i had to stop for the day, i have to go to a hardware store tomorrow and get some nuts and bolts... and still gotta port match my intake manifold to my motor(got a 12A center cast iron, it external ports r huge, my RB manifold doesn't match up there heh....) so tomorrow might be a big day for my 84 GSL that hasn't had a motor in it in 6 years... yay
How About A Cup Of STFU
Joined: Sep 2004
Posts: 1,552
Likes: 0
From: ALBANY, GA
Originally Posted by rmriggin
You should not have an issue with it clearing if you nothed the motor mounts correctly to fit in the SE engine. In fact the SE oil pan is a recommended part to use when swaping a 13b into a 12a.
Actually BEFORE YOU PUT THE MOTOR BACK IN!!!!!!!!! READ THIS!
YOU have to Cut the front corner OFF the motor mount itself, the little black disk that covers the rubber mount on the subframe. If you do not the oil pan and front cover will not go forward all the way resulting in a motor and tranny that are cocked to the side. Trust me I just did this and forgot to cut the mount itself and now I have to go back and do it...
BTW- why did you hammer the mount bar when you could have just slotted the holes instead? Are you sure you got 20mm of clearance?
Anyways good luck with the install and keep us posted. BTW are you retaining the EFI or chickening out and going carb?
Why don't you just use the front engine bracket from Racing Beat?
Front Engine Mount -13B engine into a 12A Chassis
Part Number: 11832
Retail Price: $85.00
Only $85.00 and you don't have to modify anything. Look on their site http://www.racingbeat.com/FRmazda1.htm under engine externals.
Front Engine Mount -13B engine into a 12A Chassis
Part Number: 11832
Retail Price: $85.00
Only $85.00 and you don't have to modify anything. Look on their site http://www.racingbeat.com/FRmazda1.htm under engine externals.
Whack 'em and stack 'em
Joined: Mar 2003
Posts: 1,373
Likes: 0
From: Clarksburg/Bridgeport WV- North Central Appalachia
Originally Posted by 13btnos
Why don't you just use the front engine bracket from Racing Beat?
Front Engine Mount -13B engine into a 12A Chassis
Part Number: 11832
Retail Price: $85.00
Only $85.00 and you don't have to modify anything. Look on their site http://www.racingbeat.com/FRmazda1.htm under engine externals.
Front Engine Mount -13B engine into a 12A Chassis
Part Number: 11832
Retail Price: $85.00
Only $85.00 and you don't have to modify anything. Look on their site http://www.racingbeat.com/FRmazda1.htm under engine externals.
Trending Topics

Rotary Enthusiast
Joined: Jul 2002
Posts: 1,119
Likes: 4
From: Virginia
There are those who claim to have successfully used a flattened crossmember. However it did not appear to me that doing so would accomplish the goal of moving the mount points 20mm, while maintaining the correct mounting geometry.
IMHO, there is no room for a new slot or hole without extending the ends of the bar by welding an extension on to them. If a new slot or hole is made 20mm back from and parallel to the existing slot, the bolt would be at or very close to the end of the bar. With the bolt at the extreme end and less steel surrounding it, it does not secure the crossmember and engine as securely as the original slots.
RRTEC's slot (based on his posted picture) was made perpendicular to the original slot, and connected to it, thus creating a large L-shaped slot. The problem I see with that is the larger L-shaped opening reduces the strength of the crossmember. Furthermore, the engine can potentially slide fore and aft in the new slot, which is undesirable; but not up and down, which is desirable.
There are good reasons to use vertical slots as originally intended, instead of holes or L-shaped slots. For example, motor mounts of a different thickness would place the bolt in a slightly different vertical position which could only be accomodated by a vertical slot.
No offense to anyone, and I'm sure the other methods may work well enough for some, but this is the method I have used for almost 20 years, and I think it is better. It only takes a few minutes to modify, and the resulting crossmember can be used for either 12A or 13B engine. In the picture below, you can see the weld line and a new hole drilled 20mm behind the 12A hole. The corner is trimmed on the extended piece of crossmember only on the spark plug side. No trimming of the circular mounts themselves is required. Note that this version uses a hole although a slot parallel to the original might be preferable. Additional reinforcement is also possible.
Last edited by cosmicbang; Mar 16, 2005 at 12:12 PM.
Thread Starter
Bimmer *****
Joined: Jun 2002
Posts: 2,199
Likes: 1
From: Plano, TX
Originally Posted by RRTEC
Actually BEFORE YOU PUT THE MOTOR BACK IN!!!!!!!!! READ THIS!
YOU have to Cut the front corner OFF the motor mount itself, the little black disk that covers the rubber mount on the subframe. If you do not the oil pan and front cover will not go forward all the way resulting in a motor and tranny that are cocked to the side. Trust me I just did this and forgot to cut the mount itself and now I have to go back and do it...
BTW- why did you hammer the mount bar when you could have just slotted the holes instead? Are you sure you got 20mm of clearance?
Anyways good luck with the install and keep us posted. BTW are you retaining the EFI or chickening out and going carb?
YOU have to Cut the front corner OFF the motor mount itself, the little black disk that covers the rubber mount on the subframe. If you do not the oil pan and front cover will not go forward all the way resulting in a motor and tranny that are cocked to the side. Trust me I just did this and forgot to cut the mount itself and now I have to go back and do it...
BTW- why did you hammer the mount bar when you could have just slotted the holes instead? Are you sure you got 20mm of clearance?
Anyways good luck with the install and keep us posted. BTW are you retaining the EFI or chickening out and going carb?
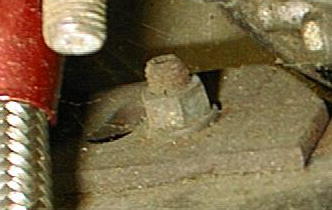
anyways, heres a pic of my mount


this is what atkins, dan told me to do, or at least, how i understood to do it...
Whack 'em and stack 'em
Joined: Mar 2003
Posts: 1,373
Likes: 0
From: Clarksburg/Bridgeport WV- North Central Appalachia
Man- I just don't remember this being that hard of a swap- granted I did mine on my old rx-7 like 12 years ago, but I do remember it was really a breeze. Damn thing lined up like a champ and had no problems with the mounts.. 
Thread Starter
Bimmer *****
Joined: Jun 2002
Posts: 2,199
Likes: 1
From: Plano, TX
Originally Posted by Jeff20B
Make sure your engine is still straight in the bay. My friend did something like that and his engine was at a slight diagonal.
Thread Starter
Bimmer *****
Joined: Jun 2002
Posts: 2,199
Likes: 1
From: Plano, TX
sh*t its pouring out now, looks like my plans r axed for today i can still pick up the rest of the nuts and bolts and washers and the oil cooler crush washers i need tho
and yes, i'm being a wuss and going carb, but i have my reasons heh... the long block SE engine i got had a broken lower intake manifold, so that would have had to have been replaced, and i didn't have an ECU... i'm using a RB 6 port holley manifold, and a holley 600cfm carb, i'm going to eventually upgrade to a holley style throttlebody and a megasquirt ecu, probably when i go turbo(got a 89-91 turbo and exhaust manifold waiting for it)
i can still pick up the rest of the nuts and bolts and washers and the oil cooler crush washers i need thoand yes, i'm being a wuss and going carb, but i have my reasons heh... the long block SE engine i got had a broken lower intake manifold, so that would have had to have been replaced, and i didn't have an ECU... i'm using a RB 6 port holley manifold, and a holley 600cfm carb, i'm going to eventually upgrade to a holley style throttlebody and a megasquirt ecu, probably when i go turbo(got a 89-91 turbo and exhaust manifold waiting for it)
Cut the mount on the front cover side, enough to clear the 1" or so you need...
If I were to do it over again (whick I might) I may just modify the mounting location as Tom outlined. I had considered that option several months ago but I was already to far into the current progect.. I feel my slotted (l-shaped) holes will hold up fine. I am going to torque the bolts down super duper tight....
Good info and great question.
You could cut the front mount and reverse the part with the four holes that bolt to the front cover. That was my friend's solution and it lined the engine back to center.
Hey, instead of doing all that aftermarket Holley junk, why not get some stock manifolds? Driveability would be better, if you care about that sort of thing.
Hey, instead of doing all that aftermarket Holley junk, why not get some stock manifolds? Driveability would be better, if you care about that sort of thing.
Thread Starter
Bimmer *****
Joined: Jun 2002
Posts: 2,199
Likes: 1
From: Plano, TX
Originally Posted by Snapshot
My engine builder replaced the mounts no big deal & dropped the 13B in no problem. What???
Thread Starter
Bimmer *****
Joined: Jun 2002
Posts: 2,199
Likes: 1
From: Plano, TX


starting to look like a real motor now... i need to find a place that sells crush washers for the oil cooler line so i can put that on, thats the only thing holding me up from attempting to put it in the car... think i'll call napa and auto zone since schucks doesn't carry crush washers big enough
Rotary Freak
Joined: Aug 2001
Posts: 2,267
Likes: 3
I've done it both the "right" way (SE Crossmember or RB mount) and the "improvised" way (slotting the holes in the mount). Frankly, I find it easier, cheaper and just as sound to slot the mount holes. It's a 5 minute job, totally free, and works great.

yo elysian - if your flattened mount bracket doesn't work out for ya, i have an extra gsl-se mount bracket if you want. all i'm asking in return is a 6pack of bud select. 
Rotary Freak
Joined: Aug 2001
Posts: 2,267
Likes: 3
Originally Posted by cpt_gloval
yo elysian - if your flattened mount bracket doesn't work out for ya, i have an extra gsl-se mount bracket if you want. all i'm asking in return is a 6pack of bud select.
Hey guys, if I was to attempt to install a 13B in a 12A chassis, should I slot the motor mount holes by 10mm and slot the front cover mount another 10mm? I can't recall if the metal on the crossmember pads is friendly. In other words, will I still be able to get a wrench and/or socket on the nut down there with it further forward?

Thread
Thread Starter
Forum
Replies
Last Post
mulcryant
2nd Generation Specific (1986-1992)
10
Sep 9, 2015 05:24 PM