
fuel sending unit replacement


Thread Starter
rotor withdrawal
Joined: Oct 2003
Posts: 571
Likes: 0
From: Alvordton, OH 43501
fuel sending unit replacement
Can you pull the sending unit out while the tanks in the car? or am I better off just swapping tanks?
will an 84 gs tank fit an 85 gsl? anything different? wiring for sending unit? lines for pickup, return, vent? filler in the same place?
will an 84 gs tank fit an 85 gsl? anything different? wiring for sending unit? lines for pickup, return, vent? filler in the same place?
Ryan
Joined: Mar 2003
Posts: 1,534
Likes: 0
From: Los Angeles, Ca 323/213/818/626
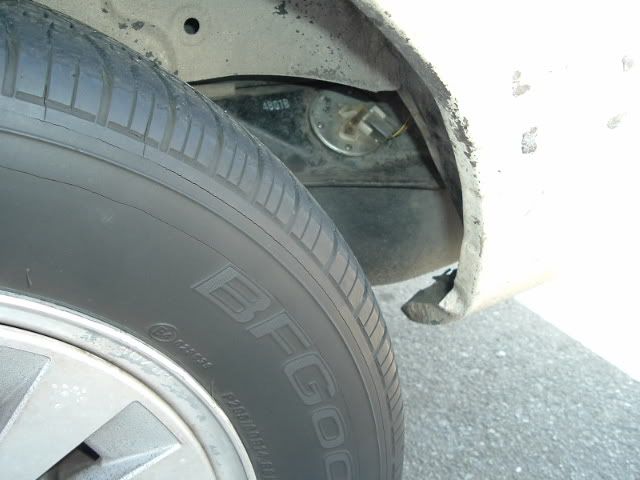
i get you detaild pics tomorrow...You can if you dont have that sheild behind your Lt R tire...
If not I think you'll have to drop it. Just make sure your empty that ***** heave when theres gas in it, even 2-3 gals. Pretty easy I'll get you a write up tomorrow.
-Ryan
If not I think you'll have to drop it. Just make sure your empty that ***** heave when theres gas in it, even 2-3 gals. Pretty easy I'll get you a write up tomorrow.
-Ryan

Senior Member
Joined: Nov 2003
Posts: 457
Likes: 0
From: Calgary, AB
Ryan's got you covered but I just thought I'd comment. If you find that the screws are extremely rusted I'd recommend dropping the tank for sure, because it'll be almost impossible to get those screws with the tank in place.
An 85 tank will fit in an 84 I'm quite sure. And yeah, after having replaced my sending unit I'd recommend replacing the tank if you have the means. All those rusted screws broke when I tried removing the sending unit and that caused major headaches for me.
An 85 tank will fit in an 84 I'm quite sure. And yeah, after having replaced my sending unit I'd recommend replacing the tank if you have the means. All those rusted screws broke when I tried removing the sending unit and that caused major headaches for me.


Ryan
Joined: Mar 2003
Posts: 1,534
Likes: 0
From: Los Angeles, Ca 323/213/818/626
All you have to do is:
1. Drain the tank. 14mm Use a 5 gal bucket that clean (dosent have to be spot less just no debris)
2. Plug the hole.
3. Follow the straps to where they bolt to the chasis unbolt the front first...so you can disconnect the fuel lines. (Hint on removing the fuel lines..use a rag to catch any excess gas. Also if the lines are hard to remove, use pliers LIGHTLY grip the hose and twist it to "BREAK the SEAL" 17mm and 24' Extension, Pliers and or Vice grip pliers ( the vise grips will be SOOO much eaiser to remove some of the clamps) Oh yea, and REMEMBER where the fule lines go when you reinstall.
4. Drop the tank. When you drop it you may find some padding like stuff fall, it goes betweent he tank and chassis.
5. Mark the location of the sending unit, for proper reinstall. Use a philips the fits the head TIGHT as Felgar said those screws may be hard to get out so just in case spray some PB Blaster and if it doesnt n screw DO NOT KEEP trying,DO NOT STRIP THE HEAD, let the PB Blaster soak and try again later. Just remember use a GOOD Philip head that fits well.
6. Personal experience: I'm not sure which tank and if the sending units are different but my friend says he has a 12 gal tank???? I have a 16 gal tank. I've replaced sending units twice. The first time I was'nt sure which way it went...I would always get weird readings, but then again that unit wasn't good to begin with...
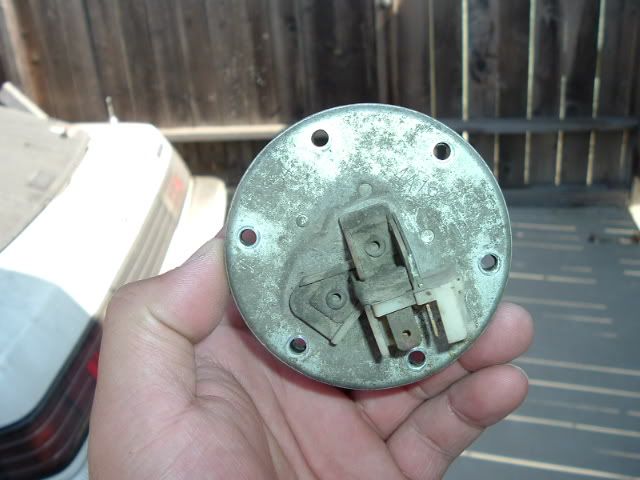
See how the pluggs are pointing @ 6 o'clock. I think that's the way it goes.( I tried to feal how it was positioned in a car on w/a tank that read properly. This is the way I installed it the 2nd time around. Its reads better but its still a 1/4 of a tank off but other than that Its better than what the last one was reading.
7. Replace it with what ever one you have then just do the oppisite for reinstall.
"EMPTY" Position

"FULL" Position

Hope that helps. Fell free to PM me for any questions...or IM: i984se
Gonna stuff my face.....
Peace.
-Ryan
1. Drain the tank. 14mm Use a 5 gal bucket that clean (dosent have to be spot less just no debris)
2. Plug the hole.
3. Follow the straps to where they bolt to the chasis unbolt the front first...so you can disconnect the fuel lines. (Hint on removing the fuel lines..use a rag to catch any excess gas. Also if the lines are hard to remove, use pliers LIGHTLY grip the hose and twist it to "BREAK the SEAL" 17mm and 24' Extension, Pliers and or Vice grip pliers ( the vise grips will be SOOO much eaiser to remove some of the clamps) Oh yea, and REMEMBER where the fule lines go when you reinstall.
4. Drop the tank. When you drop it you may find some padding like stuff fall, it goes betweent he tank and chassis.
5. Mark the location of the sending unit, for proper reinstall. Use a philips the fits the head TIGHT as Felgar said those screws may be hard to get out so just in case spray some PB Blaster and if it doesnt n screw DO NOT KEEP trying,DO NOT STRIP THE HEAD, let the PB Blaster soak and try again later. Just remember use a GOOD Philip head that fits well.
6. Personal experience: I'm not sure which tank and if the sending units are different but my friend says he has a 12 gal tank???? I have a 16 gal tank. I've replaced sending units twice. The first time I was'nt sure which way it went...I would always get weird readings, but then again that unit wasn't good to begin with...
See how the pluggs are pointing @ 6 o'clock. I think that's the way it goes.( I tried to feal how it was positioned in a car on w/a tank that read properly. This is the way I installed it the 2nd time around. Its reads better but its still a 1/4 of a tank off but other than that Its better than what the last one was reading.
7. Replace it with what ever one you have then just do the oppisite for reinstall.
"EMPTY" Position
"FULL" Position
Hope that helps. Fell free to PM me for any questions...or IM: i984se
Gonna stuff my face.....
Peace.
-Ryan
Last edited by 1984se; Oct 1, 2004 at 06:12 PM.
Trending Topics

Senior Member
Joined: Nov 2003
Posts: 457
Likes: 0
From: Calgary, AB
Regarding the way it goes in... The metal "ring" that is welded to the tank, where the screws screw into, has a notch at the bottom. You can compare the notch created in the rubber on the old sender to get the correct rotation of the new sending unit.
Man I envy you guys in your environments. That is one DARN CLEAN tank and sending unit. My screws were just one big rust blob on top, and the tank really has no paint left (due to rust) except for where the paint was protected by the foam.
Man I envy you guys in your environments. That is one DARN CLEAN tank and sending unit. My screws were just one big rust blob on top, and the tank really has no paint left (due to rust) except for where the paint was protected by the foam.
Thread Starter
rotor withdrawal
Joined: Oct 2003
Posts: 571
Likes: 0
From: Alvordton, OH 43501
the screws are way too rusted on mine, even though the cover is already gone, I still cant get the screws loose. I guess I'm dropping the tank. Not sure what the screws are going to be like on the other tank either, but I guess it doesnt matter, if I may as well change the whole tank.


Thread Starter
rotor withdrawal
Joined: Oct 2003
Posts: 571
Likes: 0
From: Alvordton, OH 43501
I'm sure I could vice grip them out, but I'd still have to drop the tank to get to it. that and the other sender is still in the other tank, still in the car. I'm wondering if it would even help to sell the car if I fix it , or if I should just offer the other tank to whoever wants the car
Joined: May 2002
Posts: 5,972
Likes: 37
From: Ottawa, Soviet Canuckistan
Drop the tank and bring the tank and the level sender to the local Gas Tank repair place...
For forty bucks Canadian (cash) they installed my level sender and properly/professionally flushed all the CRAP out of the tank. It was well worth the money to me, because they made sure that the whole tank was clean and leakproof, and that the sender was secured properly. They even added a grounding wire to one of the screws on the sender unit for extra protection and covered the level sender with a thin layer of protective coating.
Dropping the tank is easy... empty it, remove the three screws holding the filler neck and the filler cap, remove the four bolts for the straps and lower the empty tank onto your chest. Then undo the fuel lines. That's it. I dropped it with the entire filler neck attached to the tank, which I found much easier than the way the manual says to do it (leaving the neck attached to the car and unclamping it from the tank.
Jon

Senior Member
Joined: Nov 2003
Posts: 457
Likes: 0
From: Calgary, AB
Exactly the same on the SE's se7chaotic.
I agree with vipernicus, leave the neck attached. Just have to sort of wiggle the neck out of position through the wheel well just as you're lowering.... Don't want to pull too hard on the neck. For the straps I leave the front strap bolts in place and just undo the rear two.... Either way would work.
Once I took the vice grips to my screws the whole heads just broke off leaving me with plugged holes. And this was after 24+ hours soaking in lubricant. Dam rust...
My tank had no contamination in it at all. How do you guys get the inside so dirty?
Someone said that they run about 100 bucks and they got them from mazda dealer. Couldnt tell ya part number though. The person that said this info also said it was worth it because they didnt have to worry about replacing it again for quite awhile.

Thread
Thread Starter
Forum
Replies
Last Post
alphawolff
1st Generation Specific (1979-1985)
17
Nov 17, 2015 05:57 PM