When you click on links to various merchants on this site and make a purchase, this can result in this site earning a commission. Affiliate programs and affiliations include, but are not limited to, the eBay Partner Network.
I am creating this thread to ask all of my very basic questions about some planned work on my 83 GSL with ~35K on it. The reason to to do this is described in another thread, "Shuddering on Launch" https://www.rx7club.com/1st-generati...aunch-1128358/. That thread has a video of my problem and then diagnosis and recommendations from the experts on this forum.
To Do
clutch assembly, throwout bearing, pilot bearing inspect/replace if nec.
inspecting/refinishing the flywheel
replacing the rear main engine oil seal
input/output transmission seals
new starter, as the existing one is increasingly missing engagement.
checking u-joints on the drive shaft
Parts reference for others doing this in the future
Clutch Kit is an OEM replacement, no performance aspirations: Exedy Kit 10025. This came with the pressure plate, friction disc, pilot bearing, alignment tool. Conspicuously missing is the pilot bearing seal. (Bearing insertion tool from Mazdatrix).
Pilot bearing seal ordered separately, Beck Arnley 052-3471 Seal,
So the first issue is, do I need to remove so much dash trim and this "middle rubber boot" and the shifter to drop the tranny? Read a lot of thread about the three 10mm bolts below this boot, but nothing explicitly described this mid boot, and interestingly most threads with pictures showed it ripped up, presumably for access. Not my plan!
It looks like I need to remove those bolts (5th is hidden below the trim's cross brace)...
Stop...no need to disassemble interior any further. Reach down to the bottom of the top boot showing and put your fingers under the lip that holds it to 2nd boot underneath it and pull it away,turn it inside out and pull up around shifter shaft.
.
This will reveal 2nd boot which can be stretched and pushed down over shift tower on transmission which reveals the dust cover with the three 10mm head retainer bolts. Remove these bolts and pull shifter assembly straight out of top of trans.You will want to put down a rag or an old plastic trash bag to lay shifter assly on floor on passenger side to keep hypoid oil on shifter ball from leaking/staining carpet. Jam a balled up paper towel in opening of shift tower to keep dirt/rust from getting knocked into housing on trans remove/install.
When these cars were new(er) the rubber boots were much more pliable and friendly. After 30+years and lots of heat cycling,not so much. I have found way more cut/trimmed/ripped away than intact over the years.
They can with care be removed and reinstalled without damage and these boots intact make for a much quieter interior.
Some suggestions: 1st a heat gun/hair dryer is your friend. Used carefully it will soften rubber and make it pliable enough long enough to remove and to put back on at time of reassembly. The upper boot/2nd boot will likely be stuck together as one after being there for so long.
Heating will allow it to be peeled back and turned inside out. Sometimes a small pocket screwdriver or a like tool(not too sharp) needs to be inserted to start the separation process. This is where suggestion #3 comes in to play...silicone spray,with nozzle extension.
Once you have succeeded in separating a small section of upper boot from lower,hopefully without poking a hole in it,insert the nozzle and spray some lube around in there each side of screwdriver.
Suggestion #2 put a heavy towel across console area of dash before proceeding with #3 to protect dash and trim from scratches when screwdriver likely slips out of siliconed boot as you try to work it around to separate boot. Don't ask how i've come to this solution...
I believe Mazdatrix has pics on their website of replacement boots so you can visualize how they look separately. By now you see why so many cut/rip the boots on trans r&r,a lot of flat rate techs did this back in the day.
Last edited by GSLSEforme; Jul 26, 2018 at 04:11 PM.
Reason: spelling
I always remove the four 10mm bolts and then slide both boots up and off of shifter. I do it this way to keep from damaging my boots any further because they are NLA. Then I can access the 3 bolts for the shifter to get it out of the tranny.
Another thought. My preference is to repair what you have(regarding starter) versus any reman unit. The best quality starter is the original one now in your car. Within reason consider repairing. What is the symptom or symptoms that make you want to replace it?
Stop...no need to disassemble interior any further. Reach down to the bottom of the top boot showing and put your fingers under the lip that holds it to 2nd boot underneath it and pull it away,turn it inside out and pull up around shifter shaft.
.
<SNIP>.
I believe Mazdatrix has pics on their website of replacement boots so you can visualize how they look separately. By now you see why so many cut/rip the boots on trans r&r,a lot of flat rate techs did this back in the day.
Originally Posted by t_g_farrell
I always remove the four 10mm bolts and then slide both boots up and off of shifter. I do it this way to keep from damaging my boots any further because they are NLA. Then I can access the 3 bolts for the shifter to get it out of the tranny.
Either way can work.
Awesome, thanks you guys. I have all the time in the world for this, so I'm not gonna force anything. I had no idea that I was looking at 2 rubber parts! And for other interested parties, here are the photos from Mazdatrix:
Top Boot
Mid Boot
Originally Posted by GSLSEforme
Another thought. My preference is to repair what you have(regarding starter) versus any reman unit. The best quality starter is the original one now in your car. Within reason consider repairing. What is the symptom or symptoms that make you want to replace it?
The symptom is that when turning the key, there's occasionally no engagement with the ring gear, and the starter just spins. On the next or maybe one more attempt it will grab and start the car.
So I am removing exhaust and heat shields and I find this, sheesh:
Aftermarket transmission mount - a warning
Glaringly missing one of the mounting bolt into the tranny case! And it didn't just fall out, the holes don't line up. Rock Auto part (see the excellent thread on engine mounts for more hijinx in that vein).
Now I'm glad I'm doing these jobs myself. For the "shudder on launch" problem, I am thinking this might be it...essentially it's half a transmission mount! I'm going to put in a new one and test drive it.
Edit: NEVERMIND! Jumped to a conclusion, it was fine all along.
Last edited by Toruki; Jul 27, 2018 at 03:54 PM.
Reason: Pure foolishness!
Having to remove all the pieces to access the boot mounting bolts was always the deciding factor for me when doing clutch/trans work on customer vehicles. Always separated the boots as i described...as many cars as i did,the less pieces needing to be removed with inherent possibility of breaking something or misplacing something no matter how carefully you work was a factor when expedience and consistency was necessary. I was working flat rate. Of course i could have done like others and cut the boots out of the way,customer would never know...
Regarding starter symptoms,very likely cause is overrunning clutch worn out in starter drive. Your car even with low miles has had a lifetime of use with all the short trips and associated starts. Bosch electrical products for the most part are made well,is this a new starter?
While you have the transmission out,clean up the mounting surface for the starter motor on trans bellhousing til it is shiny. Likewise,clean the battery positive cable end lug and ground wire end lug til they are shiny copper. After all these years of oxidation there is always voltage drops present in these connections and even if your present starter was "good" after doing this and reassembling you would notice the starter audibly cranking over the engine faster on 1st start afterwards. Finish up your cleaning of cable ends with the application of vaseline with an acid brush as you are assembling the cables to the starter. You can use the same thing at the battery posts and terminals. The vaseline will "melt" and fill all the voids in connections. The connections will not corrode or oxidize as air/moisture cannot get to them.
So I am removing exhaust and heat shields and I find this, sheesh:
Aftermarket transmission mount - a warning
Glaringly missing one of the mounting bolt into the tranny case! And it didn't just fall out, the holes don't line up. Rock Auto part (see the excellent thread on engine mounts for more hijinx in that vein).
Now I'm glad I'm doing these jobs myself. For the "shudder on launch" problem, I am thinking this might be it...essentially it's half a transmission mount! I'm going to put in a new one and test drive it.
Damn,i rejected that as a cause for original complaint when you said the mount was new...properly installed correct mount can't help but minimize that,will it eliminate it? I will watch your thread to see response.
Same shop/tech put in those engine mounts you just replaced?
Recommend Mazda comp mount,wondering if that missing bolt's associated threads are damaged/missing from trans case. Can be repaired with 8 x 1.25 mm helicoil insert.
Last edited by GSLSEforme; Jul 27, 2018 at 08:53 AM.
Super basic question on removing the exhaust system. I searched but no threads on properly removing FB exhaust. Maybe it's a dozen different ways that all work well? So I am thinking put a support under the cat, break at the downpipe, remove the relevant hangers, remove as an assembly. Here are the fasteners I was planning to remove:
When I do it I don't take the entire exhaust off. I put some rags between the top of the exhust tips and rear body panel so the panel doesn't get scratch/dented. I undo it from the exhaust manifold in pic 1 then remove the donuts in pic 3. This should be enough for the exhaust to be moved down to get at the trans cross member bolt on the exhaust side. Be careful of the heat shield. It's very sharp.
Last edited by KansasCityREPU; Jul 27, 2018 at 09:54 PM.
So I must be lucky, the 2 piece shift boot easily separated and the top is plenty pliable enough to work up and off the shifter. Here's what it looks like for the curious.
Be careful when you put your 3 bolts back in. Make sure the nylon upper bushing is aligned correctly with the notch and the steel alignment pin. I've seen some that were just put back together in any direction, crushing the bushing and it makes the shifter feel overly tight for some reason. Gee I wonder why.
Be careful when you put your 3 bolts back in. Make sure the nylon upper bushing is aligned correctly with the notch and the steel alignment pin. I've seen some that were just put back together in any direction, crushing the bushing and it makes the shifter feel overly tight for some reason. Gee I wonder why.
Thanks Jeff, now that I've got it apart, I totally get what you're saying. For the curious, this is what it looks like after just coming out. Also the three 10mm bolts were not super tight, basically hand tightened, maybe a couple ft-lbs of torque to remove them.
--> Question: When reinserting, will I be aiming the ball to the left or the right of the retaining clip?
That bottom boot is thick and tenacious. I used a small flat blade screw driver to pull back the top edge, and then an empty bit driver to "roll" around the edge shifter's housing and push the boot's lip down and around, sort of like a mini tire machine
Still more fun! I am really enjoying this project. In the engine bay, I've got the slave cylinder detached and out of the way. Underneath, I've got the exhaust out, all of the relevant heat shields, drained the tranny, I marked and removed the drive shaft, and removed the starter. Which looks really, incredibly filthy. Something tells me it's a good idea I'm doing all of this.
Thick, oily grime spraying onto a starter looks like this:
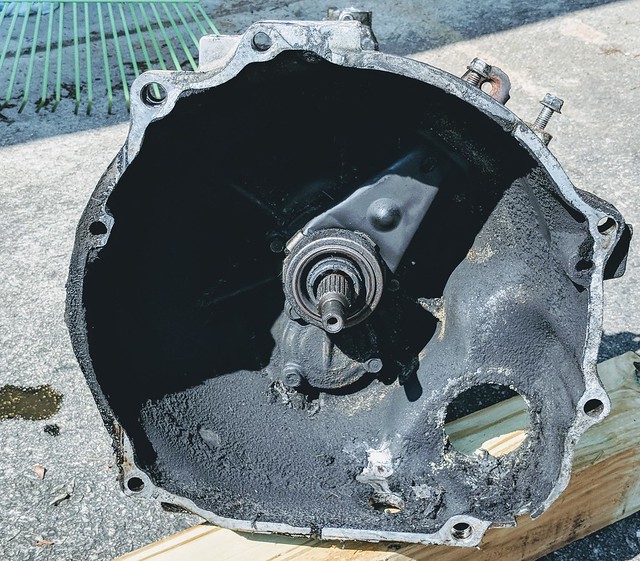
And here's what awaits inside the bell housing. I'm thinking that some of the oil seals are not really sealed? This isn't typical, right?
Gotta go over everything again, just to be sure, but I'm pretty sure the next step is to remove the transmission.
I have one of the harbor freight trans jacks, the small scissors one, love the 25% off coupon.
You'll want to clean up the ball on shifter and light amount of lube on that on reinstall. The spring is not a retainer it gives the shifter"preload" to return to middle neutral position as well as guide shifter smoothly through shift pattern. On reassembly install the ball to right side of spring.
3 shift tower bolts should be just snug,no need for gorilla tight. Basically keeping shifter cover flush to top of trans. Have seen more than a couple cars with only two bolts in shift tower,3rd snapped off in trans...
Some cars that 2nd boot has more "attitude" than others.
There's 30+ years of clutch dust in bellhousing,add some oil seepage,makes a nice glue. Pretty normal.That's why you have all seals on hand and one of reasons to remove flywheel. Wear a mask when you remove clutch assembly,washwipe down flywheel slightly once clutch/p plate are off to minimize clutch dust/chunks in your face. Once flywheel is off,inspect oilpan at back of engine to see if it's dry.
I use a 3'x4' aluminum hotel pan and situate trans in it so bell housing end sits in middle,wood block under tailshaft.
Remove t/o bearing,fork,boot and use brakleen,parts washer brush to clean out,rinse down bellhousing area of trans before removing t/o bearing support to clean replace seal and regasket and wipe/blow dry. Wash/dry flywheel and inspect,ship off to machine shop so that can be resurfaced while you do all other maintenance on trans and clean up parts.
Recommend using a block of wood between oilpan and centerlink to support engine in"position" while trans is out so no damage to ac,vacuum lines at firewall from engine tilting rearward. Also keeps strain off radiator/hoses,minimize collateral damage.
I always remove the big ring that holds the thick rubber boot. I also put some gear oil in the shifter box. When reinstalling the big rubber boot goes on last. This makes it easier to get the shifter and pretzel spring (my term) aligned.