When you click on links to various merchants on this site and make a purchase, this can result in this site earning a commission. Affiliate programs and affiliations include, but are not limited to, the eBay Partner Network.
Progress. So I was a bit worried about pulling off the transmission on my own but not a problem. With the HF scissors jack tranny lift it was controllable and easily, incrementally movable. It took a bit or heft to pull off but other than that, smooth running. And the tranny itslef is a lot light that I thought it would be. Maybe overkill? supporting the rear of the engine with the factory scissors jack. Here's the set up.
After getting it out from under the car I could get in to look at the old stuff clutch assembly. It's got fresh looking wet oil dripped down to the seam.
Pilot bearing looks good...to me. The rest of the roller bearings look like these, none missing. See any issues?
Next up, removing the old clutch assembly. Thanks for all of your help so far.
I'd say a little bit of grease applied to the needle bearings should be all it requires. The pilot seal looks ok. You could swap a new seal in but I'd leave the pilot bearing alone, just greasing it. Not too much.
I've done most of my clutch/trans jobs on a lift in standup position. Done lots on jack stands on my back with and without a trans jack. Being older now,much prefer the use of trans jack and you will too when you attempt lining up and reinstalling trans.
They aren't that heavy but the longer it takes to align input shaft/clutch/pilot bearing and get trans in place,the heavier it seems. That jack will be your friend...
Seen worse regarding dampness on back of engine,getting flywheel off and examining backside of engine/front of flywheel will tell what needs to be done.
Regarding pilot bearing,looks ok,bit dry,normal looking for low mile car...experience has taught me to replace regardless. In the past there were times i chose not to,couple came back with noise complaints,requires doing the job over again with no pay+unhappy customer.
IMO you have the new bearing/seal/right tools,use them and be done with it.
Got the clutch assy off, fristion material fairly worn but not drastic, i.e. rivets intact. It's about .125" thinner than the replacement. Flywheel looks fair, no gouges or anything that catches a fingernail, but plenty of striations and some "crackled" are that looks a little like a dried out lakebottom:
So here's the rear main seal just after removing the flywheel. Must be a small leak, the thing looks pretty good. Anyway I'll swap in the new one. This is so cool seeing the business end of the engine.
Next up, find a guy to refinish the flywheel, get to cleaning everything.
Clutch pretty worn for 35k. Look at discoloration in disc close to the hub,seen some heat,corresponds to heat check cracks in flywheel. Pressure plate likely has some heat stress on it to. Again thinking someone learning how to drive manual trans in this cars life-seen a lot of slippage/heat..Straightedge/feeler gauges on flywheel/pressure plate could show you how much warpage on each-not really necessary as you can see the results All adds up to give you that shudder on launch complaint you're chasing.
I have had to clean up/reuse flywheels like that and while serviceable they aren't as smooth as a resurfaced or new flywheel.
Rear main seal most always look good on disassembly,unless they are obviously leaking. It's after they're trifled with in R&R of flywheel they start leaking. What does front/seal side of flywheel look like? Sometimes damp from long term rear main seepage. Show a pic of flywheel where rear main seal lip rides,is there a mark or ridge you can feel with your finger. Take a pic further back that shows the whole of the back of engine to better pinpoint source of oil leak. Could be oilpan,could be longtime mess from oil filter changes.
You could use 1/4" 10 mm socket/ratchet and using two fingers go around oil pan bolts and lightly snug them,you're more looking for bolts whose tension has backed off over time from heating/cooling cycles.
Flywheel will look better than new when you get it back from machining. Personally feel properly ground flywheel is a work of art,shame it'll be hidden when all back together,lol. Clutch guaranteed to be butter smooth. So you know,it will engage closer to the floor than the worn original did. All new clutch discs do as result of thicker clutch lining than what was removed. After wearing in for a bit,not noticeable.
What condition is heater hose at back of engine under oil filter pedestal? Long term exposure to oil from filter when changing tends to weaken the rubber here. It will feel softer in that section than elsewhere in hose. I lost an engine in my GSL when this hose burst while at speed on highway. Engine empties of coolant pretty fast under pressure with the water pump helping to push it out-faster than the gauge will accurately register. In my case too late.
Last edited by GSLSEforme; Aug 2, 2018 at 07:06 PM.
This thread is awesome, very helpful, I appreciate all the time you're putting in to the pictures etc as you go through this adventure!
Hey thanks...I'm glad someone else is enjoying this too. I understand things so much better with photos...and the tech has gotten so good in smart phones that it's much easier to get a good shot.
Originally Posted by GSLSEforme
Clutch pretty worn for 35k. Look at discoloration in disc close to the hub,seen some heat,corresponds to heat check cracks in flywheel. Pressure plate likely has some heat stress on it to. Again thinking someone learning how to drive manual trans in this cars life-seen a lot of slippage/heat..Straightedge/feeler gauges on flywheel/pressure plate could show you how much warpage on each-not really necessary as you can see the results All adds up to give you that shudder on launch complaint you're chasing.
I have had to clean up/reuse flywheels like that and while serviceable they aren't as smooth as a resurfaced or new flywheel.
I see what you mean, the distinct bands of black and brown of the friction disk, and it coincides with the most damaged area on the pressure plate. A shot of the old and new for comparison. I've got the new parts back in their packages to avoid any contamination.
Rear main seal most always look good on disassembly,unless they are obviously leaking. It's after they're trifled with in R&R of flywheel they start leaking. What does front/seal side of flywheel look like? Sometimes damp from long term rear main seepage. Show a pic of flywheel where rear main seal lip rides,is there a mark or ridge you can feel with your finger. Take a pic further back that shows the whole of the back of engine to better pinpoint source of oil leak. Could be oilpan,could be longtime mess from oil filter changes
.
Ha! Maybe a bit of both. I'll go around the oil pan and check the 10mm bolts as you suggest. Here's the back of the engine prior to cleanup...it was filthy but dry toward the top and sludgy wet toward the bottom.
Flywheel engine side looks pretty clean to me, in the detail picture there is some oil, but it's on the inside of the sealed area, where it ought to be. I'll take a closer look tomorrow at the side where it interfaces with the seal.
Flywheel will look better than new when you get it back from machining. Personally feel properly ground flywheel is a work of art,shame it'll be hidden when all back together,lol. Clutch guaranteed to be butter smooth. So you know,it will engage closer to the floor than the worn original did. All new clutch discs do as result of thicker clutch lining than what was removed. After wearing in for a bit,not noticeable
.
This is exactly what I'm looking forward to.
What condition is heater hose at back of engine under oil filter pedestal? Long term exposure to oil from filter when changing tends to weaken the rubber here. It will feel softer in that section than elsewhere in hose. I lost an engine in my GSL when this hose burst while at speed on highway. Engine empties of coolant pretty fast under pressure with the water pump helping to push it out-faster than the gauge will accurately register. In my case too late.
Here's a shot of the flywheel "hub" on the engine side, that rides along the main seal. There's a slight score mark on the entire circumference, can just catch a fingernail but not deep. Still, it looks like it would slowly eat the new main seal.
In the RX7 Technical data ( link for manuals tech data: Foxed.ca - Mazda RX-7 Manuals) there's no spec for the flywheel hub size. Whatever the spec is, it looks like this one needs to be polished.
That's a pretty good groove starting there. See that more on piston engines that had infrequent oil changes. That surface needs to have a very smooth finish so as not to wear seal lip prematurely. You could get the machinist to give you his opinion on polishing that while it's there for resurfacing. If it's bad enough,there are chrome repair sleeves that can be pressed on over that wear spot to give the seal a new surface to ride on. Again ask the machinist for his opinion. I've never done this on a rotary but have done several on domestic V8s and a Honda Accord V6 crankshaft with success. Machinist could measure od of eccentric seal surface on flywheel and cross match the dimension to another application.
Google 5.0 Ford crankshaft rear main seal repair sleeve to get a pic of what this sleeve looks like. Post back results from machine shop visit.
Got the flywheel back, looks sweet! The machinist wasn't worried at all about the scoring but he cleaned it up a bit. Didn't want to remove too much so he just polished the nose. It looks scored but doesn't feel scored.
And cleaned up the bell housing. It actually went pretty well. Used penetrating oil as a solvent for all the grease/grime, sluiced the mess toward the bottom, sopped it all up, The brake clean to wash the remaining grime down. Impossible to take photos during, just too damn messy.
Yes, front and back. I have the parts and no idea how to do it...yet. Tail shaft looks easy, it's right there on the back. The front seal must be buried behind that plate that the throwout bearing rides on?
Do replace that pilot bearing. If you can get it and the seal out and the seal is ok, you can reuse the seal but its just not worth doing this over to deal with a pilot bearing failure.
I recommend the opposite. The bearing looks fine, just needs grease. The seal should be replaced as the rubber can got old and hard, and often damaged during R&R.
Do replace that pilot bearing. If you can get it and the seal out and the seal is ok, you can reuse the seal but its just not worth doing this over to deal with a pilot bearing failure.
Originally Posted by Jeff20B
I recommend the opposite. The bearing looks fine, just needs grease. The seal should be replaced as the rubber can got old and hard, and often damaged during R&R.
So Seattle to Huntsville is ~2200 miles, but I guess you guys are farther apart than that .
My reluctance to change it is due to not having the damn puller at $140 and I don't want to screw it up. I was relieved to see it looking pretty clean. There are no rotary shop tool rental places around here that I am aware of, Boston area.
There's this thread from 2011, using recommending at OEM Tools 27128 slide hammer puller rental from Autozone, but they don't seem to stock that anymore.
My tool is the standard one from advancezone with the tongs on it slightly rounded to fit the meat of the metal against the inner rim of the pilot bearing better. Once you get it you will see what I mean. And they will just loan it for free, just don't let em know you modded it.
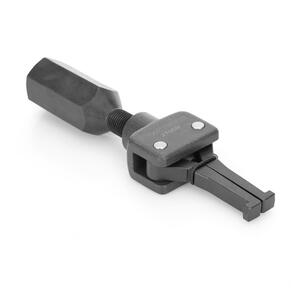
Is that a slide hammer type? I've got a 3 jaw puller that i was thinking I could mod like this, indicated by the red lines, final dims custom for our application.
I would use some aluminum stock and then wood to protect where the green arrows push against the back cover of the engine.
Yeah it fits on my slide hammer. That one you have might work but I would worry about it doing something to the rear iron. Sometimes those bearings are in there tight.
Looks like this and is only $15.00 if you already have a slide hammer.
Already shared my opinion on how to proceed here...yes, the Mazda tool is expensive. Don't recommend using 3 jaw puller-modified or not. Pilot bearing needs the shock of slide hammer to move it. Even modifying puller to get behind bearing,it will likely deform it from steady pull,not what you want.
I have a blind bearing puller/slidehammer set that i use for this job. Essentially same tool as Mazda piece. Suggest looking on ebay,have several flavors,the ones there are reasonable, $25-$60. May not be best quality-but you only need it to work once and it will have paid for itself. The right tool gets bearing out in 5-6 taps of slidehammer-in one piece,best case scenario.
When I replaced my engine and did the Exedy Stage1 upgrade, light aluminum flywheel, et al - I tried all the tricks to remove the pilot bearing to replace it, because I didn't know how many miles were on the one in the replacement engine. Tried ALL the tricks, wet bread, wadded up paper, hammering in an undersized socket, grease - you name it, nothing worked. I gave up, ordered the Mazdatrix slide hammer with the right attachment, and in 15sec it was out, effortlessly. I've had to Dremel them out before, so I know what happens when you get pissed and just go at it.
Already shared my opinion on how to proceed here...yes, the Mazda tool is expensive. Don't recommend using 3 jaw puller-modified or not. Pilot bearing needs the shock of slide hammer to move it. Even modifying puller to get behind bearing,it will likely deform it from steady pull,not what you want.
Originally Posted by LongDuck
When I replaced my engine and did the Exedy Stage1 upgrade, light aluminum flywheel, et al - I tried all the tricks to remove the pilot bearing to replace it, because I didn't know how many miles were on the one in the replacement engine. Tried ALL the tricks, wet bread, wadded up paper, hammering in an undersized socket, grease - you name it, nothing worked. I gave up, ordered the Mazdatrix slide hammer with the right attachment, and in 15sec it was out, effortlessly. I've had to Dremel them out before, so I know what happens when you get pissed and just go at it.
This is one job where you want the right tool.
Originally Posted by t_g_farrell
Yeah it fits on my slide hammer. That one you have might work but I would worry about it doing something to the rear iron. Sometimes those bearings are in there tight.
Awright awright! Jeez you guys are like the Greek chorus! </s>
OK, well, also you're all spot on correct and I can't thank you enough for your persistence and good counsel.
I ended up splitting the difference in a way, modifying a less expensive and readily available puller (HF) to fit a little bit more like the proper Mazda tool.
I'll post the details next. Did say thanks? THANKS!


 .
.