
EFI-prepping a 1st gen


Thread Starter
Rotary Enthusiast
Joined: Oct 2001
Posts: 1,022
Likes: 4
From: Ontario, Canada
EFI-prepping a 1st gen
I've been running an injected 1st gen for a few years now, and thought I'd summarize my fuel system mods to incorporate an in-tank pump. I previously ran with two pumps and an external surge tank. The noise of the two pumps combined with the multitude of potential leak points convinced me to switch over. Many thanks to Steve84GS_TII for inspiration. The tank mods were well worth the effort, and likely less work than the initial setup of the surge tank.
Adapting an FC In-tank Pump to SA Tank
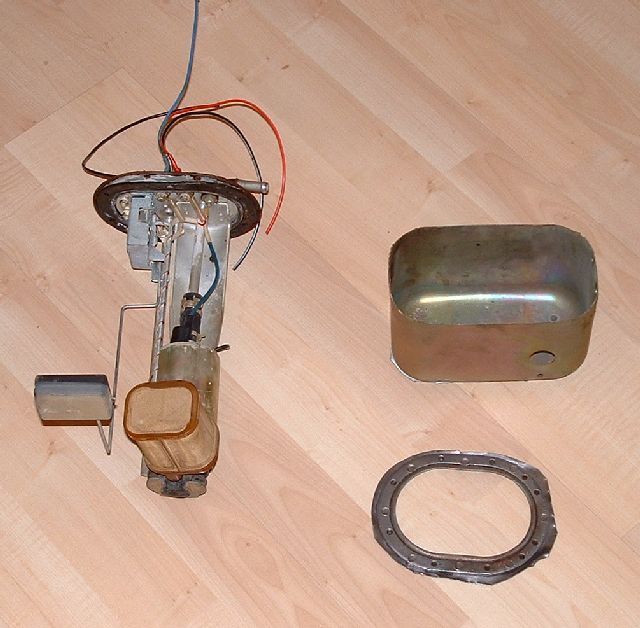
An FC fuel pump assembly, mounting flange, and slosh cup were scavenged from a tank at the auto wreckers. Tanks are already cut open to drain fuel when a wreck comes in, so the tanks are scrap value only.
The parts as removed can be seen below:
To start the swap, the stock SA fuel tank was drained and removed. To expell any remaining fuel, the tank was flushed repeatedly with water, then washed inside with dishsoap and water. Use extreme caution when working on fuel system components!!!
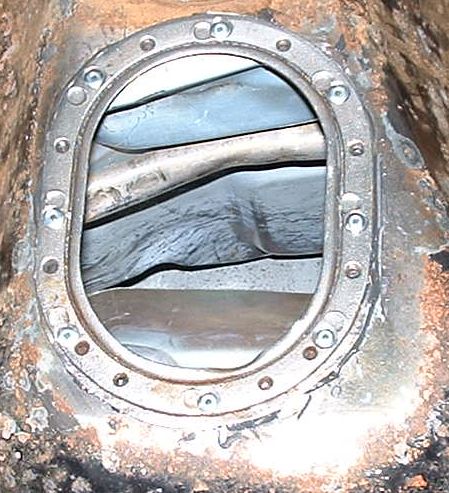
On the SA tank there is only one location where there is enough space to mount the FC flange. The mounting area was sand-prepped and then the cutout marked with a Sharpie. See pic below:
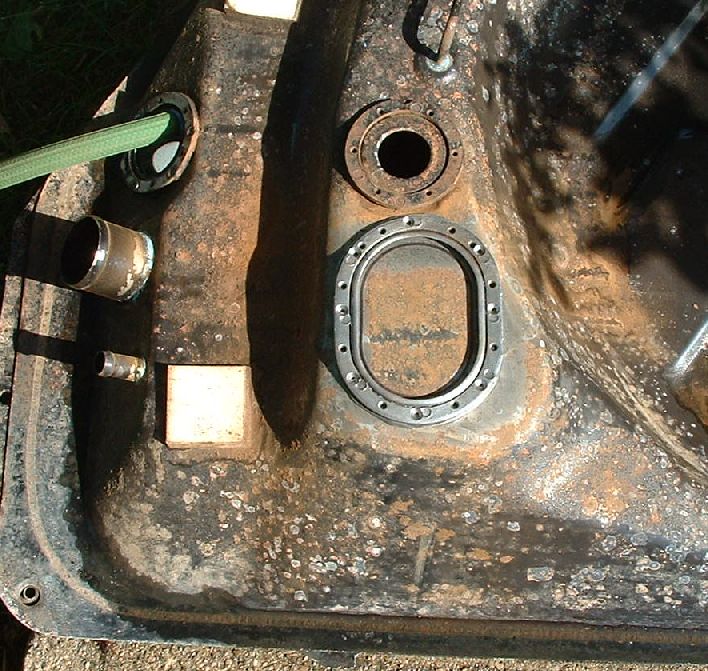
The FC flange was prepared for rivet mounting by drilling and countersinking eight 1/8" dia. holes around the perimeter of the mounting flange between the already existing threaded holes that the pump assembly fastens to. About 1/8" of the lip of the tank opening can then be carefully bend upwards to mate nicely with the FC flange. Once the flange was fit nicely to the tank, the rivet holes were drilled through the tank using the flange as a guide. Clecos were used to hold the flange in place to ensure all holes matched. Rivets or suitable screws could be placed in the holes temporarily as well if clecos aren't available. Be sure to clean any chips from the tank periodically during this process.
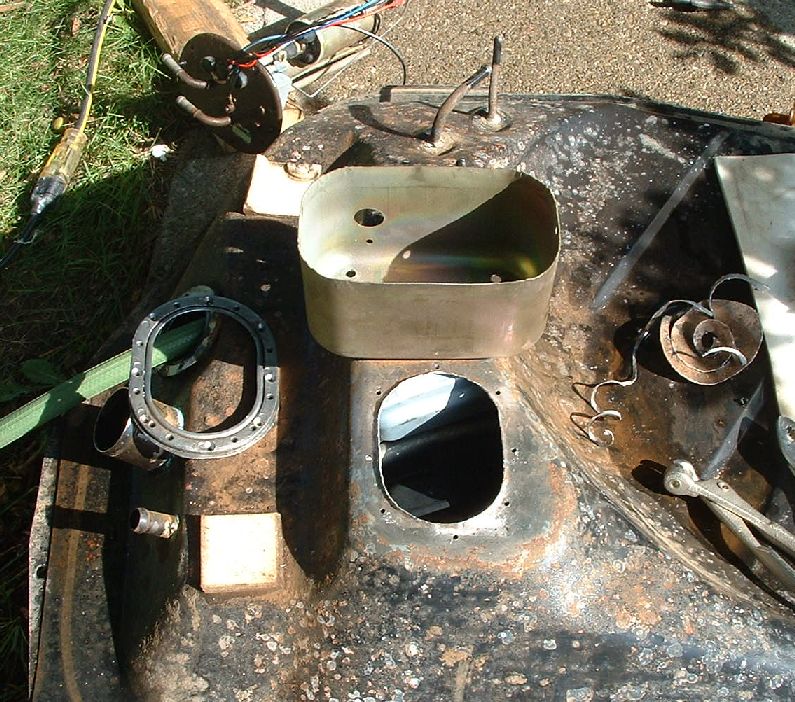
Now the tank is ready for the flange, but it should not be mounted yet. The slosh cup needs to be fit to the inside of the tank first. The stock slosh cup won't fit into the hole in the tank. To fit, it needs to be trimmed down about 1" in height. Had the mounting flange already been fit, it would need to be trimmed even farther, as the flange has a slightly smaller opening than the tank hole.
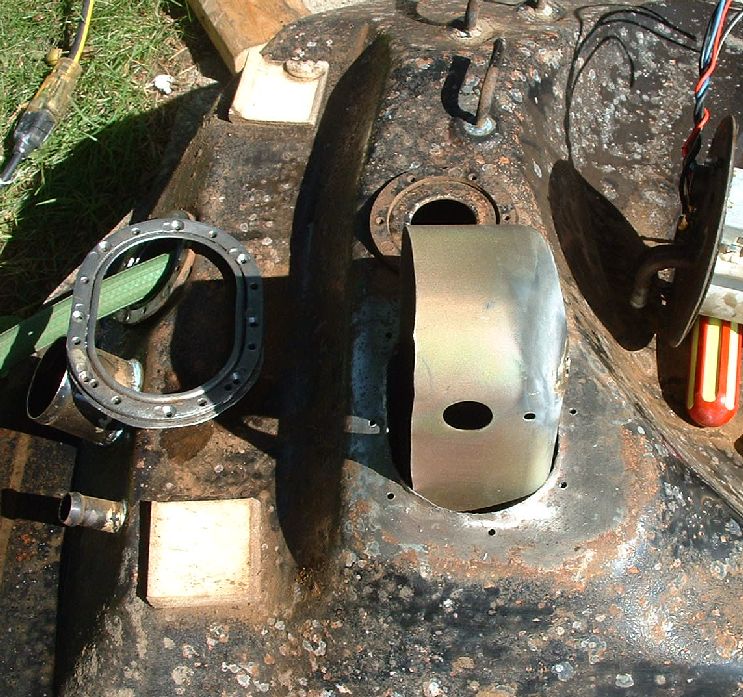
The stock internal baffles within the tank needed to be bent forward slightly to make room for the slosh cup. The next pic in sequence shows the baffle 'tweaking' needed. The slosh cup location was finalized by trial-fitting the pump assembly and checking for clearance with the return tube and pump pickup. Two 3/16" dia. rivets were used to fasten the cup into the tank. To seal these rivets, a small amount of metal-filled epoxy (JB-weld) was placed around the rivet, and at the interface between the cup and bottom of the tank.
The tank flange can now be mounted by applying a small continuous bead of JB-Weld around the mounting flange, and riveting with 1/8" rivets. Be sure to clean any JB-Weld out the pump mounting screw holes (those 8 threaded holes in the flange) prior to it curing!
Cap or crimp/braze the original fuel supply and return lines shut on the tank. Prior to final assembly, be sure to wash out the tank, and remove any contaminants that remain.
Drop in the FC pump assembly, and wire it up. Depending on pump type used, new pump wiring may be needed. To power the Bosch pump in this install, a dedicated 12 ga. feed was run from the fuel pump relay.
The final assembly looks like this:
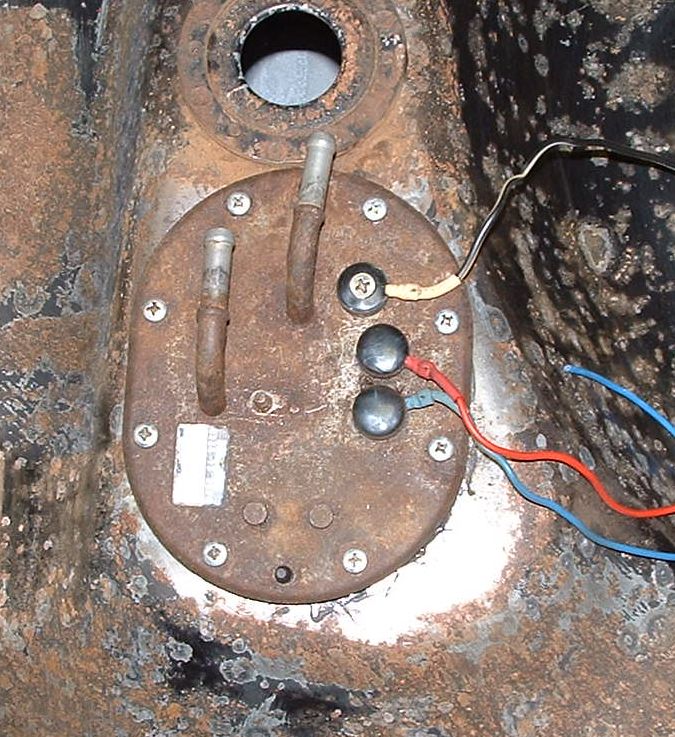
Sorry but no pics were taken after the final cleaning and painting of the tank. Access to the lines on the top of the fuel tank is impossible once the tank is mounted, so run sections of line from the supply and return lines first.
During this swap the stock return line was removed, and replaced with a 3/8" steel equivalent. It now serves as the supply, with the old 5/16" being used as the return. An in-line fuel filter (NAPA 23481, GF1481) was mounted where the stock external fuel pump used to be located. This fuel filter is a very popular unit, costs around $10, and is used on oem installations up to 360hp.
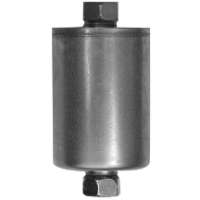
This filter uses the std GM o-ring type fittings, which can be adapted to hose by purchasing a 'Fuel Line Repair Kit'. These repair kits come in different lengths.
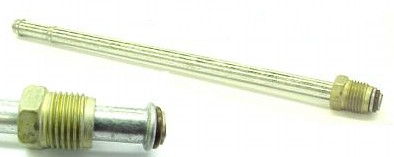
A 24inch long version can be used to replace the existing supply tube that mounts to the underbody in the axle area, connecting via hose to the fuel pump outlet on the one end, and threading directly into the filter on the other end.
Adapting an FC In-tank Pump to SA Tank
An FC fuel pump assembly, mounting flange, and slosh cup were scavenged from a tank at the auto wreckers. Tanks are already cut open to drain fuel when a wreck comes in, so the tanks are scrap value only.
The parts as removed can be seen below:
To start the swap, the stock SA fuel tank was drained and removed. To expell any remaining fuel, the tank was flushed repeatedly with water, then washed inside with dishsoap and water. Use extreme caution when working on fuel system components!!!
On the SA tank there is only one location where there is enough space to mount the FC flange. The mounting area was sand-prepped and then the cutout marked with a Sharpie. See pic below:
The FC flange was prepared for rivet mounting by drilling and countersinking eight 1/8" dia. holes around the perimeter of the mounting flange between the already existing threaded holes that the pump assembly fastens to. About 1/8" of the lip of the tank opening can then be carefully bend upwards to mate nicely with the FC flange. Once the flange was fit nicely to the tank, the rivet holes were drilled through the tank using the flange as a guide. Clecos were used to hold the flange in place to ensure all holes matched. Rivets or suitable screws could be placed in the holes temporarily as well if clecos aren't available. Be sure to clean any chips from the tank periodically during this process.
Now the tank is ready for the flange, but it should not be mounted yet. The slosh cup needs to be fit to the inside of the tank first. The stock slosh cup won't fit into the hole in the tank. To fit, it needs to be trimmed down about 1" in height. Had the mounting flange already been fit, it would need to be trimmed even farther, as the flange has a slightly smaller opening than the tank hole.
The stock internal baffles within the tank needed to be bent forward slightly to make room for the slosh cup. The next pic in sequence shows the baffle 'tweaking' needed. The slosh cup location was finalized by trial-fitting the pump assembly and checking for clearance with the return tube and pump pickup. Two 3/16" dia. rivets were used to fasten the cup into the tank. To seal these rivets, a small amount of metal-filled epoxy (JB-weld) was placed around the rivet, and at the interface between the cup and bottom of the tank.
The tank flange can now be mounted by applying a small continuous bead of JB-Weld around the mounting flange, and riveting with 1/8" rivets. Be sure to clean any JB-Weld out the pump mounting screw holes (those 8 threaded holes in the flange) prior to it curing!
Cap or crimp/braze the original fuel supply and return lines shut on the tank. Prior to final assembly, be sure to wash out the tank, and remove any contaminants that remain.
Drop in the FC pump assembly, and wire it up. Depending on pump type used, new pump wiring may be needed. To power the Bosch pump in this install, a dedicated 12 ga. feed was run from the fuel pump relay.
The final assembly looks like this:
Sorry but no pics were taken after the final cleaning and painting of the tank. Access to the lines on the top of the fuel tank is impossible once the tank is mounted, so run sections of line from the supply and return lines first.
During this swap the stock return line was removed, and replaced with a 3/8" steel equivalent. It now serves as the supply, with the old 5/16" being used as the return. An in-line fuel filter (NAPA 23481, GF1481) was mounted where the stock external fuel pump used to be located. This fuel filter is a very popular unit, costs around $10, and is used on oem installations up to 360hp.
This filter uses the std GM o-ring type fittings, which can be adapted to hose by purchasing a 'Fuel Line Repair Kit'. These repair kits come in different lengths.
A 24inch long version can be used to replace the existing supply tube that mounts to the underbody in the axle area, connecting via hose to the fuel pump outlet on the one end, and threading directly into the filter on the other end.
Last edited by renns; Sep 13, 2006 at 07:18 PM. Reason: added last couple pics
Thread Starter
Rotary Enthusiast
Joined: Oct 2001
Posts: 1,022
Likes: 4
From: Ontario, Canada
Originally Posted by REVHED
What's the small tube next to the fuel pickup?
I should also say I've tossed the car around heavily with the tank on 'E', and have not experienced any fuel supply problems.
Thread Starter
Rotary Enthusiast
Joined: Oct 2001
Posts: 1,022
Likes: 4
From: Ontario, Canada
Oh, that's the fuel level sending unit. It's all one integral unit to keep the number of tank connections to a minimum. I checked the FSM, and the resistance range of the FC unit is identical to the 1st gen cars, so it should work fine. I haven't bothered wiring it up, though. It's just along for the ride.
There's also a low-level sensor that hangs down beside the pump as well. This would be a nice addition, perhaps driving an LED tucked into the instrument panel somewhere. A good rainy day project when the to-do list gets a bit shorter!
There's also a low-level sensor that hangs down beside the pump as well. This would be a nice addition, perhaps driving an LED tucked into the instrument panel somewhere. A good rainy day project when the to-do list gets a bit shorter!
Trending Topics

FB+FC=F-ME
Joined: Jul 2004
Posts: 3,353
Likes: 5
From: Rohnert Park CA
Nice!.......Its quiet, huh?
I meant to do all that when I did mine,but I was too eager to get it all installed and running.I see the SA tank has a remote vent hook up very similar to the FC tank(the little round hole/flange) ahead of the FC pump.Very good for you!I had to do the hole/flange job twice in order to fit up the FC vent,which is seperate from the FC pump assembely. Looks like only the FB has the tank vent integrated with the pickup tubes.
For the gauge,I just used the stock FB sending unit since I wasnt sure if the FC unit was going to hit anything along its throw.I just clipped the FC float/rod off.I did utilize the FC low fuel light,wiring it into the stock FB wiring,since my stock low fuel light sender didnt work.BTW,that light is not just a simple on/off.....I think its controlled by the CPU under the dash,to have the light gradually intensify,as the fuel level begins to clear the sensor in the tank.Takes a good 30-40 miles, from the light coming on dim,to it staying on bright.And itll fluctuate in turns.
For the fuel lines,I utilized the stock FB feed line since its the same size as the stock TII line and the same size as the steel line coming off of the pump unit.my logic is,theres no point going bigger when you have a 5/16" bottle neck right out of the pump.To finish it off,I matched the stock TII system by running another 5/16" FB feed line as a return line.It is prebent and fits right along side the feed line.For a filter,I run the stock FC unit. Its a regular,"rubber hose on barb" type EFI filter so its easy to plumb and change,no wrenches.
Thread Starter
Rotary Enthusiast
Joined: Oct 2001
Posts: 1,022
Likes: 4
From: Ontario, Canada
Originally Posted by gonzz
You running a turbo engine?
Nice writeup, thanks! It's just what I plan on doing for my s5 turbo swap, although I'll probably end up welding it in with my mig welder. Like steve keeps saying its factory reliable and quiet is always good, I hate loud fuel pumps or loud anything for that matter, gets real annoying real fast.
Thread Starter
Rotary Enthusiast
Joined: Oct 2001
Posts: 1,022
Likes: 4
From: Ontario, Canada
Originally Posted by Hades12
One question, How did you rivit the cup to the bottom. Drill from the top?
Nice writeup, thanks! It's just what I plan on doing for my s5 turbo swap, although I'll probably end up welding it in with my mig welder.
The SE doesn't use an intank fuel pump, which at least for me is the whole appeal of doing it this way, I don't wanna speak for him, but I believe he feels the same way I do. And that tank isn't that bad, look at the pics that show the inside, its still nice and clean, I would assume he sanded off all the rust and painted it with some kind of rust inhibitive primer to clean it up.
Renns: I agree welding the cup inside the tank isn't going to be fun even with a mig welder. I was actually thinking of drilling a few holes through the bottom of the tank just under where the cup would go, place the cup in there and weld the cup to/through those holes, making spot welds basically. And I plan on getting some kind of fuel safe paint to coat the areas affected by the heat of welding. As you say though, the jb weld and rivets are plenty strong I'm sure, they only see some minor vibrations.
Renns: I agree welding the cup inside the tank isn't going to be fun even with a mig welder. I was actually thinking of drilling a few holes through the bottom of the tank just under where the cup would go, place the cup in there and weld the cup to/through those holes, making spot welds basically. And I plan on getting some kind of fuel safe paint to coat the areas affected by the heat of welding. As you say though, the jb weld and rivets are plenty strong I'm sure, they only see some minor vibrations.
Thread Starter
Rotary Enthusiast
Joined: Oct 2001
Posts: 1,022
Likes: 4
From: Ontario, Canada
The bottom half of the tank is perfect, as it has that nice layer of stock undercoating on it. The top half of my tank is painted only from the factory, and the paint had blistered a fair bit around the top of the tank. Pretty normal for a tank of this vintage I expect, save perhaps an Arizona desert special. The surface rust was removed and the top half of the tank re-painted prior to final assembly. BTW, this is a Georgia car that has never seen a northern winter.
A decent GSL-SE tank is very rare up here in Canada. Add to that the fact that it won't fit in the early 1st gen cars, and you have your answer.
A decent GSL-SE tank is very rare up here in Canada. Add to that the fact that it won't fit in the early 1st gen cars, and you have your answer.
Yea, SE tanks are impossible to find, especially here in New Jersey, my 83 is an original NJ car, and the tank was pretty rusty, I was able to save it, but if I could find a replacement I think I'd go for it, like yours the bottom was in pretty good shape, but the top was covered in surface rust. oh well...
FB+FC=F-ME
Joined: Jul 2004
Posts: 3,353
Likes: 5
From: Rohnert Park CA
Im pretty sure my rings and slosh baffle were brazed in,which is just as good as a TIG/MIG/Gas weld......stronger in some cases.I did have a radiator shop do mine,and they love to braze.Personally,I think a spot welder would be ideal for this job.Thats hw the factory parts are secured.Maybe find a local high school or college with a good metal shop and make a small donation in exchange for 10 minutes with their spot welder?
For anyone looking to attack the job with a Mig/Tig welder,Id go about it this way.Instead of trying to get your torch down into the tank,approach the job from the bottom with a rosette or "plug" weld.That way you minimize the welding thats directly applied to the tank and its internal coating.And the weld will positively seal the tank....not that the rivits and JB weld wont seal it up...I just preffer welding,because I have the means.
Basically,you drill a couple holes in the bottom of the tank,directly where the box sits.Make the holes about 3/8" diameter.Then,place the box into the tank,covering the holes from the inside.If you can find a way to wedge or hold the baffle in place,just flip the tank over and you should now have 2 holes in the tank,and the bottom of the baffle right against those two holes.Fire up the welder and start in the middle of the hole,on the base of the baffle,working your way out towards the edge of the hole until the entire thing is just one big puddle.The floor of the baffle will now be the permanent "plug" for the holes you drilled,effectively melded to the tank bottom by the welds.
If I were to approach the job now,Id have done all the welding myself,as I now own a Mig,Tig and Plasma cutter.But this was 5 years ago,when I didnt have much stuff......
Last edited by steve84GS TII; Sep 14, 2006 at 11:14 PM.
I pulled a somewhat waterdamaged GSL-SE tank the other day. If it's reusable, it'll go into an '83.
If it's too far gone, do you think I should pull the cup and pickup assembly and install it in the '83 tank similar to what renns did?
If it's too far gone, do you think I should pull the cup and pickup assembly and install it in the '83 tank similar to what renns did?
FB+FC=F-ME
Joined: Jul 2004
Posts: 3,353
Likes: 5
From: Rohnert Park CA
That'd be an easy way to go,so long as you dont mind running an external fuel pump.
The SE mounting ring and cup are smaller than the FC units since the SE did have an external EFI pump.It'd be easier to do since your not trying to cram an entire pump assembely into the tank.
The SE mounting ring and cup are smaller than the FC units since the SE did have an external EFI pump.It'd be easier to do since your not trying to cram an entire pump assembely into the tank.