
"Economical" Alternator Upgrade

Thread Starter
Joined: Nov 1998
Posts: 12,974
Likes: 62
From: So. Arlington, TX!!!
OK, here's the latest of what I have found after doing this conversion three times in various year's chassis. For those wanting to ditch the 50/55 amp alternator in your 1stgen, this is probably the cheapest way to kick up to an 80 amp alternator which should be plenty unless you've got a TON of stuff and you run it at max ALL the time...
First up, the universal wiring diagram reference...

For the TII alt plug, I've seen two different wire colors, but I think the yellow w/blue stripe and white w/green stripe combo may have been a conversion harness leftover itself. Underneath is a quicky reference to all the different color combos I've seen in the various chassis and the physical rlationship of the different plugs...early style on bottom. Just match your colors and you'll get it right. I need to state again that the 1979 part had already been converted to the later style charging system and the external regulator was eliminated. Since the car is gone, I really am not sure what is involved making the conversion, but these are how the wires in the engine bay harness attached to the TII alt when I replaced the old alternator originally installed by Rotary Performance.
First up, the universal wiring diagram reference...
For the TII alt plug, I've seen two different wire colors, but I think the yellow w/blue stripe and white w/green stripe combo may have been a conversion harness leftover itself. Underneath is a quicky reference to all the different color combos I've seen in the various chassis and the physical rlationship of the different plugs...early style on bottom. Just match your colors and you'll get it right. I need to state again that the 1979 part had already been converted to the later style charging system and the external regulator was eliminated. Since the car is gone, I really am not sure what is involved making the conversion, but these are how the wires in the engine bay harness attached to the TII alt when I replaced the old alternator originally installed by Rotary Performance.
Last edited by mar3; Jul 15, 2008 at 09:08 PM.
Thread Starter
Joined: Nov 1998
Posts: 12,974
Likes: 62
From: So. Arlington, TX!!!
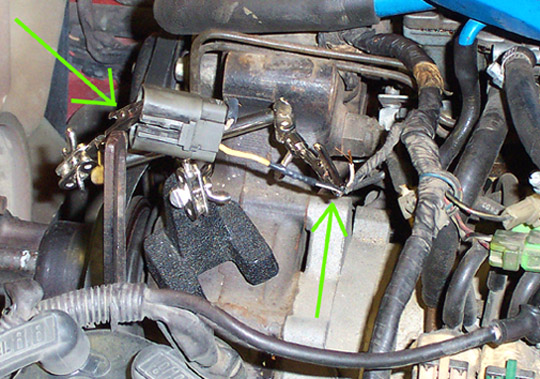
This is the actual install in the 1980 chassis...
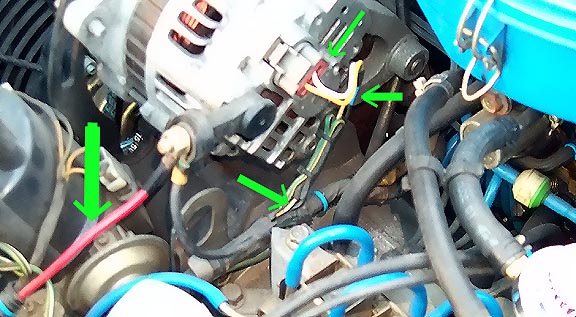
Going from the top green arrow clockwise...
Going from the top green arrow clockwise...
- The '89/'91 TII plug itself which you must have gotten with the alternator to make this happen.
- Tiny bit of the blue stripe on the yellow wire from the TII alt plug....the second TII alternator I got for the '83 had simply yellow and white wires with no stripes at all.
- White wire w/black stripe...note that this particular wire's color scheme seems to be the same regardless of year...looking at the Haynes, you wouldn't think it so, but neither of the swapped alternators ever burned out.
- 8 ga. wire going to the fusible link box on the strut tower of the '80...it never, ever gave me any problems with this routing, I might add.
Last edited by mar3; Jul 15, 2008 at 09:15 PM.
Thread Starter
Joined: Nov 1998
Posts: 12,974
Likes: 62
From: So. Arlington, TX!!!
This is the actual install into the 83 chassis...
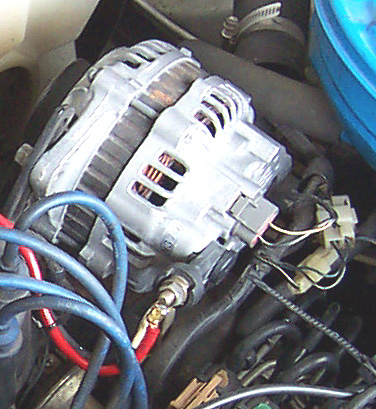
For this install, I decided to completely take apart the plug of the TII alternator I picked up and run the '83 wires directly into the TII plug's metal spades...a lot of frustrating work because of the small size of everything, but the result is a completely factory look...the wire on the output pedestal this time goes directly to the battery, which is the method favored by Rotary Performance as evidenced in them doing just that to the long gone '79...
For this install, I decided to completely take apart the plug of the TII alternator I picked up and run the '83 wires directly into the TII plug's metal spades...a lot of frustrating work because of the small size of everything, but the result is a completely factory look...the wire on the output pedestal this time goes directly to the battery, which is the method favored by Rotary Performance as evidenced in them doing just that to the long gone '79...
Last edited by mar3; Jul 22, 2008 at 10:43 PM.
Thread Starter
Joined: Nov 1998
Posts: 12,974
Likes: 62
From: So. Arlington, TX!!!
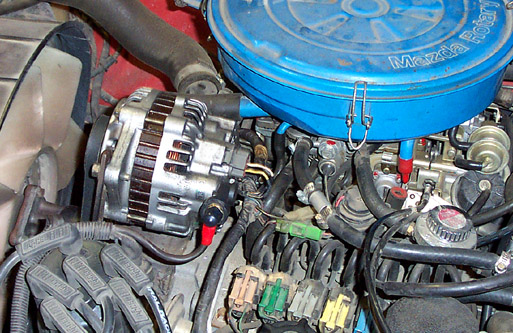
Actually bolting in the '89/'91 TII alternator into the 1stgen chassis is the easiest part.
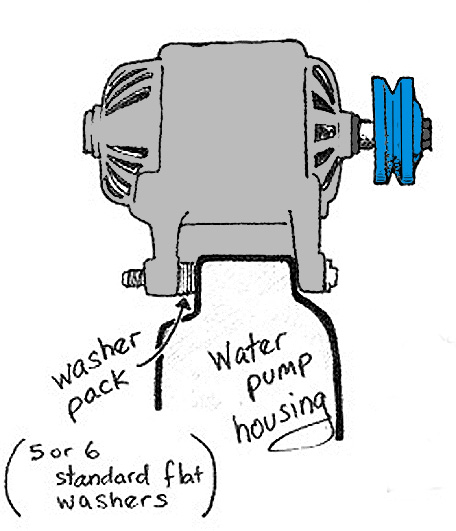
Done...the pulley doesn't need to be changed and it will work with your old belt, too, although this would be a real good time to put on a new one, right?
- Just unbolt your old alternator and keep all the fasteners and related clips, if any...
- Buy 5 or 6 standard size flat washers like you'll find at Home Depot that will just fit on the alternator bolt itself.
- Use masking tape to hold that pack of washers together...trust me on this one...

- Physically place the TII alternator into the mount, run the long bolt in and stuff your washer pack as shown in the diagram below and tighten.
Done...the pulley doesn't need to be changed and it will work with your old belt, too, although this would be a real good time to put on a new one, right?
Last edited by mar3; Jul 22, 2008 at 11:04 PM.
Trending Topics
Awesome Mario! I was just asked someone about the wiring diagram to do this swap and this looks very well done. Is the TII plug somewhat of an easy to find connector at, say, an autoparts store? Just wondering, 'cause I didn't get it with the 80-A alt. Thanks.
Thread Starter
Joined: Nov 1998
Posts: 12,974
Likes: 62
From: So. Arlington, TX!!!
Thanks, guys for the compliments on the sketches...all hand done for your viewing pleasure...I love stipple drawings...
The '79 that was converted was done by Rotary Performance of Garland, TX. I never looked to see what they did with the leftover wiring, but the regulator itself was gone. That particular car has since faded into the mists of history after taking down a utility pole late one rainy night on Cooper St....
Originally posted by frode
what are you doing with the wiring for the original external regulator when you are using a alternator with a built-in regulator in a SA?
what are you doing with the wiring for the original external regulator when you are using a alternator with a built-in regulator in a SA?
The AUTO DOCTOR
Joined: Mar 2001
Posts: 1,952
Likes: 0
From: South Side of ATL. Ga.
Originally posted by nosajwrx-7
Your diagram reminds me of that book for type 1 Volkswagon that's called something like "Hows to keep your Volkswagon alive for the complete idiot" or something like that. Great work!
Your diagram reminds me of that book for type 1 Volkswagon that's called something like "Hows to keep your Volkswagon alive for the complete idiot" or something like that. Great work!

...and i have a FEW friends that want to know how the hell you can jump or bypass the ext. reg. on rotary stuff...rx2,3 100 and repu... so if anybody knows PLEASE shead some light on this.
Last edited by mar3; Jul 15, 2008 at 09:55 PM.
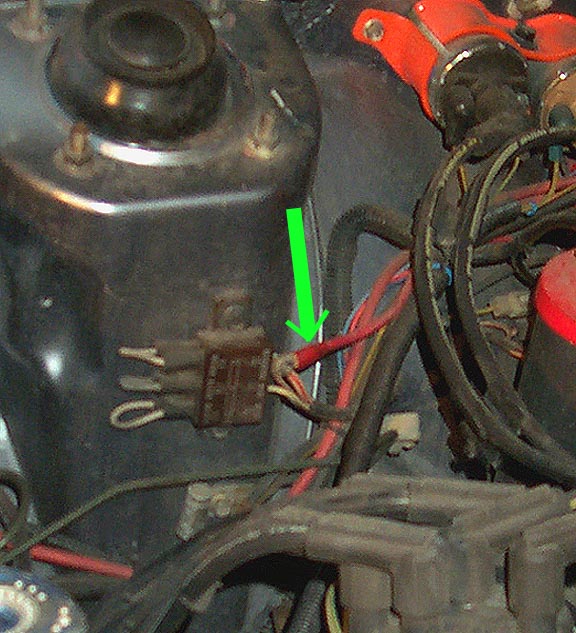
Originally posted by mar3
The actual shot of the fusible link attachment as physical proof I did it that way in the '80...

The actual shot of the fusible link attachment as physical proof I did it that way in the '80...
if you did the upgrade to a higher rating alternator, why do you still have the stock fusible links? Or am I missing something.
Last edited by mar3; Jul 22, 2008 at 11:24 PM.
Got Boost?
Joined: Feb 2002
Posts: 1,066
Likes: 1
From: Watertown, MA
and i have a FEW friends that want to know how the hell you can jump or bypass the ext. reg. on rotary stuff...rx2,3 100 and repu... so if anybody knows PLEASE shead some light on this.
You need some type of regulator. So first off, you need an FB alt, or something more exotic like Mario is showing here, the S5 style.
Then you have to make a decision, do you need the dummy light? If not then its really easy, if so, you need to get a choke & check relay from an FB.
If you eliminate the dummy light than all you need is a diode. if you keep the dummy light, then just wire in the choke and check relay's coil/diode in the orientation the diode would be, then wire in the NC (normally closed), NO (normally open) parts to the dummy light, and choke switch respectively.
Now for the good stuff:
1. Remove the alternator, and external regulator.
2. Install new alternator, using washers like shown by Mario above if necessary.
3. Grab the BLg (from key switch, ON and start) wire that went to the regulator and route it over to the alternator (or choke and check and add a wire from there to the alt).
4. Connect the BLg wire to both the anode of the diode(the side the arrow points away from, no white band on real diode) and to the BW wire coming from the �83 alt (Y or WL if S5) .
5. Connect the Cathode of the diode (the side the arrow points to, the side with the white bar on a real diode) to the WB wire coming from the �83 alt (W or WG if S5).
6. Start the car, and check the system voltage, to be sure the alternator is now working.
That�s it, your done� remove unnecessary wires and clean up.
Refer to Mario's wonderful drawing above, he did a good job, and it may be helpful for color comparison for different years.
Thread Starter
Joined: Nov 1998
Posts: 12,974
Likes: 62
From: So. Arlington, TX!!!
Originally posted by wackyracer
if you did the upgrade to a higher rating alternator, why do you still have the stock fusible links? Or am I missing something.
if you did the upgrade to a higher rating alternator, why do you still have the stock fusible links? Or am I missing something.
Yea I've had my 80 amp alt in there for over a year on stock fuseable links and it works fine.
Last edited by mar3; Feb 10, 2012 at 11:56 PM. Reason: Killed quote since reply was back-to-back to post in question...
Thread Starter
Joined: Nov 1998
Posts: 12,974
Likes: 62
From: So. Arlington, TX!!!
The wires are the same for an '84....here is an S5 80 amp alt into an '84 chassis I did this past weekend...this time, I chose to simply solder in the leads and shrink-wrap them since I'm selling red rex to a local buyer in May...
This first one is the pedestal clamp that makes in-car soldering a joy, seen holding the S5 plug and a bit of the '84s wire...
And then the completed install with a little rubber cap to make DriveFast7 a happy camper this time around...
One thing I should add....make sure you get a ring end that fits the S5 alternator's output pedestal before you start, so you'll have everything right there when you do the upgrade. The stock output wire from the chassis harness will have to be cut to length for the "new" alternator as it is way too long.
This alternator was off of eBay for $40.50 total, so this is the cheapest one I've done so far....and yes, I know, one day I'll clean the freakin' engine bay...
Last edited by mar3; Jul 15, 2008 at 09:41 PM.
raysspl.com
Joined: Sep 2003
Posts: 3,508
Likes: 0
From: L.A.
S5 alternators
regarding the S5 TII alternator, is it the same as the S4 or S5 all motor (n/a) alternator??? great write up btw, mar3
thanks in advance,
-Ray-
thanks in advance,
-Ray-
Last edited by d0 Luck; Feb 11, 2004 at 12:03 AM.
Thread Starter
Joined: Nov 1998
Posts: 12,974
Likes: 62
From: So. Arlington, TX!!!
The NA alternators are anywhere from 50 to 65 amp output models...that's why you're looking for a TII car...if someone is advertising or listing an S4 or S5 alternator, always make sure it's an 80 amp model before bidding or buying one. The metal tag on the alternator will have its amp rating clearly on it.
SKELETOR!
Joined: Mar 2003
Posts: 1,077
Likes: 0
From: Prescott Valley, AZ
I gots me a 91 turbo alternator...
.jpg)
....The stock ring up top was too small for the bolt it attaches too, so I just cut it, bent it out, and fastened it tight under the nut.
The plastic harness is different, so it was busted open, and the 2 wires with spade connectors slip right on. Works great.
....The stock ring up top was too small for the bolt it attaches too, so I just cut it, bent it out, and fastened it tight under the nut.
The plastic harness is different, so it was busted open, and the 2 wires with spade connectors slip right on. Works great.
Last edited by mar3; Jul 22, 2008 at 11:30 PM.
Last week I upgraded my 74 REPU 50 amp generator and external regulator to a S4 88 Rx7 n/a 70 amp alternator with built in regulator.
Bolted right up. Used four thick washers instead of spacer. REPU spacer won't fit, too long. Biggest trick was wiring up the exciter wire. Take the six pin external regulator connector. The one that's wired into the harness. Flip it up so it's connectors are looking up at you. Bottom rightmost wire gets wired into the alternator. It gets +12 volts with ignition switch ON or START.
On the alternator, where the the two wire pigtail goes: Wire it into the top, horizontal connector on the alternator. I am not using the lower vertical connector at all.
The Generator dash idiot light works correctly too. With motor off and ignition switch to ON, G light is on. With motor running G light is off!
And I got rid of that ugly external regulator.
14.38 volts @ alternator. 14.36 volts @ battery + terminal!!!!!!!!!! Only .02 volt drop thru the 11 foot REPU + alt cable! I replaced the stock 10 gauge alt wire with thickly sleeved 6 gauge.
There's not much electrical components on the old school rotaries so 70 amps will be PLEANTY. At most I'll add a 100 watt stereo or some nice 80 watt headlights.
Plus the S4 88 n/a 70 amp alternator was in stock for $106.00. The S5 90 T][ 80 amp alternator was in Indiana for $168.
Last edited by DriveFast7; Feb 11, 2004 at 02:58 PM.
Joined: May 2002
Posts: 5,972
Likes: 37
From: Ottawa, Soviet Canuckistan
This alternator was off of eBay for $40.50 total, so this is the cheapest one I've done so far....and yes, I know, one day I'll clean the freakin' engine bay...
Jon
junkyards here in socal are packed with MX-6, 2nd gens, and other mazda that have same alternators. $15 with 30 days warranty. In my experience with imports, I will only get the green coil pack. other colors are bought from autozone pep-boys etc which are known for failure. yes, they come with lifetime warranty but how many times would you need to change it.