
DLIDFIS install pics


Thread Starter
Full Member
Joined: May 2006
Posts: 244
Likes: 0
From: Statesville, NC
DLIDFIS install pics
Many thanks to Jeff20B for his excellent write-up and diagrams on DLIDFIS!
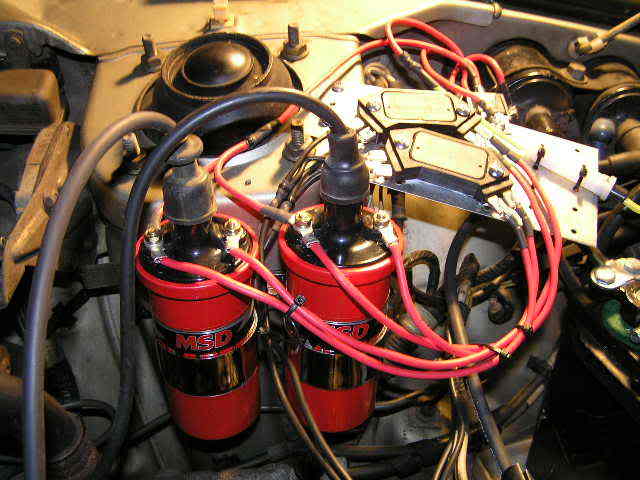
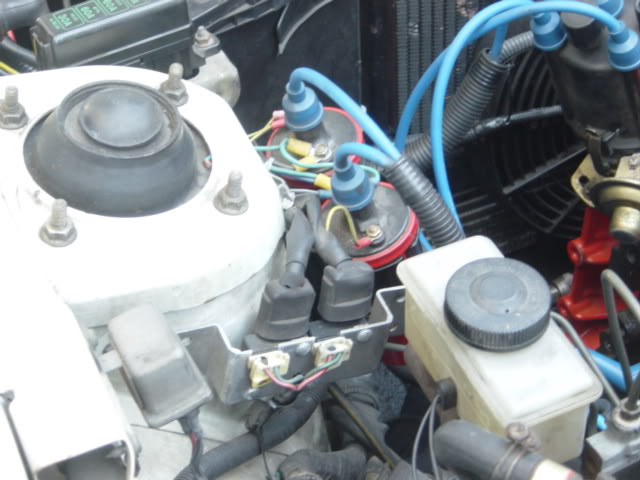
Right after I bought the car (�83 12A completely stock) a few months ago, the leading igniter died and I converted it to HEI (GM), so I already had a J109 gutted and wired up to use the terminals to connect wires to.
In preparation for this install, I removed the plug wire holder from the front of the driver side shock tower and moved the brown terminal connector that is on the inside of the shock tower to it�s place. This gave me room on the inside of the shock tower to mount two new Blaster coils to use for the leading ignition. I also mounted a metal plate on the shock tower that I picked up at the hardware store.
I left the trailing ignition completely stock.
I left the stock leading coil in place, removed the coil wire from it, taped over the hole, and of course there is no igniter signal going to it.
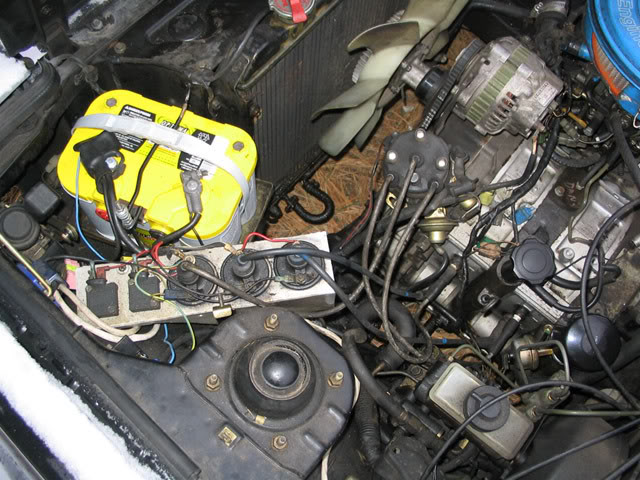
I used the + terminal of this coil to get an ignition switch source for the relay to use in the new wiring harness I made.
The relay input is wired through a 30 amp fuse directly to the + terminal of the battery.
The relay output is wired to the + terminals of both new coils.
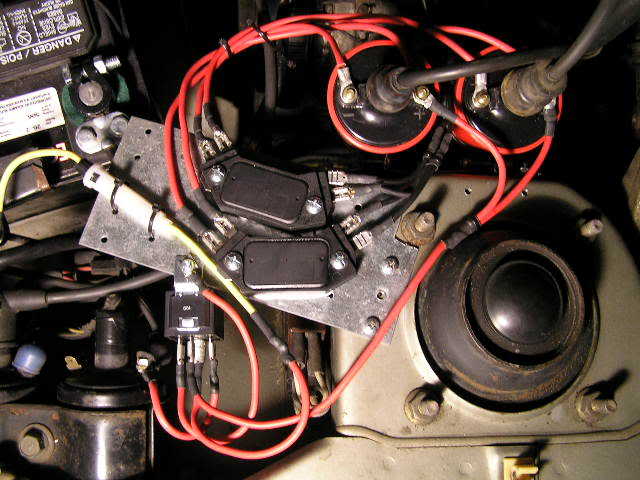
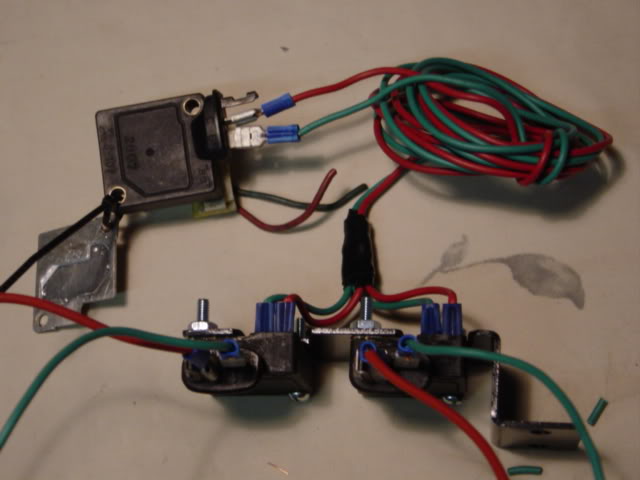
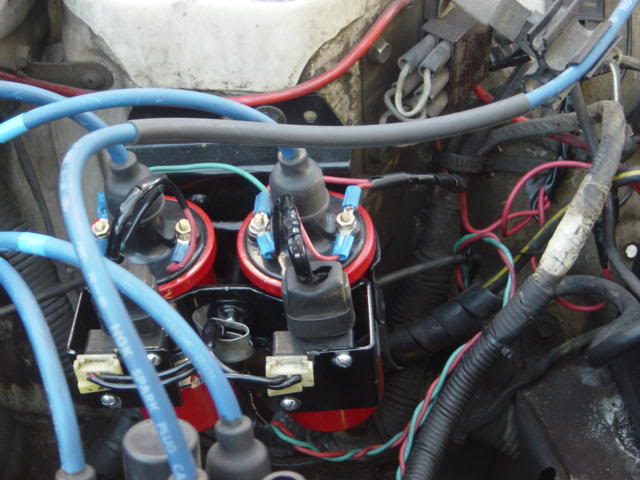
I mounted two HEI igniters on the metal plate.
The B connection from each igniter goes to the + terminal on the coils.
The C connection from each igniter goes to the - terminal on the coils.
The G connection on both igniters goes to the red or � connection on the gutted J109.
The W connection on both igniters goes to the green or + connection on the gutted J109.
I probably should have used red / black wire for + & -, but I had a role of red 12 gauge wire so that is what I used.
All wires going into connectors are crimped (not crushed) and then soldered, with heat shrink over the connection. In addition, where I had to take one wire and make two ends on it, I made up one wire and then peeled insulation off it and soldered another wire on, put heat shrink on it and then tie-wrapped the two wires together to reduce possibility of the connection coming apart.
The car started the first time I tried it, so I guess I got it wired right. It revs easily above 7K which it had trouble doing before. My seat-of-pants dyno says it has a couple of more horsepower, but that may just be newness factor
Anyway, I have all new stuff (except for 1 plug wire) in the leading ignition so it should be more reliable. One of the plug wires was too short so I had to use an old one. I went by NAPA today and ordered two new 8mm plug wires with a 90 degree connector on the coil end and 45 degree connector on the plug end that are the correct length.
Counting coils, igniters, wire and connectors, I�ll probably have about $125 in this, plus several hours of making a mounting support and manufacturing wires.
You can find all the diagrams I used by searching on DLIDFIS or HEI igniter.
I apologize for the pictures- they were made after dark under a work light�
- David
thats sweet good job ++ on the lil write up
i tryed the hemi igniter due to the same problems u had but i never had it running right i think that was due to timming oh well glad it works 4 ya i was going this route but i got a free msd 6a box..
i tryed the hemi igniter due to the same problems u had but i never had it running right i think that was due to timming oh well glad it works 4 ya i was going this route but i got a free msd 6a box..


WWW.SUPERCHARGED-RX7.COM
Joined: Jan 2006
Posts: 481
Likes: 1
From: illinois
Very nice job indeed. My only concern is the exposure on all those connectors.
Ever thought about getting a project enclosure box like this one?

It's like $2 something at radio shack comes in variety of sizes. You can drill holes for the wiring and install it where your fusable links are currently at (after you replace them with a second gen fuse box)
When I work on my car I always put tools around that area that's why i'm saying that.
Ever thought about getting a project enclosure box like this one?
It's like $2 something at radio shack comes in variety of sizes. You can drill holes for the wiring and install it where your fusable links are currently at (after you replace them with a second gen fuse box)
When I work on my car I always put tools around that area that's why i'm saying that.
Trending Topics
a project enclosure is meant to house an electronic device that you would build. they are made of plastic and in this particular situation, you would use it to shield and enclose the dlidfis setup.
Nice job.
I have found that gutting ignitors is completely unnecessary. Just file down some male quick disconnects until they're a snug fit inside the plastic connector on the dizzy. Then push them all the way in, bend them up and zip tie the wires to the existing harness. This way everything is backwards compatible. In all the years I've done it this way, not a single one has ever fallen out or given me trouble.
I have found that gutting ignitors is completely unnecessary. Just file down some male quick disconnects until they're a snug fit inside the plastic connector on the dizzy. Then push them all the way in, bend them up and zip tie the wires to the existing harness. This way everything is backwards compatible. In all the years I've done it this way, not a single one has ever fallen out or given me trouble.

This was completed in '01. Still working perfectly after all these years.
Notice the stock ignitor's connector just hanging there? If I ever have to change it back, I can. Fully backwards compatible. Not so with a gutted ignitor and the subsequent modification to the harness, and all that. I simply install an ignitor, plug the stock connector to it, and reconnect the coil. Oh, and grab my left over coil to cap wire out of the glove box and throw it on the cap, and run it like stock through the cap. Easier than changing your oil.
Notice the stock ignitor's connector just hanging there? If I ever have to change it back, I can. Fully backwards compatible. Not so with a gutted ignitor and the subsequent modification to the harness, and all that. I simply install an ignitor, plug the stock connector to it, and reconnect the coil. Oh, and grab my left over coil to cap wire out of the glove box and throw it on the cap, and run it like stock through the cap. Easier than changing your oil.

Hunting Skylines
Joined: Apr 2001
Posts: 3,431
Likes: 4
From: Brisbane, Queensland, Australia.
Originally Posted by Jeff20B
Nice job.
I have found that gutting ignitors is completely unnecessary. Just file down some male quick disconnects until they're a snug fit inside the plastic connector on the dizzy. Then push them all the way in, bend them up and zip tie the wires to the existing harness. This way everything is backwards compatible. In all the years I've done it this way, not a single one has ever fallen out or given me trouble.
I have found that gutting ignitors is completely unnecessary. Just file down some male quick disconnects until they're a snug fit inside the plastic connector on the dizzy. Then push them all the way in, bend them up and zip tie the wires to the existing harness. This way everything is backwards compatible. In all the years I've done it this way, not a single one has ever fallen out or given me trouble.
Thread Starter
Full Member
Joined: May 2006
Posts: 244
Likes: 0
From: Statesville, NC
The way I did my install with the HEI igniters, if an igniter or coil fails, all I have to do is move the plug wires from the coils back to the distributor cap and connect the original coil wire from the working coil back to the distributor cap. Run it like this until I get to the nearest generic auto parts store. No reliance on 20+ year old J109's... But I do carry spare J109's for the trailing
- David
- David
Thread Starter
Full Member
Joined: May 2006
Posts: 244
Likes: 0
From: Statesville, NC
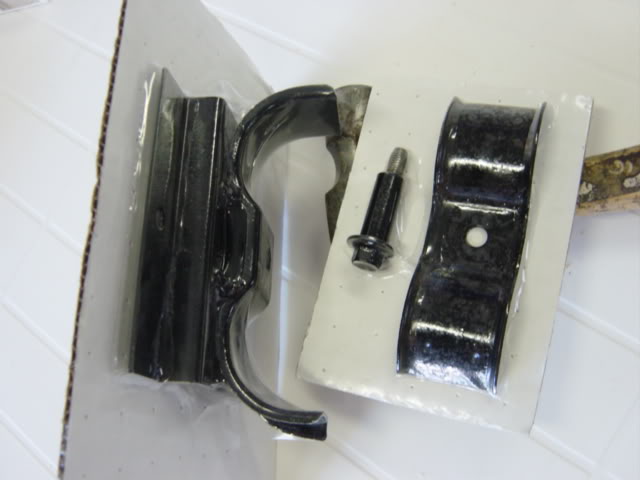
I bought two coil mounting brackets from Advance Auto and set aside the chrome coil covers. I cut a piece off of a closet rod hanger (3/4" wide x 8" or so). I drilled 3 holes in this to match the holes of the two coil mounting brackets (after they were tightened down on the coils, with the middle holes overlapped). Painted it black, put a screw in each end and a bolt in the middle, and bolted it to an existing bolt hole (where I moved the brown electrical connector mentioned earlier).
Works great!
- David
Works great!
- David
its supposed to do that
Joined: Jan 2003
Posts: 1,352
Likes: 2
From: PNW
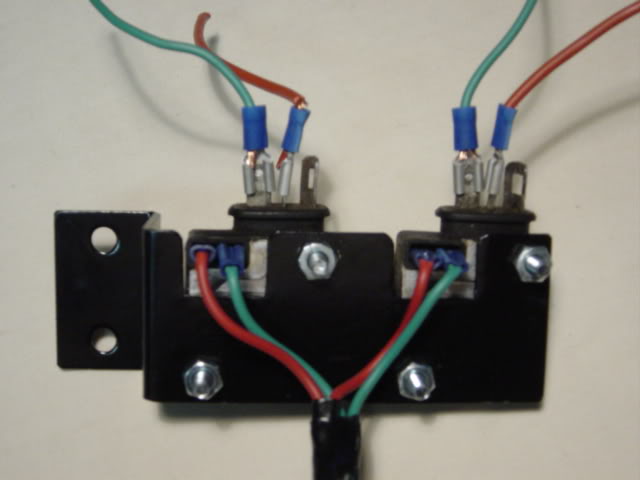
i need to clean up the wiring but here is a better shot. 2 wires from the dizzy leading pickup come up to the munting flange and are wired to the 2 j-109's. then trailing ignitor is on the dizzy still and the trailing wires run through the leading section of the dizzy cap(less contacts to jump=stronger spark).
isaac
isaac
