
1984 GSL-SE S4 13b Project

Thread Starter
Joined: Jun 2003
Posts: 832
Likes: 11
From: Northern California
WEEEE! Took the first "drive" today
First time the car has moved under it's own power in 3-3.5 years.
http://www.youtube.com/watch?v=WBdI89_K19g
First time the car has moved under it's own power in 3-3.5 years.
http://www.youtube.com/watch?v=WBdI89_K19g

Junior Member
Joined: Aug 2009
Posts: 8
Likes: 0
From: Norman
ITS ALIVE!!! Finally got it started for the first time and it feels goooood.
Need some suggestions though.
It starts but takes a lot of cranking and some throttle manipulation.
I think timing is spot on and it has new plugs. I do have the temp and oxygen sensor to hook up though.
Anyway feeling very motivated now. : )
Need some suggestions though.
It starts but takes a lot of cranking and some throttle manipulation.
I think timing is spot on and it has new plugs. I do have the temp and oxygen sensor to hook up though.
Anyway feeling very motivated now. : )
Thread Starter
Joined: Jun 2003
Posts: 832
Likes: 11
From: Northern California
Awesome!
Did you wire in the Circuit Opening Relay?
How's the fuel in the tank? Mine was pretty reluctant to start, the fuel was 2 years old. I put some fresh gas in and it seemed to help.
Did you wire in the Circuit Opening Relay?
How's the fuel in the tank? Mine was pretty reluctant to start, the fuel was 2 years old. I put some fresh gas in and it seemed to help.
Junior Member
Joined: Aug 2009
Posts: 8
Likes: 0
From: Norman
I did put the COR in. The fuel in the tank is all new with a little injector cleaner as well. Had to take it all out and clean it out to weld the fuel cup and pump assembly in.
I'm thinking timing isn't as spot on as I thought. After advancing it was starting better and better.
The only thing I didn't use that you did, I think, is the fuel pump relay. Though I may still out it on. Just got a hold of one.
Can't wait till that first drive down the road. I'm still smiling from the sound of that open header.

Like2Drive, did you happen to snap any pics of the S4/SE tranny mod? A write-up of that would be great help to people like me that have never cracked open a tranny case...
I wonder if that mod would work with a TII tranny and the SE tailshaft?
I have seen a few RX-8 6 speed trannys on ebay recently, too. I know the bellhousing pattern is the same, but I'm not sure about the clutch size, input shaft spline, overall length, clutch fork, throw-out bearing, etc. I don't think I've seen any threads where it has actually been done in a first gen. It would be cool to at least have bragging rights to having a 6 speed in your FB...
Sorry to stray off-topic, your nifty mods just got my gears turnin'. I would like to know more about the tranny mod if at all possible...
Thanks!
Thread Starter
Joined: Jun 2003
Posts: 832
Likes: 11
From: Northern California
I did put the COR in. The fuel in the tank is all new with a little injector cleaner as well. Had to take it all out and clean it out to weld the fuel cup and pump assembly in.
I'm thinking timing isn't as spot on as I thought. After advancing it was starting better and better.
The only thing I didn't use that you did, I think, is the fuel pump relay. Though I may still out it on. Just got a hold of one.
Can't wait till that first drive down the road. I'm still smiling from the sound of that open header.
I'm thinking timing isn't as spot on as I thought. After advancing it was starting better and better.
The only thing I didn't use that you did, I think, is the fuel pump relay. Though I may still out it on. Just got a hold of one.
Can't wait till that first drive down the road. I'm still smiling from the sound of that open header.
If you think the timing may be off, I'd check that out first. I still need to get mine dialed in, I don't have a timing light though. May have to borrow one from kragen or autozone.
Bet that header sounds nice
 Post some videos if you have a camera!
Thread Starter
Joined: Jun 2003
Posts: 832
Likes: 11
From: Northern California
Like2Drive, did you happen to snap any pics of the S4/SE tranny mod? A write-up of that would be great help to people like me that have never cracked open a tranny case...
I wonder if that mod would work with a TII tranny and the SE tailshaft?
I have seen a few RX-8 6 speed trannys on ebay recently, too. I know the bellhousing pattern is the same, but I'm not sure about the clutch size, input shaft spline, overall length, clutch fork, throw-out bearing, etc. I don't think I've seen any threads where it has actually been done in a first gen. It would be cool to at least have bragging rights to having a 6 speed in your FB...
Sorry to stray off-topic, your nifty mods just got my gears turnin'. I would like to know more about the tranny mod if at all possible...
Thanks!
I wonder if that mod would work with a TII tranny and the SE tailshaft?
I have seen a few RX-8 6 speed trannys on ebay recently, too. I know the bellhousing pattern is the same, but I'm not sure about the clutch size, input shaft spline, overall length, clutch fork, throw-out bearing, etc. I don't think I've seen any threads where it has actually been done in a first gen. It would be cool to at least have bragging rights to having a 6 speed in your FB...
Sorry to stray off-topic, your nifty mods just got my gears turnin'. I would like to know more about the tranny mod if at all possible...
Thanks!
Take the SE tranny and unbolt the tail shaft
Remove the shift fork and speedo gear.
Take the S4 tranny and unbolt the tail shaft
Remove the shift fork and speedo gear
Install the speedo gear from the SE tranny onto the S4 tailshaft.
Install the shift fork and tail housing from the SE onto the S4 tranny.
Use silicon sealer to seal the tail shaft to the gearbox.
I don't know the technical name for it, but there is a square metal object that the shifter ball sits in. The square sits on the end of the shift fork, make sure you put that on BEFORE you seal/slide it all together. I had to pull mine apart again. On one of the transmissions the square is held in by a bolt, the other is pinned in. You will have to drive it out with a punch. Try not to damage it if you want to re-use it.
This Hybrid transmission wasn't even my idea, I just did a search to see what they had done about the mounting of the 2nd gen tranny in a first gen. I can't guarantee this will work with a 12a transmission only the GSL-SE. This will solve shifter placement AND transmission mount position.

Congrats MAN!!!
I'm about to start working on my rx7 again, I was out of town, and then had a crazy series of events at work that have taken all my time... I think you have a small exhaust leak :p JK
I still need to decide the best way to deal with mating the 13b exhaust mani to my 12a exhaust system??? Anyone have anything?
Thread Starter
Joined: Jun 2003
Posts: 832
Likes: 11
From: Northern California
Congrats MAN!!!
I'm about to start working on my rx7 again, I was out of town, and then had a crazy series of events at work that have taken all my time... I think you have a small exhaust leak :p JK
I still need to decide the best way to deal with mating the 13b exhaust mani to my 12a exhaust system??? Anyone have anything?
I'm about to start working on my rx7 again, I was out of town, and then had a crazy series of events at work that have taken all my time... I think you have a small exhaust leak :p JK
I still need to decide the best way to deal with mating the 13b exhaust mani to my 12a exhaust system??? Anyone have anything?
Don't do that! the stock 1st gen exhaust is 2 inches. Get yourself the 13b pre-cats and main cat and then have a custom exhaust made like I plan on doing. That way it will all be 2.5" the way it was meant to be
That exhaust "leak" is only pre-cats! Haha
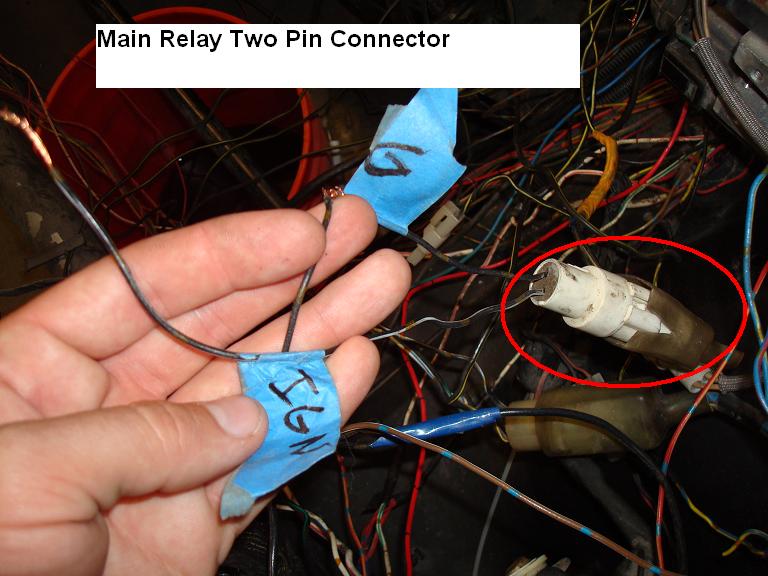
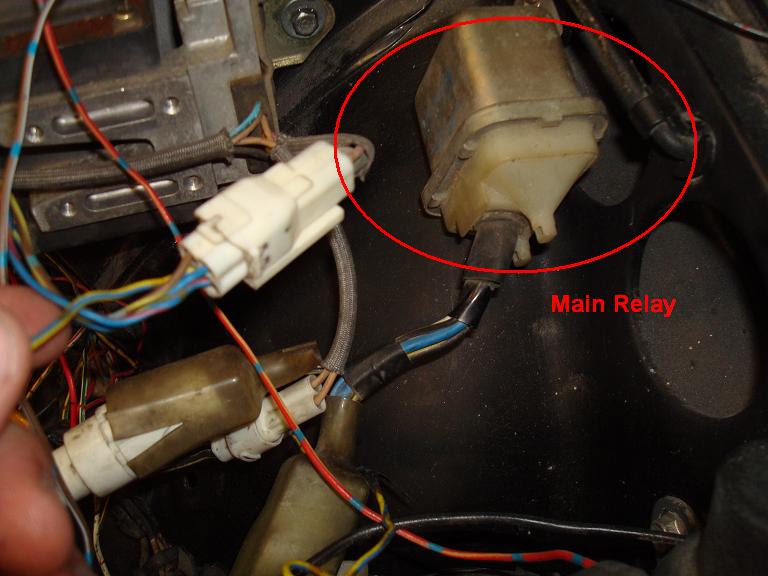
Main Relay Wiring
This relay is gold in color and has two connectors coming off of it. A Four pin and a two pin connector. On an FC this can be found next to the brake fluid reservoir on the driver side. Can be found on pages 50-31 and 50-28:
Black/White- Needs ignition source 1 power
Black- Ground
Four wires on the other Connector:
Black/Green- Battery Power from Main Fuse box
White/Blue- Battery Power from Main Fuse box
Black/White- Connects to FEM-02, which carries power to the Air Bypass Solenoid. You will need to splice this wire, one goes to FEM-02 the other goes to the Air Bypass Relay.
Black/Yellow-Connect to FEM-02 and trailing coil two pin connector. Almost all the black/yellow wires will need this. There are a few others, including one black/yellow wire that is wrapped up in the 1st gen harness.
Pictures
***************Where is the black/yellow located in the 1st gen harness?************
Thread Starter
Joined: Jun 2003
Posts: 832
Likes: 11
From: Northern California
If you unravel some of the 1st gen harness that is on the driver side of the engine bay you'll see it. It will have many different leads and split offs just like the 2nd gen one.
Full Member
Joined: Apr 2008
Posts: 75
Likes: 0
From: alberta, canada
this is a great writeup. im considering pulling engine out my n/a s5 to put in my fb. want to try and put stock fd manifold and turbos on it too. not sure how hard that would be tho. maybe s4 jdm turbo engine would be better engine. then no problems with mop and limp mode. and power fc can be used. think i threw an apex seal in my fb. and its my baby. fc is just old beat track **** but engine only has 10,000km on street ported rebuild.
Thread Starter
Joined: Jun 2003
Posts: 832
Likes: 11
From: Northern California
N/A S5 would be fun in a 1st gen, even MORE power!
The wiring is going to be a bit different though. Nothing an average garage mechanic couldn't figure out though. Especially with a forum like this and a Factory Manual
The wiring is going to be a bit different though. Nothing an average garage mechanic couldn't figure out though. Especially with a forum like this and a Factory Manual
Full Member
Joined: Apr 2008
Posts: 75
Likes: 0
From: alberta, canada
figured i'd swap the whole s5 wiring harness. not sure how hard turoing an n/a s5 will be. especially trying ti put the fd twin turbos on it. a buddy said i should try just for sheer bragging rights about twin turbo 1st gen. that little car would fly!
Thread Starter
Joined: Jun 2003
Posts: 832
Likes: 11
From: Northern California
Well N/A rotors have high compression so you can't run very much boost safely. It would be better if you found a turbo motor. Twin turbo's are over rated and without all the vacuum lines and solenoids from the FD they probably wouldn't function properly. I would rather have a single turbo and it would be easier.

Thread Starter
Joined: Jun 2003
Posts: 832
Likes: 11
From: Northern California
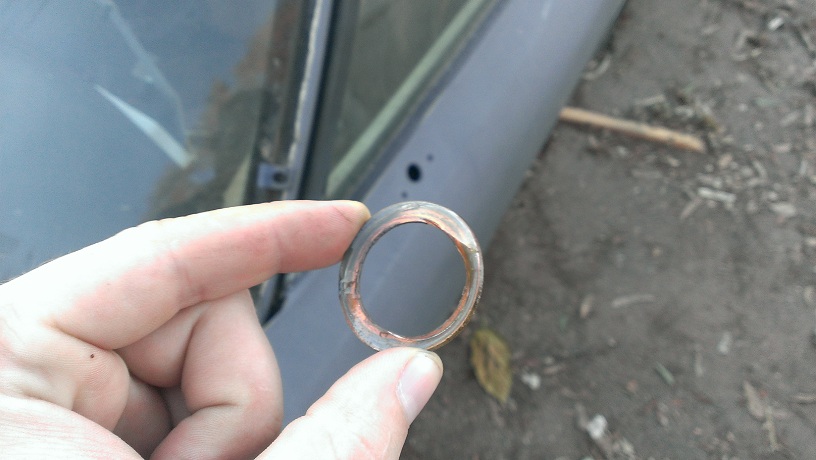
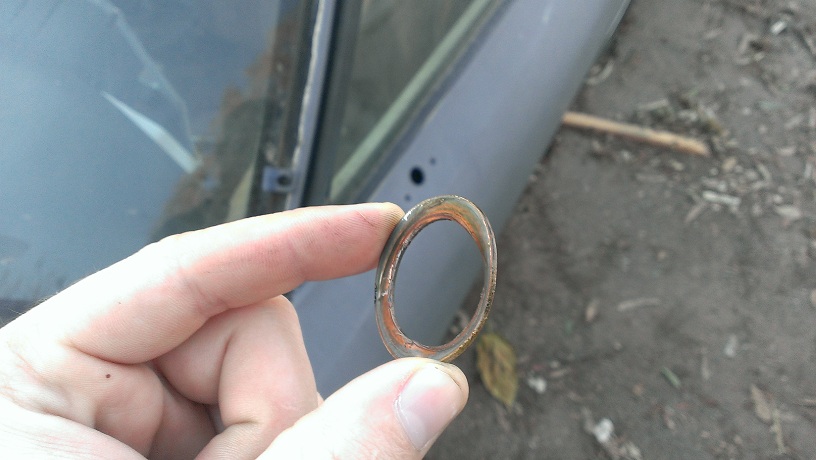
Been a long time since I updated my project, because I haven't really done much. The car runs but has been spraying oil off the eccentric shaft pulley. So I decided to investigate and found the crush washer was all messed up and the o ring is not so round anymore. I also wanted to check to make sure I hadn't dropped my torrington bearing. I did the measurement from the pulley boss to e-shaft and it was within spec so I think I am ok there. Also checked the oil and didn't see any metal.
Ordered replacement crush washer and o ring for the E-shaft bolt.
Ordered replacement crush washer and o ring for the E-shaft bolt.
Wondering about radiators, I currently have the stock GSL-SE one in there, but the tabs are broken and previous owner spray painted it with regular black paint - totally bubbling and peeling off. Can't find any new replacements, but FC radiators are a cinch to find.
Are the FC radiators that much more efficient?
Also, if you wouldn't mind could you take some snaps of how you mounted it?
Will the stock FB fan shroud fit over it?
Cheers man - keep up the great work!
Are the FC radiators that much more efficient?
Also, if you wouldn't mind could you take some snaps of how you mounted it?
Will the stock FB fan shroud fit over it?
Cheers man - keep up the great work!
Thread Starter
Joined: Jun 2003
Posts: 832
Likes: 11
From: Northern California
FC radiator fits with a little coercing using the stock mounting tabs. You have to hammer the passenger side a bit, IIRC. It has been a while but I will take post some pictures in a minute
Thread Starter
Joined: Jun 2003
Posts: 832
Likes: 11
From: Northern California
As you can see the biggest problem with the FC radiator is the angle the spout comes off for the upper hose. I will eventually get a different hose. This one is only temporary. As far as mounting it, it is a pretty easy install. I have to double check to see if I had to cut or bend anything.
Thread Starter
Joined: Jun 2003
Posts: 832
Likes: 11
From: Northern California
Also, you asked about the effeciency.... in my case the answer is yes. Since the GSL-SE radiator and motor I had were full of coolant sludge, as I would call it. I had a parts car (87 NA) so I just used everything I needed off of it.
Thread Starter
Joined: Jun 2003
Posts: 832
Likes: 11
From: Northern California
I took a look at the radiator again, in the lower left (driver side) corner of the radiator you do have to trim the radiator surround just a bit for the oil cooler lines. Picture soon.