
1984-1985 12a clutch change guide.


Thread Starter
Full Member
Joined: Sep 2018
Posts: 54
Likes: 1
From: TX
1984-1985 12a clutch change guide.
Did a clutch job a few weeks ago, and decided to write up and document the steps I took. I know there are other write-ups, but I thought this might help somebody.
I'm going to get these pictures in here differently, this was just the easiest way for right now.
For reference, this job takes place on my 1985 12a powered �S� base model, but should also be relevant for nearly any 1st gen.
Parts I used for this engine/transmission combination, including fluids and parts I replaced along with the clutch.
Exedy 10008 clutch kit � This fits non turbo 83-92 12a/13b � Atkins
Clutch Pilot Bearing Seal - 11-404A-1881 � Mazdatrix � does NOT come in the exedy clutch kit
Rear Main Seal - 10-556A-1668 � Mazdatrix � This is the ACTUAL 12a/13b 10mm seal, not the 5mm rx8 one.
Clutch Fork � Part # N204-16-520 � Fits 12a/13b 84-88 - Atkins
Rear Transmission Seal � Mazdatrix � This is the seal to the driveshaft
Transmission Mount � Rockauto or mazda competition. I tested WESTAR EM8095 and it fits fine, if a bit soft.
Flywheel Ring Gear Brake � Atkins � For removing and torqueing the flywheel.
LUK Slave/Master cylinders � Rockauto � Compared side-by-side with NAPA and they seem identical down to the packaging. No issues so far.
Shifter Bushing Kit � Atkins
Shifter Return Spring � Atkins
Clutch Master Cylinder Firewall Gasket � Atkins
Steel Braided Clutch Flex Hose � Atkins
Flywheel Nut � 11-711C-0810 - Mazdatrix � You shouldn�t need this, but mine was busted up by an air chisel
Redline MT-90 75w90 GL-4 Gear Oil 1 Gallon - I like this oil so far.
DOT-3/4/5.1 brake fluid. Each step up in number is a higher boiling point. Do NOT use DOT-5, it�s not compatible. I usually use a good quality DOT 4 with a boiling point above 400f to be safe for spirited driving on the street.
4-10 hours of time.
Document everything. Pictures of every step will save your life when you�re reassembling, especially if you are new to this kind of work, or these cars. Pictures take extra time when you�re removing things, but you�ll appreciate them later. Bag and tag and separate every bolt. Some bolts that look like they should be identical, aren�t. Mazda didn�t seem to like to make things easy for us.
Some of these steps can be done in a different order, this is just the order that was fastest for me.
MASTER AND SLAVE CYLINDERS
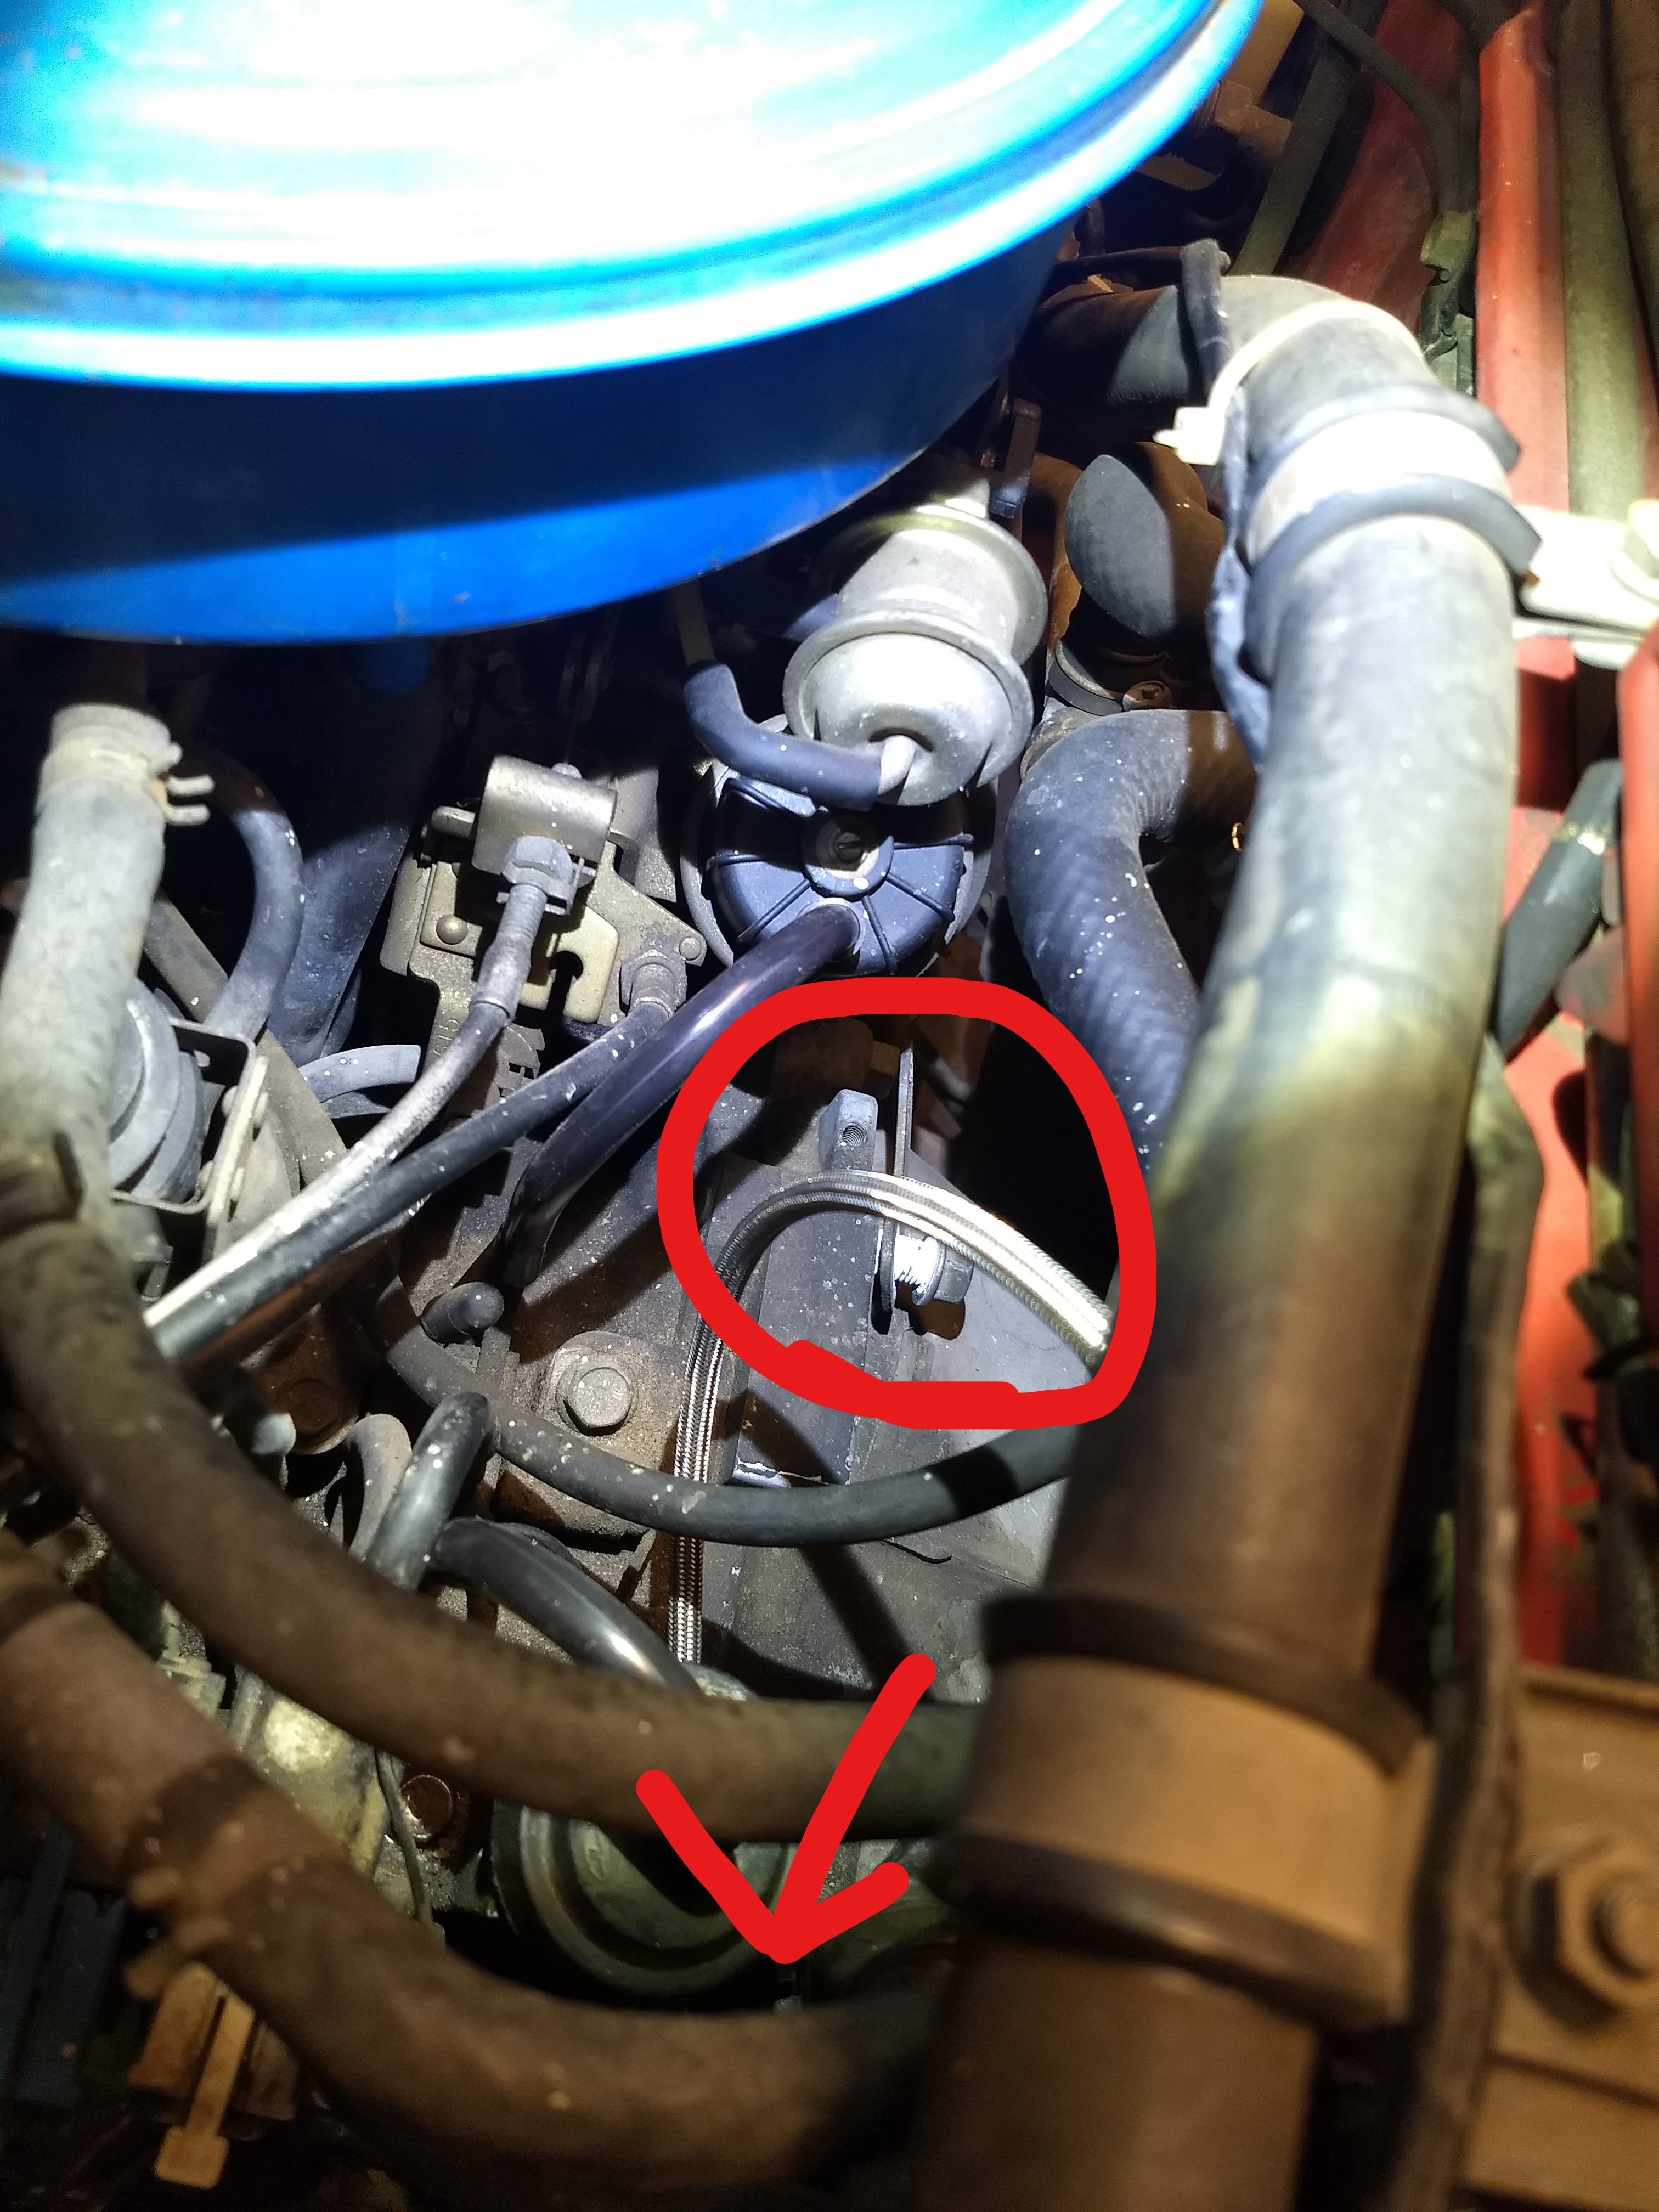
First I replaced the leaky Master and Slave cylinders. Brake fluid will ruin your paint nearly instantly, cover your car with rags and towels, clean spilled fluid with soapy water asap if you spill. First I sucked out the old fluid with a turkey baster and pumped the clutch pedal. There are nuts inside the car holding the slave cylinder to the firewall. I got to mine by removing the seat, laying on my back with my face under the dash, a flashlight in my mouth an a open ended wrench in hand. Not the easiest fasteners to reach. Next I unscrewed the hardline from the master cylinder with a flare nut wrench and removed the cylinder. Next I disconnected the flex line from the hardline. Finally, the slave cylinder is attached to the transmission with 2 bolts. These bolts CAN be accessed without removing any other parts, just take your time. You�ll need a 12� extension, a swivel joint on the end, a magnet for pulling the bolts out once they are loose, and the right size socket� 12 or 13mm.
On the bench, fill the new master cylinder with fluid. Push the piston with a rod or bolt to push fluid through the cylinder and prime it, get all the air out that you can BEFORE you mount the cylinder to the car, makes bleeding the air out much, much easier when you get everything assembled again.
Remount the newly filled master cylinder, connect your hardline, rubber or stainless flexline, and slave cylinder. Finally, bolt the slave cylinder to the transmission. Take your time. The transmission is aluminum, these bolt holes strip EXTREMELY easily. Under no circumstances overtorque or use an impact when reinstalling these bolts. I suggest the extension and your fingers only until the bolts are fully seated, then torque with a wrench. You should be able to line the slave up with the bolt holes by pushing on the back side of it near the bleeder nipple, and guide the bolts into the holes with a long magnet.
TRANSMISSION CLUTCH/SHIFTER BUSHINGS/DRAIN AND FILL
First, I removed the two bell housing bolts on the top of the transmission. They're easiest to get from the top of the car, not the bottom. Make sure to either label or place these bolts in a pattern so you know exactly where they came from, most of the bolts are different lengths and very easy to get mixed up, ask me how I know.
https://www.dropbox.com/s/zf74gugdrn...43_LI.jpg?dl=0
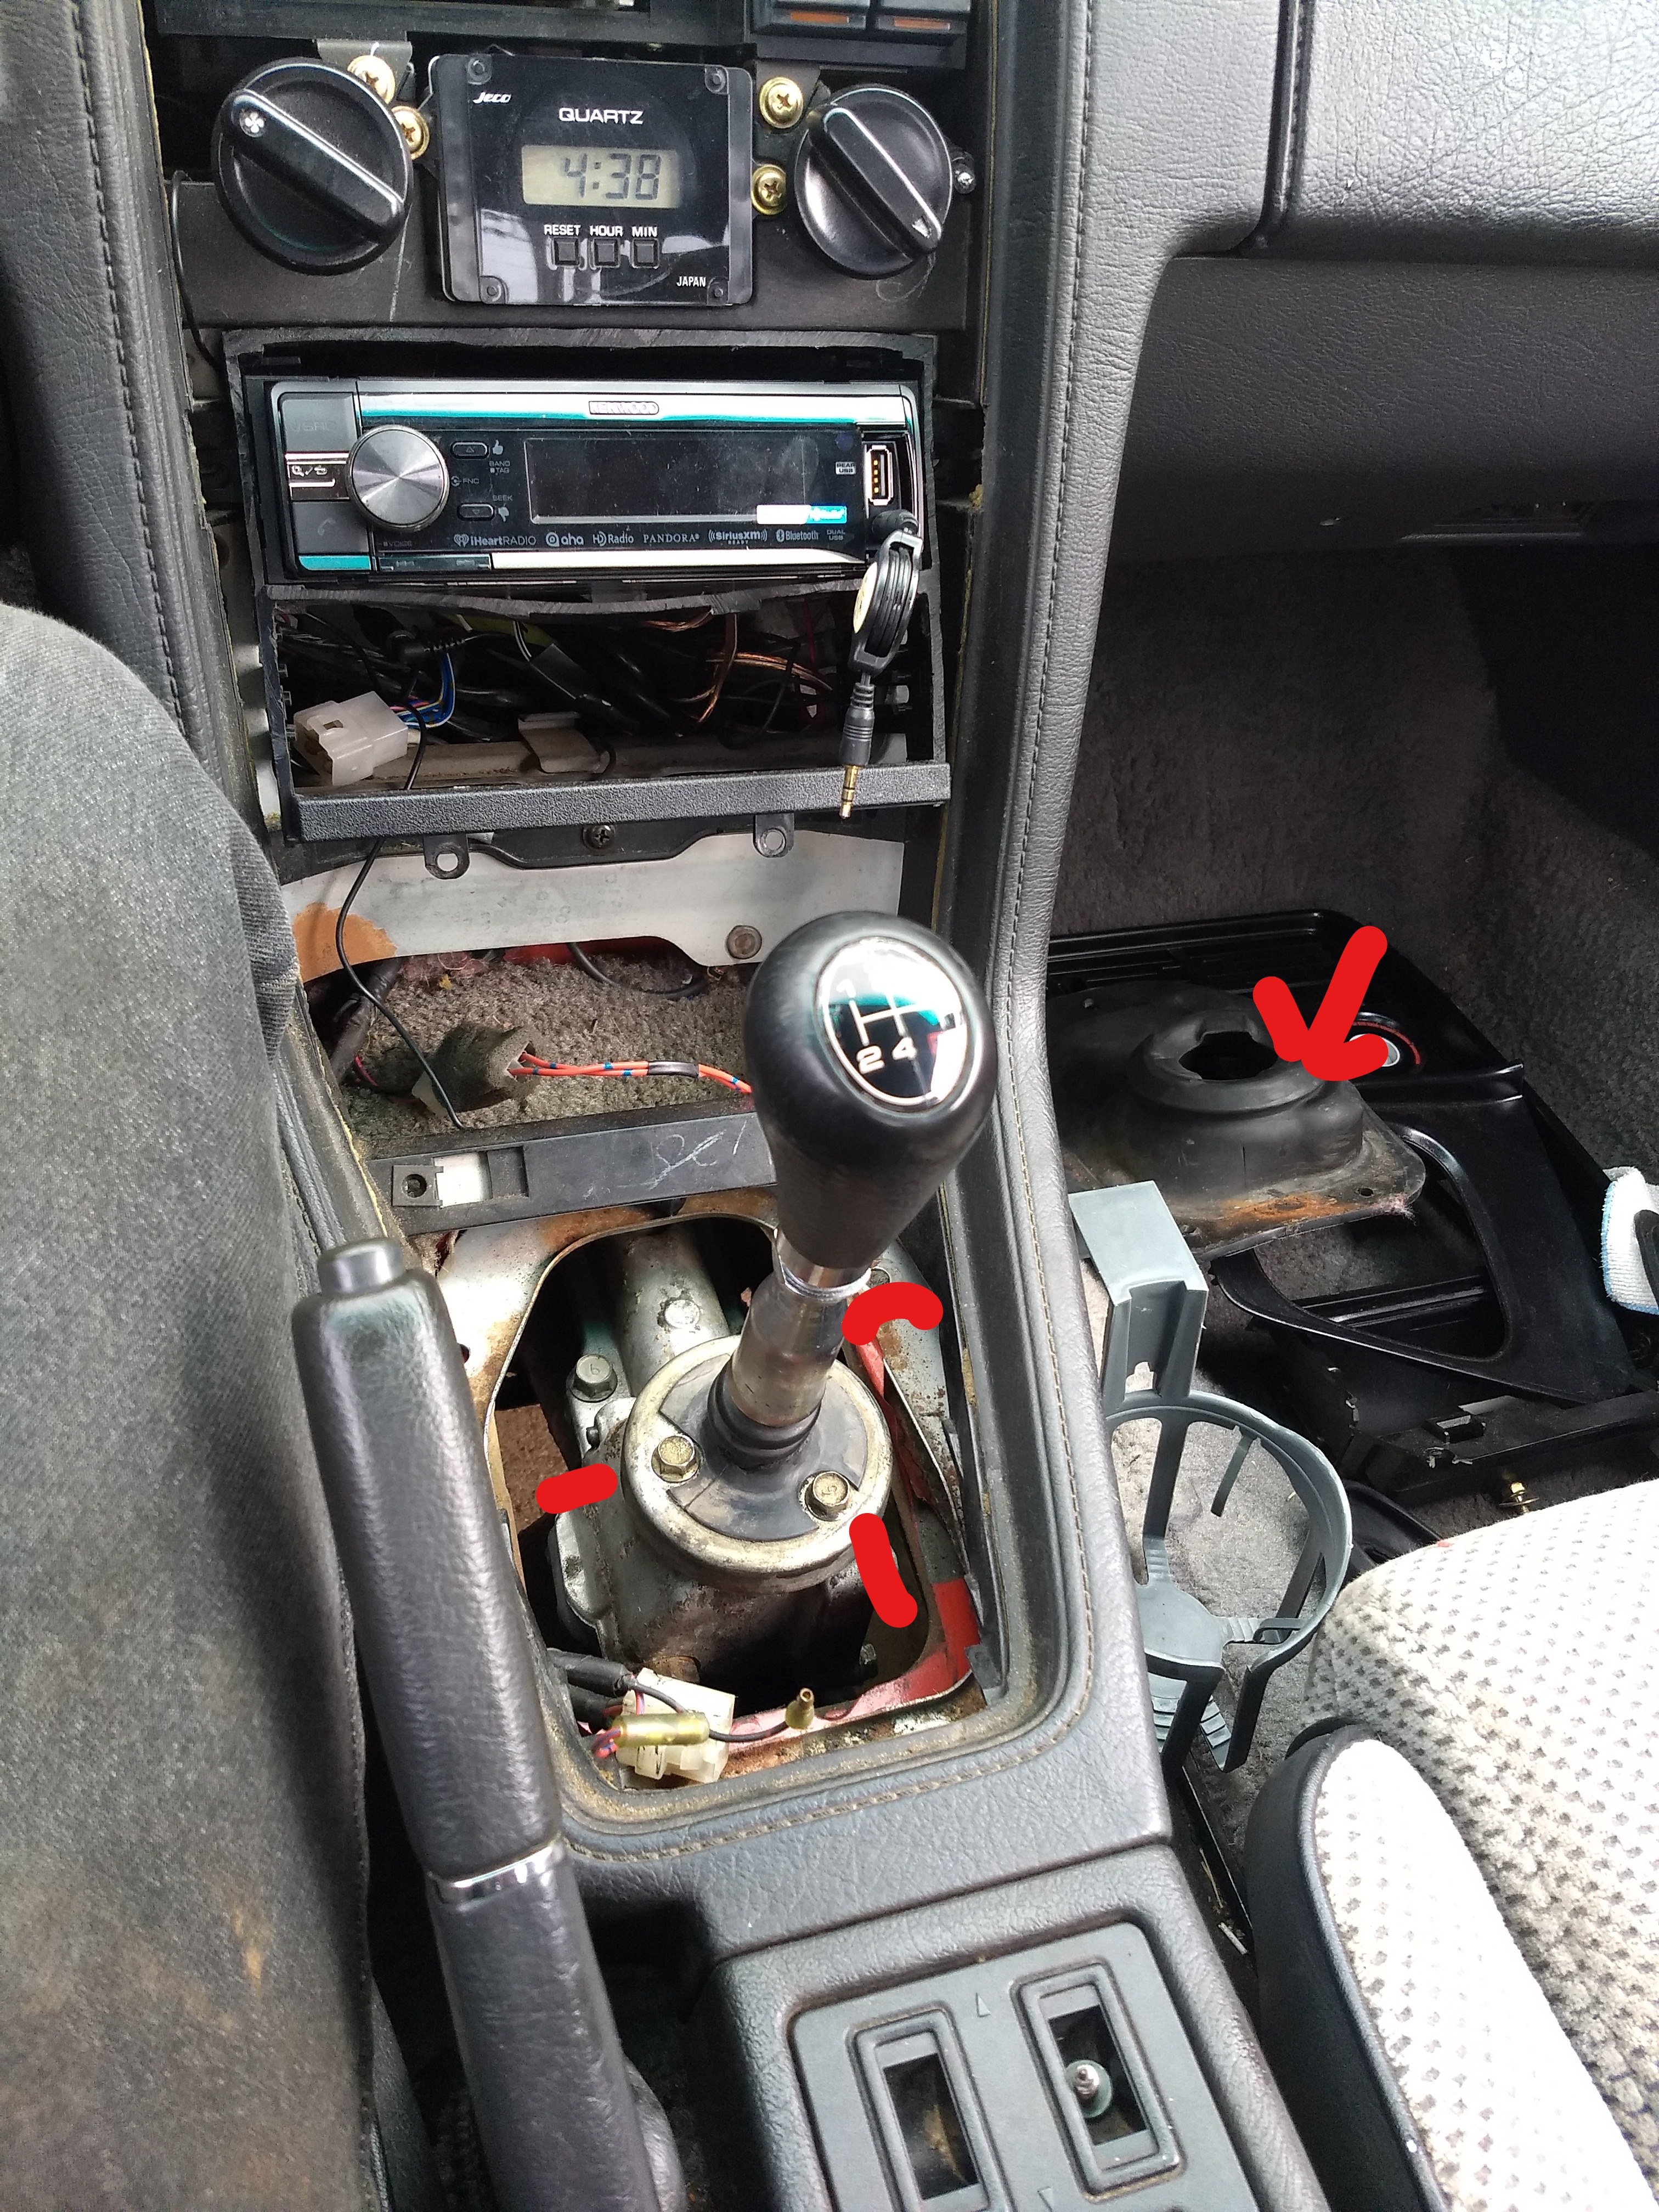
Inside the car, remove the shifter. You'll need to take off the trim, and undo a few bolts to get off all the rubber. The shift **** just unscrews, lefty loosy. Once all the trim and rubber is off, unbolt the shifter and remove the assembly. Don�t lose the shifter bushings and the metal shims unless you�re replacing them with new.
https://www.dropbox.com/s/hk19agahfb...41_LI.jpg?dl=0
Disconnect the battery.
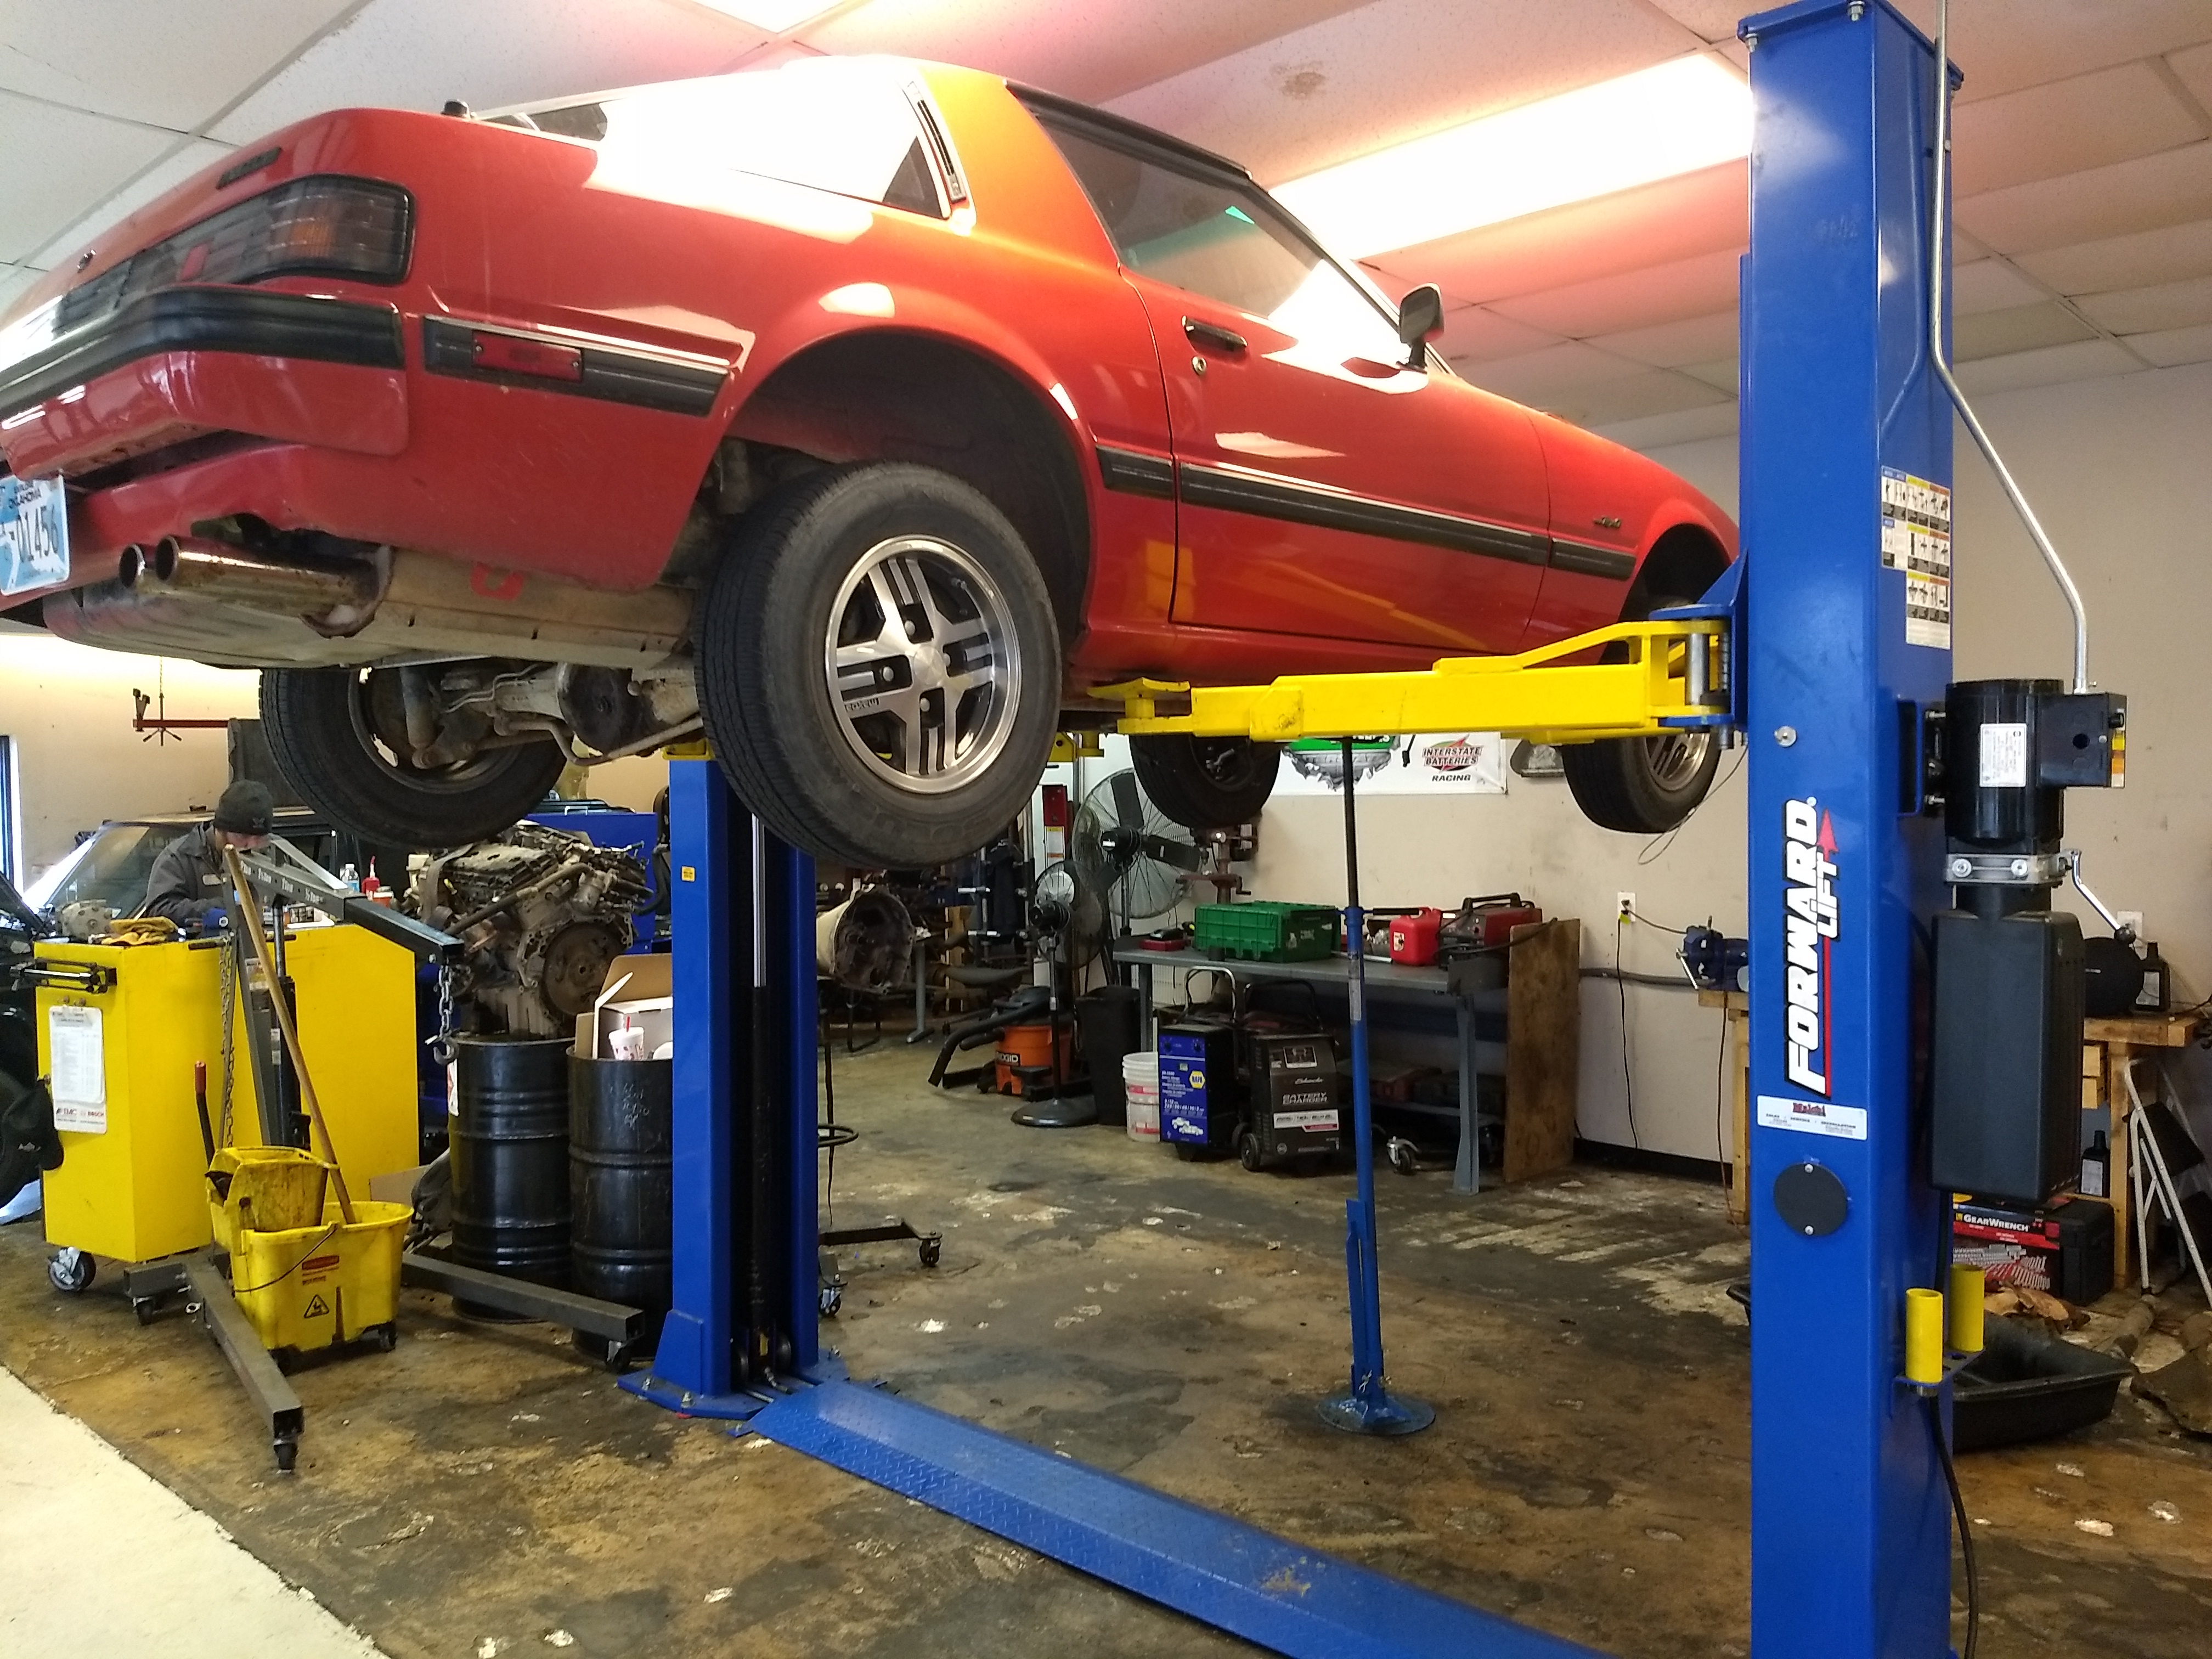
Lift the vehicle. I work in a shop and had access to a 2 post lift, but I realize most don�t. Get enough room to work underneath comfortably, and have enough space to drop the transmission down and slide it out. I�d recommend jackstands out of the way of the transmission, exhaust, and driveshaft.
https://www.dropbox.com/s/cpyoig3nga...56681.jpg?dl=0
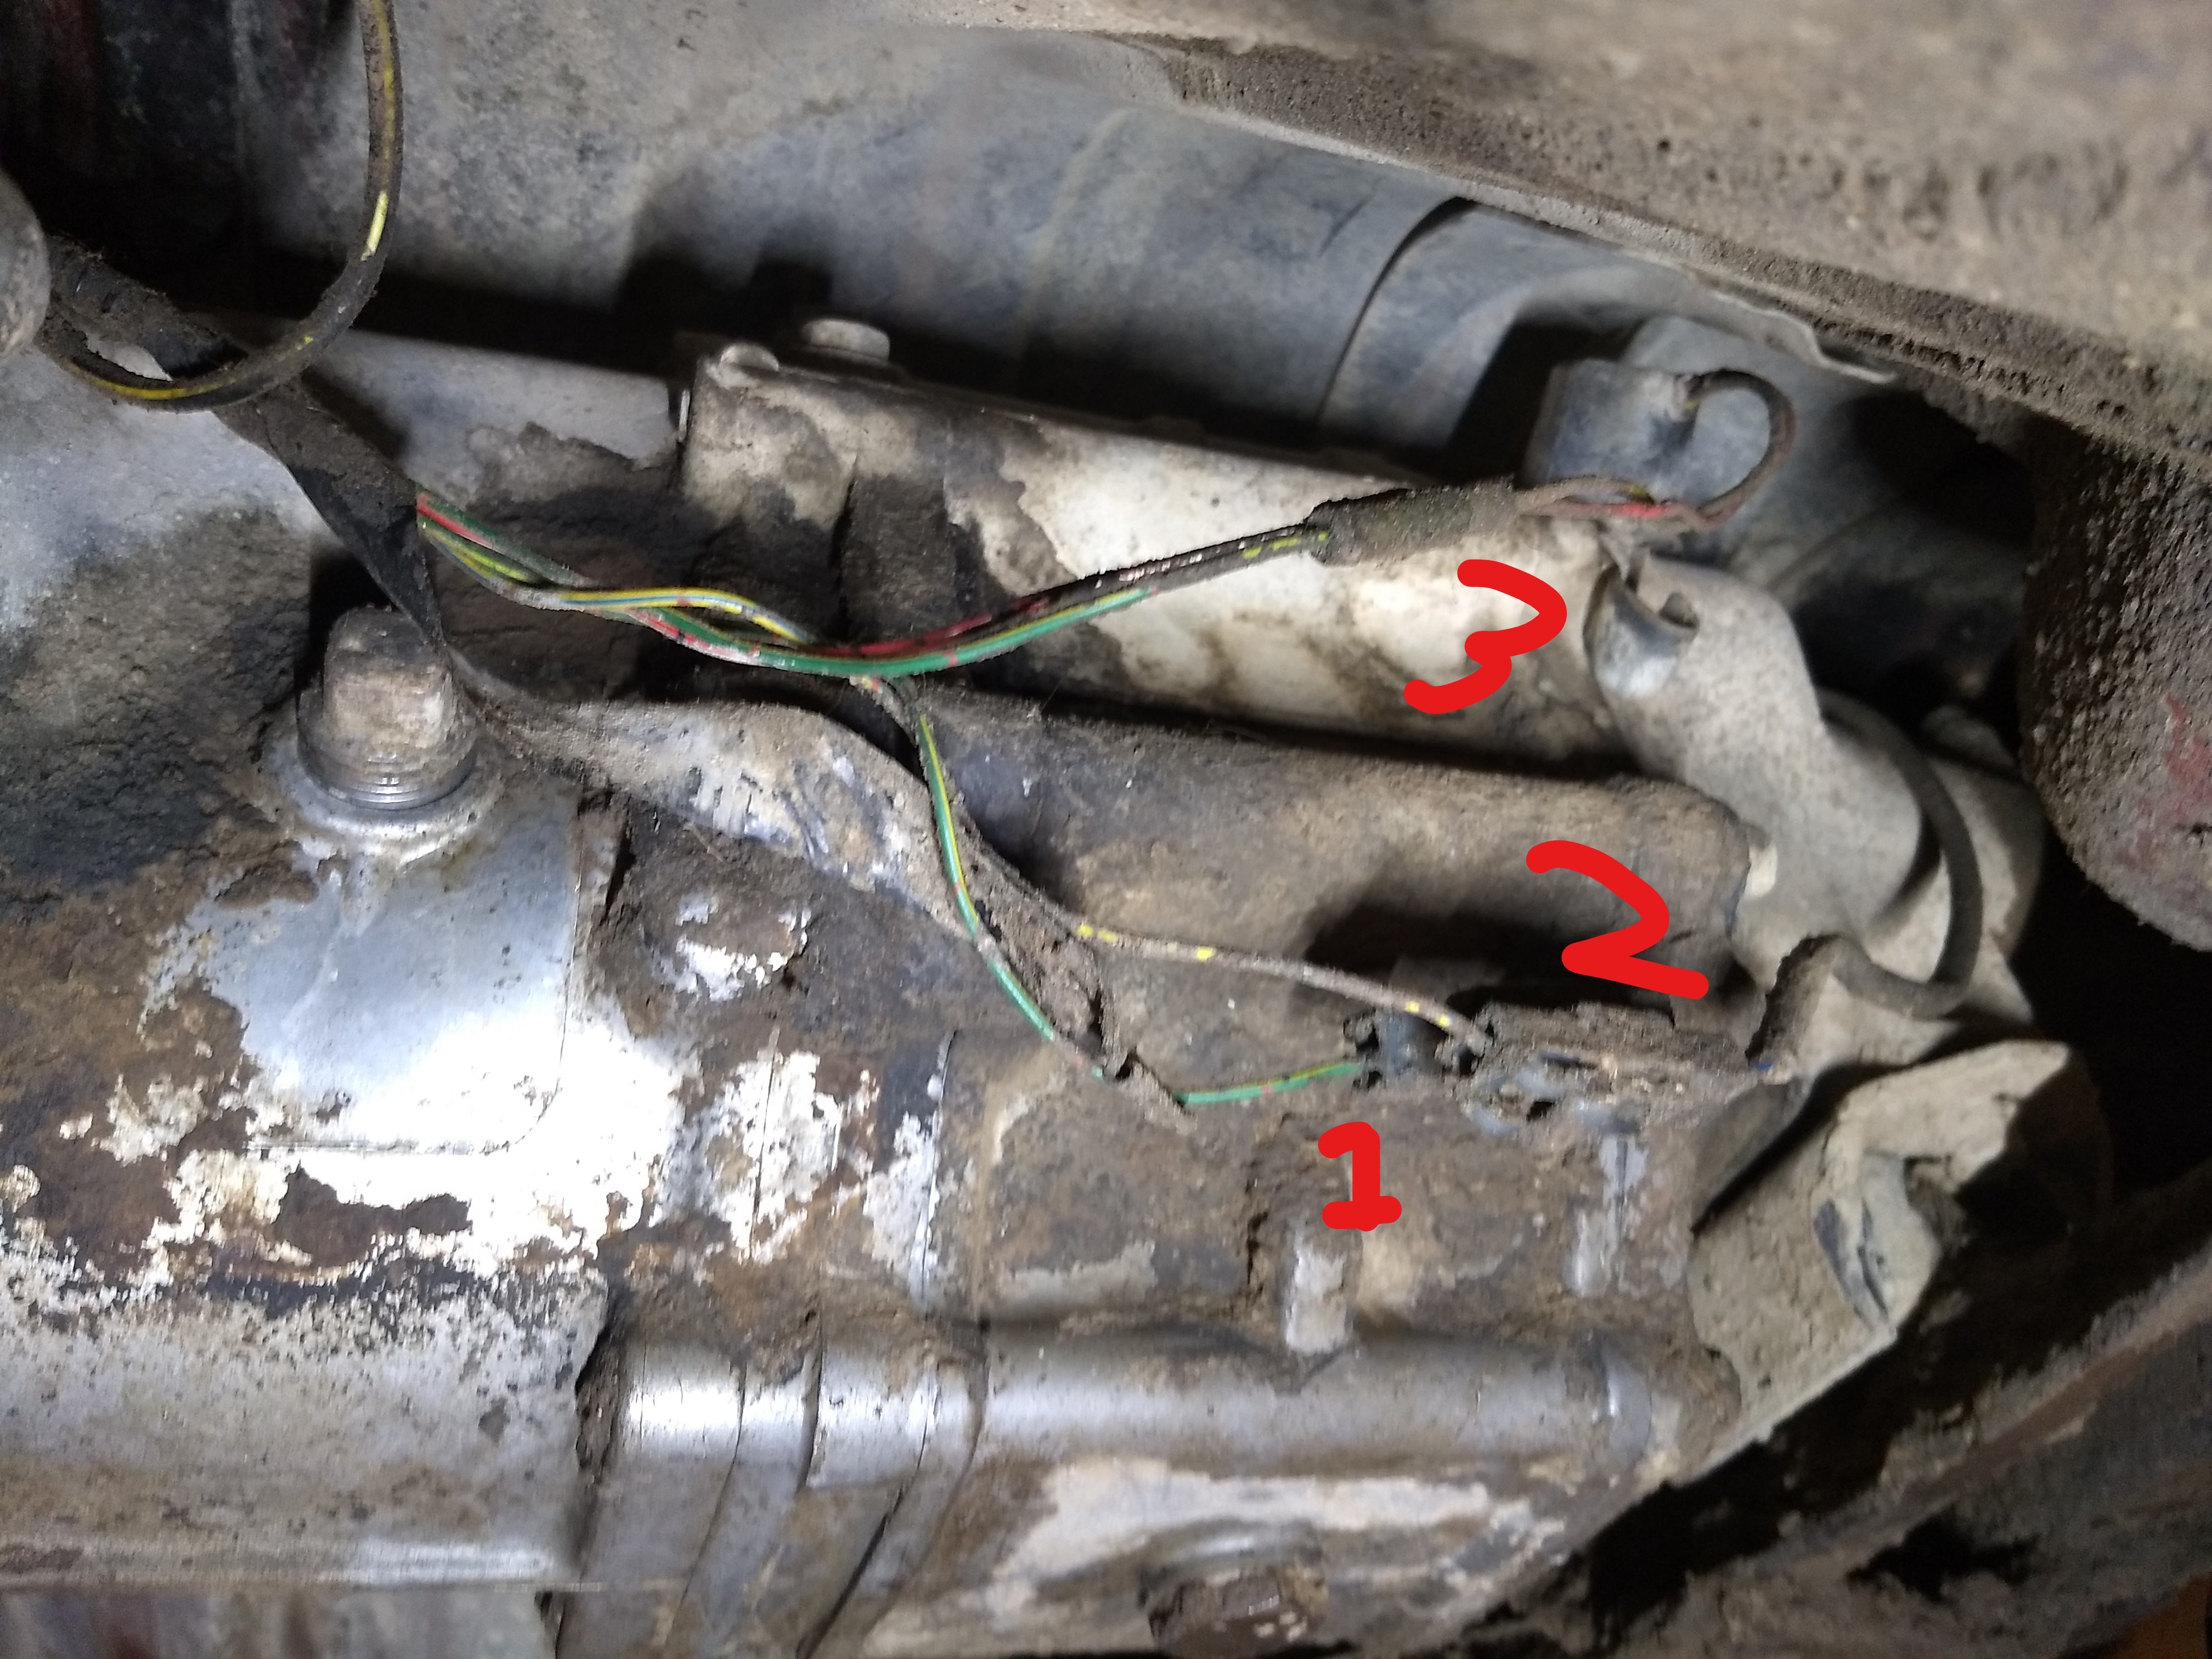
At this point I documented the wiring to the transmission and the starter motor, then disconnected all the connectors and leads, as well as the speedometer cable.
https://www.dropbox.com/s/u5agyp9vjz...46_LI.jpg?dl=0
Next I removed the starter motor. Two bolts and it should slide right out. I hope your battery is disconnected for this or you could have some fireworks!
https://www.dropbox.com/s/fjylfhhi08...35_LI.jpg?dl=0
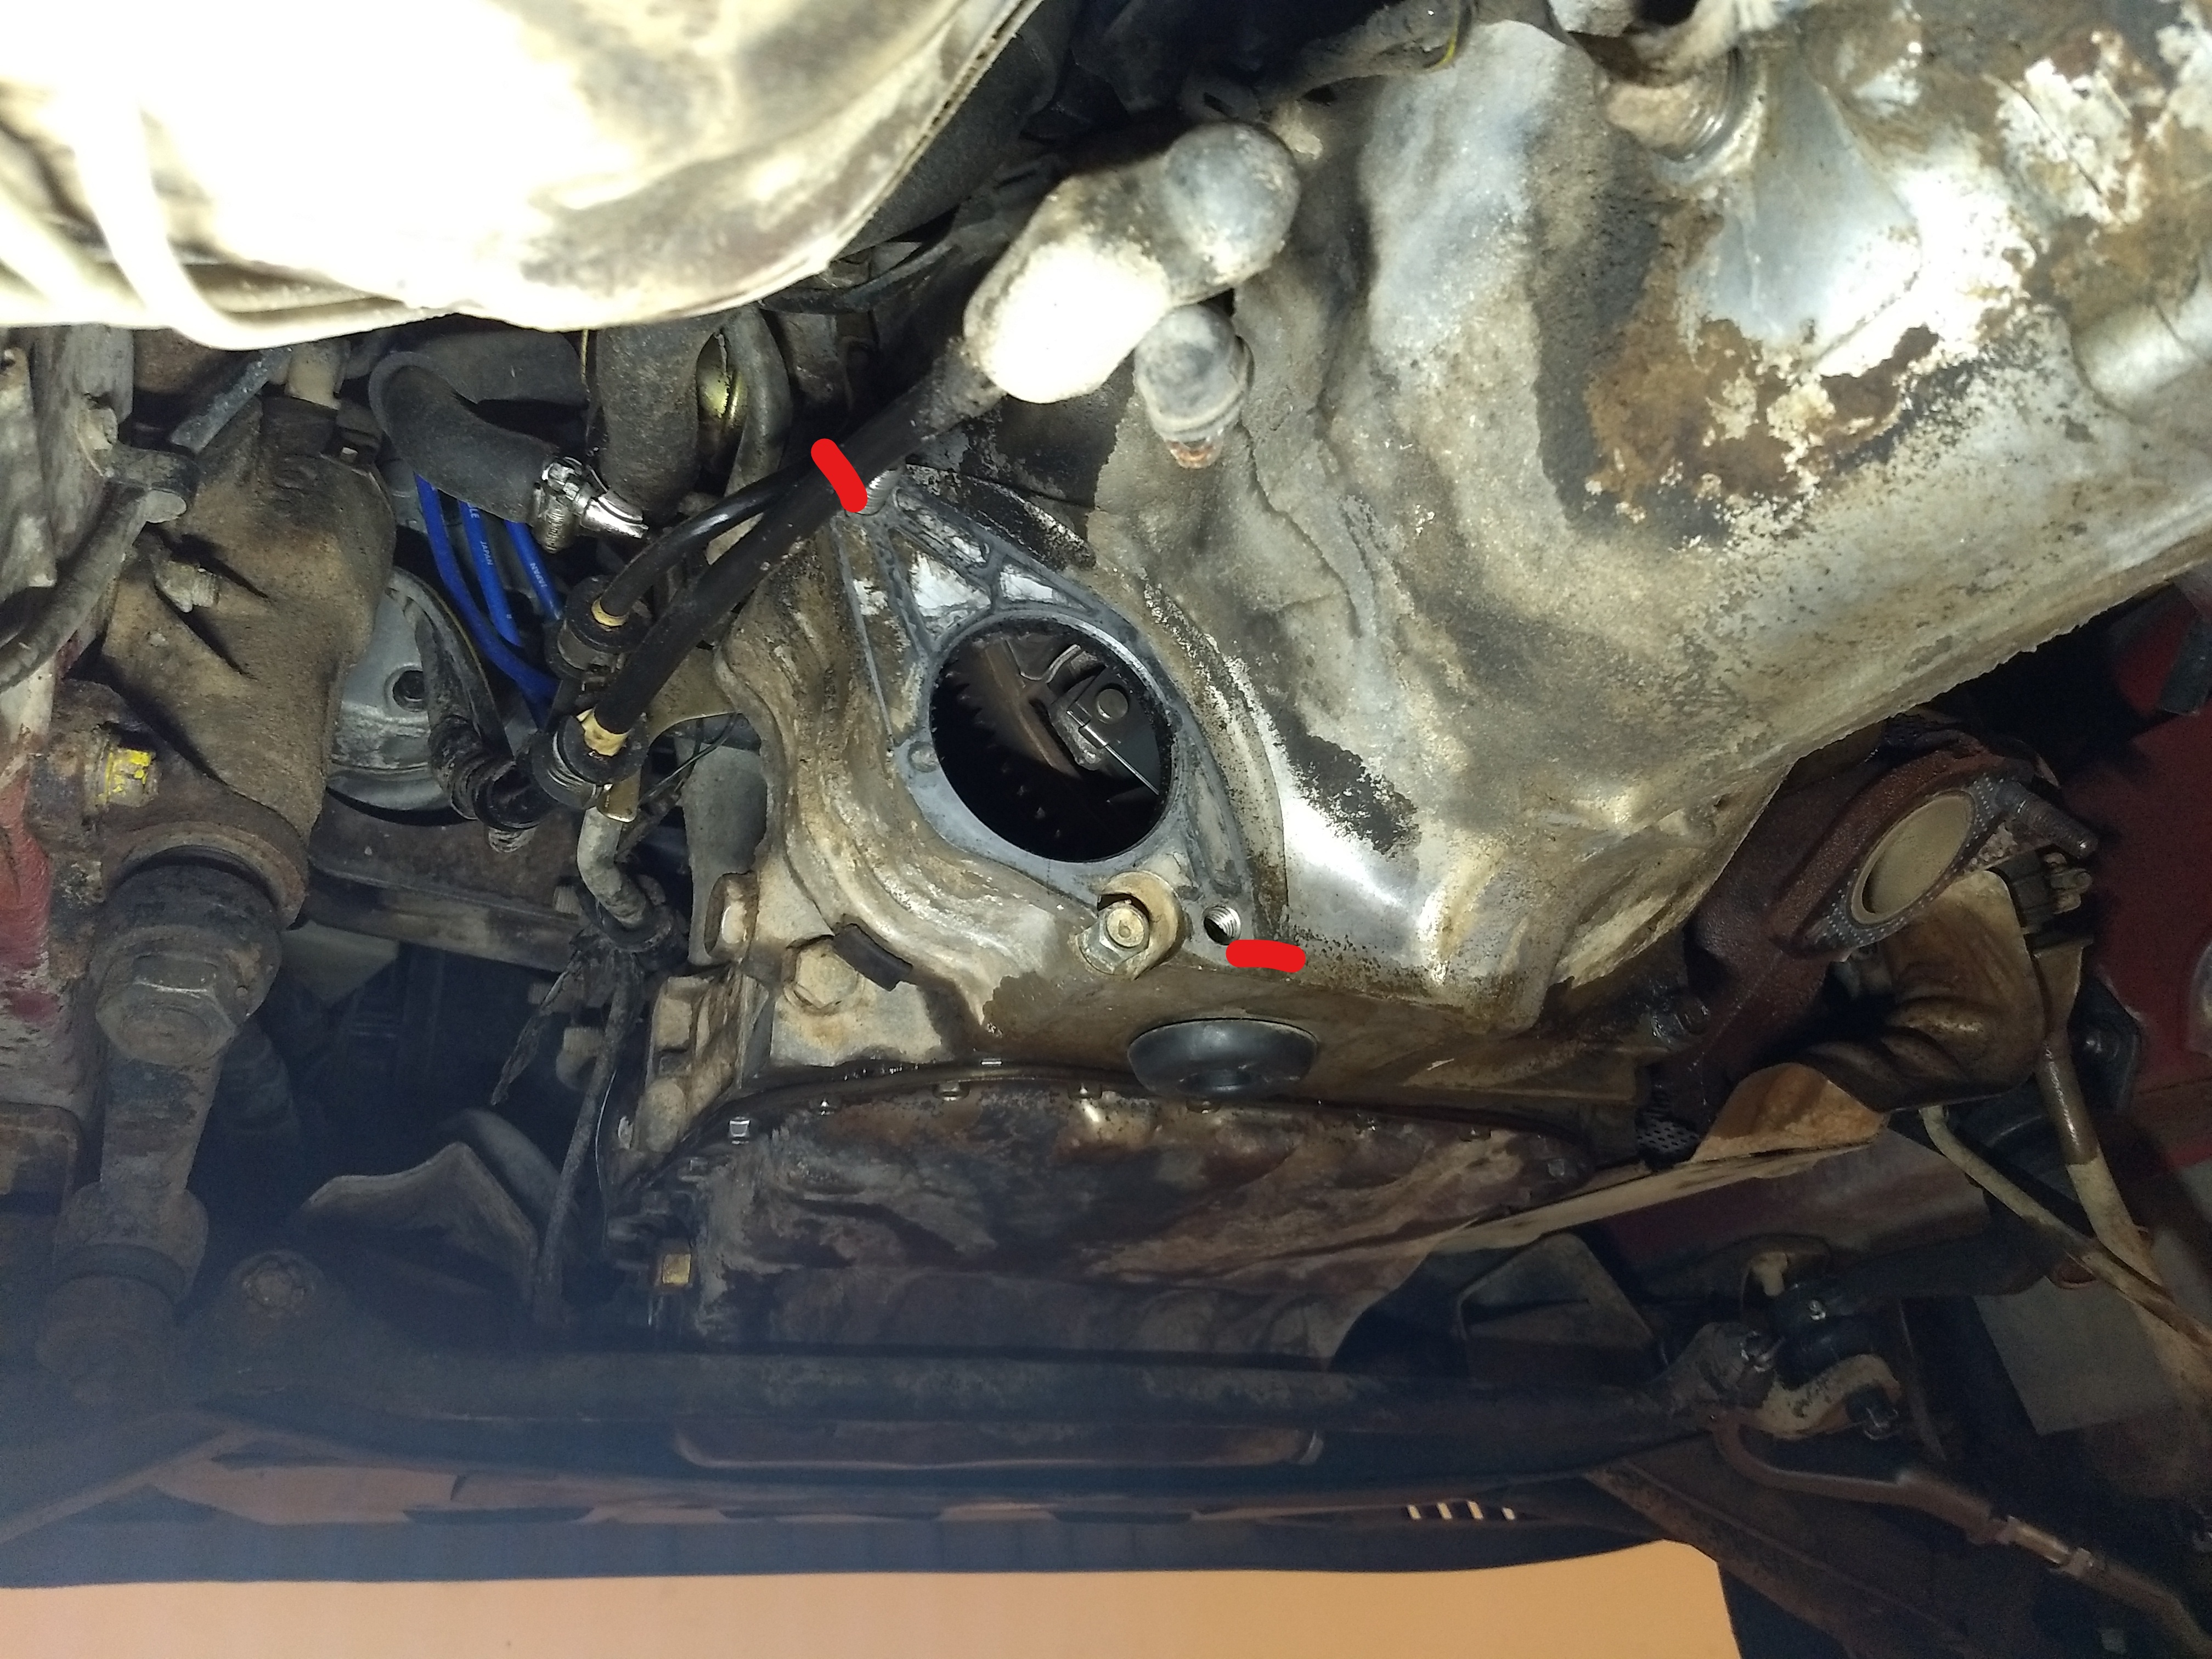
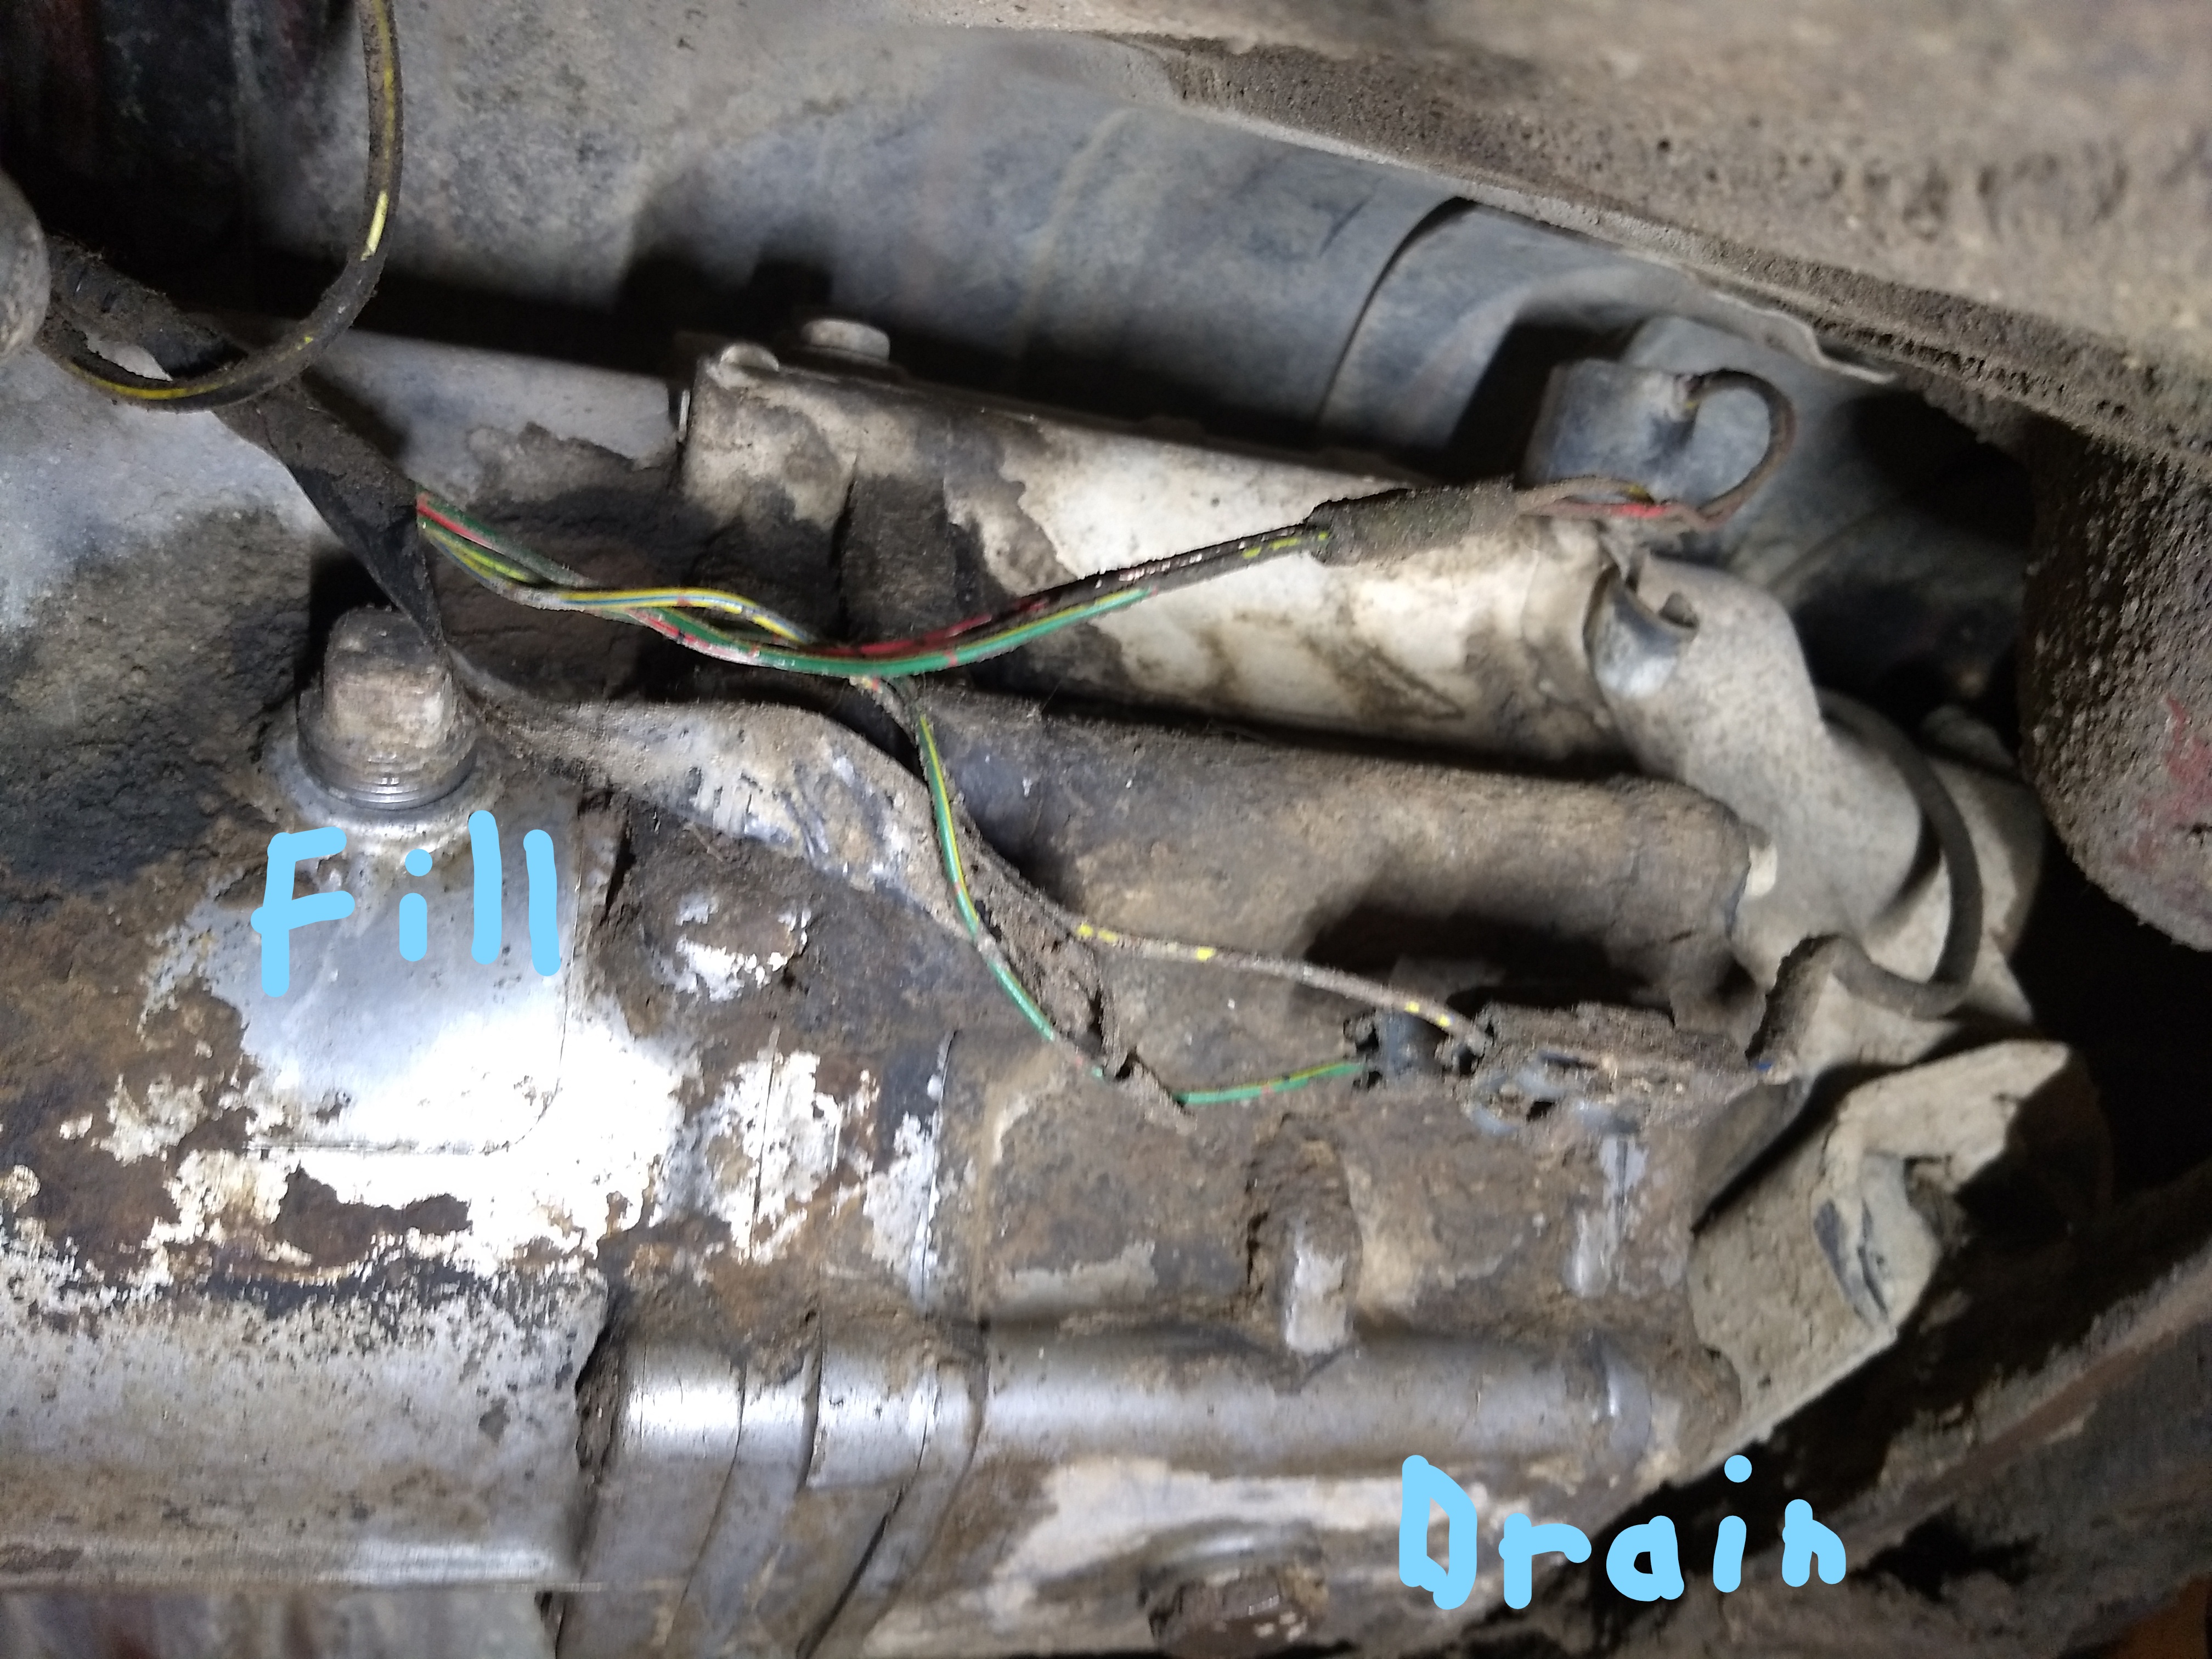
Drain the transmission. It�s good practice to check that the fill plug comes loose BEFORE opening the drain plug, just in case it�s stuck so that you won�t be left without a way to replace the fluid.
https://www.dropbox.com/s/oyzcvqpqwv...82%29.jpg?dl=0
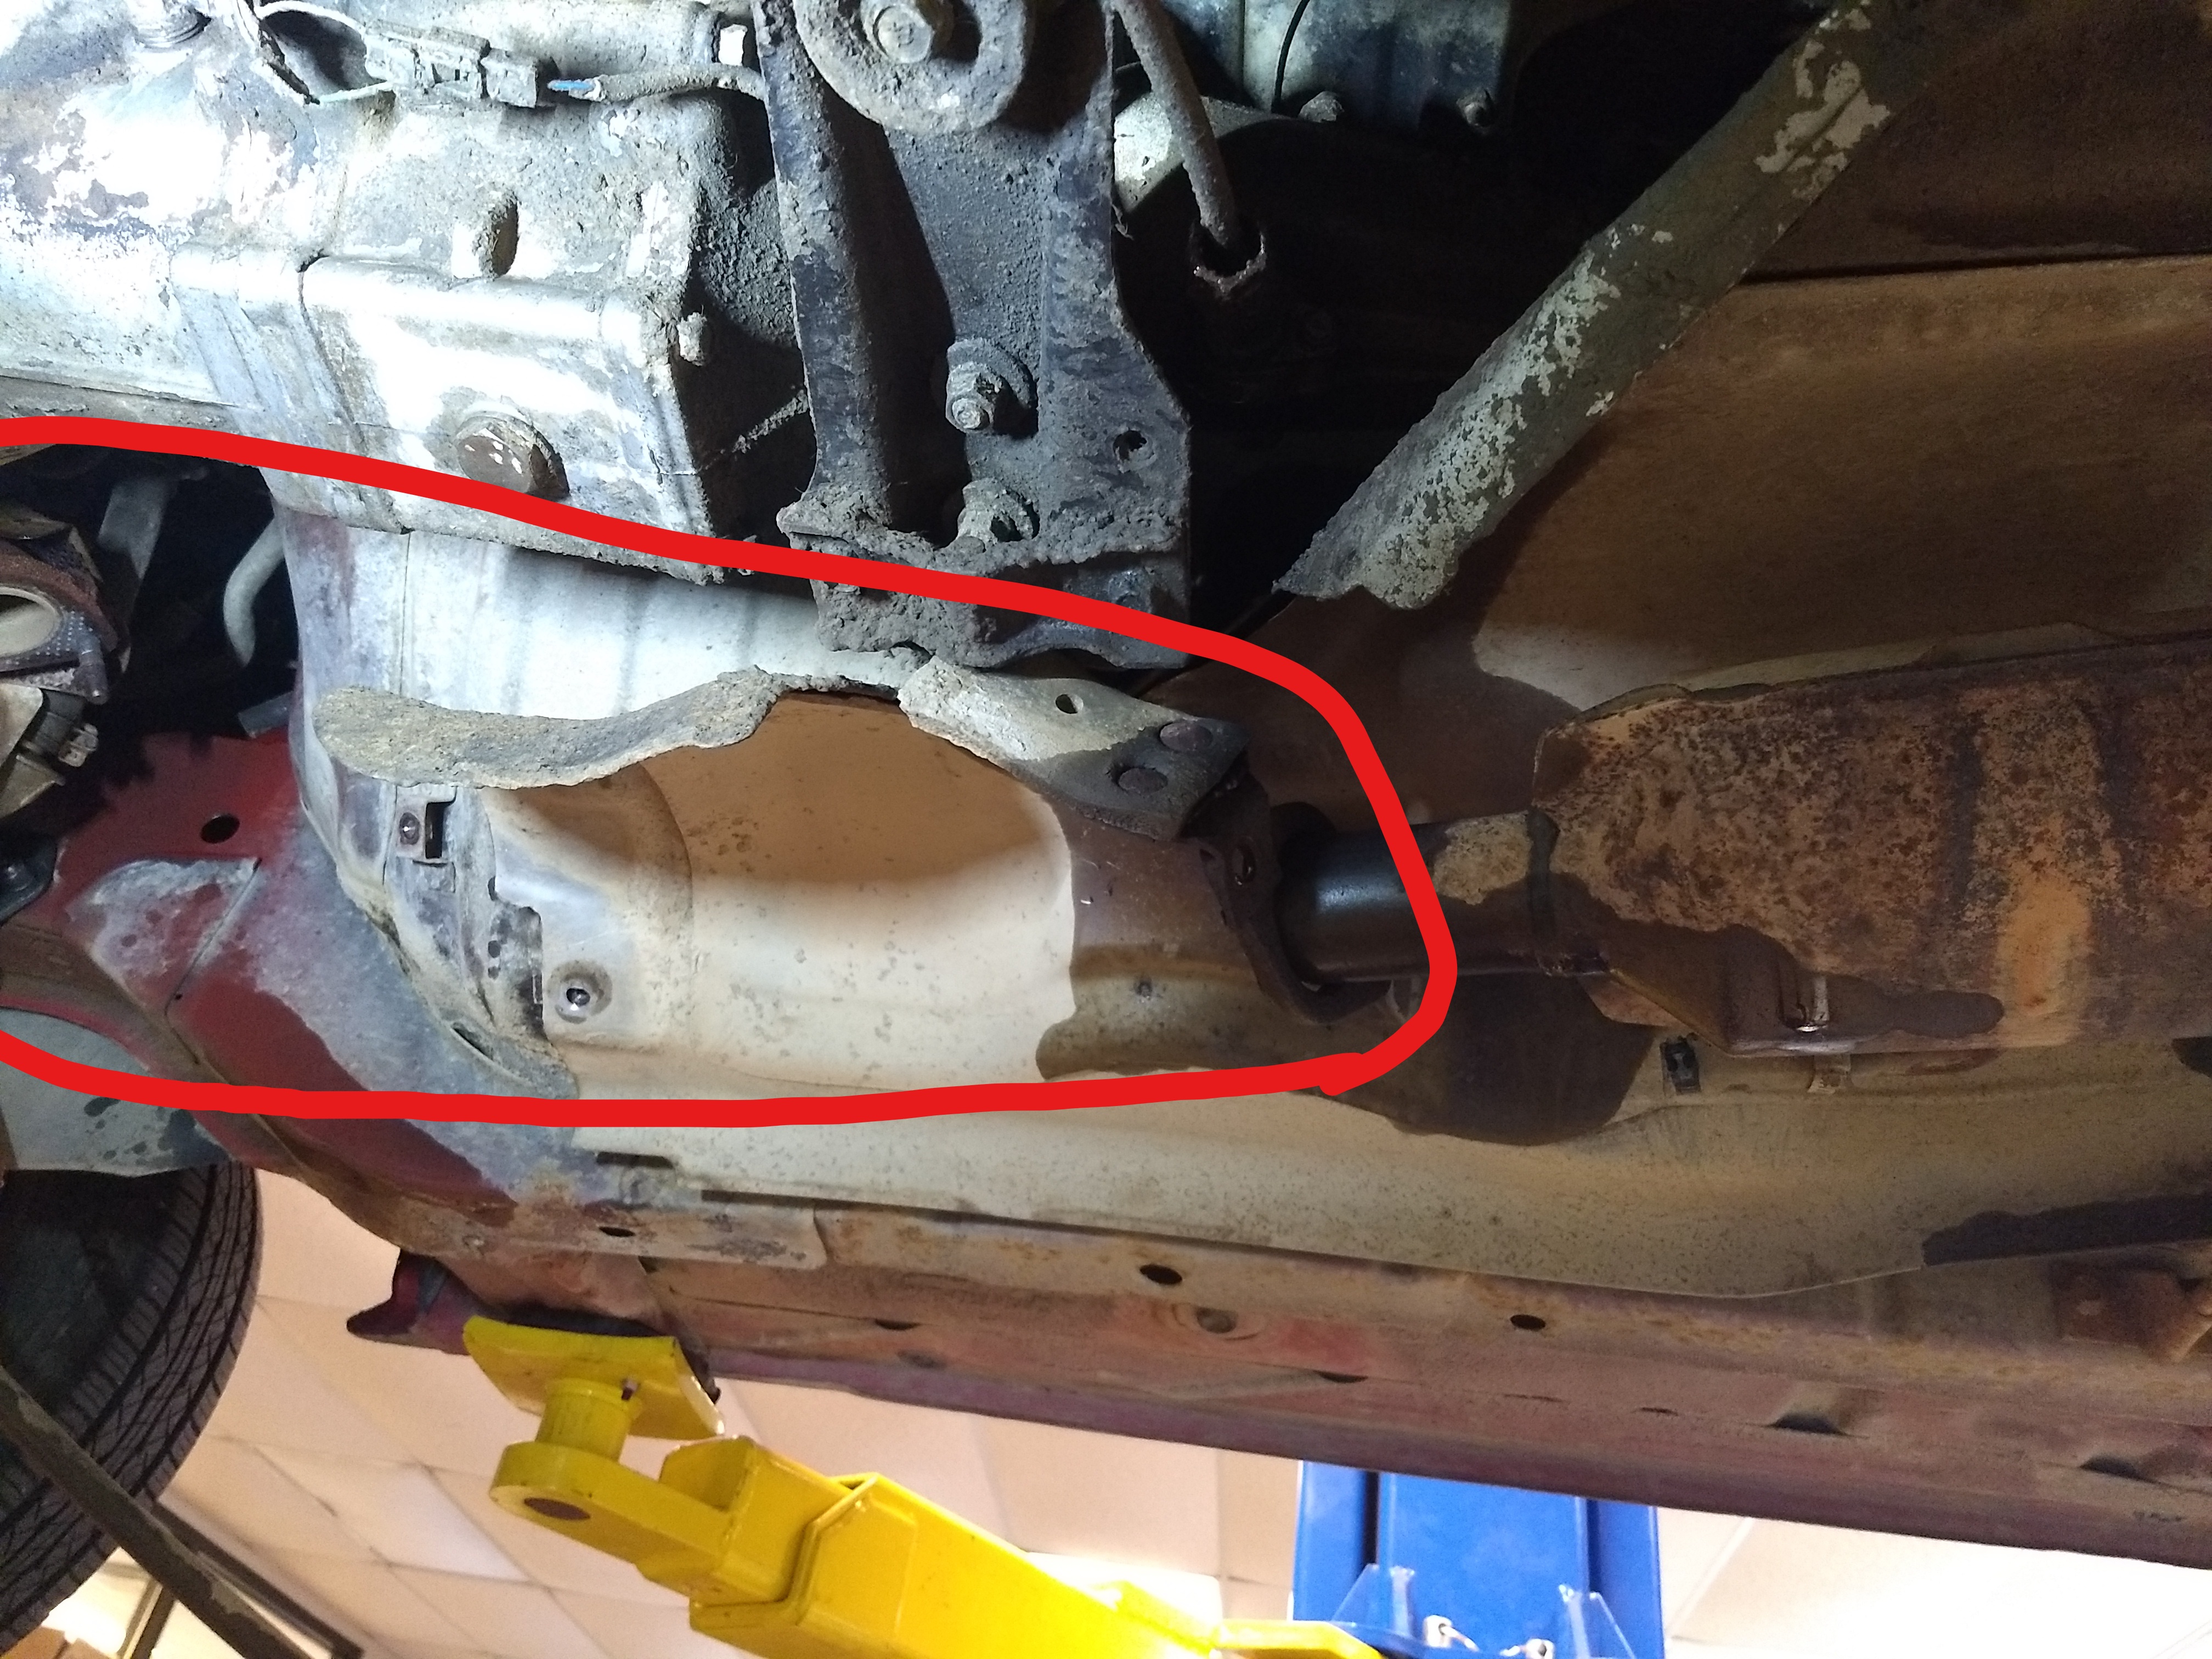
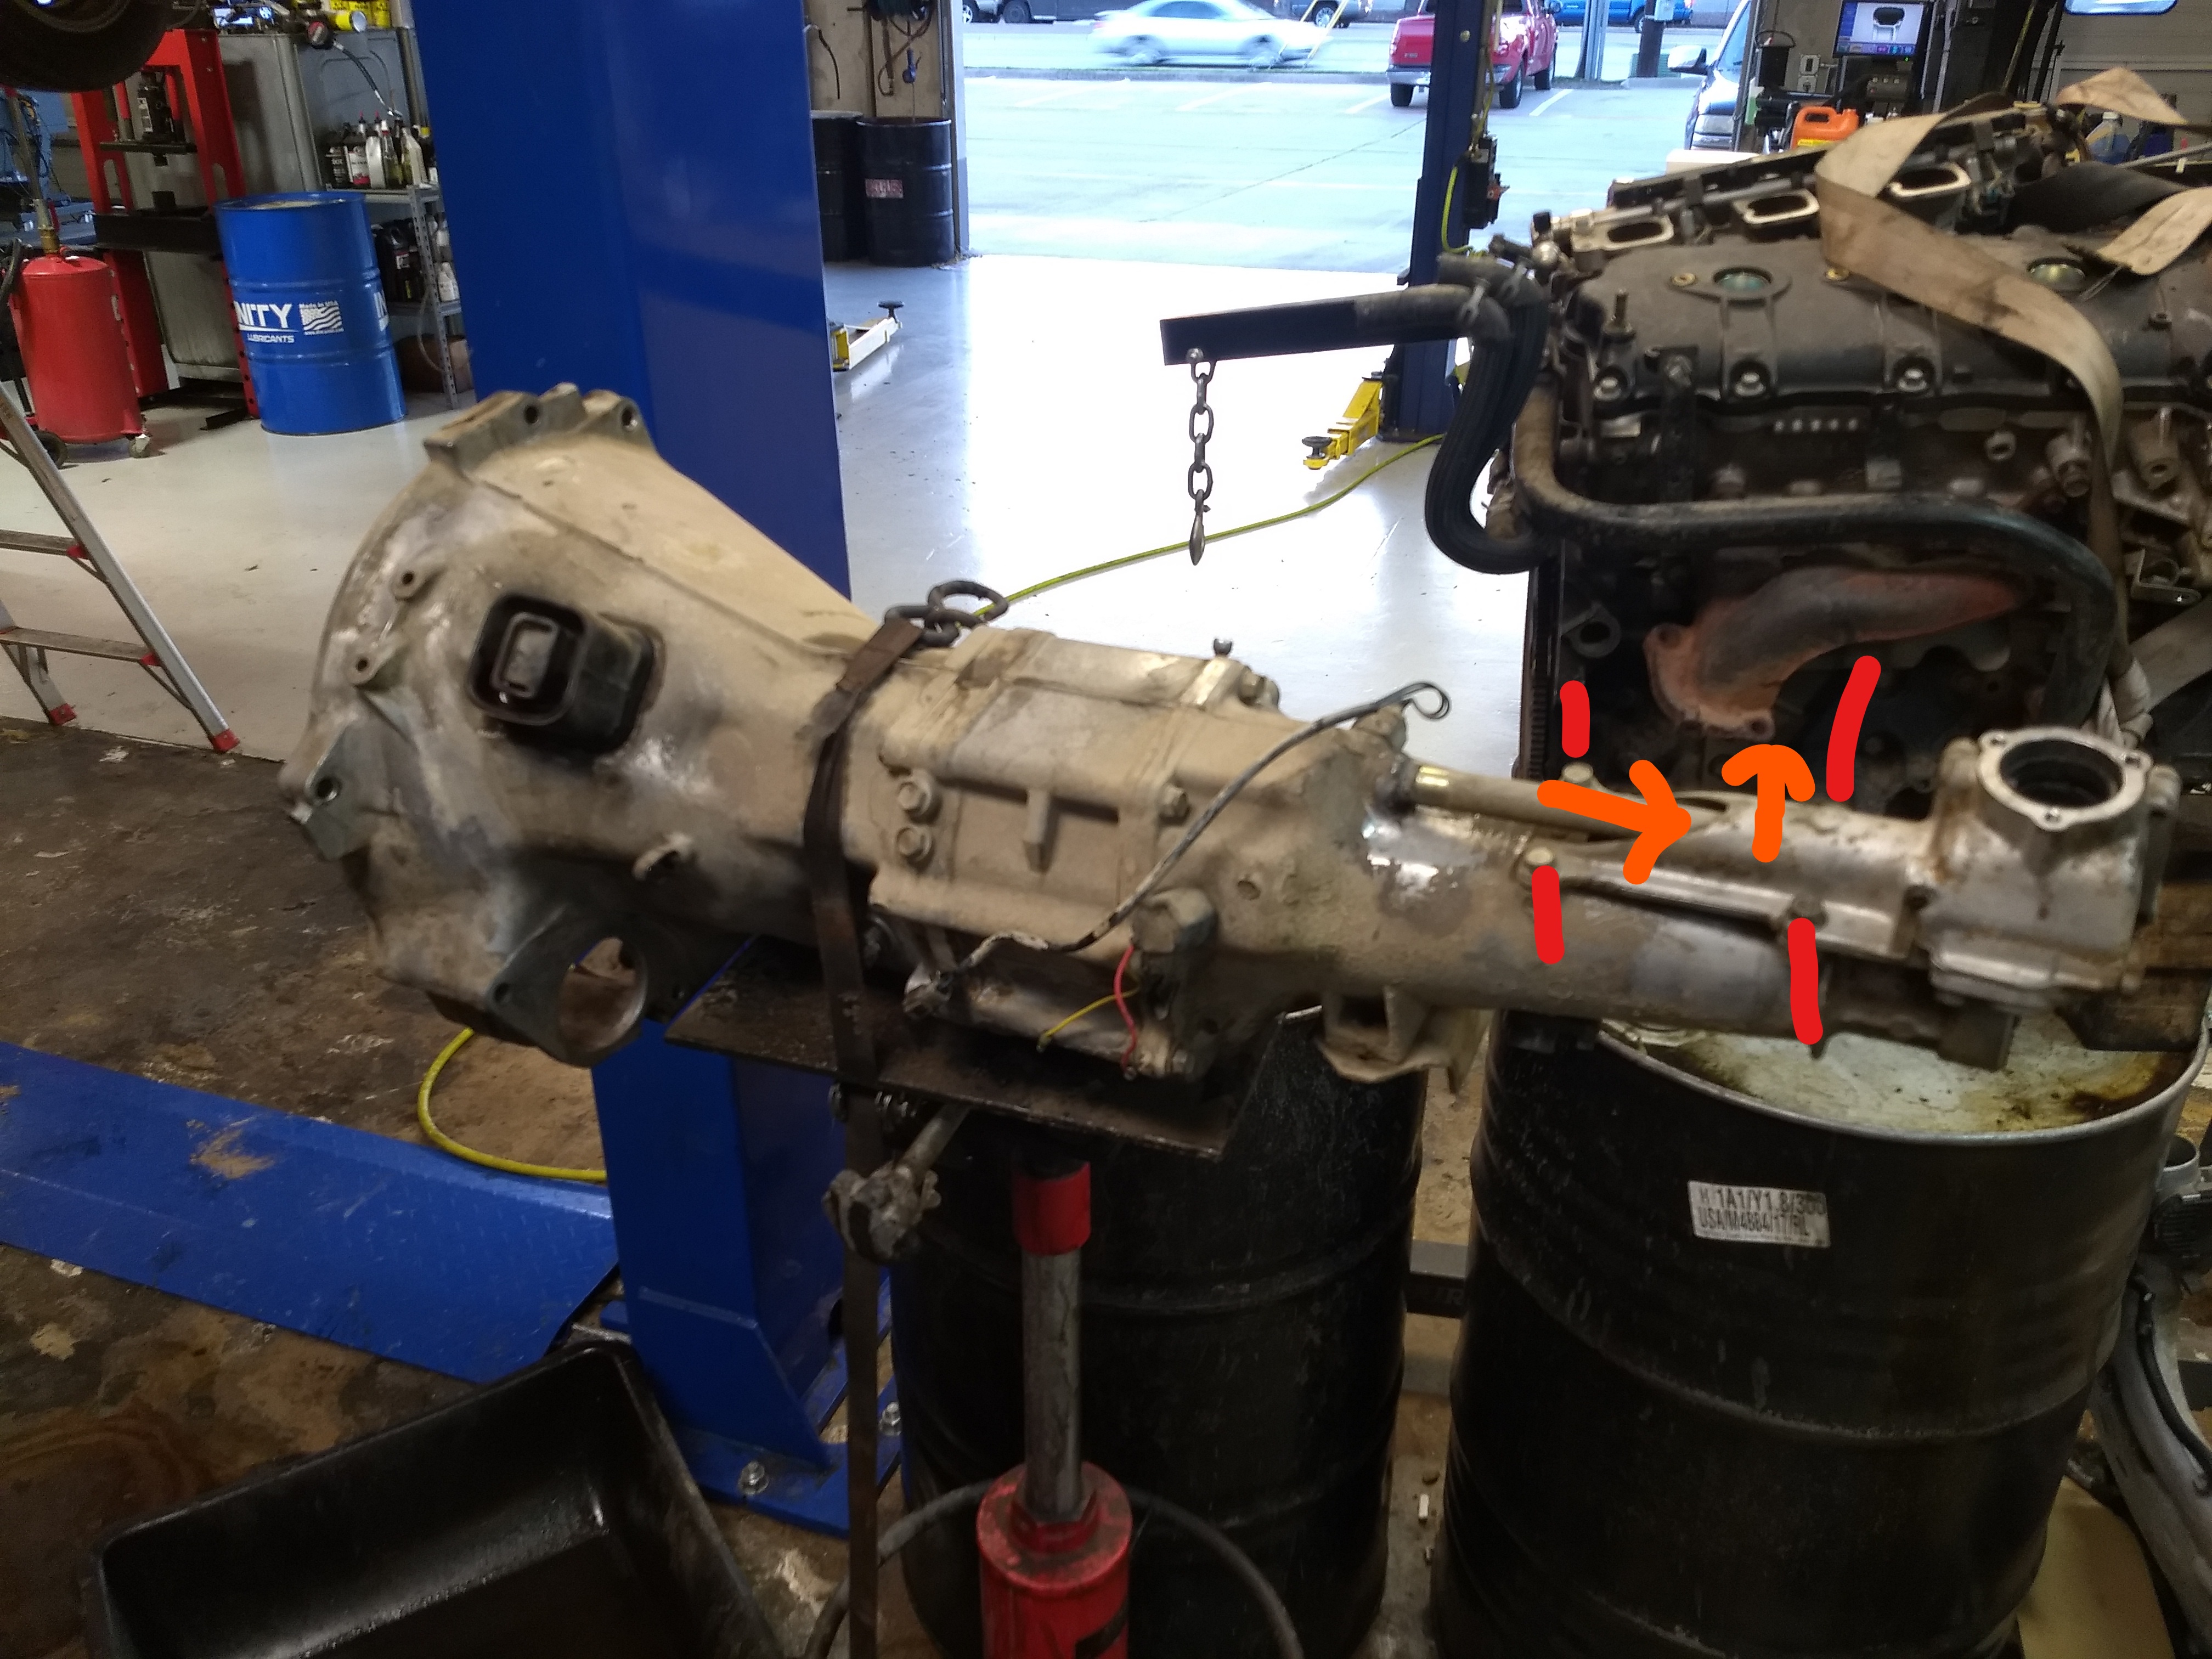
To gain access to the driveshaft and to make space for the transmission to come out, we need to remove part of the exhaust and exhaust heat shielding. In my particular case, I wasn�t worried about my exhaust gaskets and chose to only remove the cats from my exhaust system. This left room to get the rest of the heat shielding out as well as the driveshaft.
https://www.dropbox.com/s/brw5upp6pz...88_LI.jpg?dl=0
Unbolt and slide out the headshields.
This would be a good time to drain the transmission, BEFORE you remove the driveshaft. If you aren�t flushing the transmission, you�ll need a transmission plug for when you remove the driveshaft.
Mark the driveshaft orientation with a punch or paint pen for balancing purposes, then remove the 4 nuts and bolts holding to the differential and slide it out of the transmission. The transmission may puke if it�s not drained or plugged.
Remove the rest of the bellhousing bolts. There should be 3 more if I remember correctly.
https://www.dropbox.com/s/nn2batck24...31_LI.jpg?dl=0
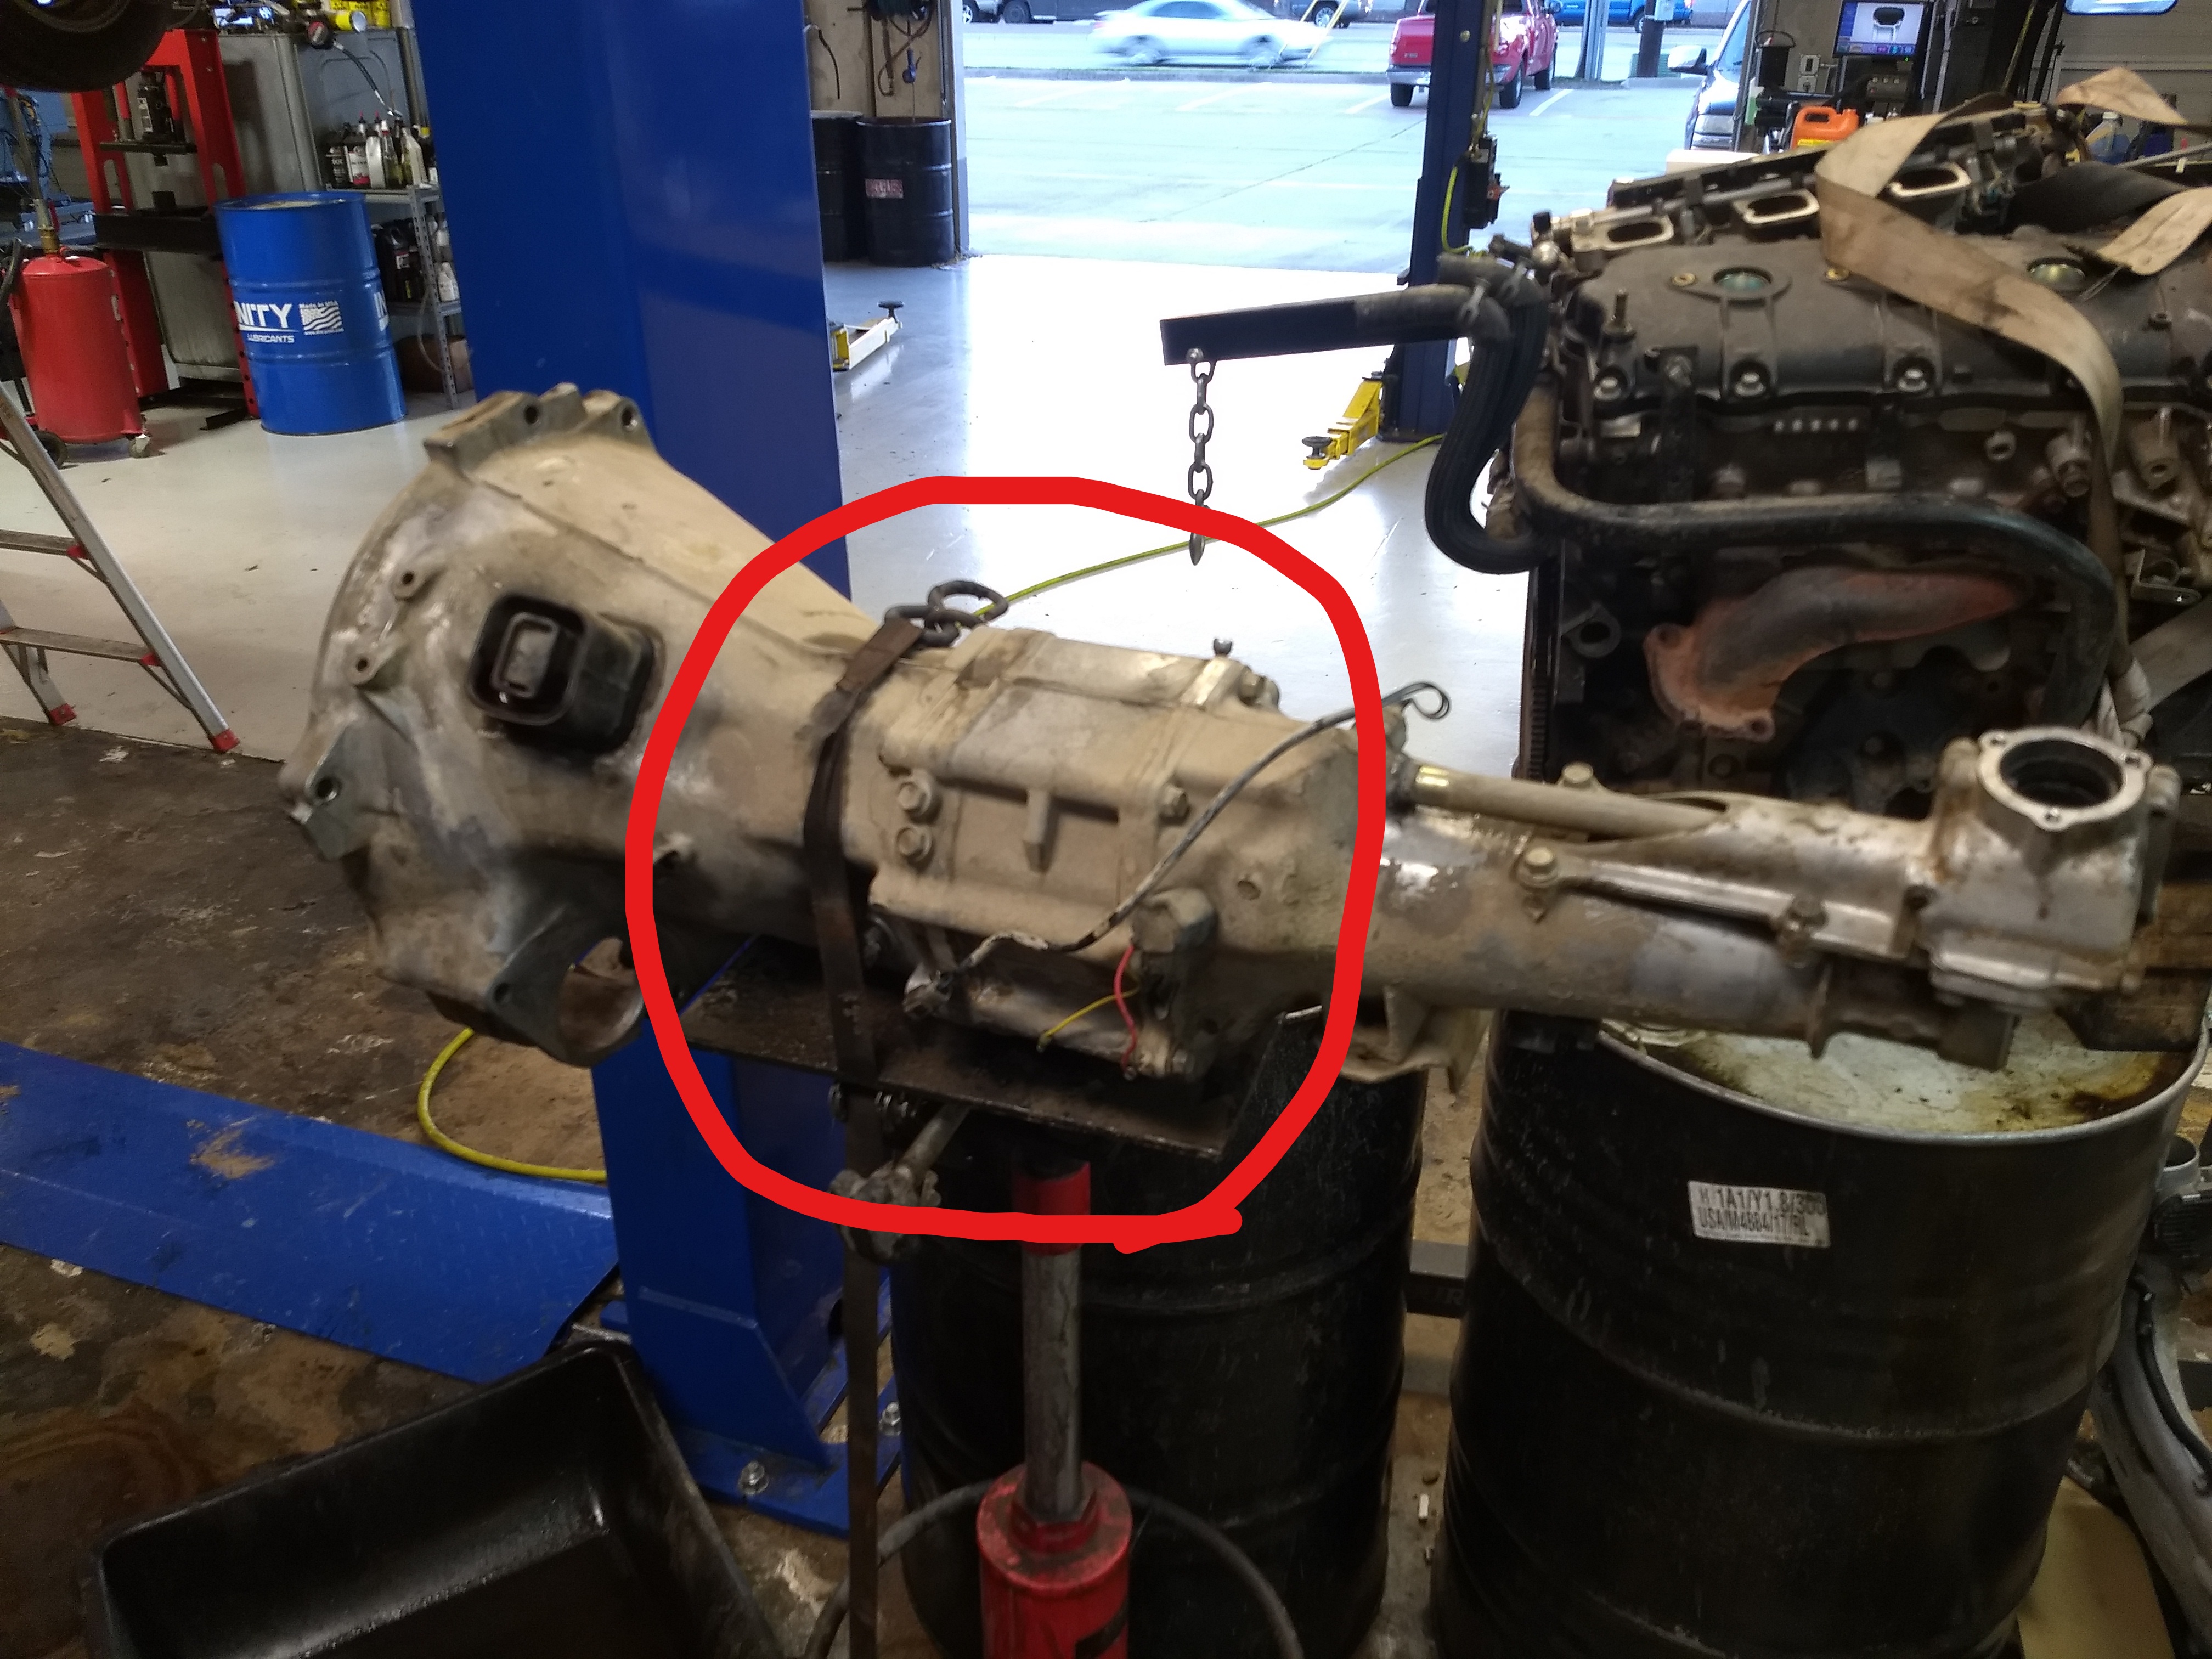
Next I strapped a transmission jack securely to the bottom of the transmission, under the balance point below the drain plug. If you�re doing this at home, don�t risk benchpressing it. Buy or borrow a scissor lift transmission jack and be done with it. Here�s a cheap one that will work fine: https://www.harborfreight.com/450-lb...ack-39178.html
https://www.dropbox.com/s/u1wocpzlpj...28_LI.jpg?dl=0
Unbolt the transmission crossmember. I recommend replacing the rubber transmission mount, a cheap rockauto one will fit, and probably be better than your old one, or spend the big bucks and get a mazda competition mount.
With everything removed, the transmission should pull straight back and down.
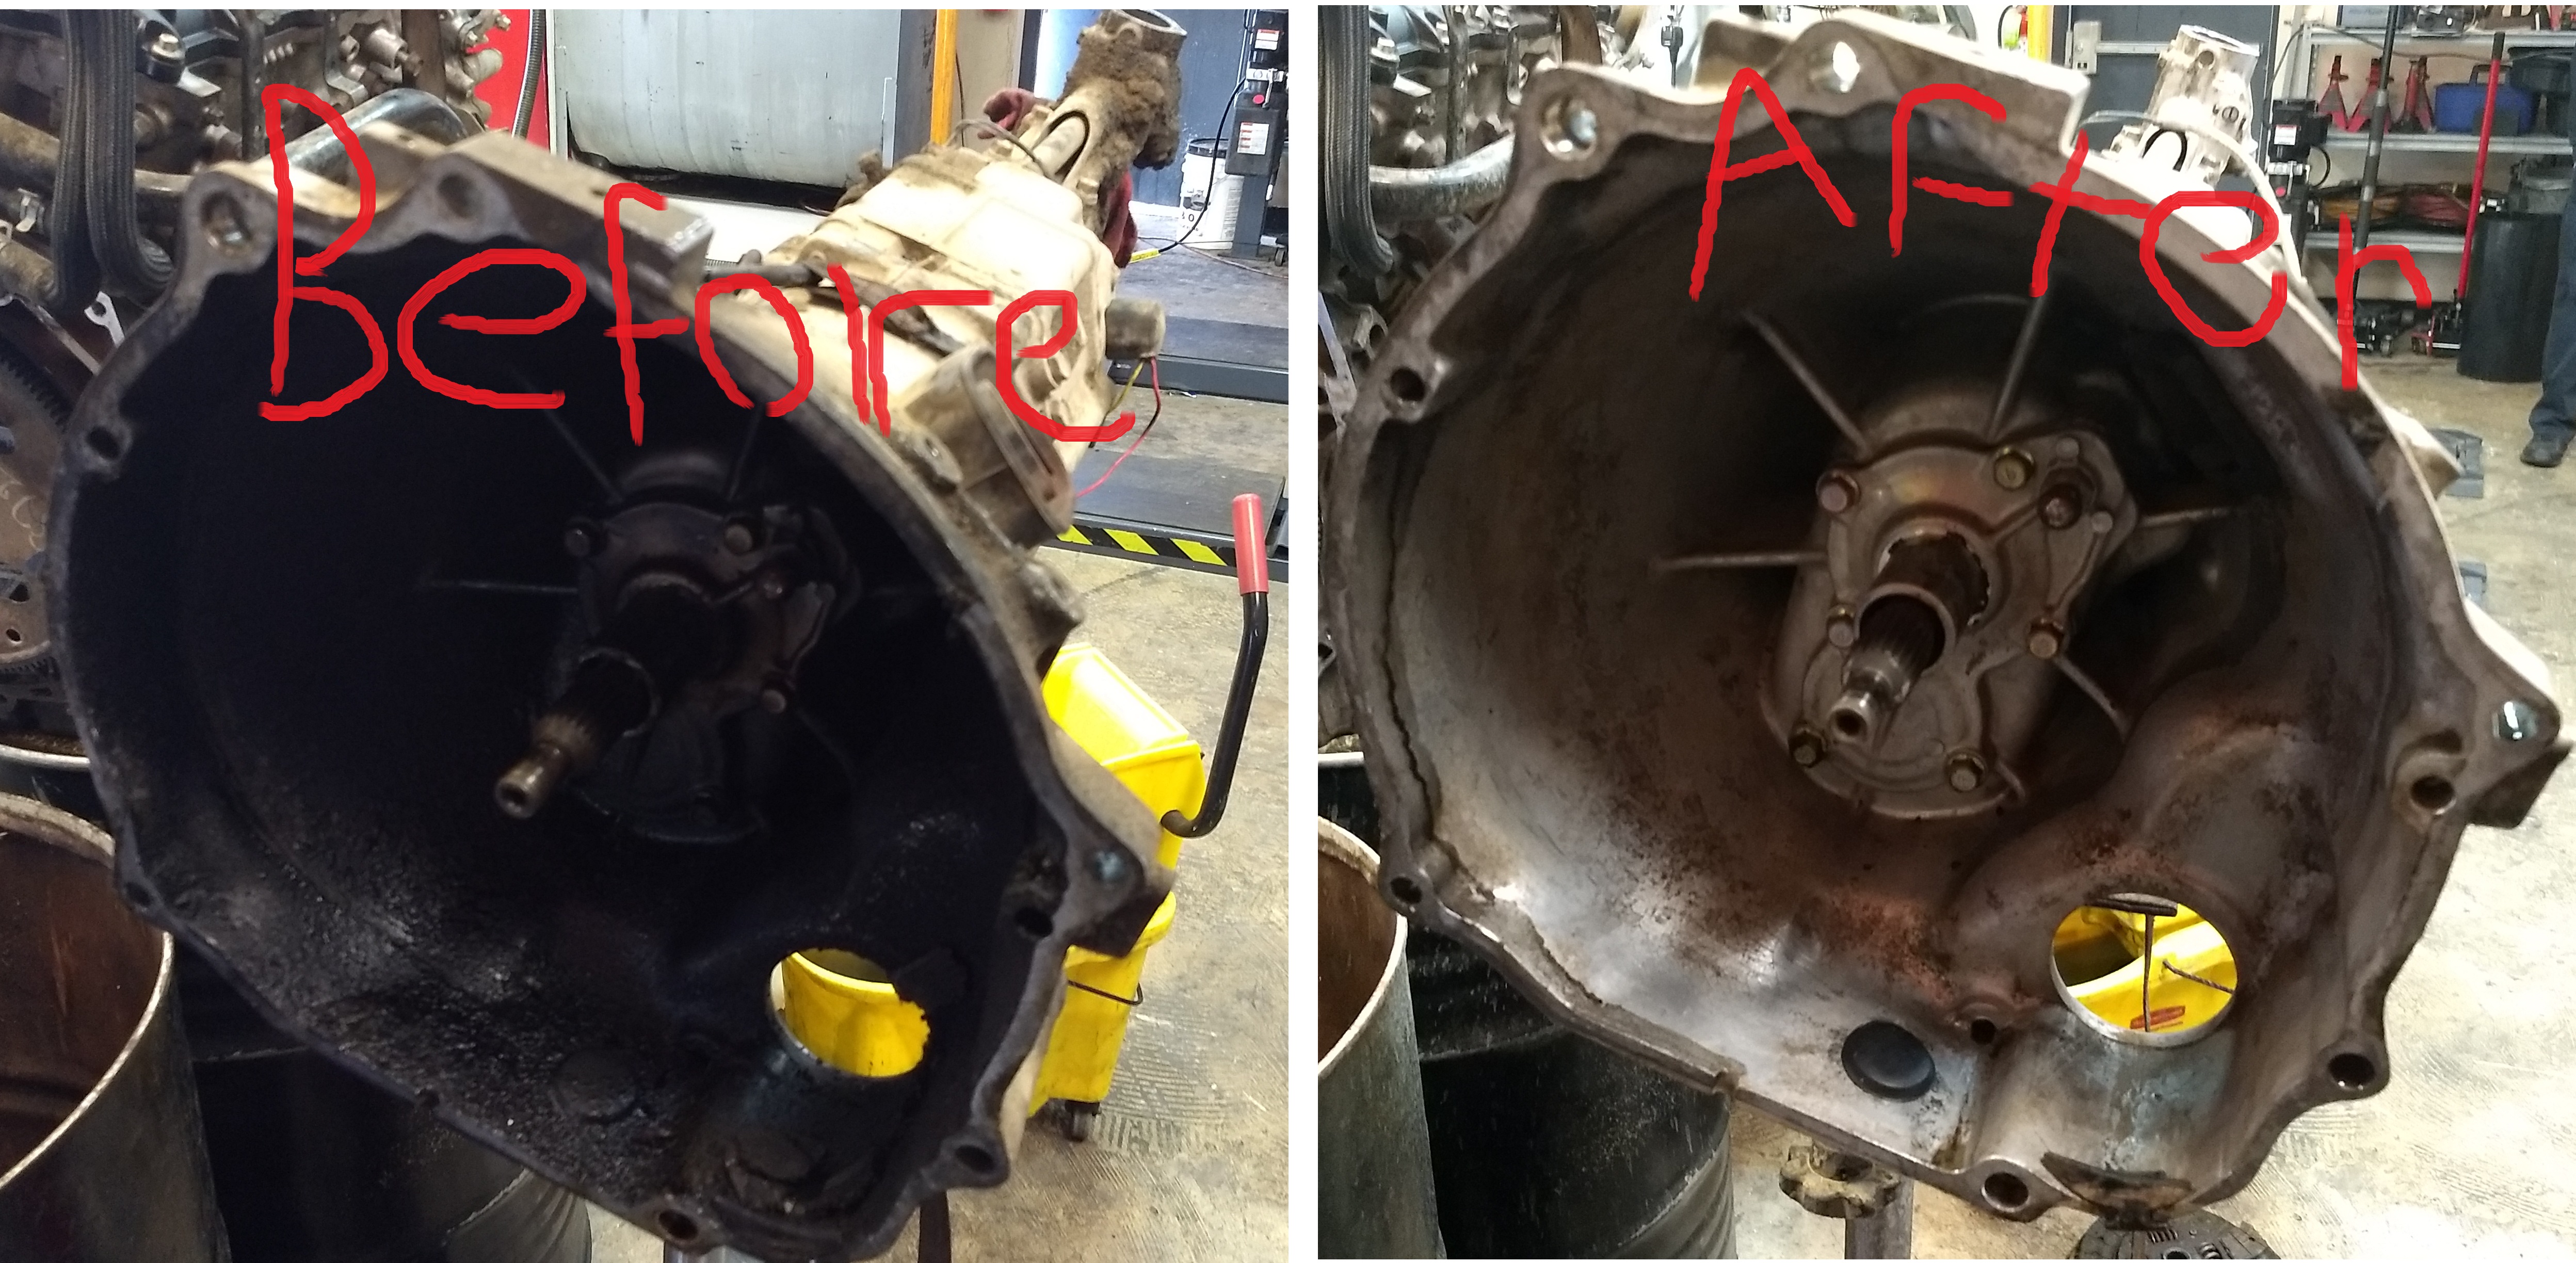
Lower the transmission all the way down, and then you can take a look at your handy work.
Remove the throwout bearing and clutch fork from the bellhousing and clean everything on the tranny with brake clean and a brass brush if yours is filthy like mine is. Watch out, brake/clutch dust is pretty bad for your health.
https://www.dropbox.com/s/37c833vy7q...4%202.jpg?dl=0
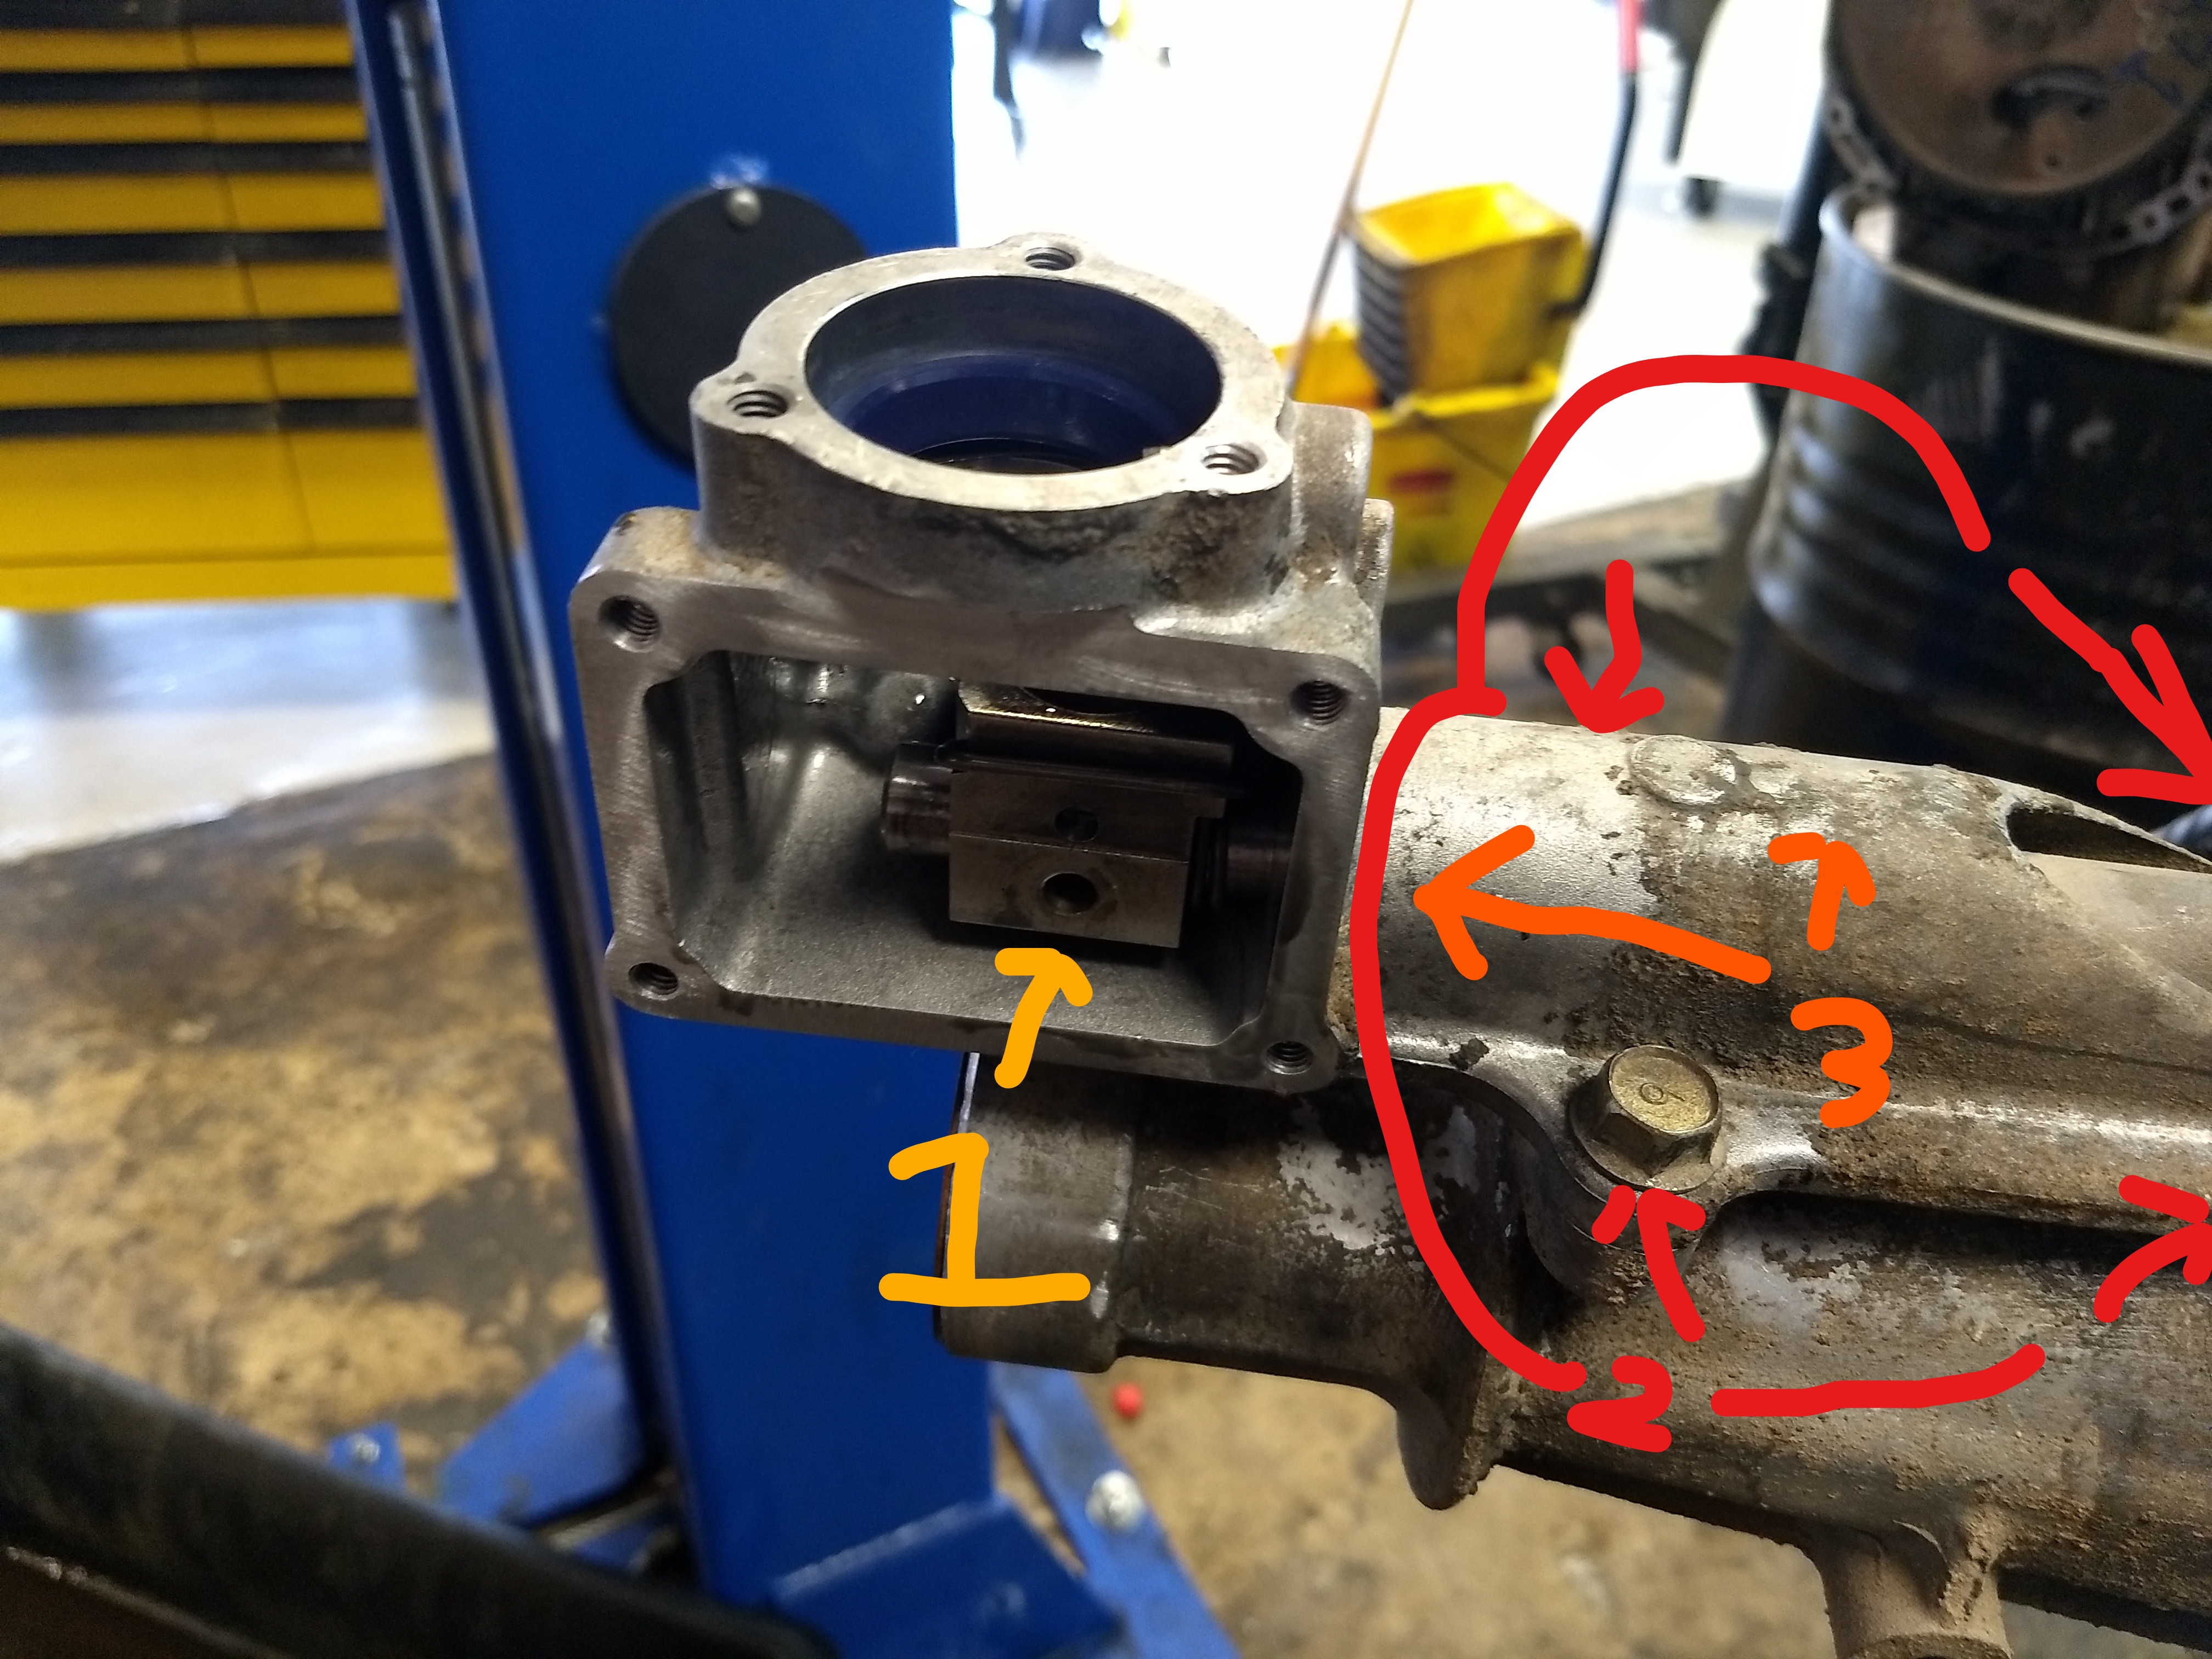
This is the best time to do the shifter return spring. Here's some pictures to see what you're working with. To get that little block out you need to remove the bolt holding it to the shaft, then as far as I can tell, unbolt the 4 bolts holding the shifter assembly to the transmission body and pry up off the locator pins and pull it out. There's a seal between the linkage tube and the trans body so it's a tight fit.
https://www.dropbox.com/s/q114gjk2es...66_LI.jpg?dl=0
https://www.dropbox.com/s/o613n71tae...82%29.jpg?dl=0
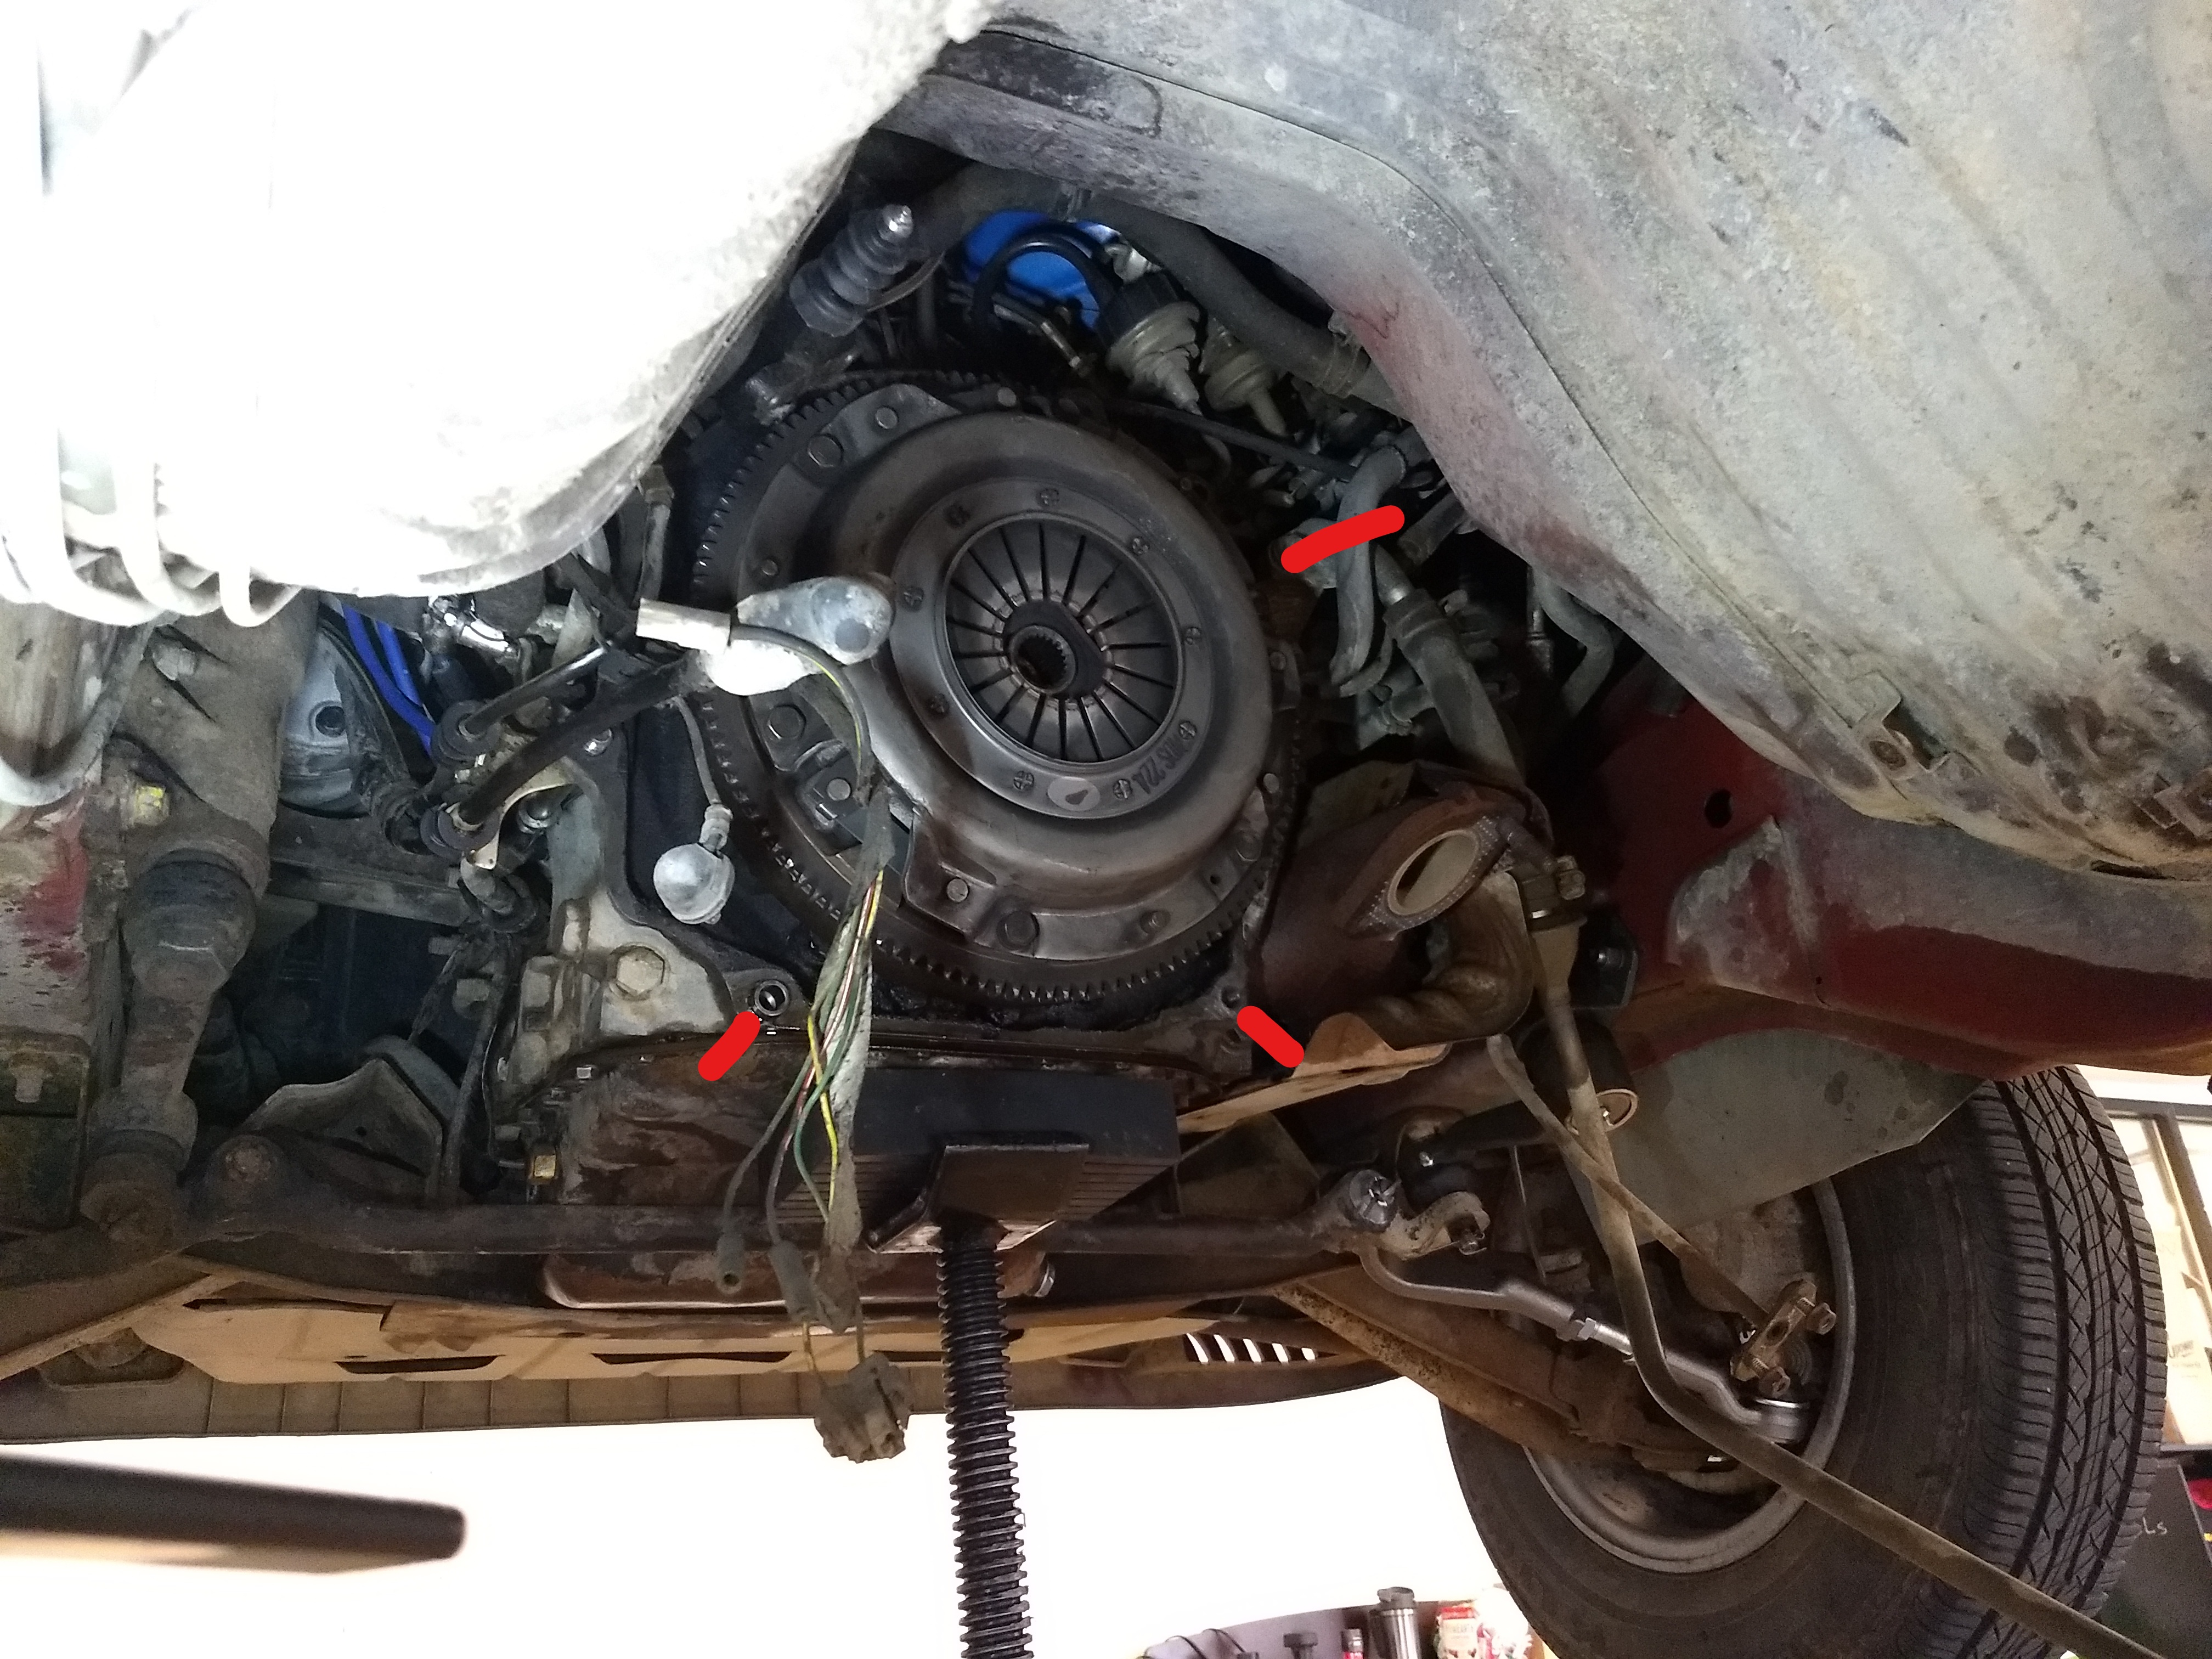
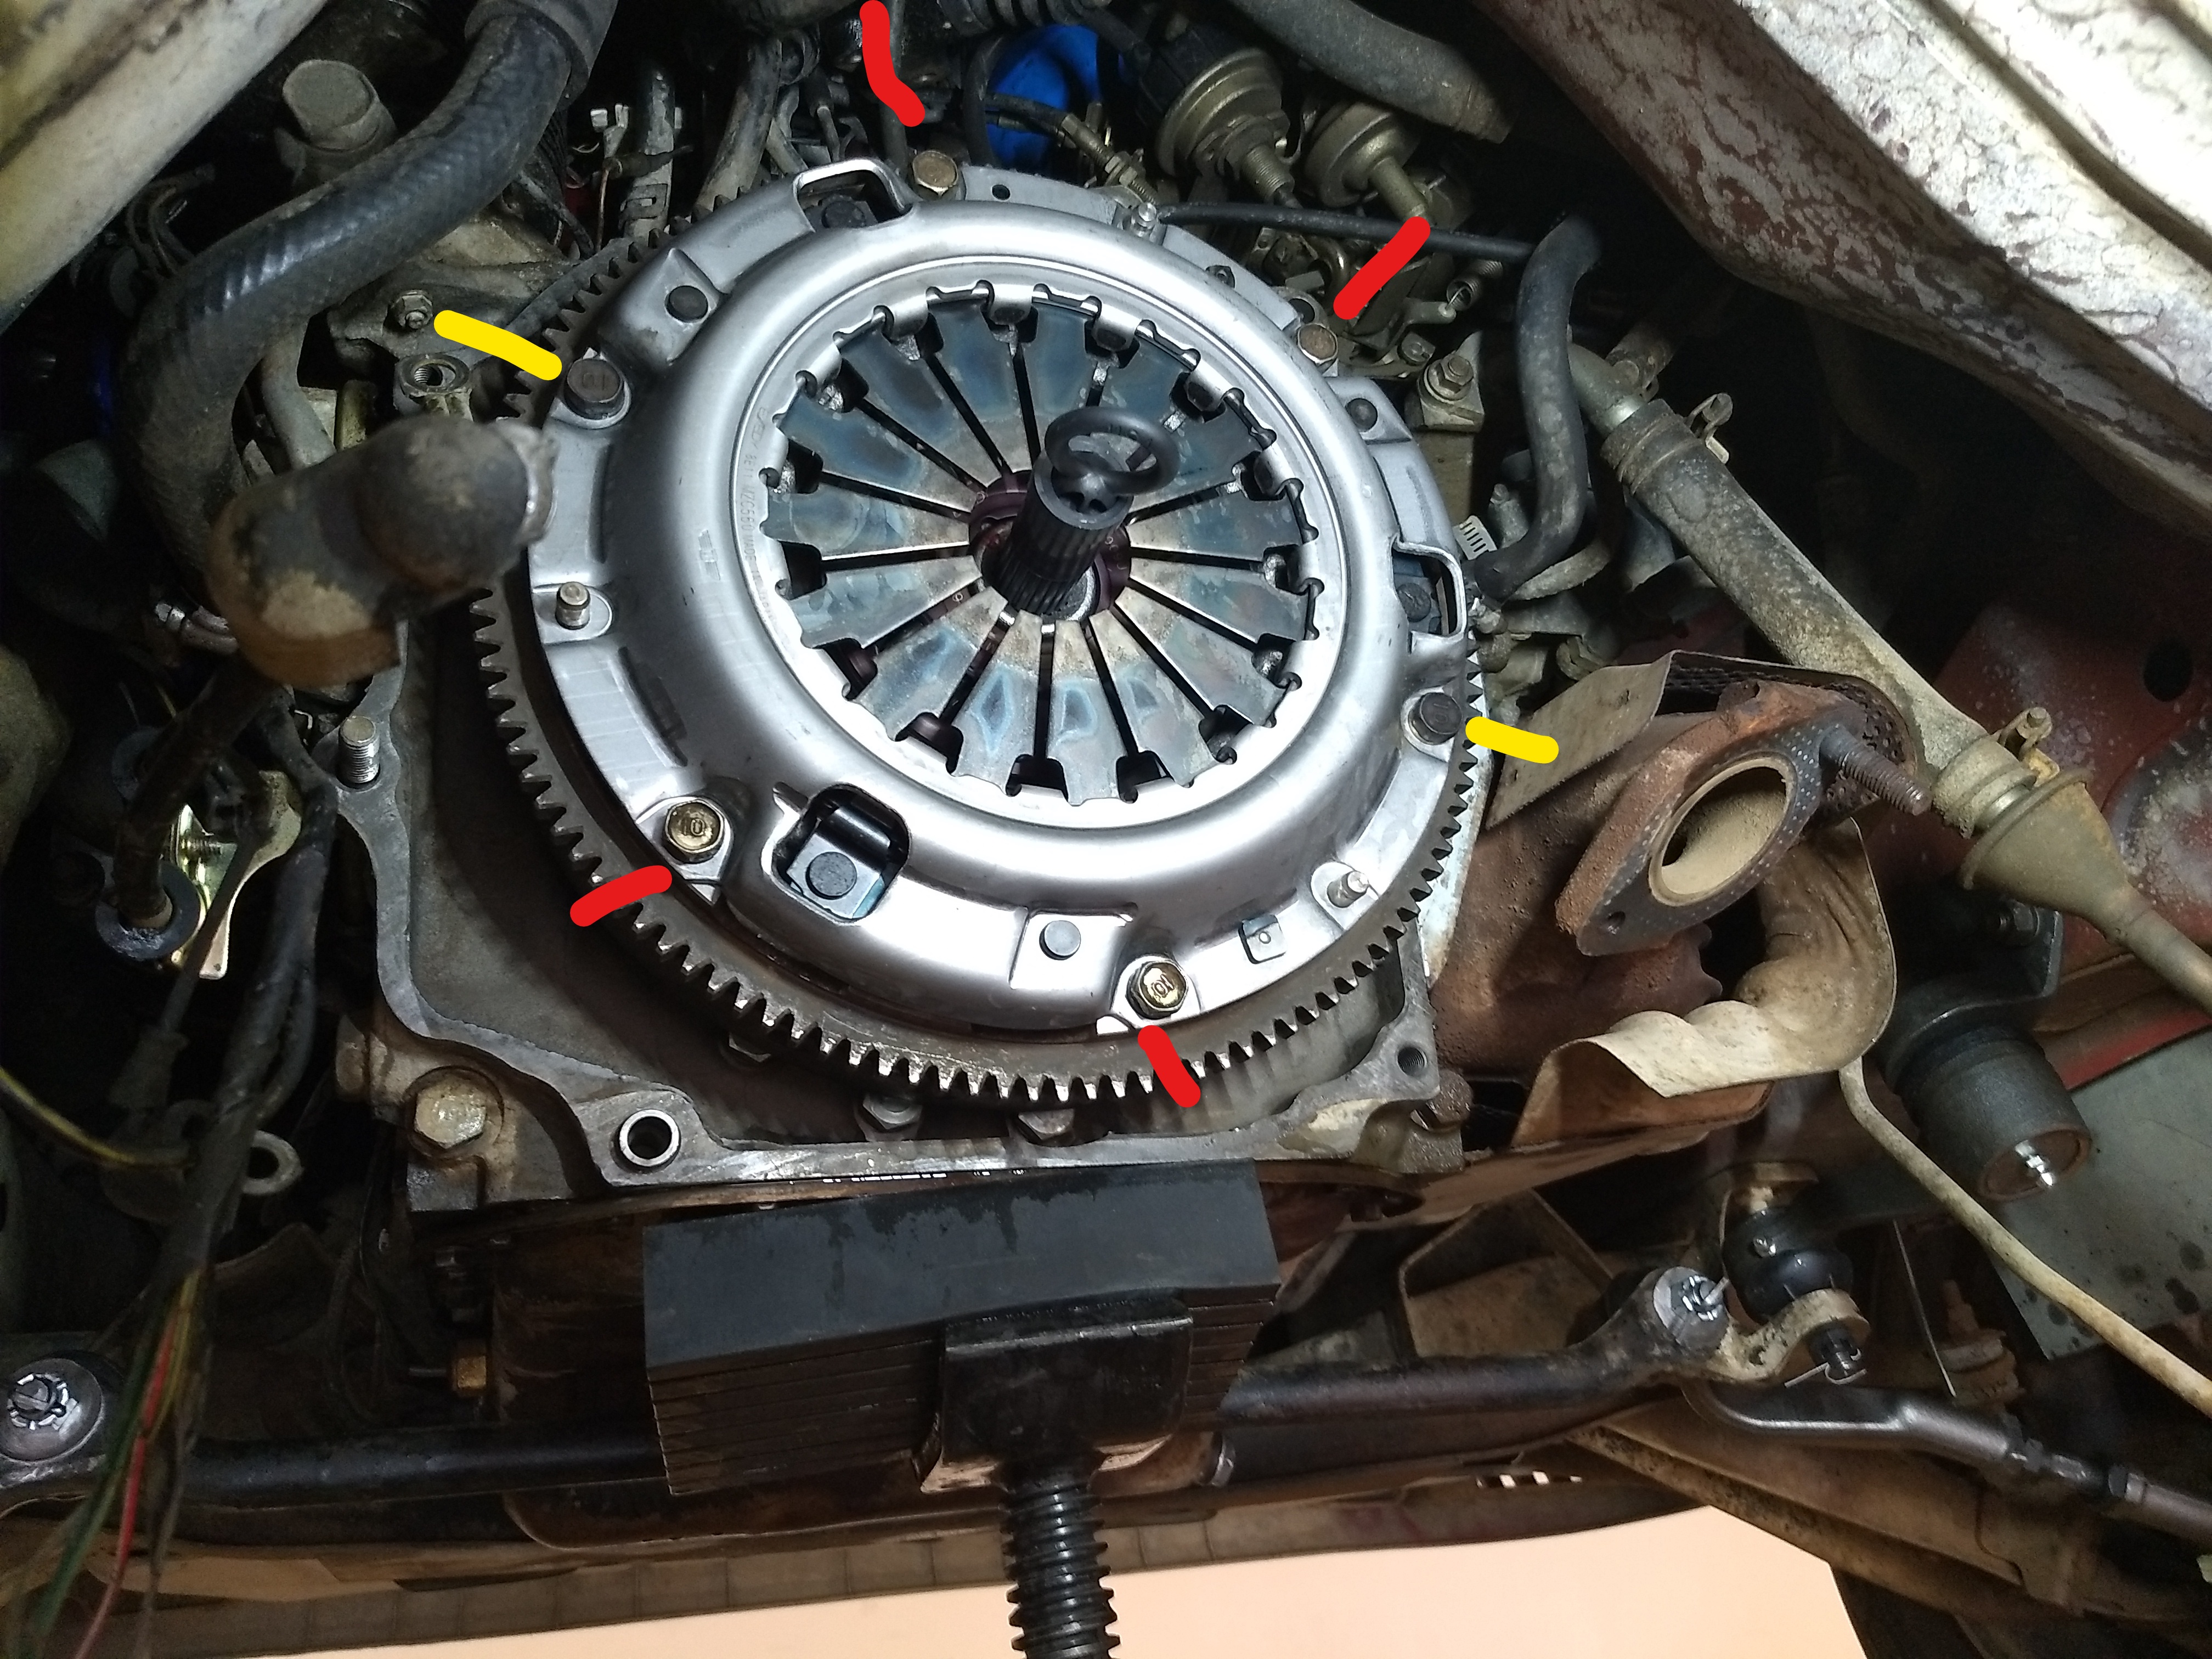
On the engine side, you'll need to remove the bolts around the pressure plate (two of the bolts are different, remember where they go or take a picture) and the assembly should fall off. Support it all and catch everything so the clutch and pressure plate don't fall when the bolts are all out.
https://www.dropbox.com/s/l0zq2h97jv...53_LI.jpg?dl=0
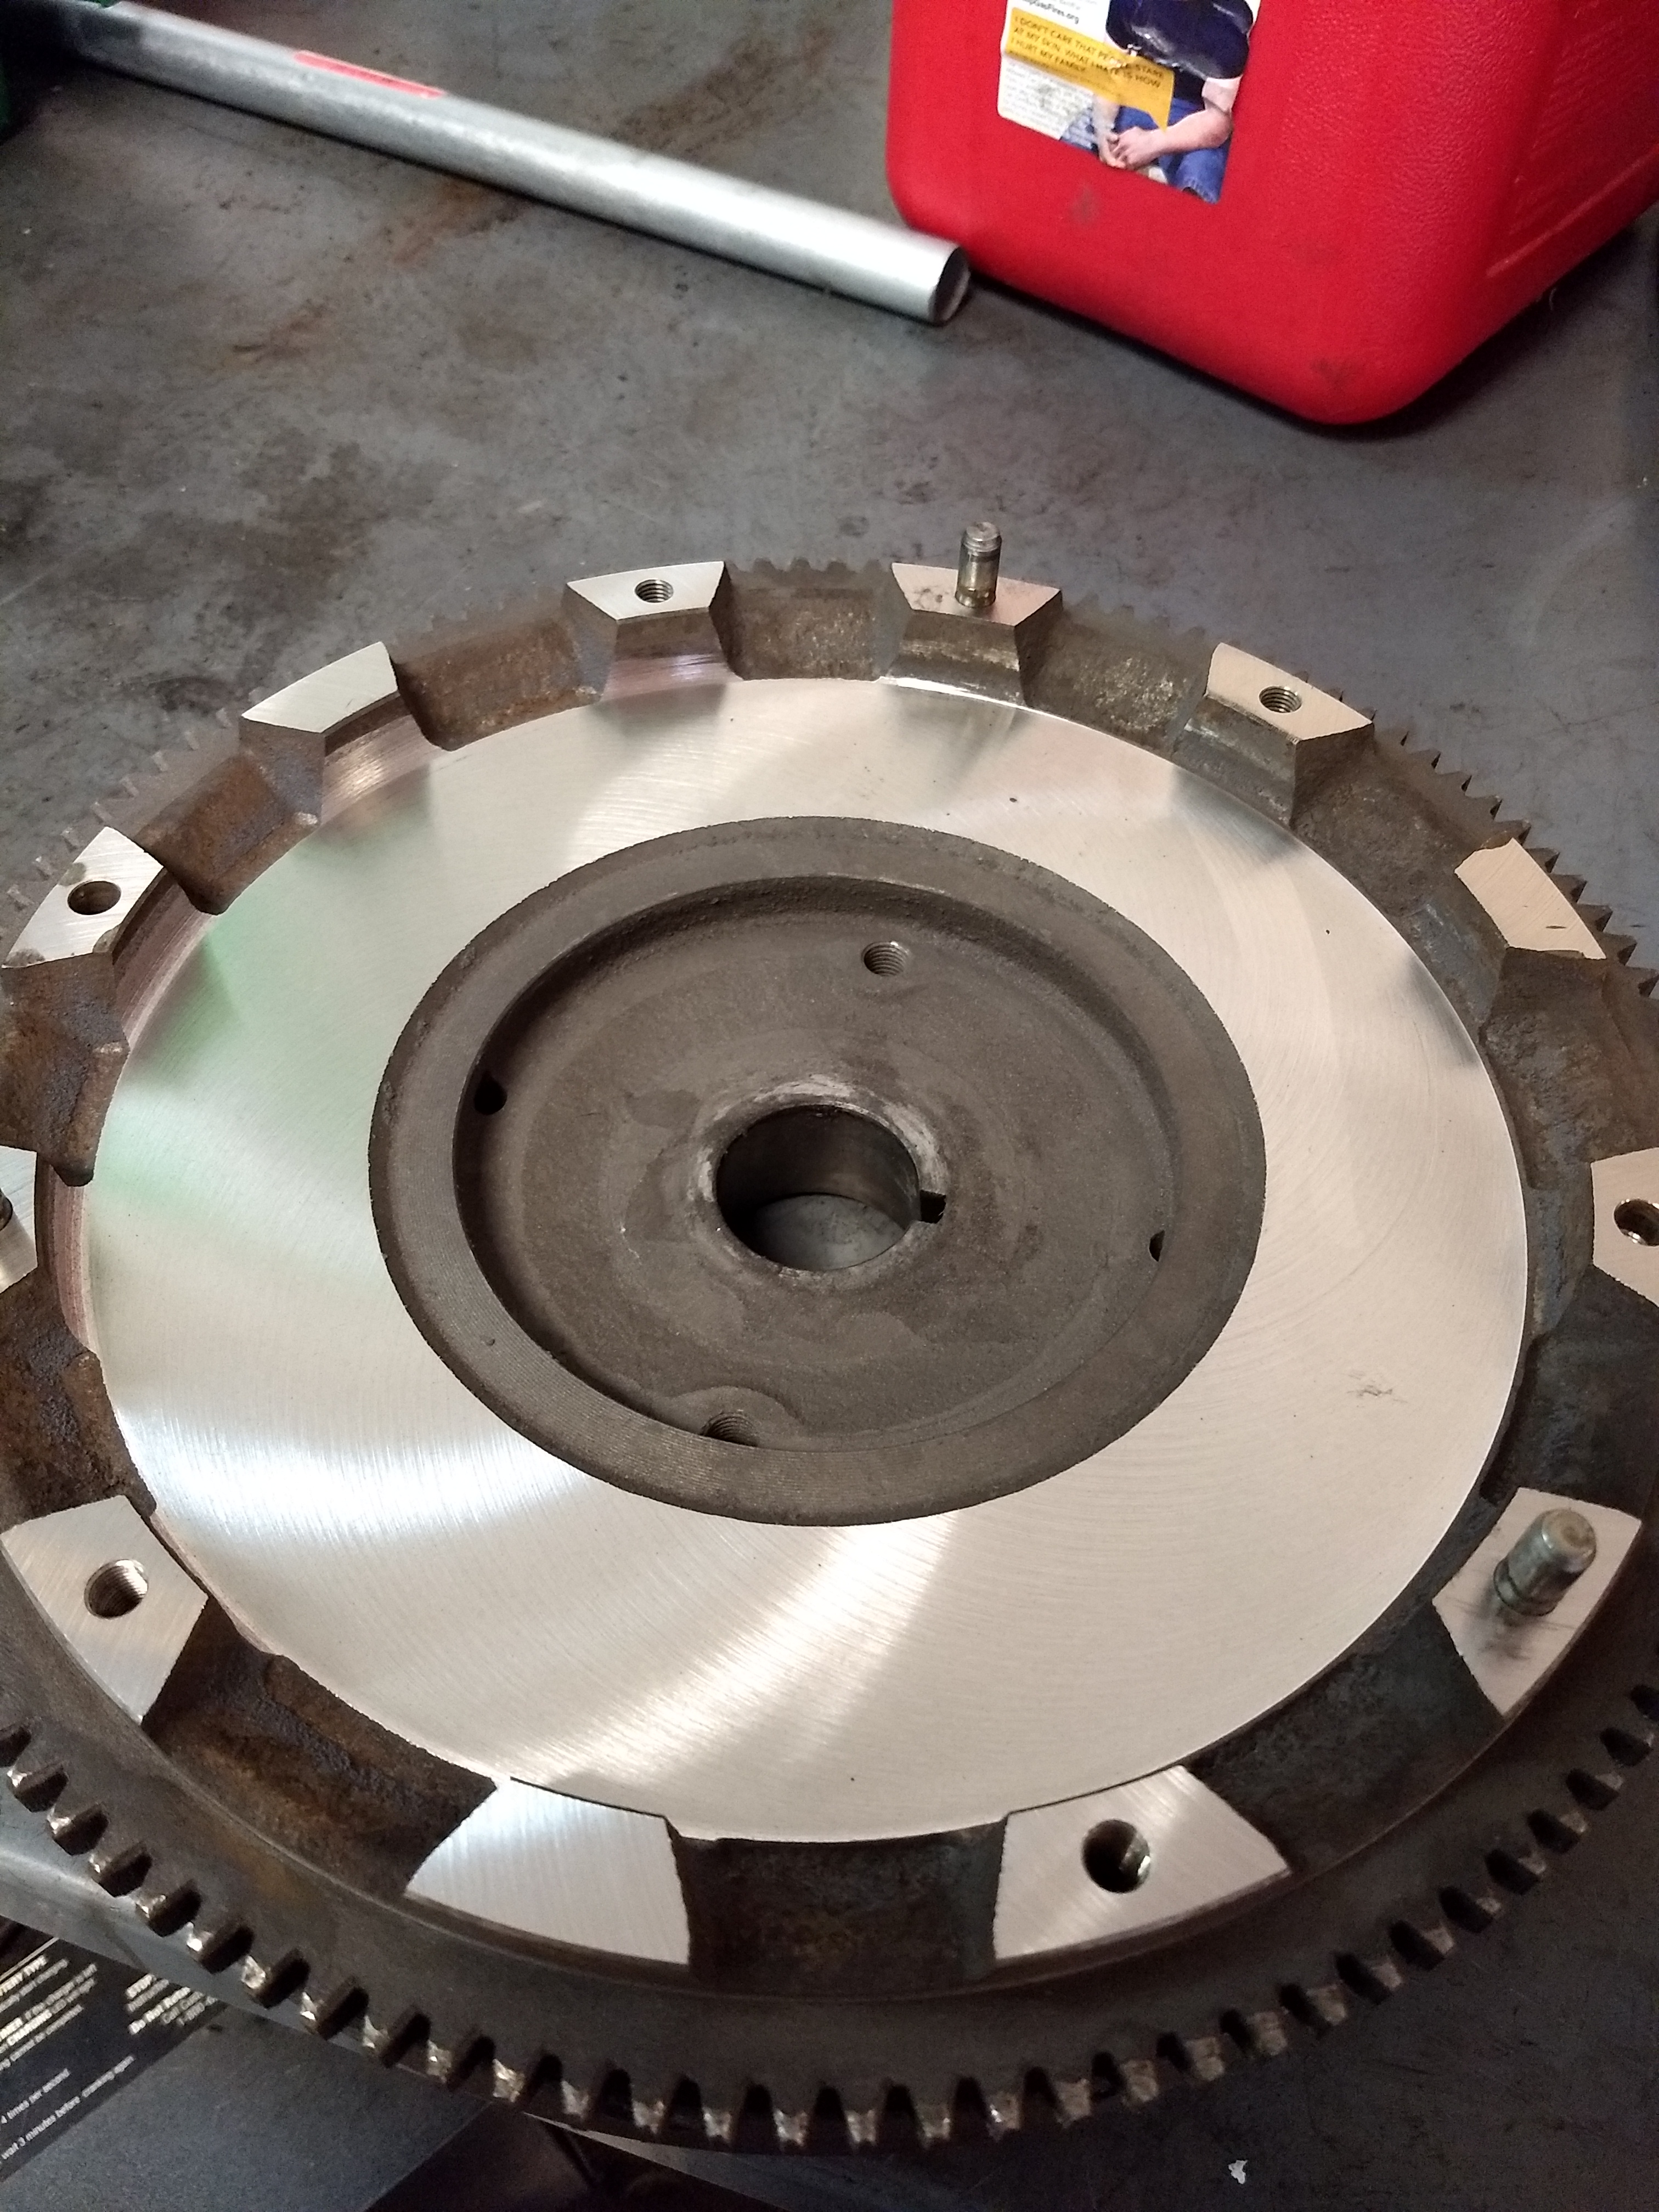
Behind the pressure plate and clutch you'll find the flywheel and the dreaded flywheel nut. Here's a picture of my resurfaced flywheel.
https://www.dropbox.com/s/n1cpilvp8c...45189.jpg?dl=0
Don't cheap out, get an aftermarket flywheel WITH FLYWHEEL COUNTERWEIGHT FOR YOUR EXACT YEAR AND ENGINE, or a refurbished flywheel, again for your exact year and engine, or find a machinest with rotary experience to machine your flywheel. If your machinest hasn't touched rotary before, he may not machine all the surfaces correctly. Also make sure he doesn't lose the pressure plate alignment pins on the outer edges of the flywheel, they DO come out and can get lost.
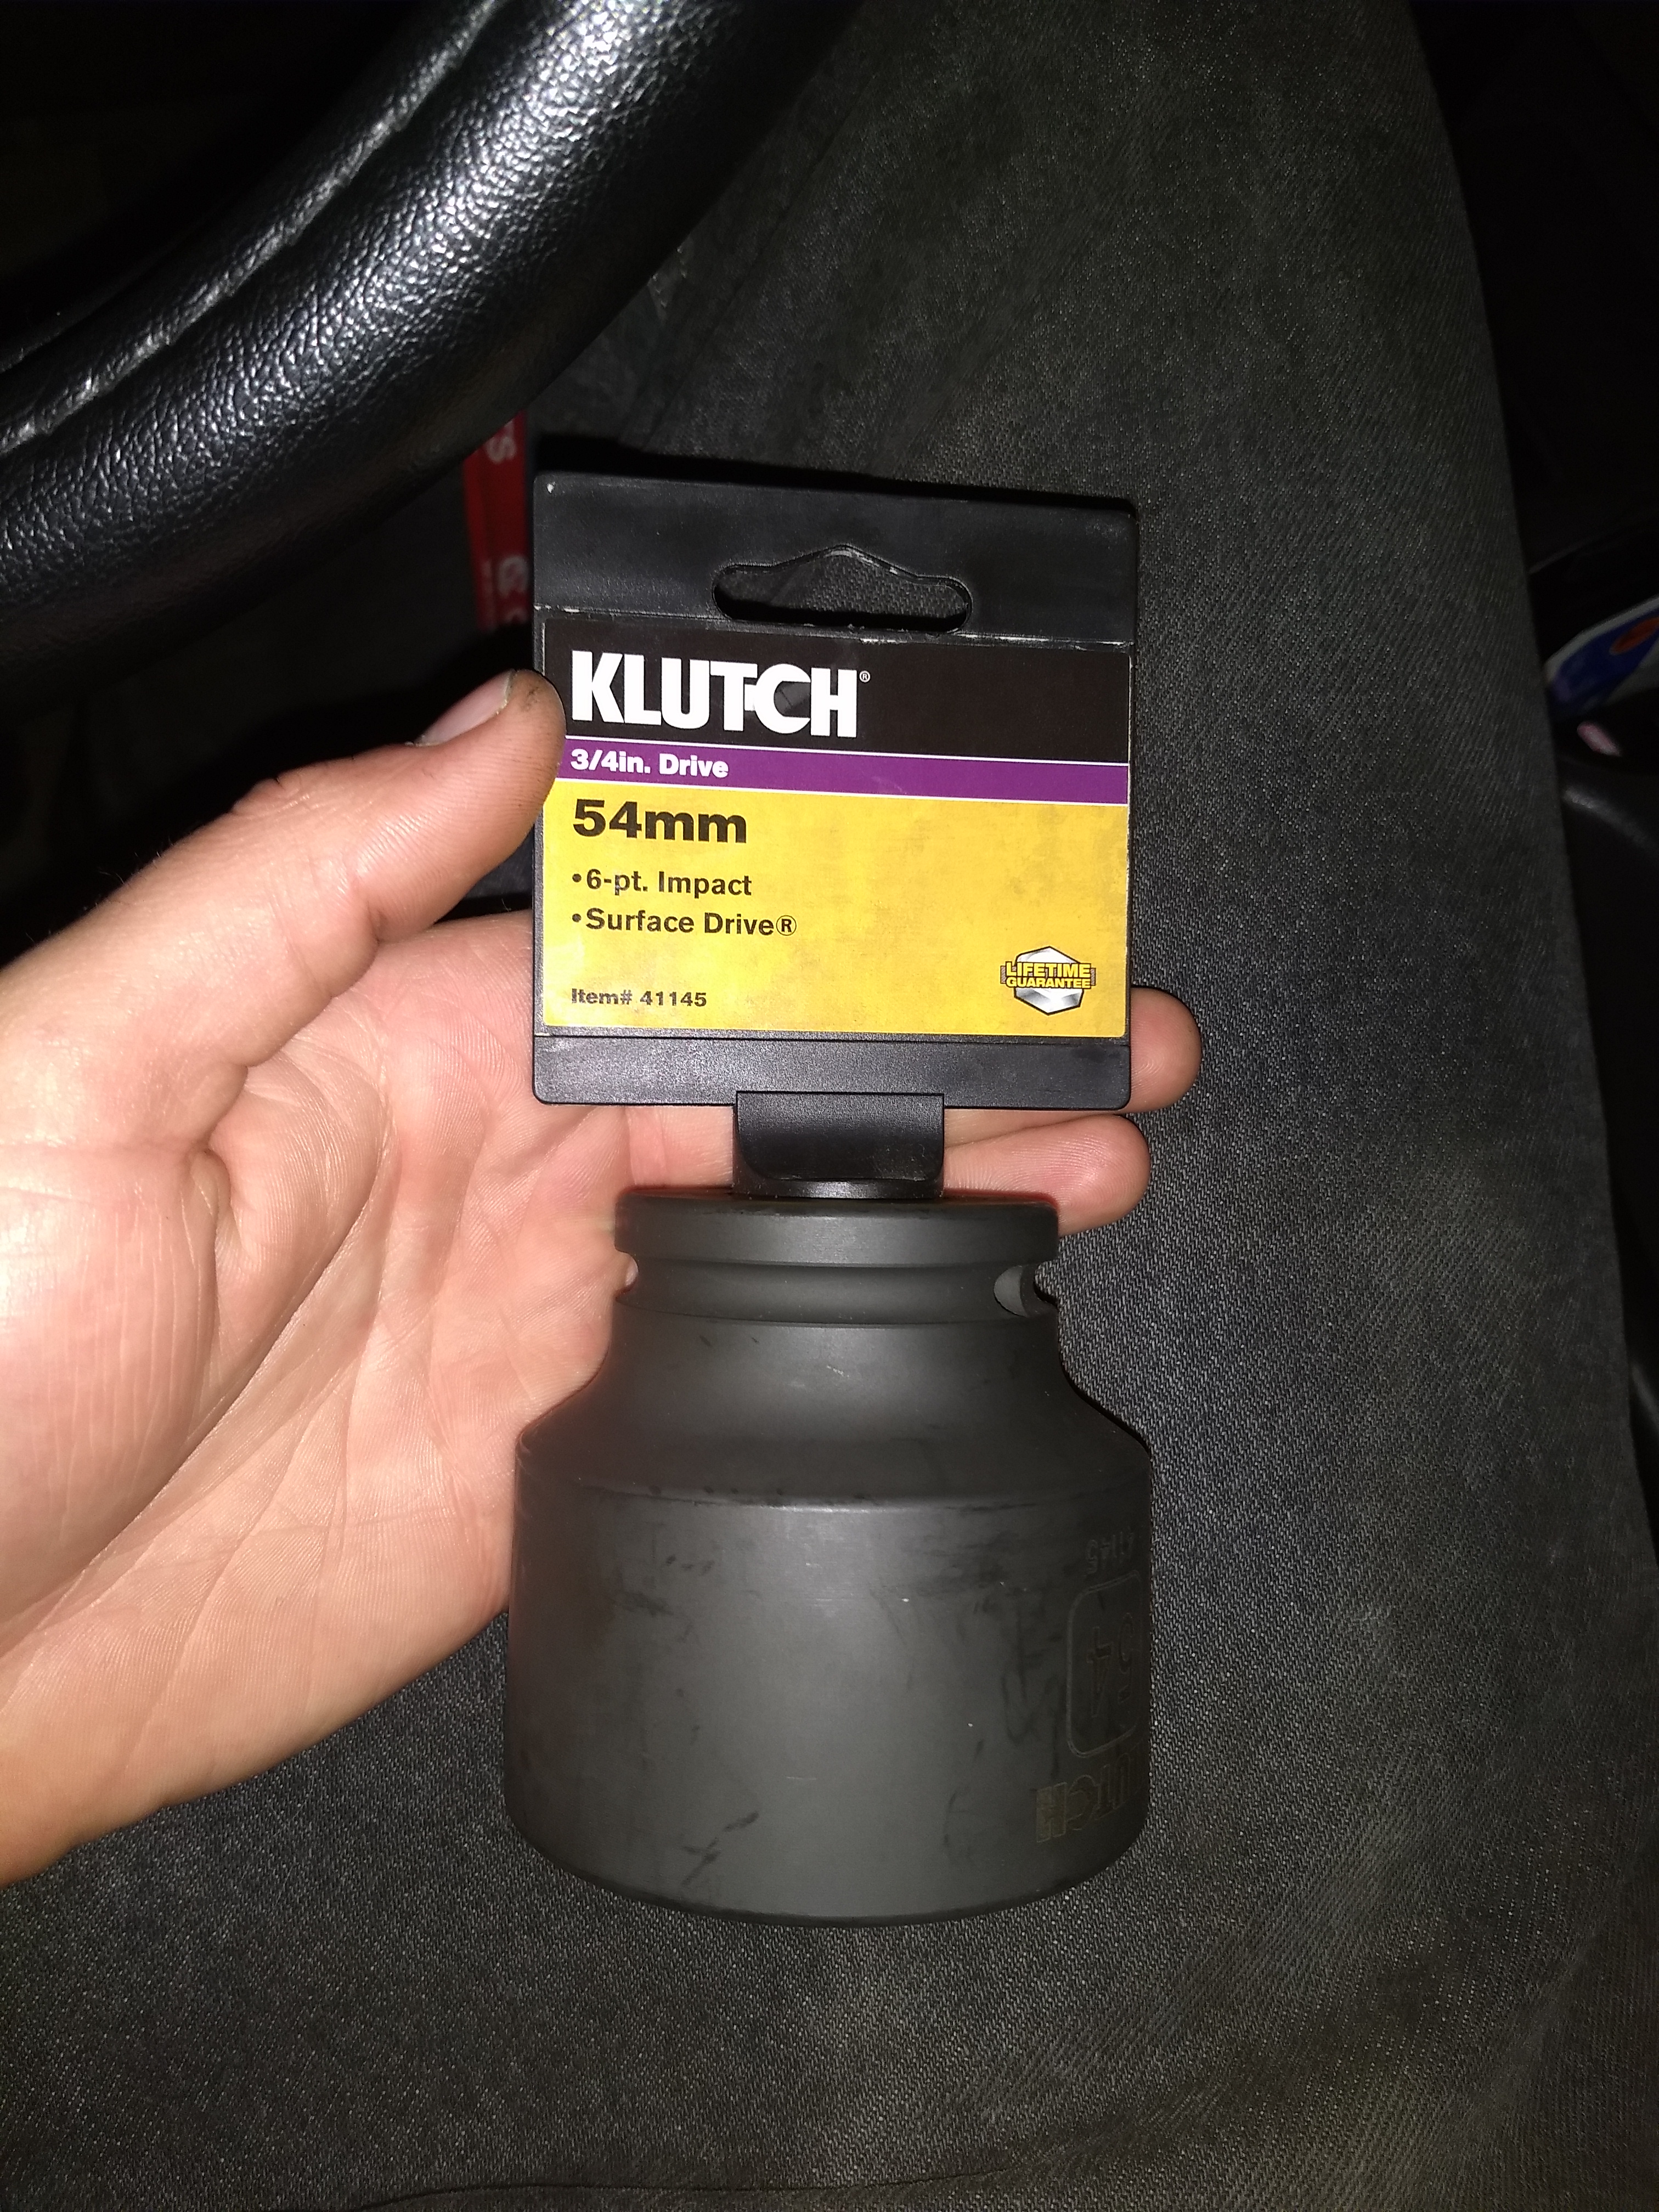
The flywheel nut is 54mm or 2-1/8". Hint, northern tool sells a 54mm impact socket that fits for only $20. Don't cheap out on this either... I suggest the atkins rotary flywheel ring gear brake here. The nut needs to be tightened to 280ft lbs I think, and trust me, it's nearly impossible to find any way to prevent the engine/flywheel from spinning to get the nut loose or tight without the tool.
https://www.dropbox.com/s/37k4u1cwv2...22951.jpg?dl=0
Remove the nut, then the flywheel. Easier said than done... Flywheel may be a bit stuck as well. Don't pry or hit the starter ring gear teeth running around the flywheel or you can break them easily. Rent a pilot bearing removal tool and replace the pilot bearing with fresh high temp grease and seal. Consider doing the rear main seal if yours is leaking... Watch out for replacement rear mains. Rx8 seals are 5mm, and original 12a and 13b seals are 10mm. There are both positive and negative reports on using the rx8 seals.
REASSEMBLY
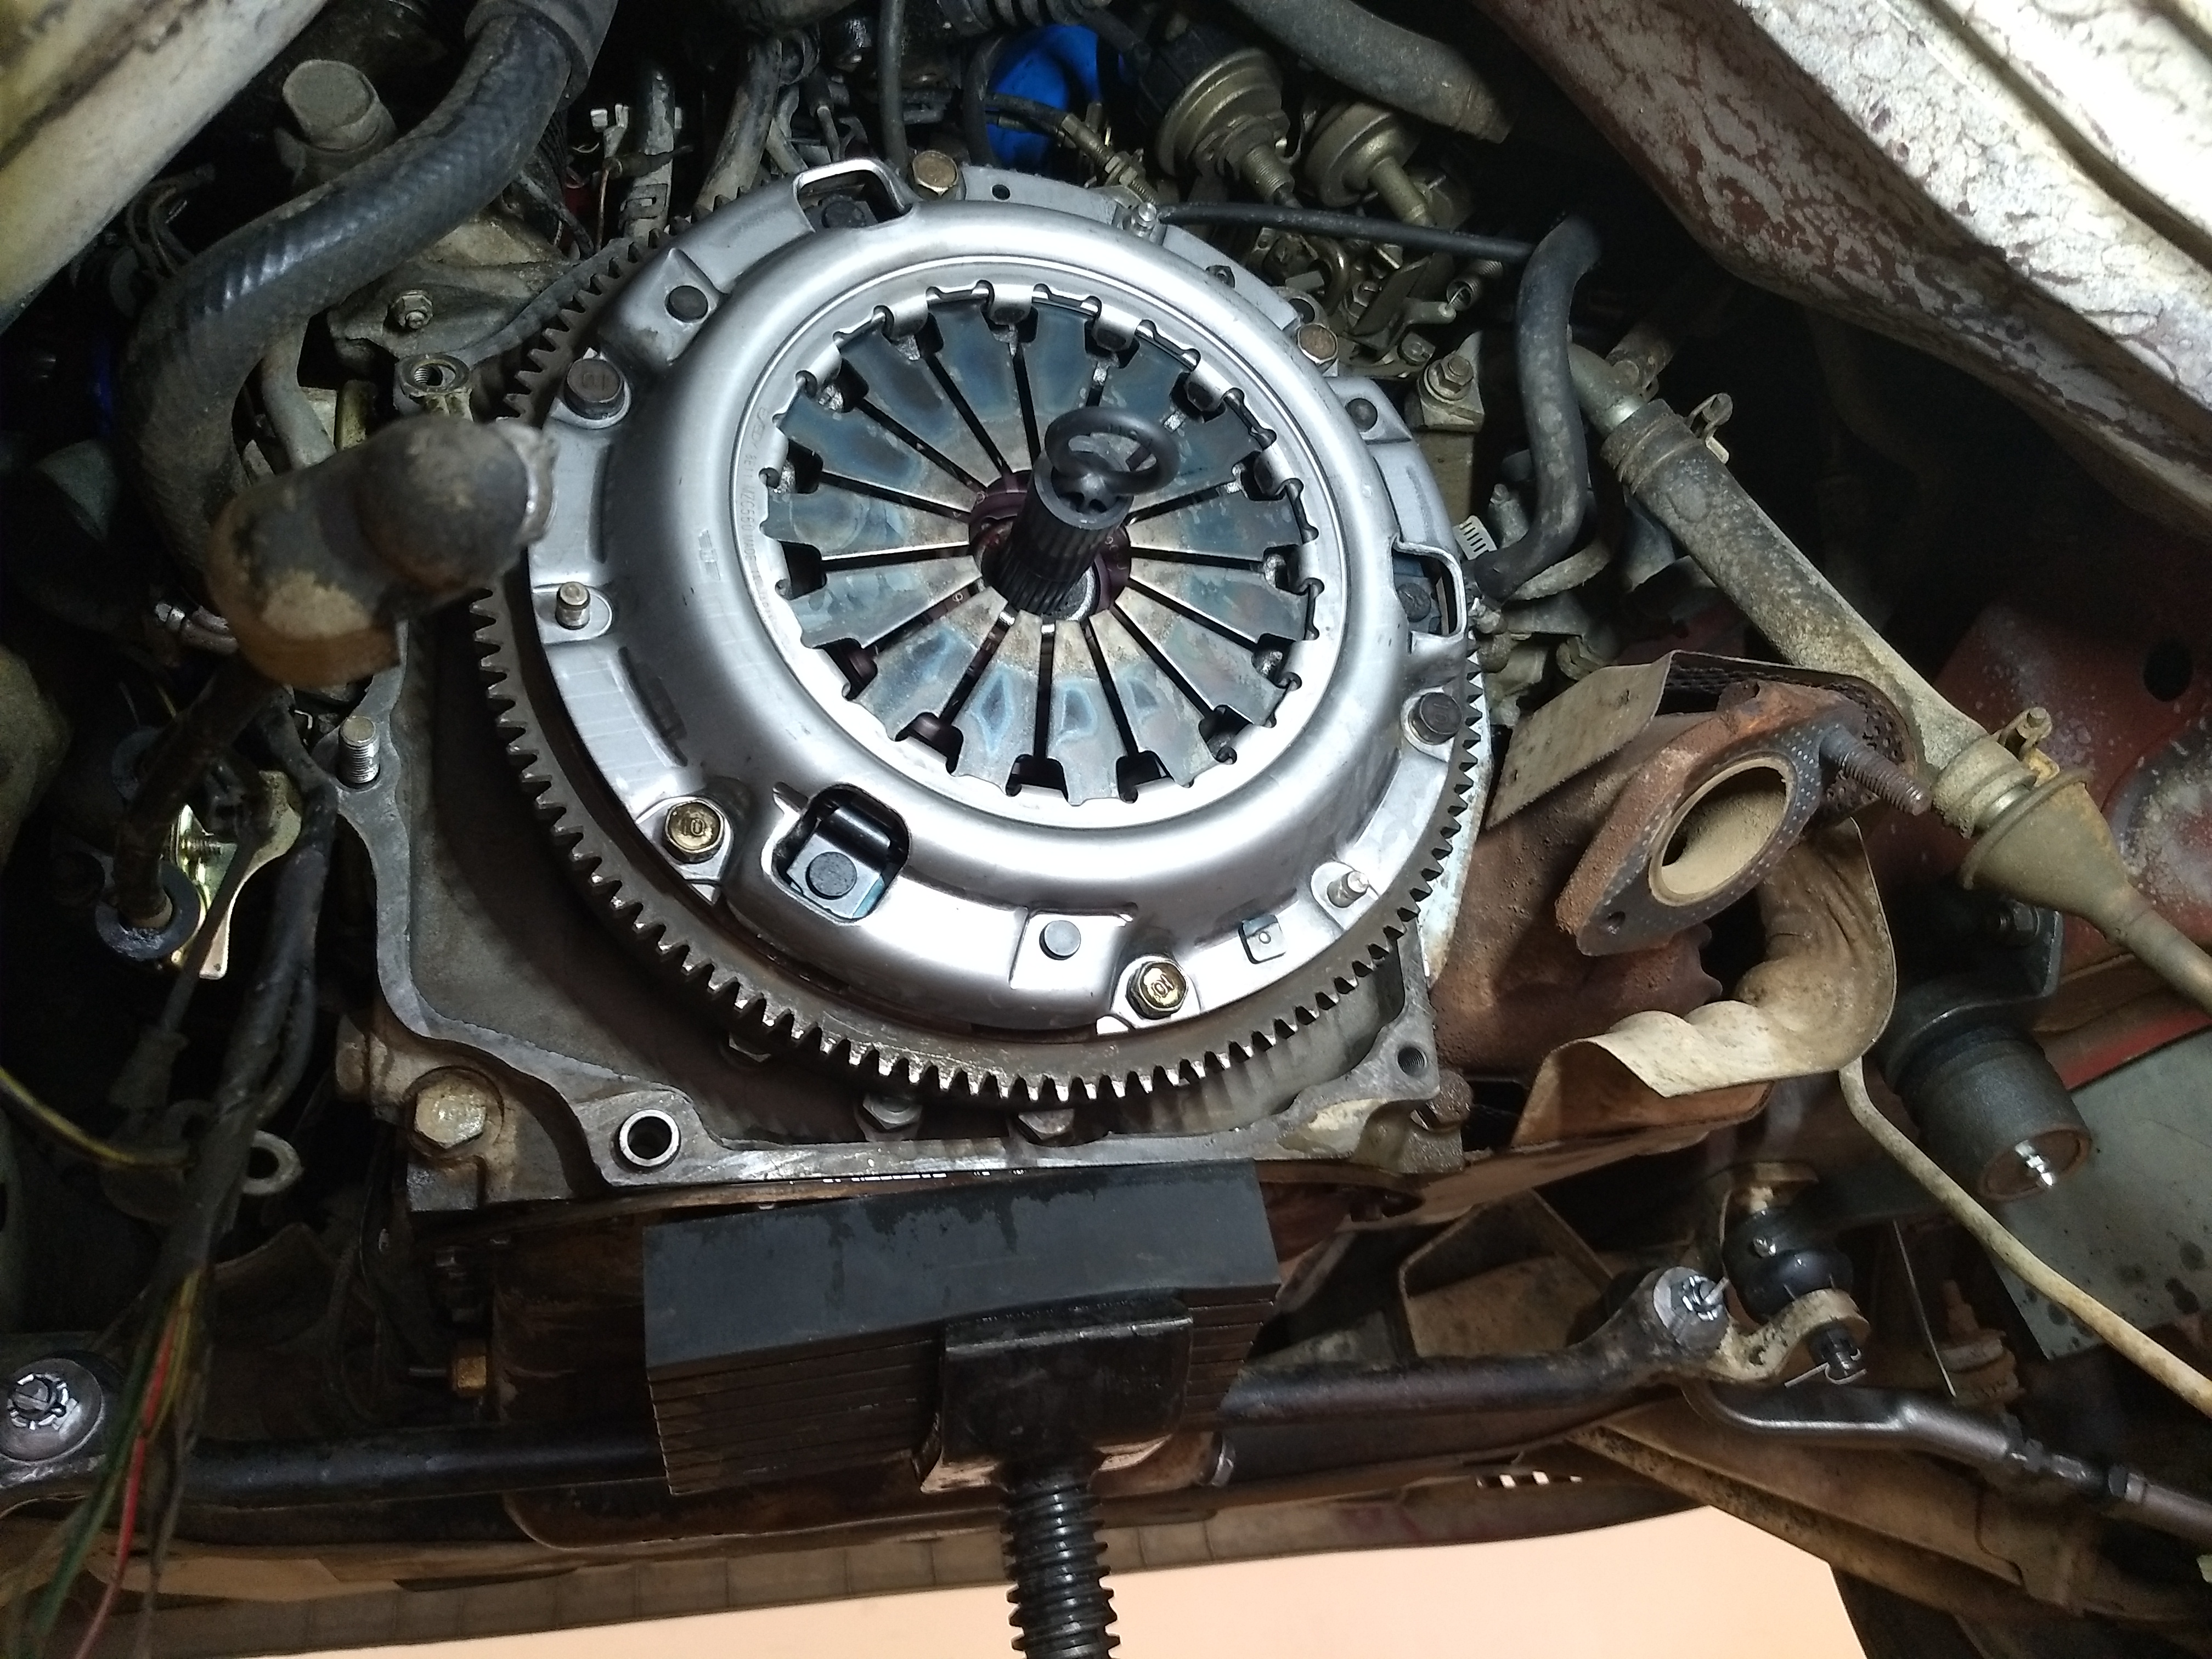
Put the replacement/resurfaced flywheel back on and wash with brake clean. Then the clutch disk, with alignment tool that should come in the kit. Last, slide place the cleaned pressure plate over the clutch disk and align with the pins, and bolt it back on.
https://www.dropbox.com/s/0wse6kdn22...23153.jpg?dl=0
On the transmission side, grease the trans shaft and spindle with the included grease. Slide on the clutch release bearing, then replace your clutch fork especially if it's worn on the contact points. That'll help with clutch feel.
Reassemble the shifter assembly, and fill halfway with 80 or 90w oil.
Make sure the transmission is IN GEAR, so that you can rotate the trans so the shafts and everything line up.
Raise the transmission up and slide it forward until everything engages. Easier said than done, I suggest an extra pair of hands so someone can check if everything is flush and correct. Bolt the bellhousing back and the transmission mount and crossmember.
Replace the driveshaft.
Starter Motor
Reconnect electrical connections
Heat Shields
Catalysts or exhaust system.
Refill the transmission. GL-4. I suggest the redline mt-90 that I used. Buy a 3 quarts or a gallon. The trans takes a bit more than 2 quarts, fill to the fill plug level.
I suggest differential flush at this point as well. Gl-5 in Limited Slip (GSL/GSL-SE), GL-4 is OK in open diffs as far as I know.
Lower the car and do the top two bellhousing bolts.
Bolt the slave cylinder back in. Be careful, I suggest running the bolts in with fingers only, again, avoid stripping these holes at any cost or you'll have to drop everything again and retap the threads.
Inside the car replace the shifter, boots and trim and reconnect the battery.
Double check everything, and carefully test your handywork.
Break in the clutch with gentle city driving for at least 100 miles.
I'm going to get these pictures in here differently, this was just the easiest way for right now.
For reference, this job takes place on my 1985 12a powered �S� base model, but should also be relevant for nearly any 1st gen.
Parts I used for this engine/transmission combination, including fluids and parts I replaced along with the clutch.
Exedy 10008 clutch kit � This fits non turbo 83-92 12a/13b � Atkins
Clutch Pilot Bearing Seal - 11-404A-1881 � Mazdatrix � does NOT come in the exedy clutch kit
Rear Main Seal - 10-556A-1668 � Mazdatrix � This is the ACTUAL 12a/13b 10mm seal, not the 5mm rx8 one.
Clutch Fork � Part # N204-16-520 � Fits 12a/13b 84-88 - Atkins
Rear Transmission Seal � Mazdatrix � This is the seal to the driveshaft
Transmission Mount � Rockauto or mazda competition. I tested WESTAR EM8095 and it fits fine, if a bit soft.
Flywheel Ring Gear Brake � Atkins � For removing and torqueing the flywheel.
LUK Slave/Master cylinders � Rockauto � Compared side-by-side with NAPA and they seem identical down to the packaging. No issues so far.
Shifter Bushing Kit � Atkins
Shifter Return Spring � Atkins
Clutch Master Cylinder Firewall Gasket � Atkins
Steel Braided Clutch Flex Hose � Atkins
Flywheel Nut � 11-711C-0810 - Mazdatrix � You shouldn�t need this, but mine was busted up by an air chisel
Redline MT-90 75w90 GL-4 Gear Oil 1 Gallon - I like this oil so far.
DOT-3/4/5.1 brake fluid. Each step up in number is a higher boiling point. Do NOT use DOT-5, it�s not compatible. I usually use a good quality DOT 4 with a boiling point above 400f to be safe for spirited driving on the street.
4-10 hours of time.
Document everything. Pictures of every step will save your life when you�re reassembling, especially if you are new to this kind of work, or these cars. Pictures take extra time when you�re removing things, but you�ll appreciate them later. Bag and tag and separate every bolt. Some bolts that look like they should be identical, aren�t. Mazda didn�t seem to like to make things easy for us.
Some of these steps can be done in a different order, this is just the order that was fastest for me.
MASTER AND SLAVE CYLINDERS
First I replaced the leaky Master and Slave cylinders. Brake fluid will ruin your paint nearly instantly, cover your car with rags and towels, clean spilled fluid with soapy water asap if you spill. First I sucked out the old fluid with a turkey baster and pumped the clutch pedal. There are nuts inside the car holding the slave cylinder to the firewall. I got to mine by removing the seat, laying on my back with my face under the dash, a flashlight in my mouth an a open ended wrench in hand. Not the easiest fasteners to reach. Next I unscrewed the hardline from the master cylinder with a flare nut wrench and removed the cylinder. Next I disconnected the flex line from the hardline. Finally, the slave cylinder is attached to the transmission with 2 bolts. These bolts CAN be accessed without removing any other parts, just take your time. You�ll need a 12� extension, a swivel joint on the end, a magnet for pulling the bolts out once they are loose, and the right size socket� 12 or 13mm.
On the bench, fill the new master cylinder with fluid. Push the piston with a rod or bolt to push fluid through the cylinder and prime it, get all the air out that you can BEFORE you mount the cylinder to the car, makes bleeding the air out much, much easier when you get everything assembled again.
Remount the newly filled master cylinder, connect your hardline, rubber or stainless flexline, and slave cylinder. Finally, bolt the slave cylinder to the transmission. Take your time. The transmission is aluminum, these bolt holes strip EXTREMELY easily. Under no circumstances overtorque or use an impact when reinstalling these bolts. I suggest the extension and your fingers only until the bolts are fully seated, then torque with a wrench. You should be able to line the slave up with the bolt holes by pushing on the back side of it near the bleeder nipple, and guide the bolts into the holes with a long magnet.
TRANSMISSION CLUTCH/SHIFTER BUSHINGS/DRAIN AND FILL
First, I removed the two bell housing bolts on the top of the transmission. They're easiest to get from the top of the car, not the bottom. Make sure to either label or place these bolts in a pattern so you know exactly where they came from, most of the bolts are different lengths and very easy to get mixed up, ask me how I know.
https://www.dropbox.com/s/zf74gugdrn...43_LI.jpg?dl=0
Inside the car, remove the shifter. You'll need to take off the trim, and undo a few bolts to get off all the rubber. The shift **** just unscrews, lefty loosy. Once all the trim and rubber is off, unbolt the shifter and remove the assembly. Don�t lose the shifter bushings and the metal shims unless you�re replacing them with new.
https://www.dropbox.com/s/hk19agahfb...41_LI.jpg?dl=0
Disconnect the battery.
Lift the vehicle. I work in a shop and had access to a 2 post lift, but I realize most don�t. Get enough room to work underneath comfortably, and have enough space to drop the transmission down and slide it out. I�d recommend jackstands out of the way of the transmission, exhaust, and driveshaft.
https://www.dropbox.com/s/cpyoig3nga...56681.jpg?dl=0
At this point I documented the wiring to the transmission and the starter motor, then disconnected all the connectors and leads, as well as the speedometer cable.
https://www.dropbox.com/s/u5agyp9vjz...46_LI.jpg?dl=0
Next I removed the starter motor. Two bolts and it should slide right out. I hope your battery is disconnected for this or you could have some fireworks!
https://www.dropbox.com/s/fjylfhhi08...35_LI.jpg?dl=0
Drain the transmission. It�s good practice to check that the fill plug comes loose BEFORE opening the drain plug, just in case it�s stuck so that you won�t be left without a way to replace the fluid.
https://www.dropbox.com/s/oyzcvqpqwv...82%29.jpg?dl=0
To gain access to the driveshaft and to make space for the transmission to come out, we need to remove part of the exhaust and exhaust heat shielding. In my particular case, I wasn�t worried about my exhaust gaskets and chose to only remove the cats from my exhaust system. This left room to get the rest of the heat shielding out as well as the driveshaft.
https://www.dropbox.com/s/brw5upp6pz...88_LI.jpg?dl=0
Unbolt and slide out the headshields.
This would be a good time to drain the transmission, BEFORE you remove the driveshaft. If you aren�t flushing the transmission, you�ll need a transmission plug for when you remove the driveshaft.
Mark the driveshaft orientation with a punch or paint pen for balancing purposes, then remove the 4 nuts and bolts holding to the differential and slide it out of the transmission. The transmission may puke if it�s not drained or plugged.
Remove the rest of the bellhousing bolts. There should be 3 more if I remember correctly.
https://www.dropbox.com/s/nn2batck24...31_LI.jpg?dl=0
Next I strapped a transmission jack securely to the bottom of the transmission, under the balance point below the drain plug. If you�re doing this at home, don�t risk benchpressing it. Buy or borrow a scissor lift transmission jack and be done with it. Here�s a cheap one that will work fine: https://www.harborfreight.com/450-lb...ack-39178.html
https://www.dropbox.com/s/u1wocpzlpj...28_LI.jpg?dl=0
Unbolt the transmission crossmember. I recommend replacing the rubber transmission mount, a cheap rockauto one will fit, and probably be better than your old one, or spend the big bucks and get a mazda competition mount.
With everything removed, the transmission should pull straight back and down.
Lower the transmission all the way down, and then you can take a look at your handy work.
Remove the throwout bearing and clutch fork from the bellhousing and clean everything on the tranny with brake clean and a brass brush if yours is filthy like mine is. Watch out, brake/clutch dust is pretty bad for your health.
https://www.dropbox.com/s/37c833vy7q...4%202.jpg?dl=0
This is the best time to do the shifter return spring. Here's some pictures to see what you're working with. To get that little block out you need to remove the bolt holding it to the shaft, then as far as I can tell, unbolt the 4 bolts holding the shifter assembly to the transmission body and pry up off the locator pins and pull it out. There's a seal between the linkage tube and the trans body so it's a tight fit.
https://www.dropbox.com/s/q114gjk2es...66_LI.jpg?dl=0
https://www.dropbox.com/s/o613n71tae...82%29.jpg?dl=0
On the engine side, you'll need to remove the bolts around the pressure plate (two of the bolts are different, remember where they go or take a picture) and the assembly should fall off. Support it all and catch everything so the clutch and pressure plate don't fall when the bolts are all out.
https://www.dropbox.com/s/l0zq2h97jv...53_LI.jpg?dl=0
Behind the pressure plate and clutch you'll find the flywheel and the dreaded flywheel nut. Here's a picture of my resurfaced flywheel.
https://www.dropbox.com/s/n1cpilvp8c...45189.jpg?dl=0
Don't cheap out, get an aftermarket flywheel WITH FLYWHEEL COUNTERWEIGHT FOR YOUR EXACT YEAR AND ENGINE, or a refurbished flywheel, again for your exact year and engine, or find a machinest with rotary experience to machine your flywheel. If your machinest hasn't touched rotary before, he may not machine all the surfaces correctly. Also make sure he doesn't lose the pressure plate alignment pins on the outer edges of the flywheel, they DO come out and can get lost.
The flywheel nut is 54mm or 2-1/8". Hint, northern tool sells a 54mm impact socket that fits for only $20. Don't cheap out on this either... I suggest the atkins rotary flywheel ring gear brake here. The nut needs to be tightened to 280ft lbs I think, and trust me, it's nearly impossible to find any way to prevent the engine/flywheel from spinning to get the nut loose or tight without the tool.
https://www.dropbox.com/s/37k4u1cwv2...22951.jpg?dl=0
Remove the nut, then the flywheel. Easier said than done... Flywheel may be a bit stuck as well. Don't pry or hit the starter ring gear teeth running around the flywheel or you can break them easily. Rent a pilot bearing removal tool and replace the pilot bearing with fresh high temp grease and seal. Consider doing the rear main seal if yours is leaking... Watch out for replacement rear mains. Rx8 seals are 5mm, and original 12a and 13b seals are 10mm. There are both positive and negative reports on using the rx8 seals.
REASSEMBLY
Put the replacement/resurfaced flywheel back on and wash with brake clean. Then the clutch disk, with alignment tool that should come in the kit. Last, slide place the cleaned pressure plate over the clutch disk and align with the pins, and bolt it back on.
https://www.dropbox.com/s/0wse6kdn22...23153.jpg?dl=0
On the transmission side, grease the trans shaft and spindle with the included grease. Slide on the clutch release bearing, then replace your clutch fork especially if it's worn on the contact points. That'll help with clutch feel.
Reassemble the shifter assembly, and fill halfway with 80 or 90w oil.
Make sure the transmission is IN GEAR, so that you can rotate the trans so the shafts and everything line up.
Raise the transmission up and slide it forward until everything engages. Easier said than done, I suggest an extra pair of hands so someone can check if everything is flush and correct. Bolt the bellhousing back and the transmission mount and crossmember.
Replace the driveshaft.
Starter Motor
Reconnect electrical connections
Heat Shields
Catalysts or exhaust system.
Refill the transmission. GL-4. I suggest the redline mt-90 that I used. Buy a 3 quarts or a gallon. The trans takes a bit more than 2 quarts, fill to the fill plug level.
I suggest differential flush at this point as well. Gl-5 in Limited Slip (GSL/GSL-SE), GL-4 is OK in open diffs as far as I know.
Lower the car and do the top two bellhousing bolts.
Bolt the slave cylinder back in. Be careful, I suggest running the bolts in with fingers only, again, avoid stripping these holes at any cost or you'll have to drop everything again and retap the threads.
Inside the car replace the shifter, boots and trim and reconnect the battery.
Double check everything, and carefully test your handywork.
Break in the clutch with gentle city driving for at least 100 miles.
Joined: Aug 2011
Posts: 3,078
Likes: 42
From: Cambridge, Minnesota
Hey man, I'll be the first one to say thanks for posting this information! It's definitely along the lines of what I like to see on the forums. A few things I'd recommend would be adding the pictures in-line throughout the post so that someone wouldn't have to click through links to Dropbox. On those same lines, each post here only allows for 12 images. If you're going to exceed that, feel free to split the post so that you don't exceed that set maximum.
In the mean time, awesome work and thanks for the time spent in the writeup
In the mean time, awesome work and thanks for the time spent in the writeup
Thread Starter
Full Member
Joined: Sep 2018
Posts: 54
Likes: 1
From: TX
Thanks. I'm absolutely going to make some inline images, Dropbox was just the fastest way for me to get some links on there from my phone... just gotta get the post edited now with some new img links
Thanks for your comment
Edit: looks like I can't edit the original post anymore. I'll be posting some easier to view images in the post below, in the same order as the post.
Thanks for your comment
Edit: looks like I can't edit the original post anymore. I'll be posting some easier to view images in the post below, in the same order as the post.
Trending Topics


Thread
Thread Starter
Forum
Replies
Last Post
dj55b
1st Gen Archive
4
Nov 17, 2009 12:47 PM
Karl573
2nd Generation Specific (1986-1992)
11
Feb 26, 2008 11:11 AM